

Pick an order
Every step of the pick, from pick list to picked tote, scan by scan.
Picking is the first hands-on stage of outbound. You batch a set of allocated orders into a pick list, then walk the warehouse and pull each item into a tote, scanning as you go. This guide follows the whole job from an empty cart to a finished pick list.
Everything here lives under the Picking section of the sidebar. It is operator-only, so a brand on a client account never sees any of it. For the screen-by-screen reference, see the Picking manual.
About the screenshots
The screenshots are taken in the Canopy Condiments demo warehouse, so bin labels, tote barcodes and order counts will differ from yours. Where a screen depends on your warehouse — the route map, the aisle direction cue — the text says so.
Before you start
You need three things in place, or the session will not start:
- Allocated orders for the brand you are picking. An order has to be allocated (stock reserved) before it can be batched — or backordered and admitted for a partial shipment, and not held whole by the brand's minimum or wait. Allocation happens on the Orders side.
- A specific warehouse selected in the top bar. Picking routes and bins are warehouse-specific, so if the top bar is set to "All warehouses" the session cannot resolve a location. Pick the warehouse you are standing in.
- Free totes. Each order on the cart needs a tote that is Available — one already In Use or Flagged is rejected when you start the pick.
- No Bulk Ship contention. If a Bulk Ship session grabbed the same shelf stock while your batch was being planned, the create fails with "Stock was committed to Bulk Ship while planning. Refresh and try again." — reload and rebuild it. A backordered order can be refused for its own reasons too: partial shipping was turned off since, a reship's re-send ships whole, or its reservation changed while you planned ("… changed concurrently — retry").
- The right kind of work. Two jobs are picked on the same screens but follow their own rules: a cart of a Bulk Ship batch an operator sent to the floor, and a wholesale order sent to picking. Their steps are Parts 3 and 4 below. Orders in a live Bulk Ship batch never appear in the counts of Parts 1 and 2.
And you need an operator role: client users cannot reach any of this.
Part 1 — Build the pick list
You start from Picking → Pick Lists. This is the queue of pick batches, each with a status, a strategy, a progress bar, and who it is assigned to.
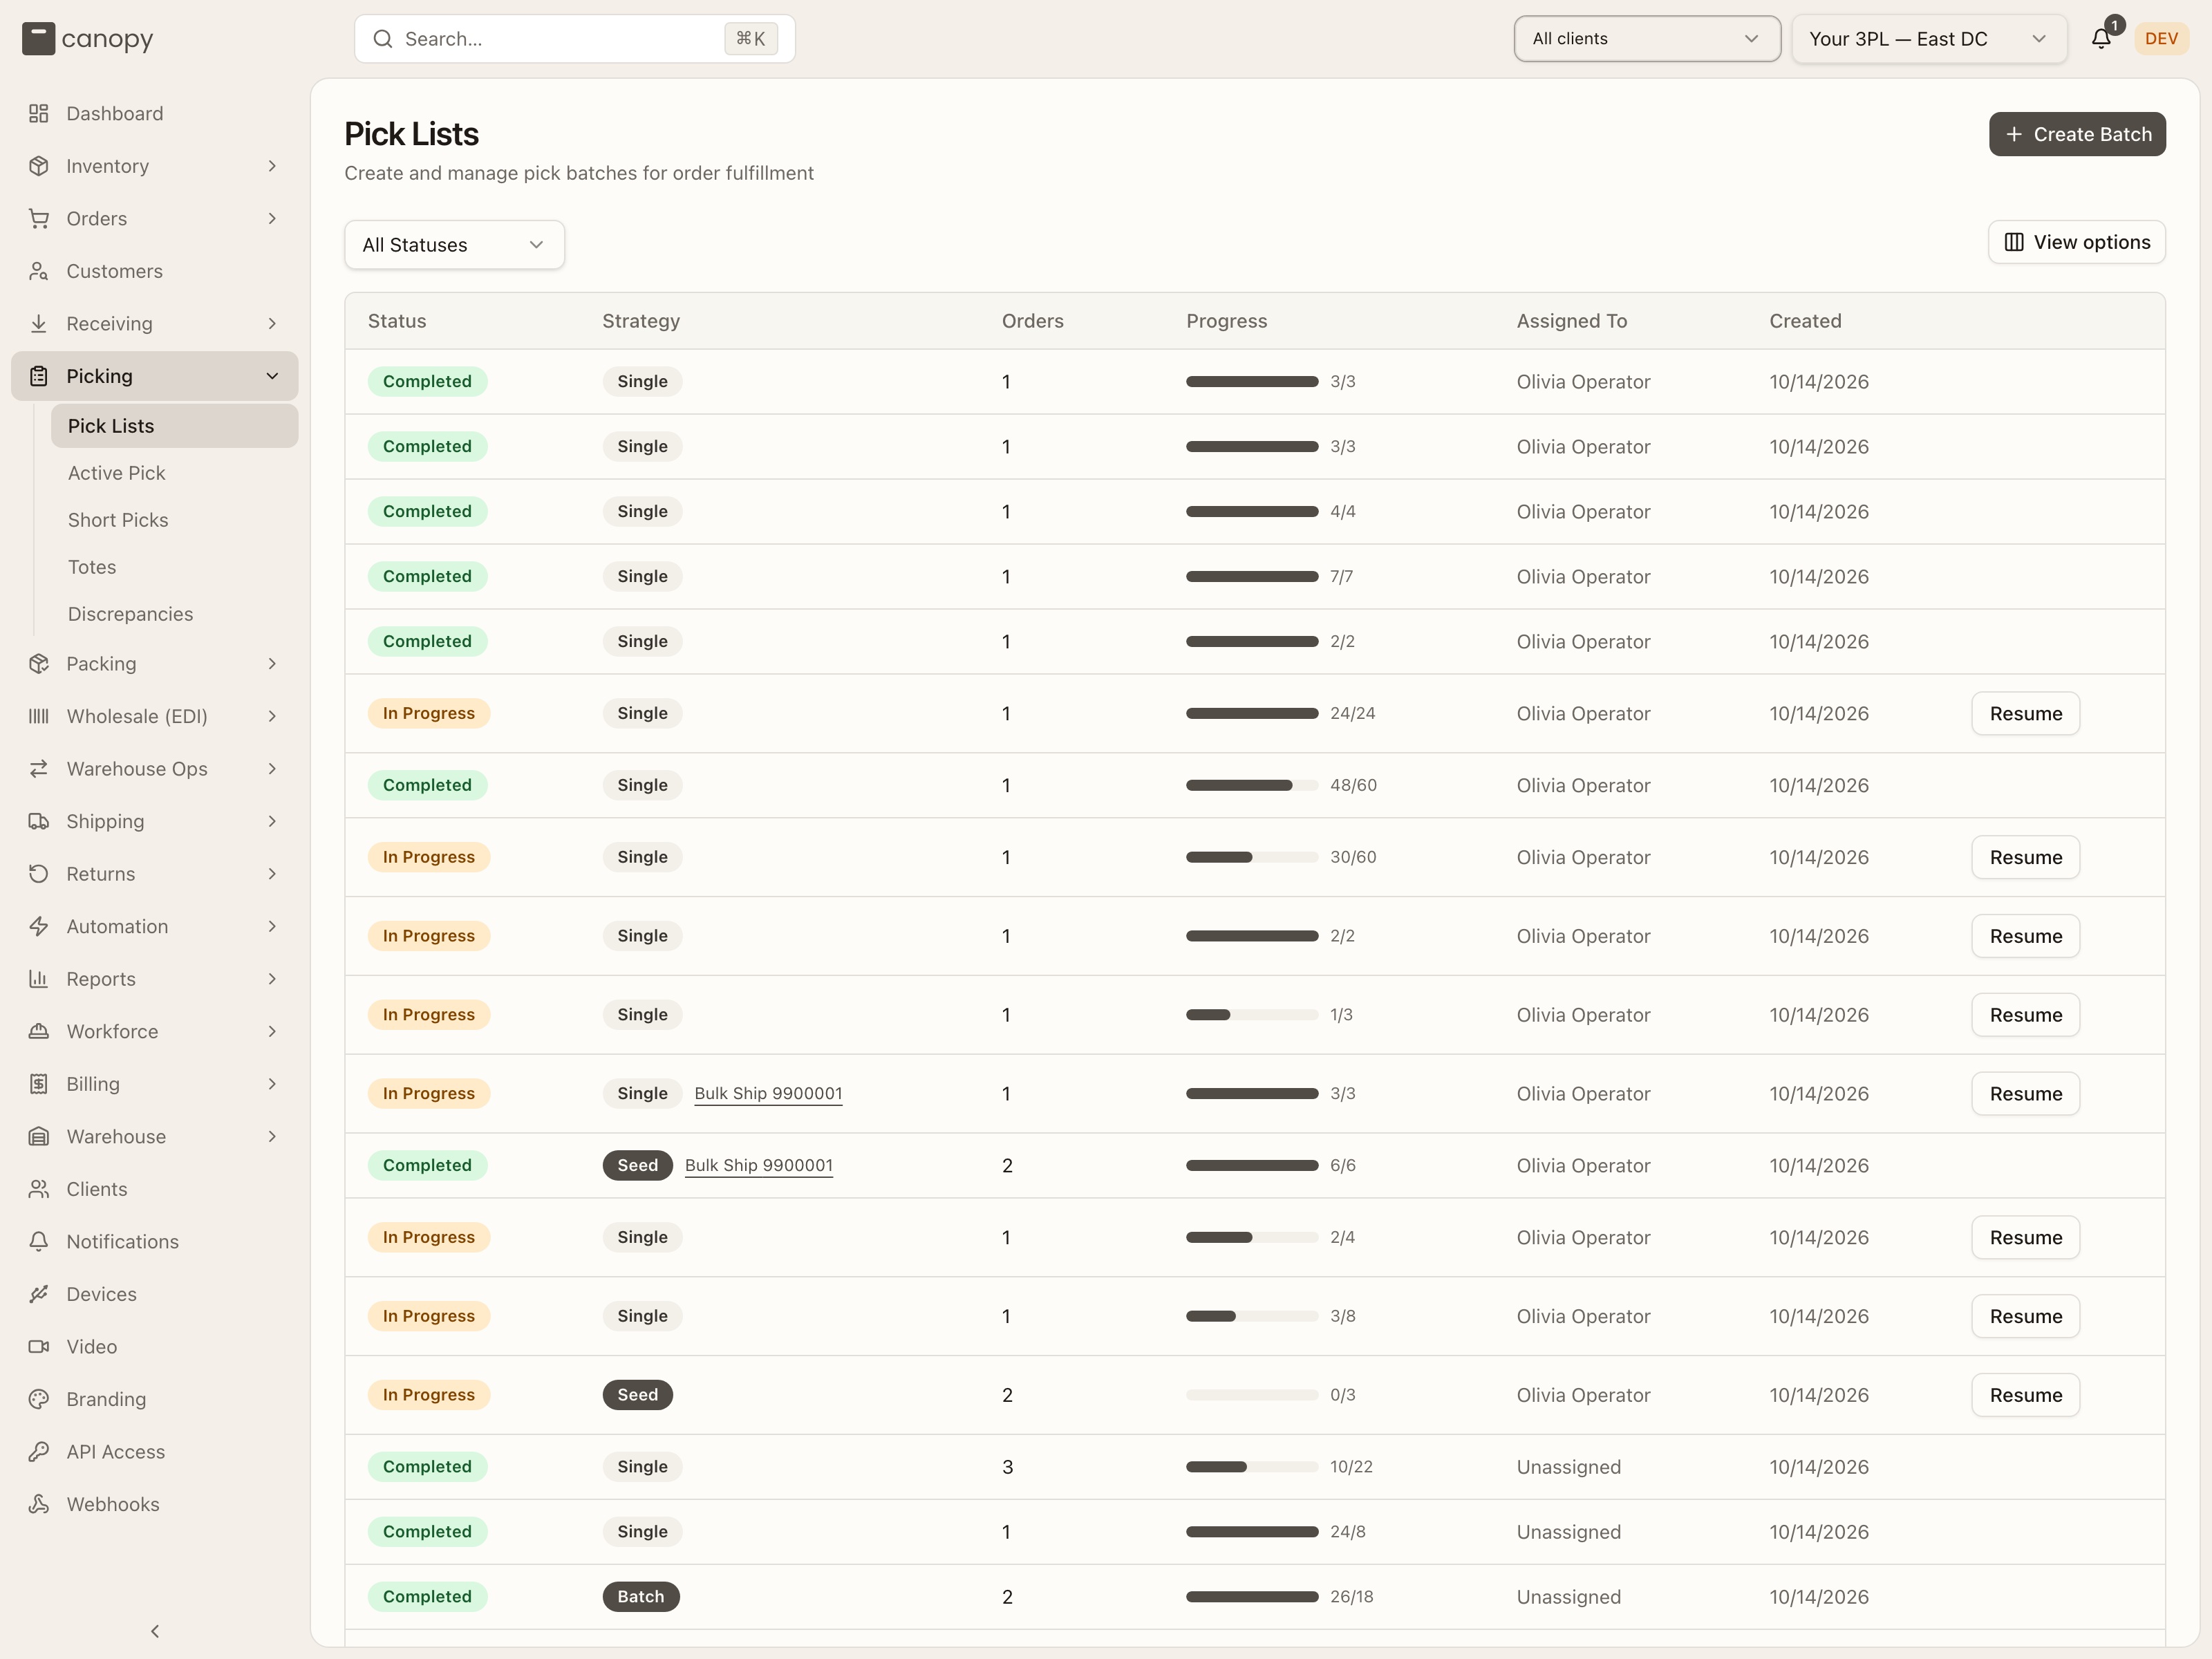
Click a batch to open its detail. On the Orders tab, an order admitted for partial shipment shows Partial — not on this list: followed by the backordered lines that stay off this list and ship in a later cycle.
Open Create Batch
Press Create Batch. The "Create Pick Batch" sheet slides in. Pick the Client (Brand) first, and the sheet heads the count "N orders ready to pick" — with "(M partial)" after it, and on each client's row, where some are orders admitted as partial shipments — split by priority (badges such as 3 EXPEDITED, 15 STANDARD, 2 RUSH). The note under it — "Replenish orders need stock moved to picking locations first. Eligible orders can also be fulfilled through Bulk Ship." — is why a brand's Replenish orders are not in that number: their stock is in overstock, so either replenish the pick face or run them through Bulk Ship.
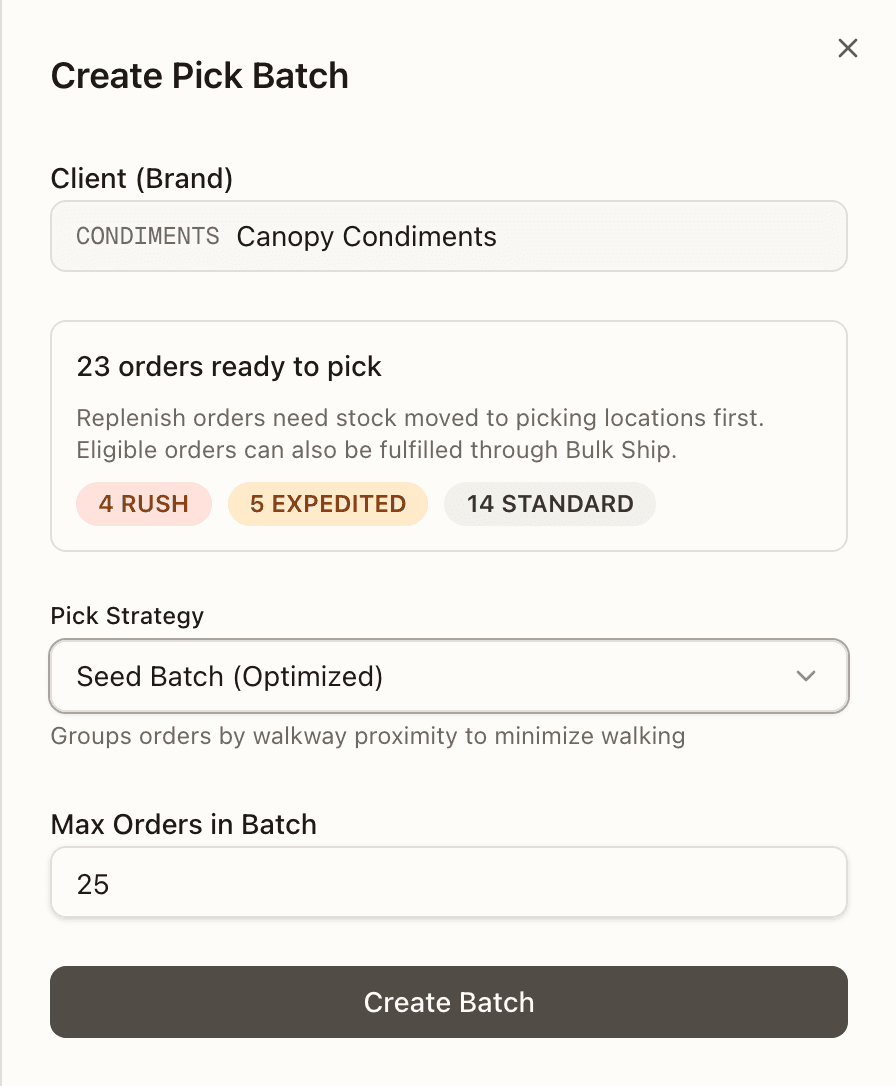
The batch is picked in the warehouse pinned in the top bar. If the top bar is on All warehouses and your tenant runs more than one warehouse, a Warehouse field appears in the sheet asking "Which warehouse is this batch picked in?" — answer it, or Create Batch stays disabled. The count above is counted in that warehouse, so on All warehouses it never offers you orders this batch could not pick.
Choose a pick strategy
Pick one of three strategies. The sheet explains each as you select it:
- Seed Batch (Optimized) groups orders by walkway proximity to minimize walking. This is the default for a multi-order batch.
- Batch Pick (Priority) picks items for multiple orders by priority.
- Single Order builds a one-order pick list.
For a batch, set Max Orders in Batch (2 to 50, default 25). Single Order hides this.
Create the batch
Press Create Batch. On success you see "Pick list created successfully!" and a Start Picking button. You can start right away, or Close and come back to it later from the Pick Lists table. The new list shows as Pending until someone starts it.
Resuming instead of creating
If a list already exists, find it in the Pick Lists table: a Pending row ends in Start Picking, an In Progress row in Resume. Both drop you into the same pick session described next (a Pending list is started for you on the way in). The list's detail panel offers the same under Open Picking / Resume Picking.
Part 2 — Run the pick session
Starting a list opens the Active Pick screen. The session moves through four phases, shown in the stepper at the top: Setup → Scan Totes → Picking → Complete.
Setup — start the session
The setup screen shows a "Start a Pick Session" card. If the top bar is on All warehouses it only asks you to pick one; otherwise you choose where the work is.
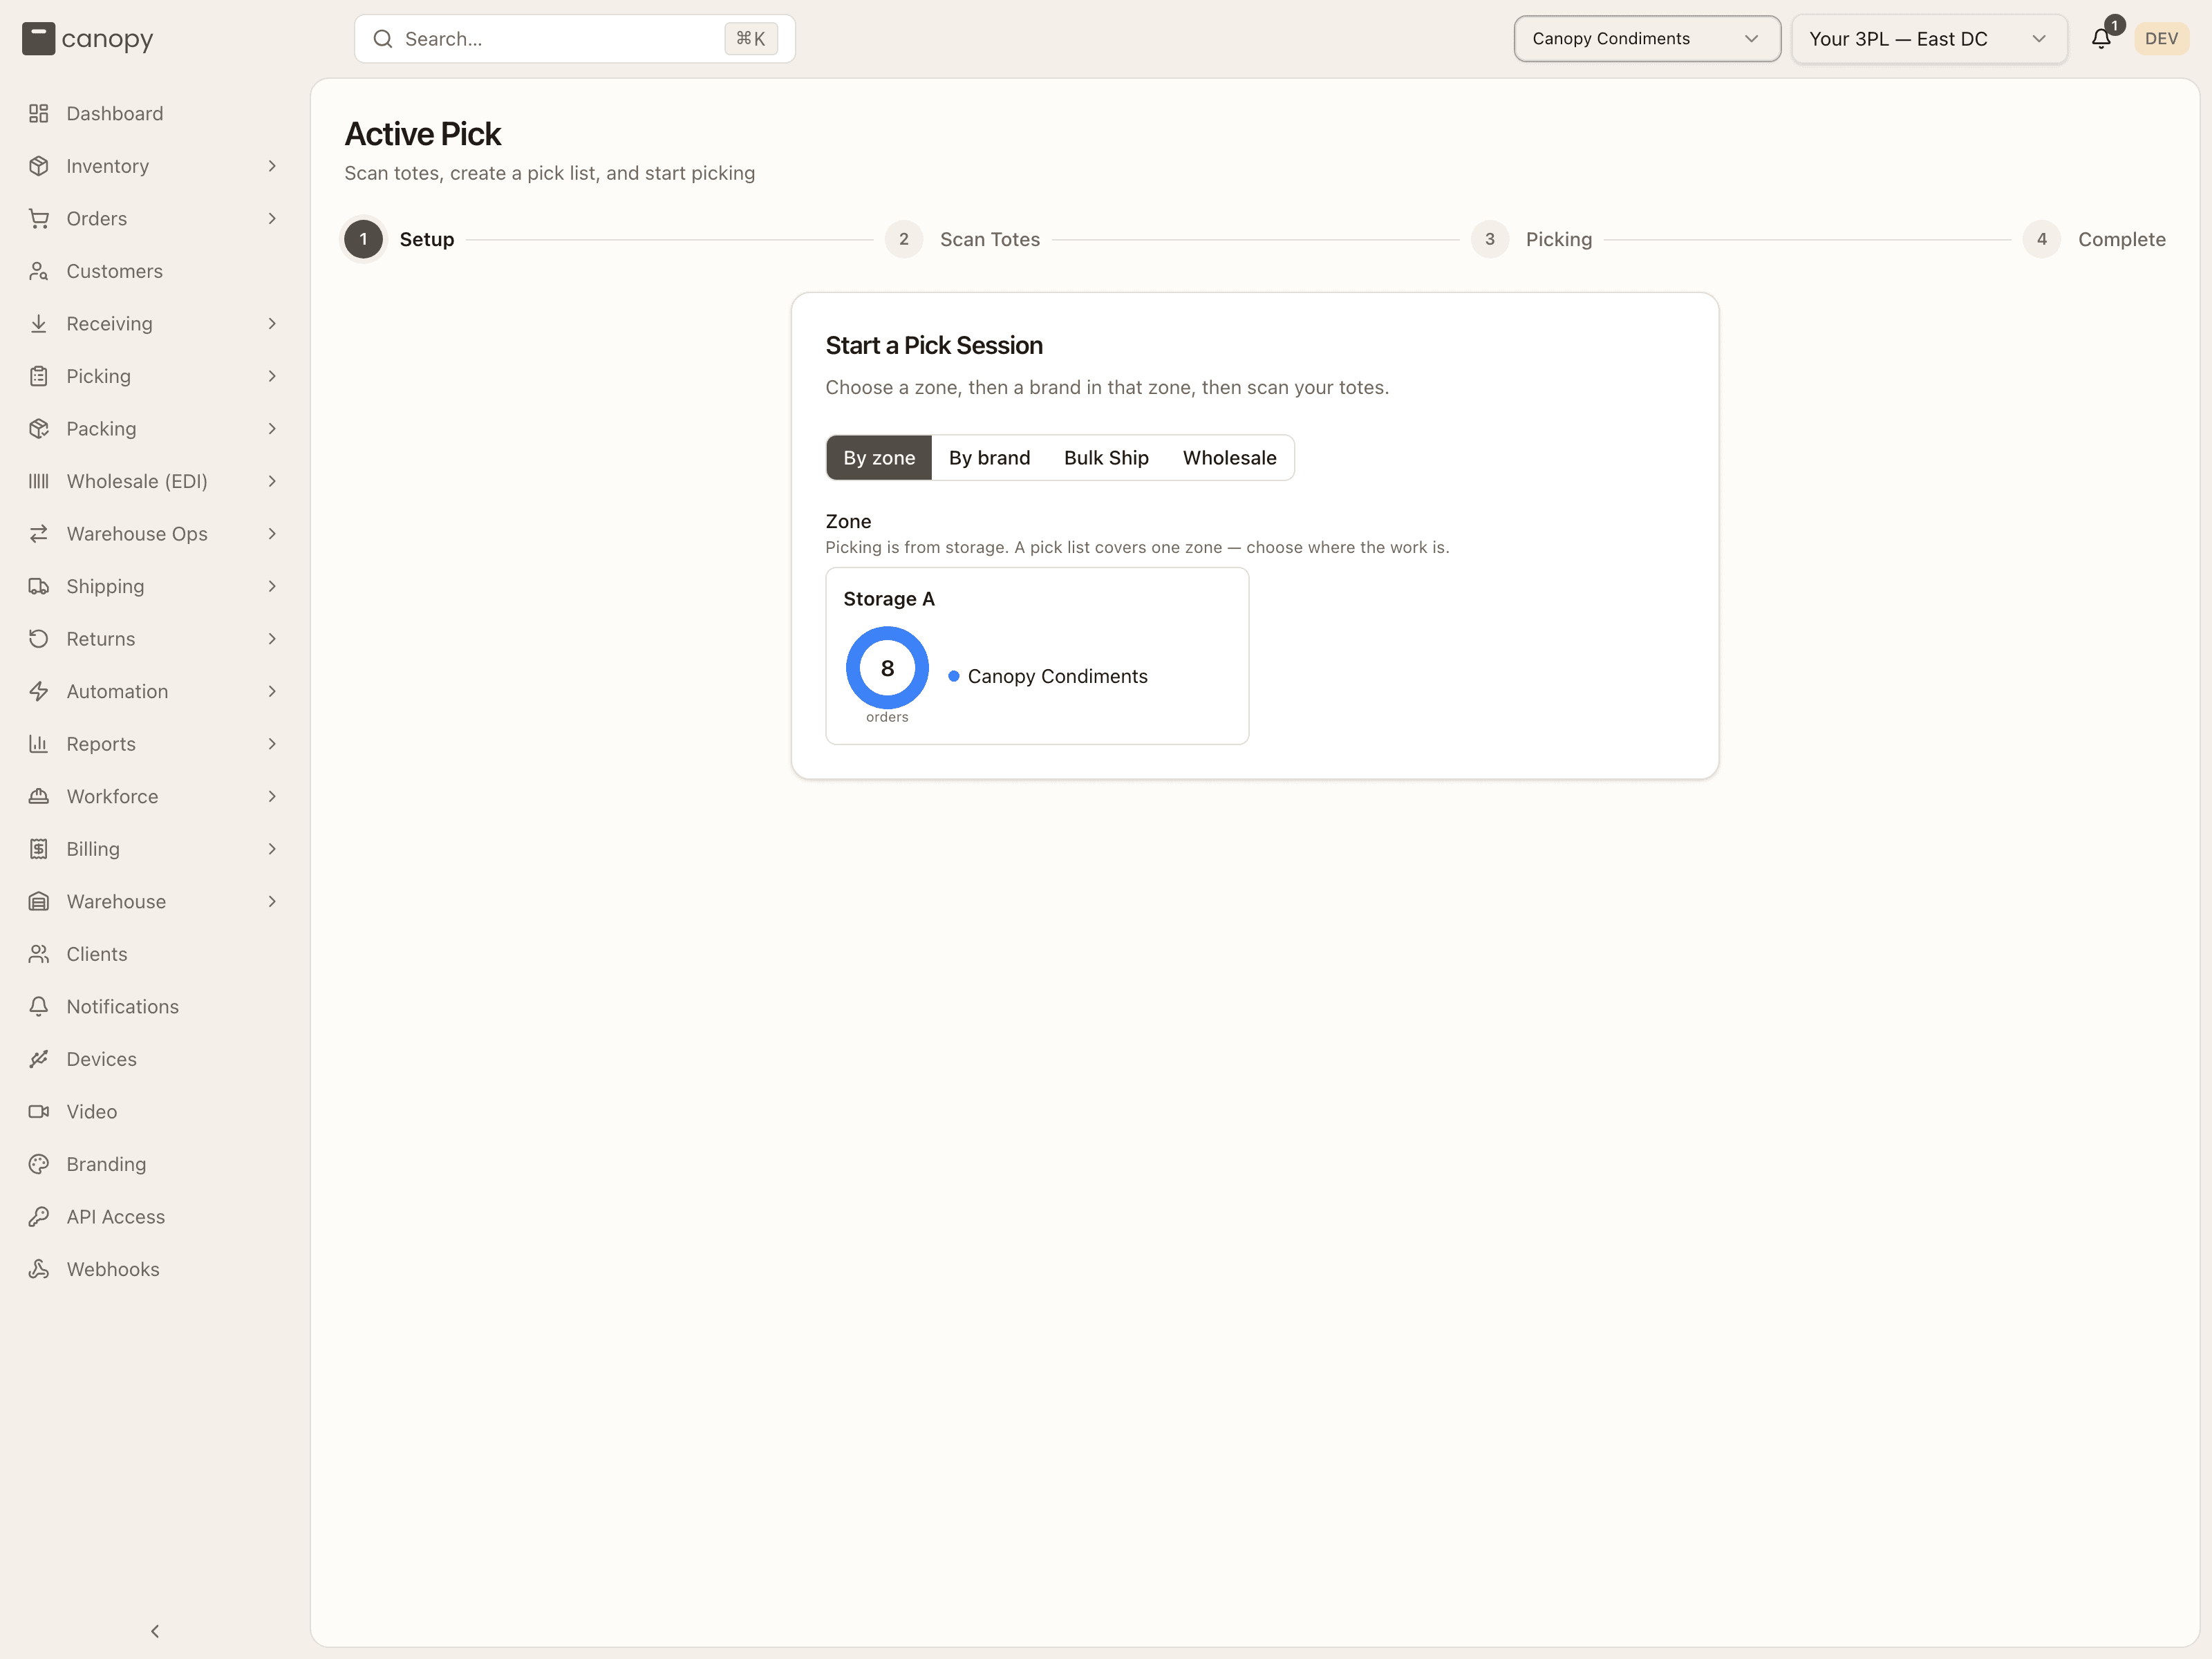
By zone is the default: each storage zone is a card with a ring of how many allocated orders are waiting there and which brands they belong to. Tap a zone, then tap the brand under Brand in that zone. The card then reads "Available in Storage A — 6 orders" (your zone and count), with "(2 partial)" appended when some of those orders are backordered but admitted for partial shipping — the pick takes what's allocated and leaves the rest backordered. Press Next: Scan Totes.
With nothing pickable for that brand the card reads "No allocated orders available for this brand." and adds "Replenish orders need stock moved to picking locations first. Eligible orders can also be fulfilled through Bulk Ship."
By brand skips the zone: choose the Brand / Client and the pick draws from every pickable bin in the warehouse, with the available orders broken down by priority badge (each badge carries its own (n partial) count when it has any). Use it when a brand's stock has ended up across zones.
Once you have chosen, any Active pick sessions already open for that brand are listed on the card with a Resume button — a picker back from a break takes one of those rather than starting a new cart.
Two more switches, Bulk Ship and Wholesale, pick the two special jobs described in Parts 3 and 4. They are only shown to operators.
(When you open an in-progress list from Pick Lists, the session skips setup and takes you straight to wherever you left off — picking if every order already has a tote, otherwise the tote screen to finish loading the cart.)
Scan Totes — load the cart
Now you assign a tote to each order and load them onto the cart. Scan each tote's
barcode. Each tote lands in the next open slot on the cart, and the slot after it
is highlighted as the next to fill; tap an empty slot first if you want the tote
somewhere else. The counter tracks scanned / available — you cannot scan more
totes than there are orders. Scan a tote by mistake? Tap the × on its tile to remove
it — the tile itself no longer reacts to a tap.
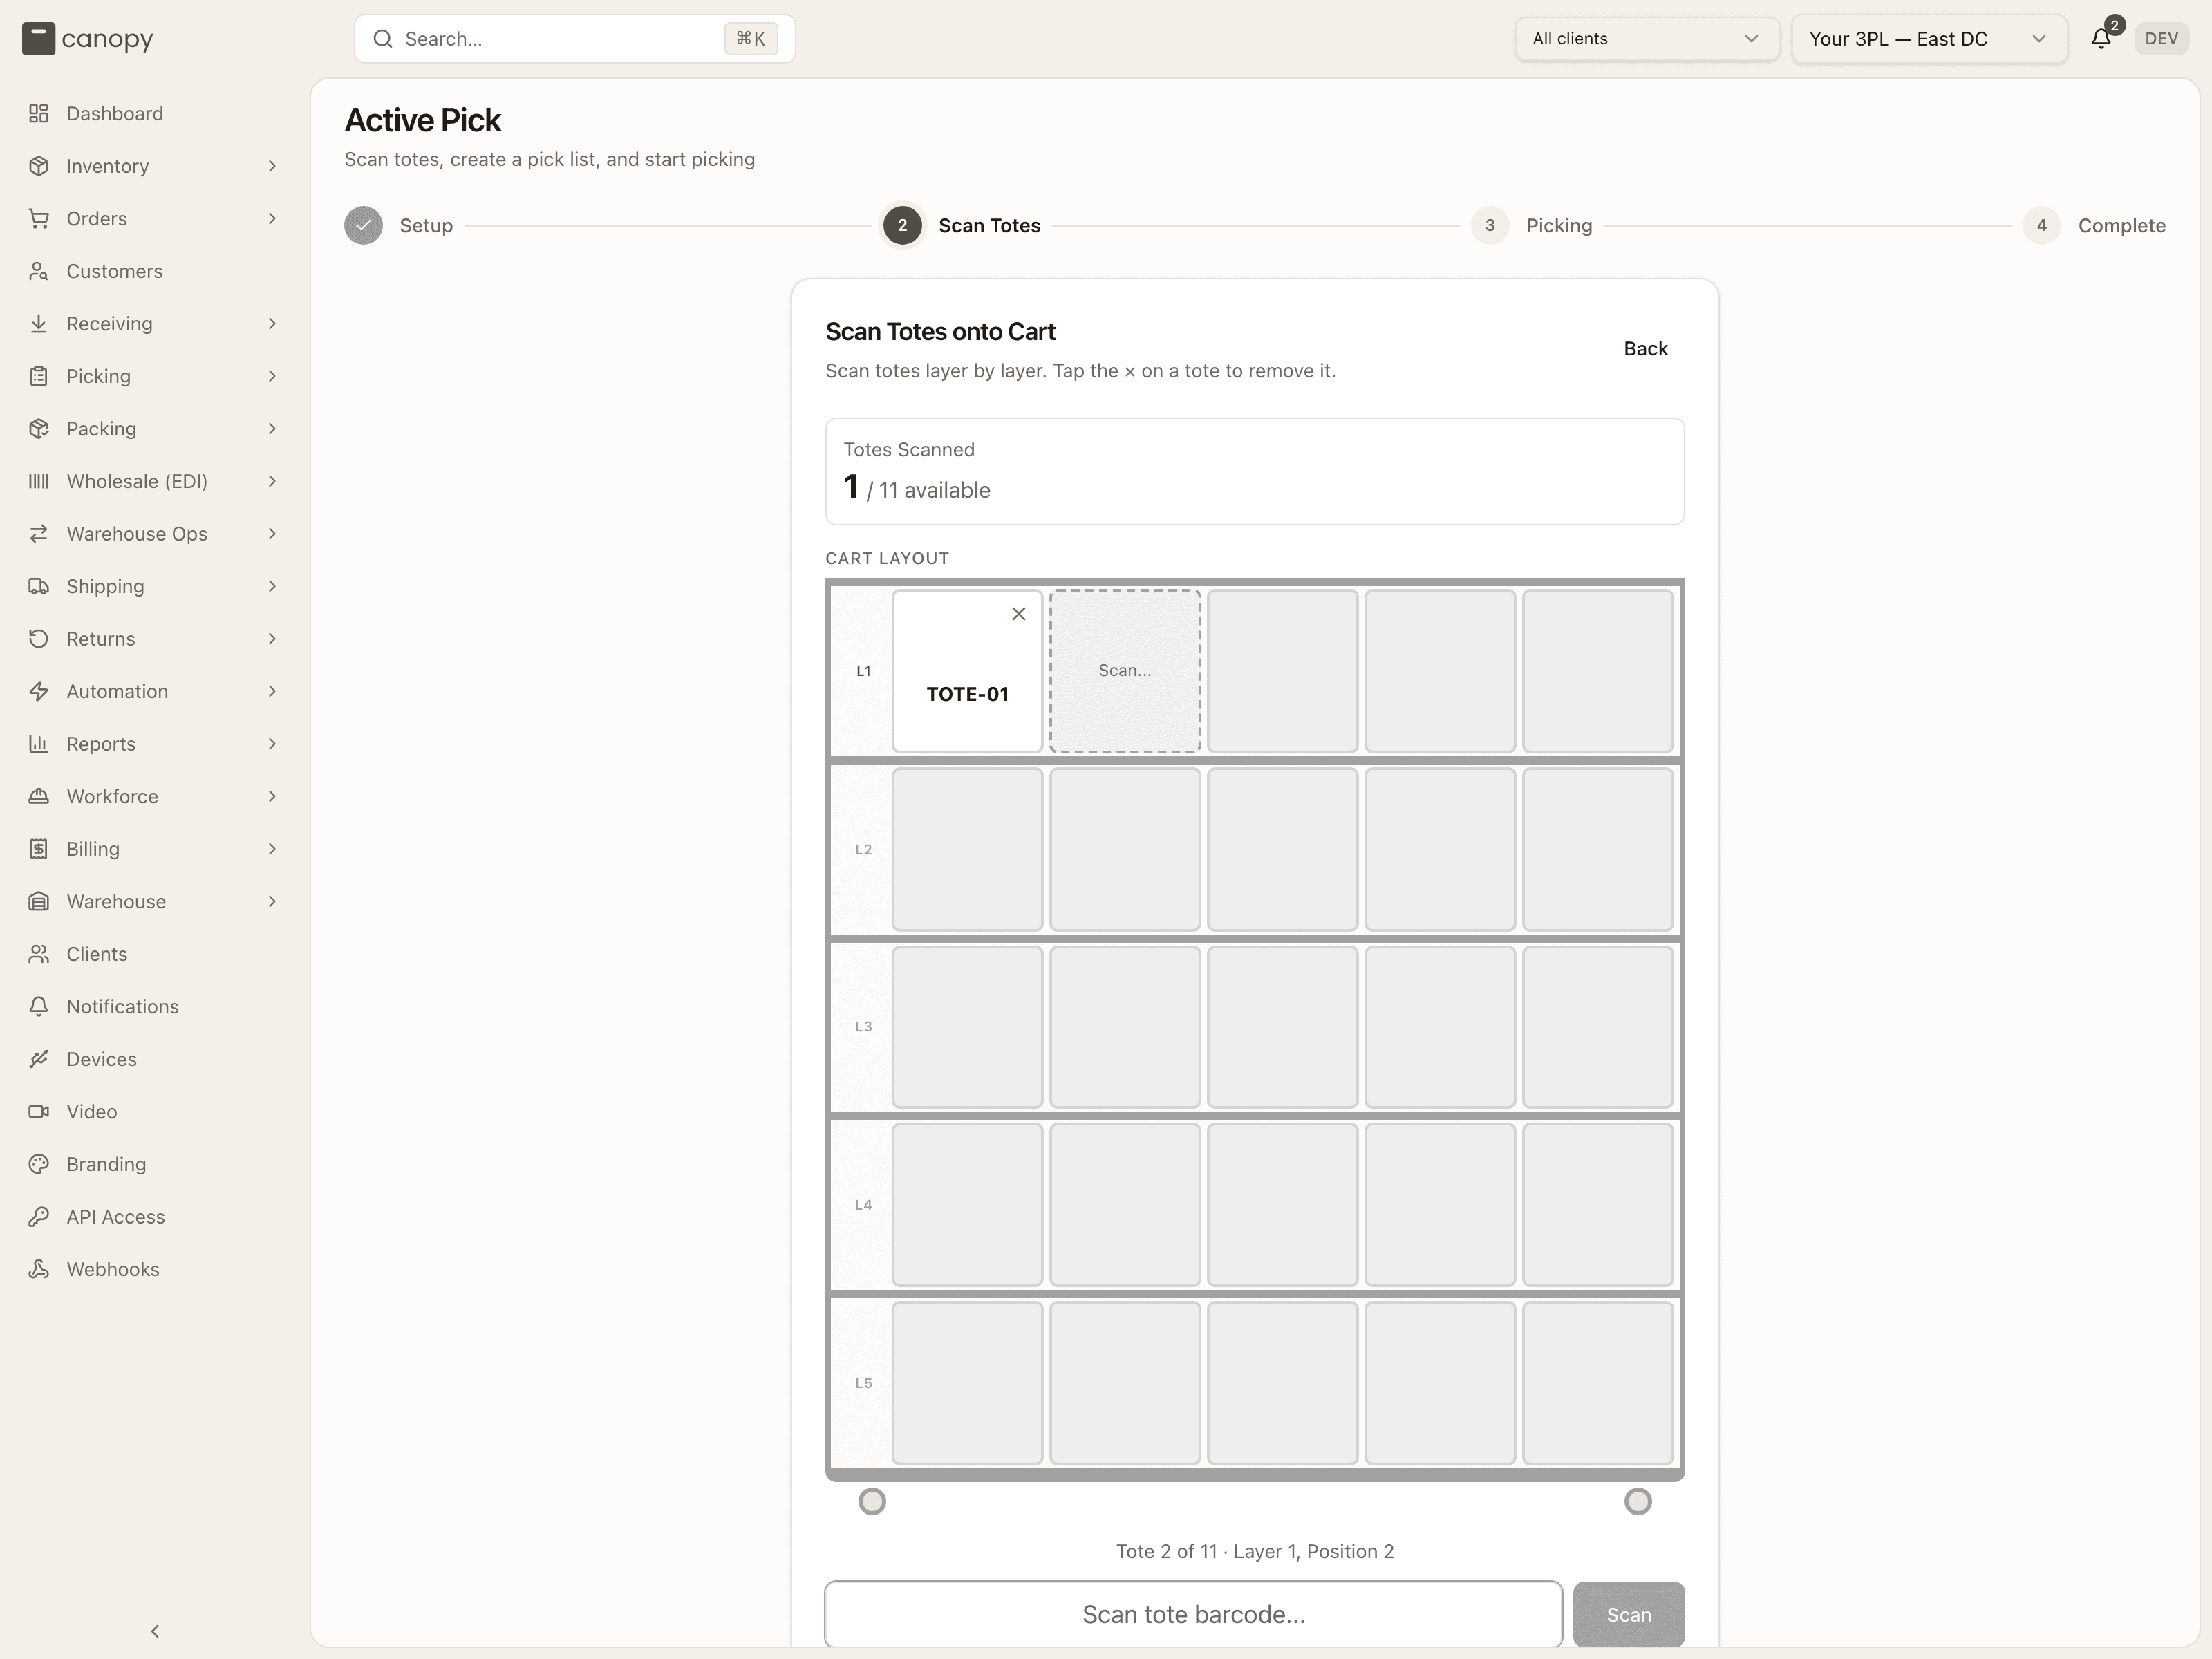
The cart fills one layer at a time (five slots per layer, five layers). When a layer is full, press Next Layer and keep scanning. Start Picking is offered as soon as the first tote is on the cart, labelled with the order count — Start Picking (1 order), Start Picking (6 orders) — so you can pick fewer orders than are waiting. Once every order has a tote, the cart shows "All N totes scanned".
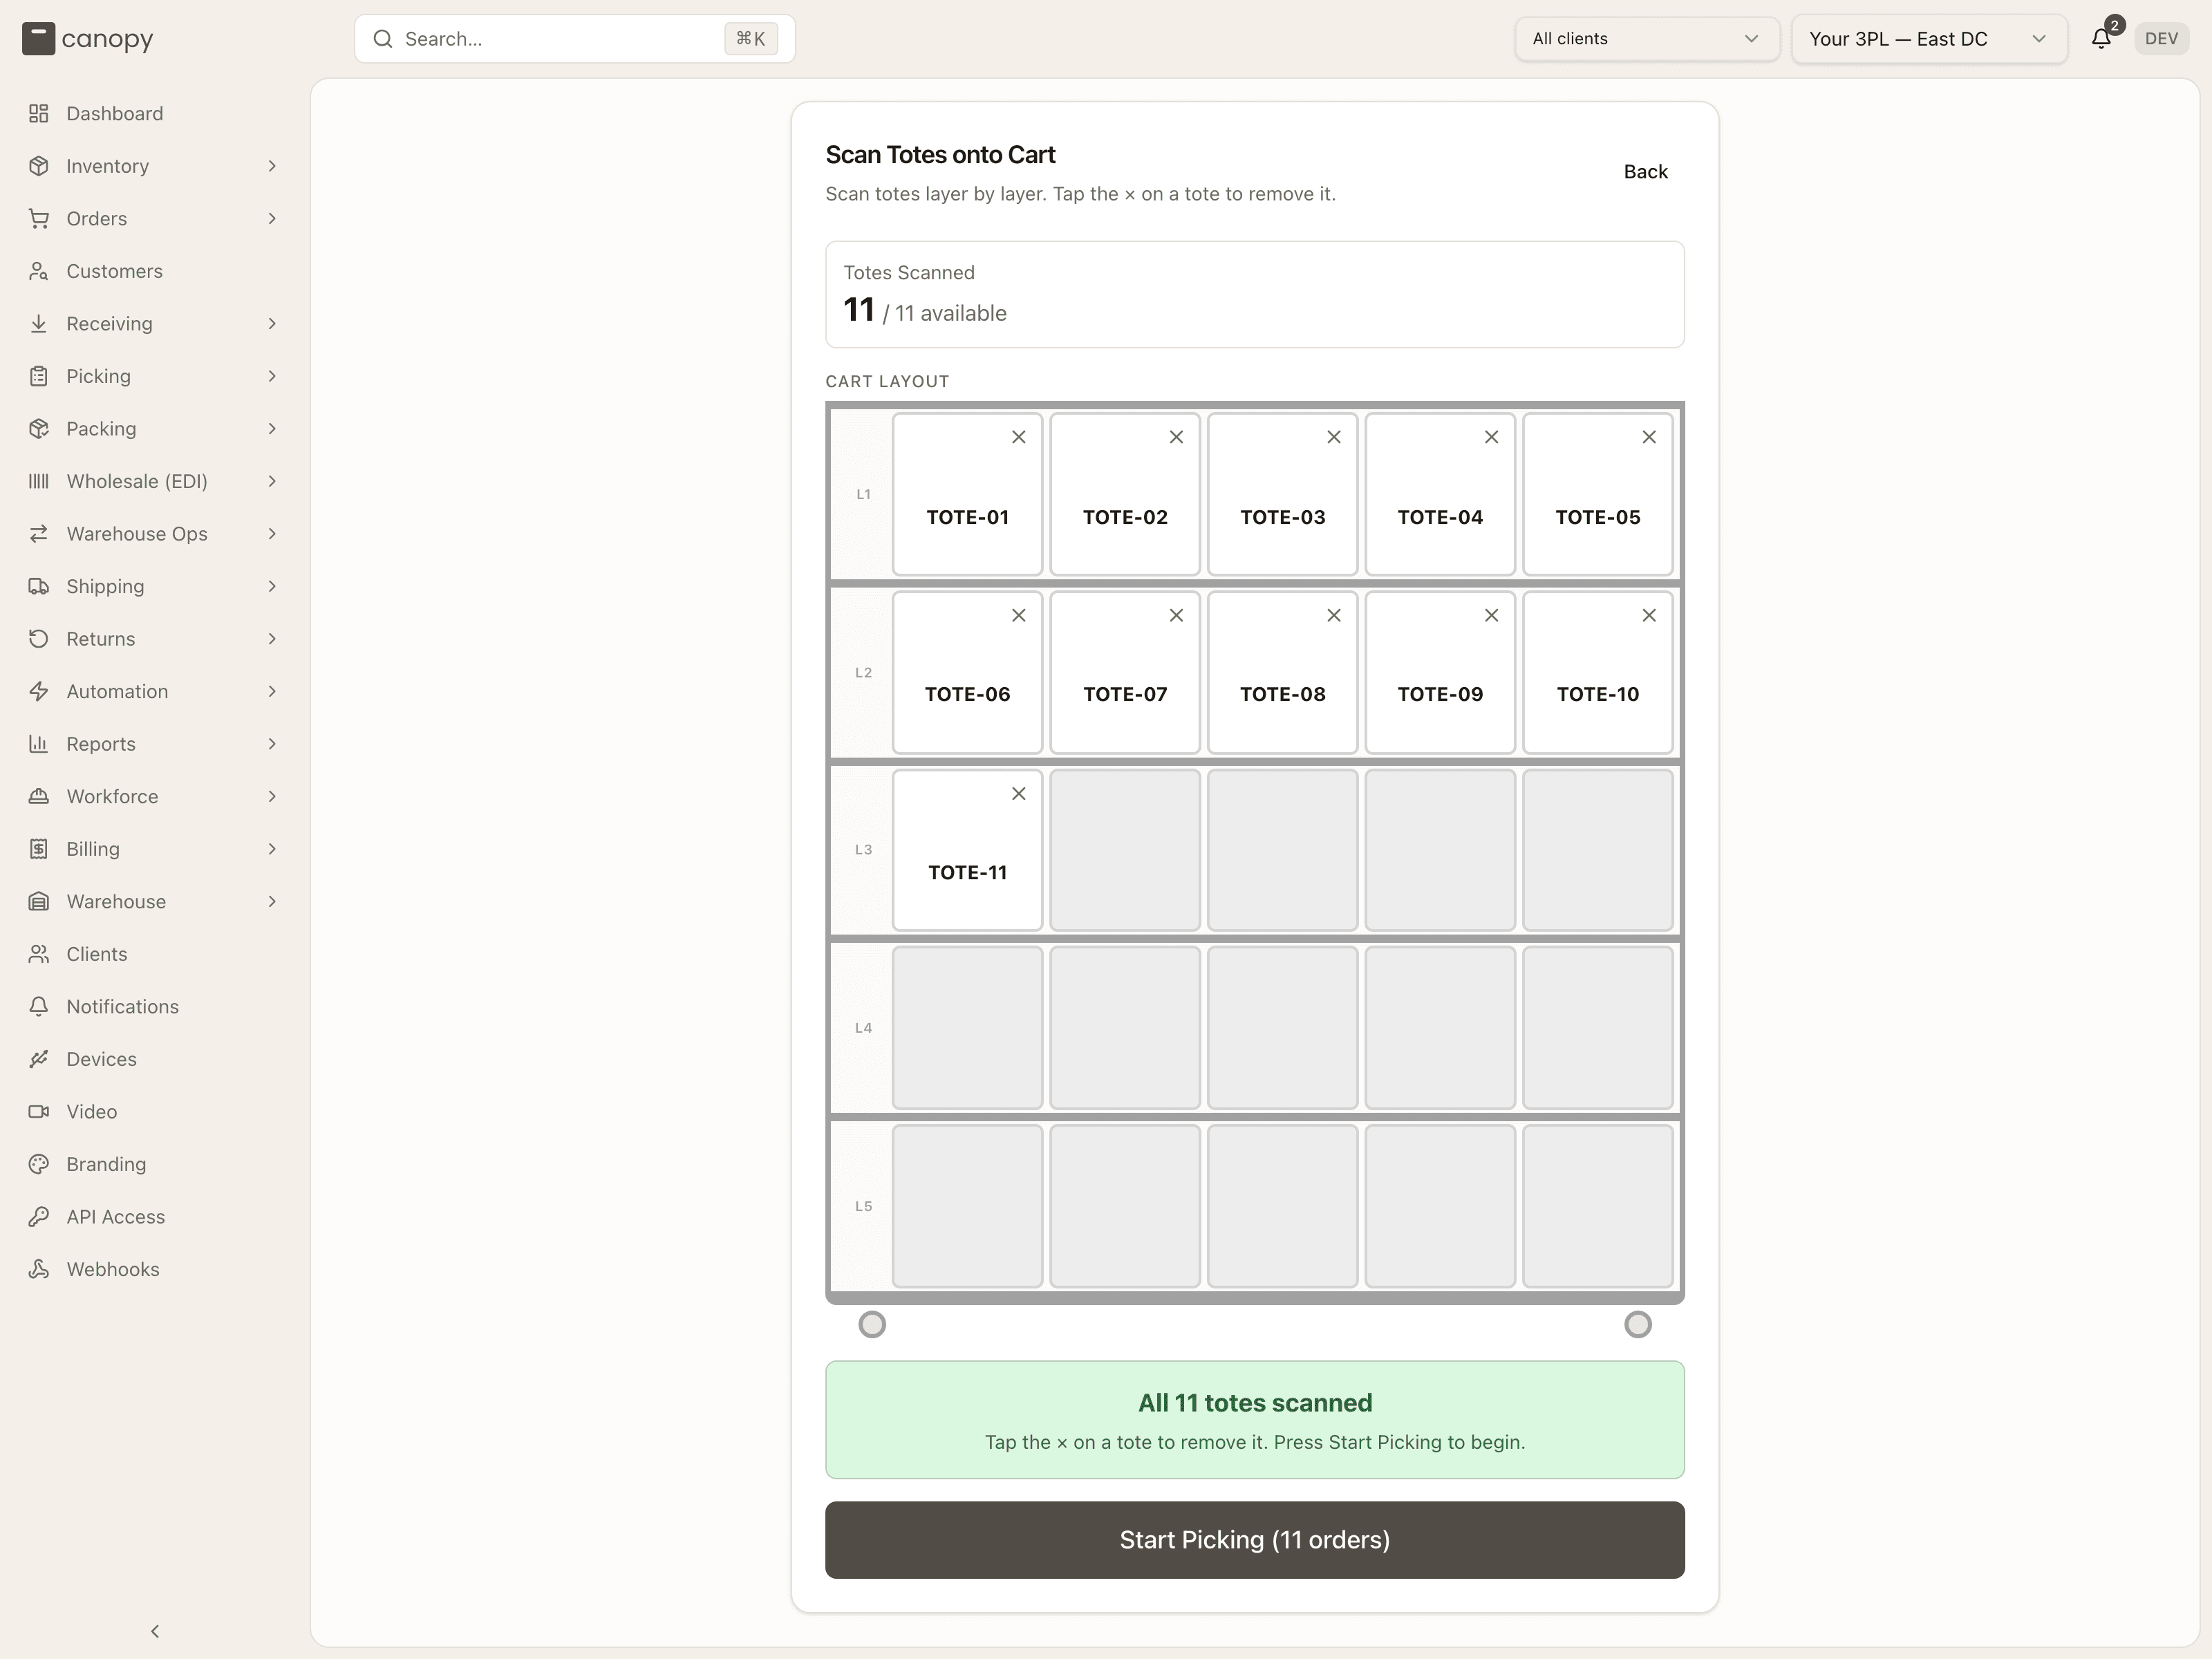
Press Start Picking. Each tote was already checked as you scanned it (the button reads Checking… for a moment, and a tote in use or flagged is refused on the spot: "Tote "…" is currently in use for another order"). The app checks once more that every tote on the cart is still free; one that is already in use or flagged is named in an error and dropped off the cart for you to rescan a good one. It then creates and starts the list in one step — a single tote makes a Single pick, more than one an optimized Seed batch — and moves you to the picking phase.
Picking — walk the route, one bin at a time
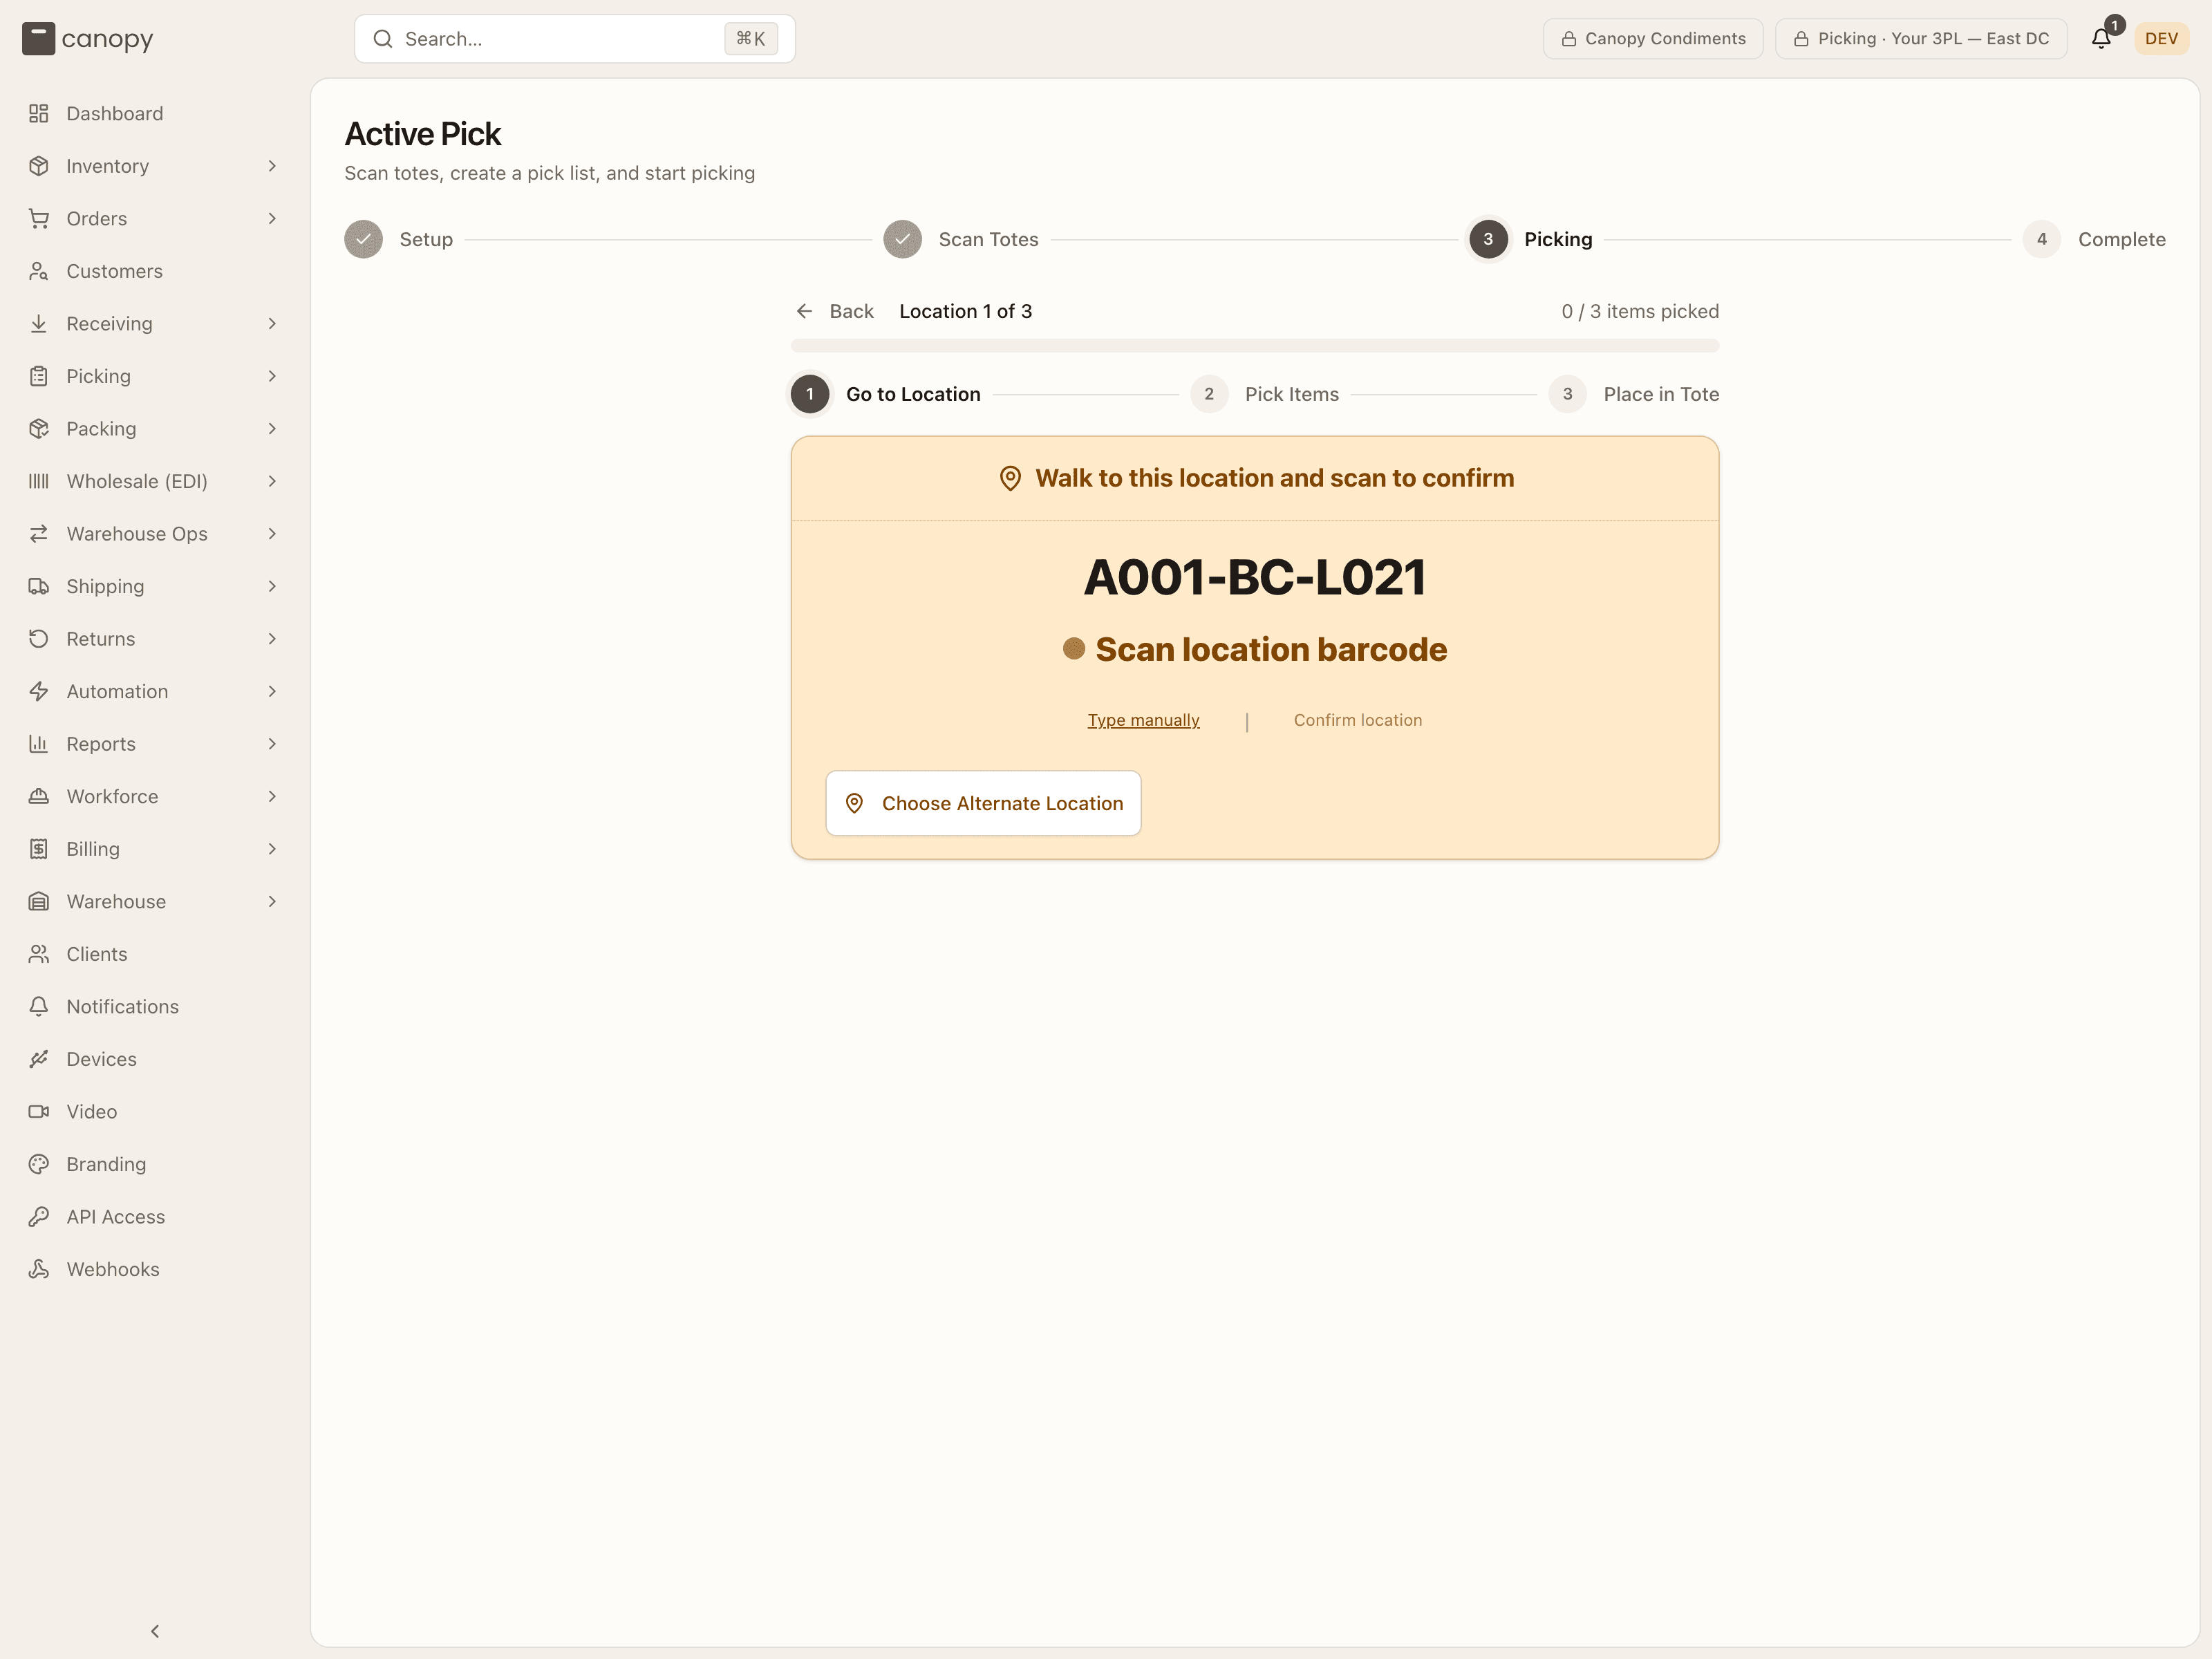
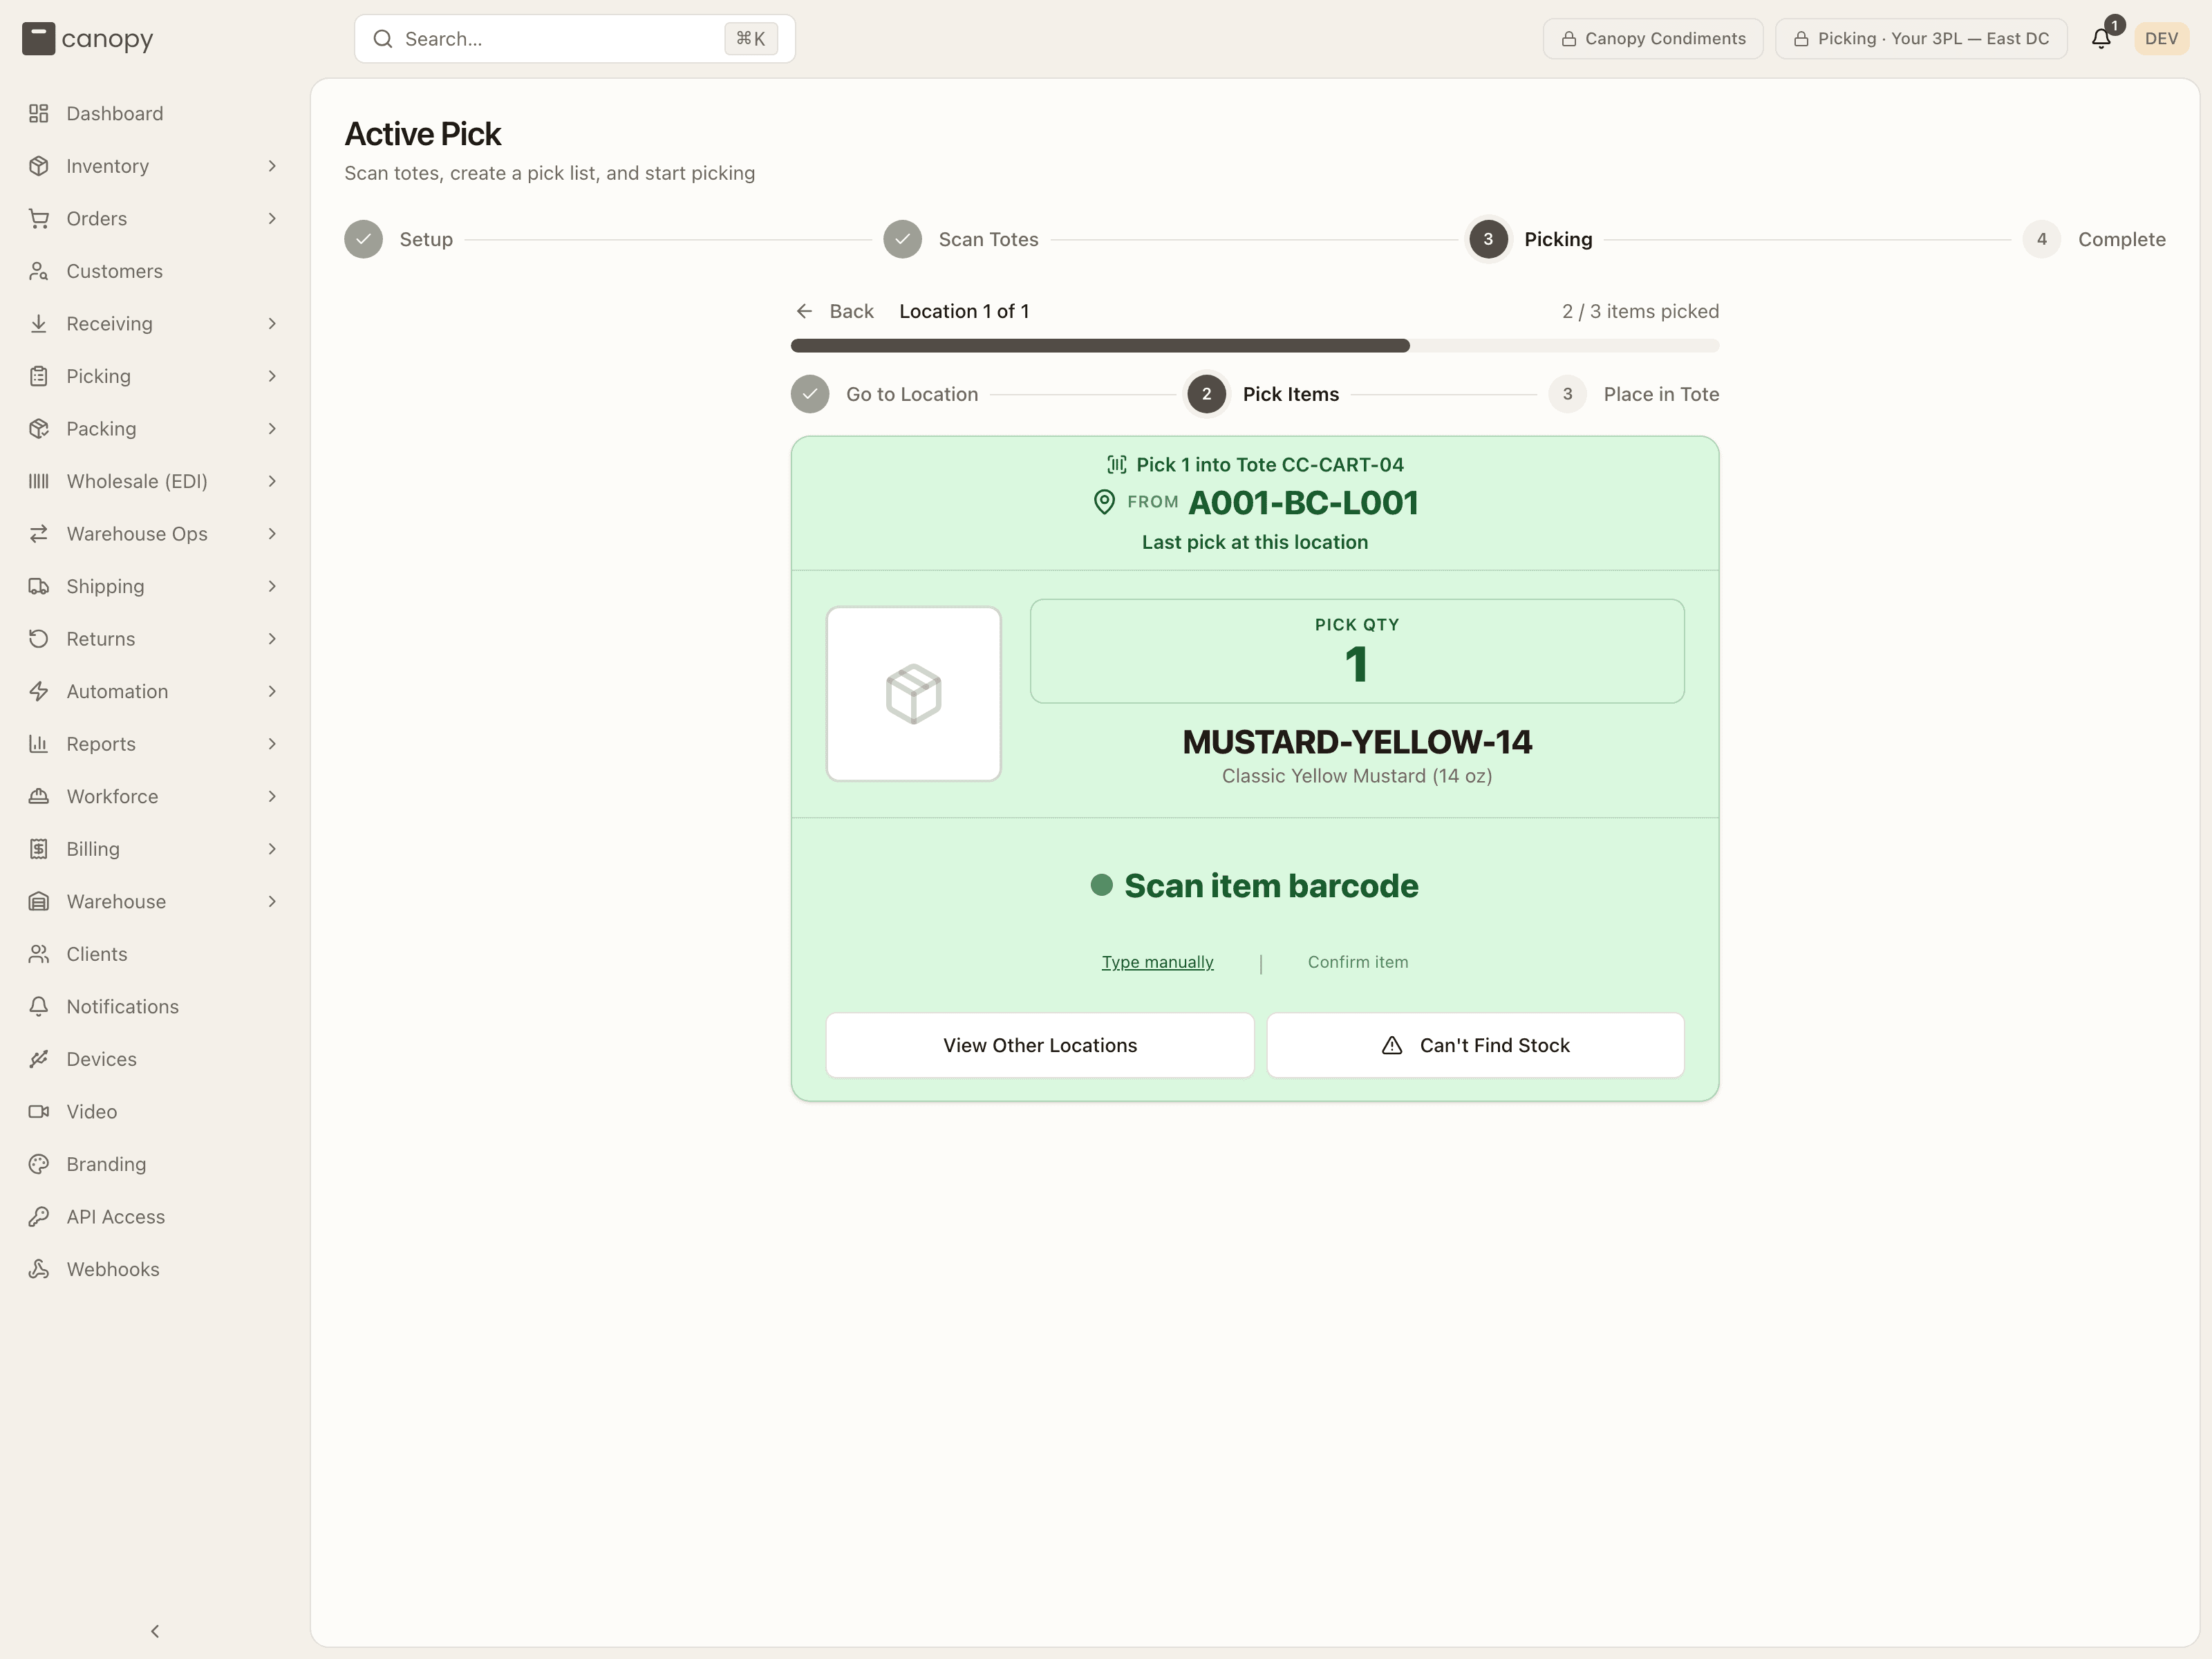
This is the core of the job. The app routes you bin by bin along the shortest walk. Each stop repeats the same three sub-steps, shown in a mini-stepper: Go to Location → Pick Items → Place in Tote. Above them, Location X of N and the items-picked bar track the whole list.
-
Go to Location. The screen shows the bin to walk to. If the warehouse has a drawn layout, a route map below it is zoomed to the stop, with buttons to recenter or fit the whole warehouse, and on a horizontal aisle the card adds "Head left along the aisle" or "Head right…". A bin holding more than one SKU on your list warns "N different SKUs in this bin — double-check the item". Walk there and scan the location barcode to confirm you are at the right bin. Scan the wrong bin and it warns you "Wrong bin!". If a barcode will not scan, press Type manually, type the label, and press Confirm. Confirm location is different: it skips the scan entirely and takes your word for it. Choose Alternate Location opens the alternate-locations panel before you have picked anything (see When stock is not there).
-
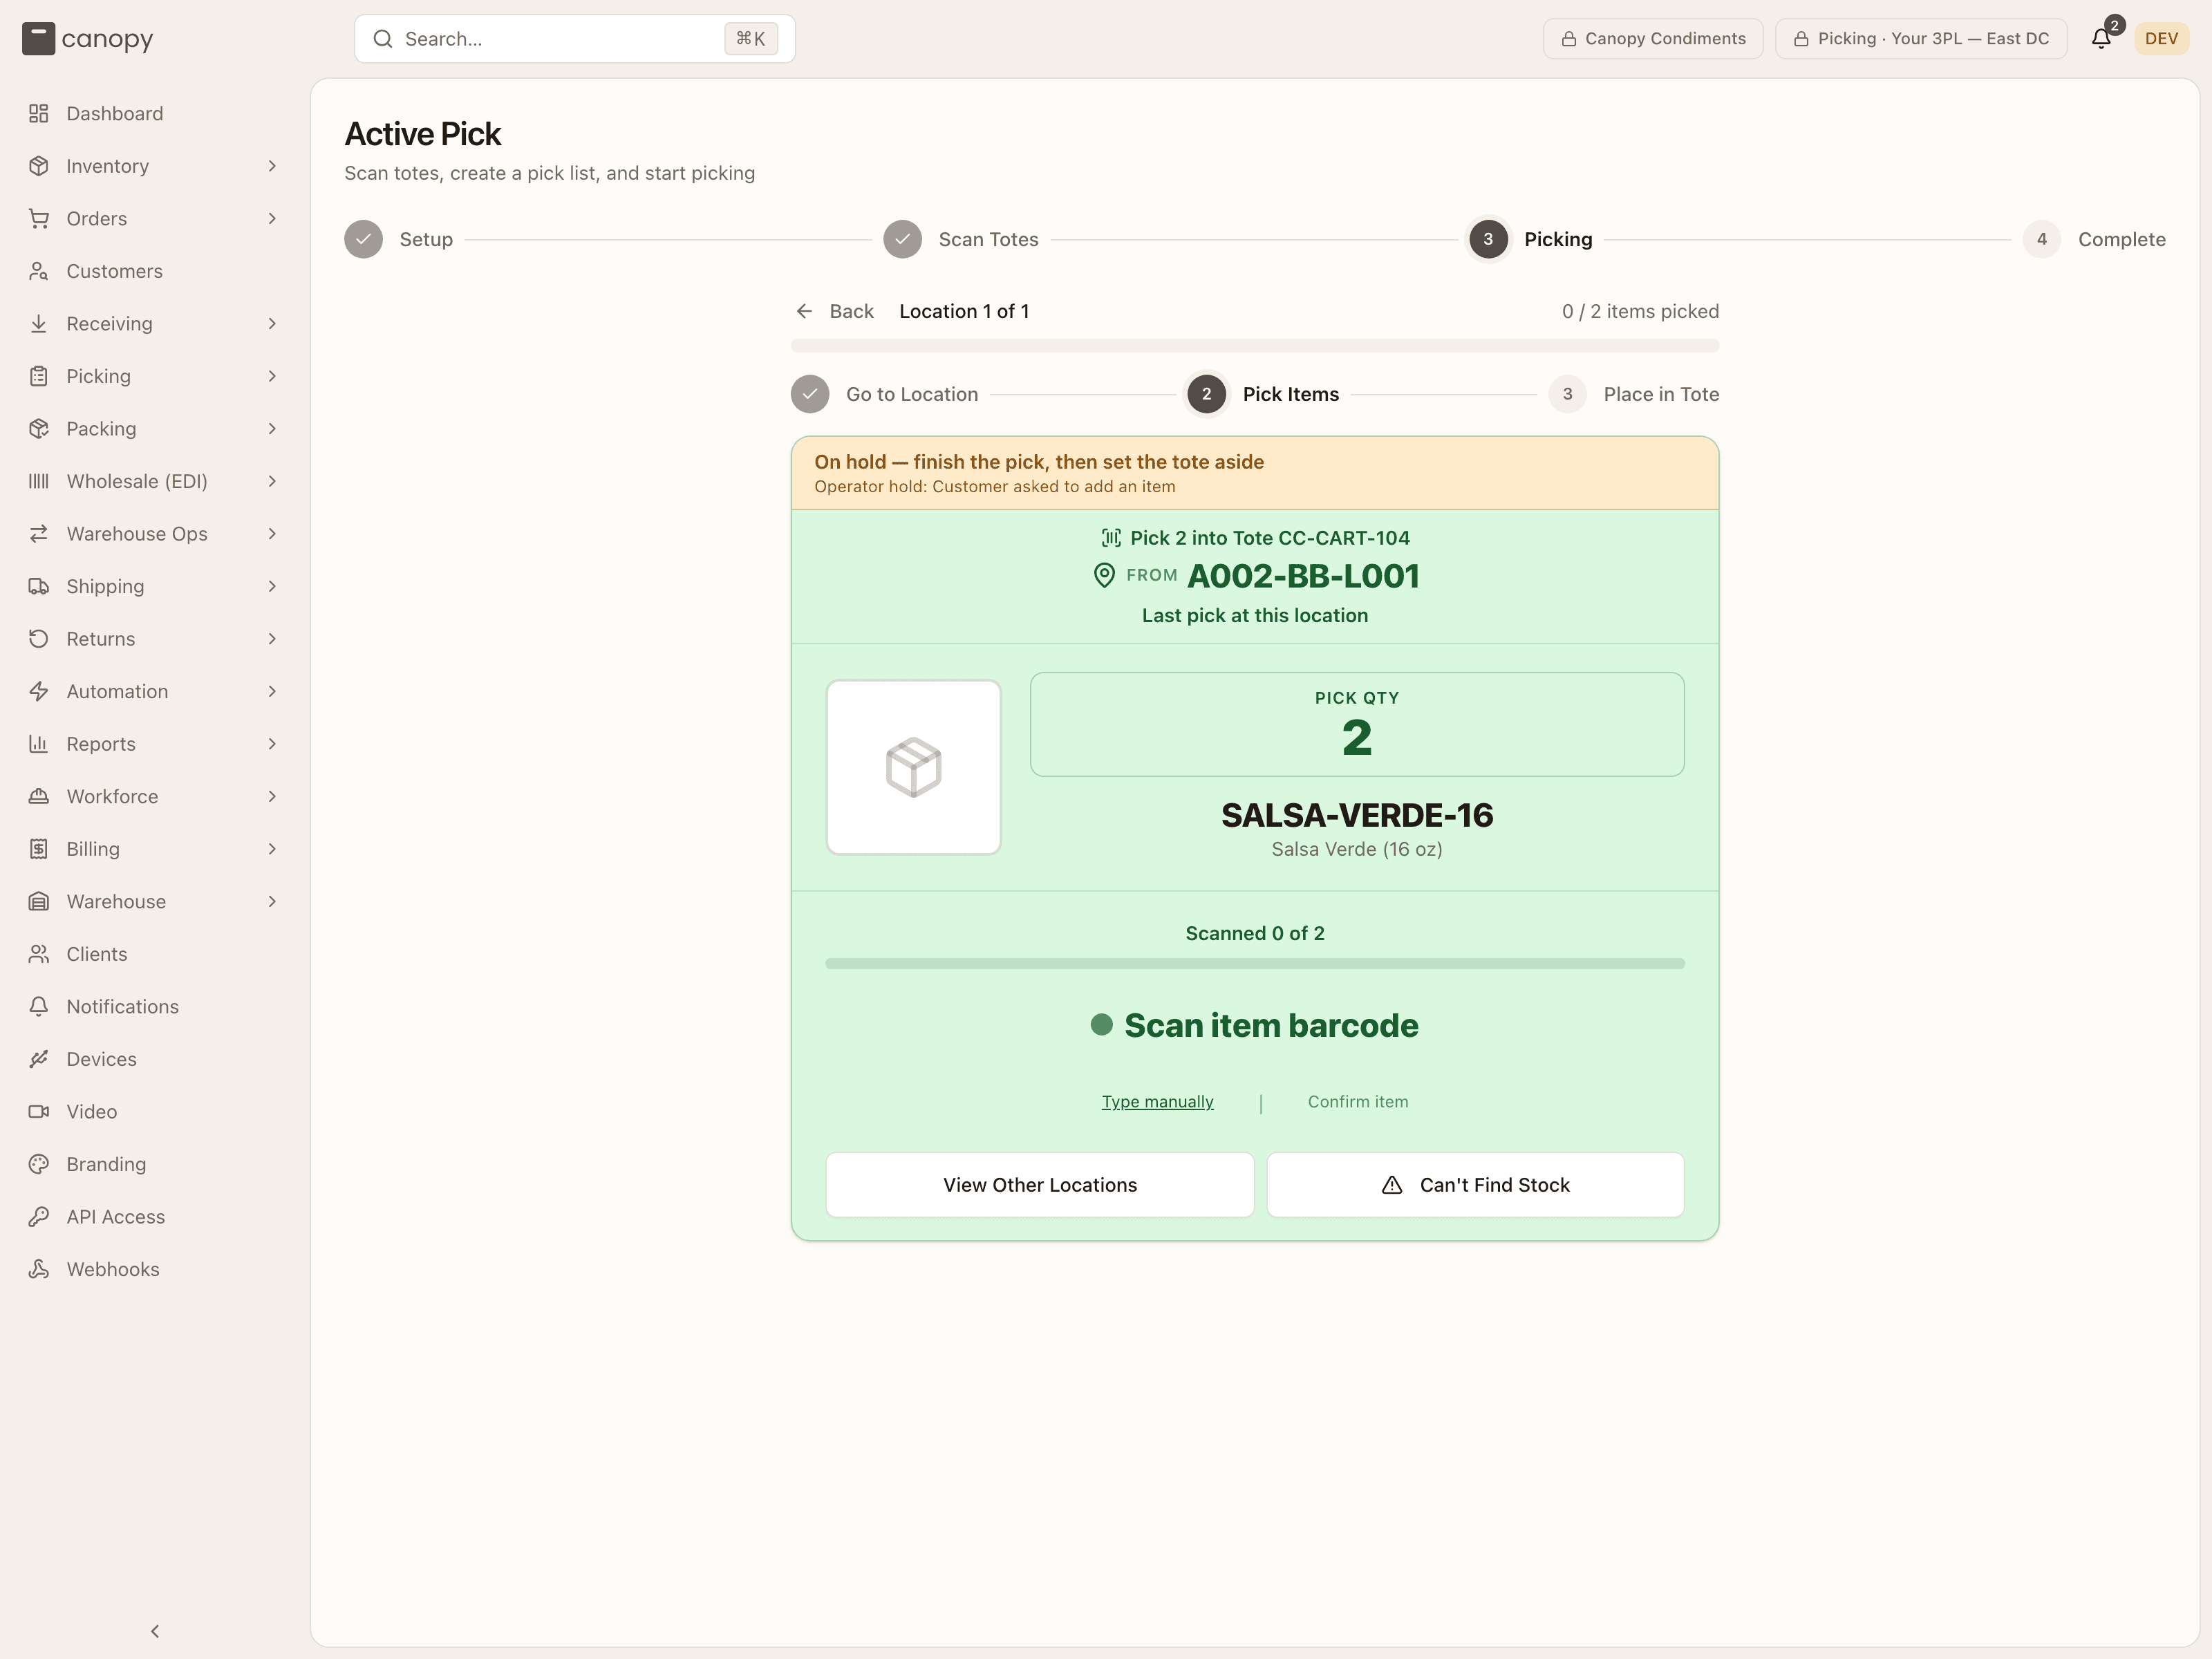
Pick Items. It shows what to pick and where it goes — "Pick N into Tote X", the bin you are standing at, the SKU, its picture, the lot and expiry, and the quantity to pick. Scan the item once per unit. A progress bar tracks "Scanned X of N" when you need more than one. The header also counts down the stop: "N picks left here", then "Last pick at this location". As with the bin, Type manually → Pick records a typed barcode, while Confirm item records the pick without a scan. If the stock is not there, use Can't Find Stock or View Other Locations — both open the same panel (see Exceptions).
-
Place in Tote. Drop the picked units into the highlighted tote and scan the tote again to confirm. The cart diagram highlights the right tote and the screen says how many items were placed in it. Type manually → Confirm and Confirm tote are the no-scan alternatives; whether the tote was confirmed by scan or by hand is recorded against the item and shows up in the tote's history.
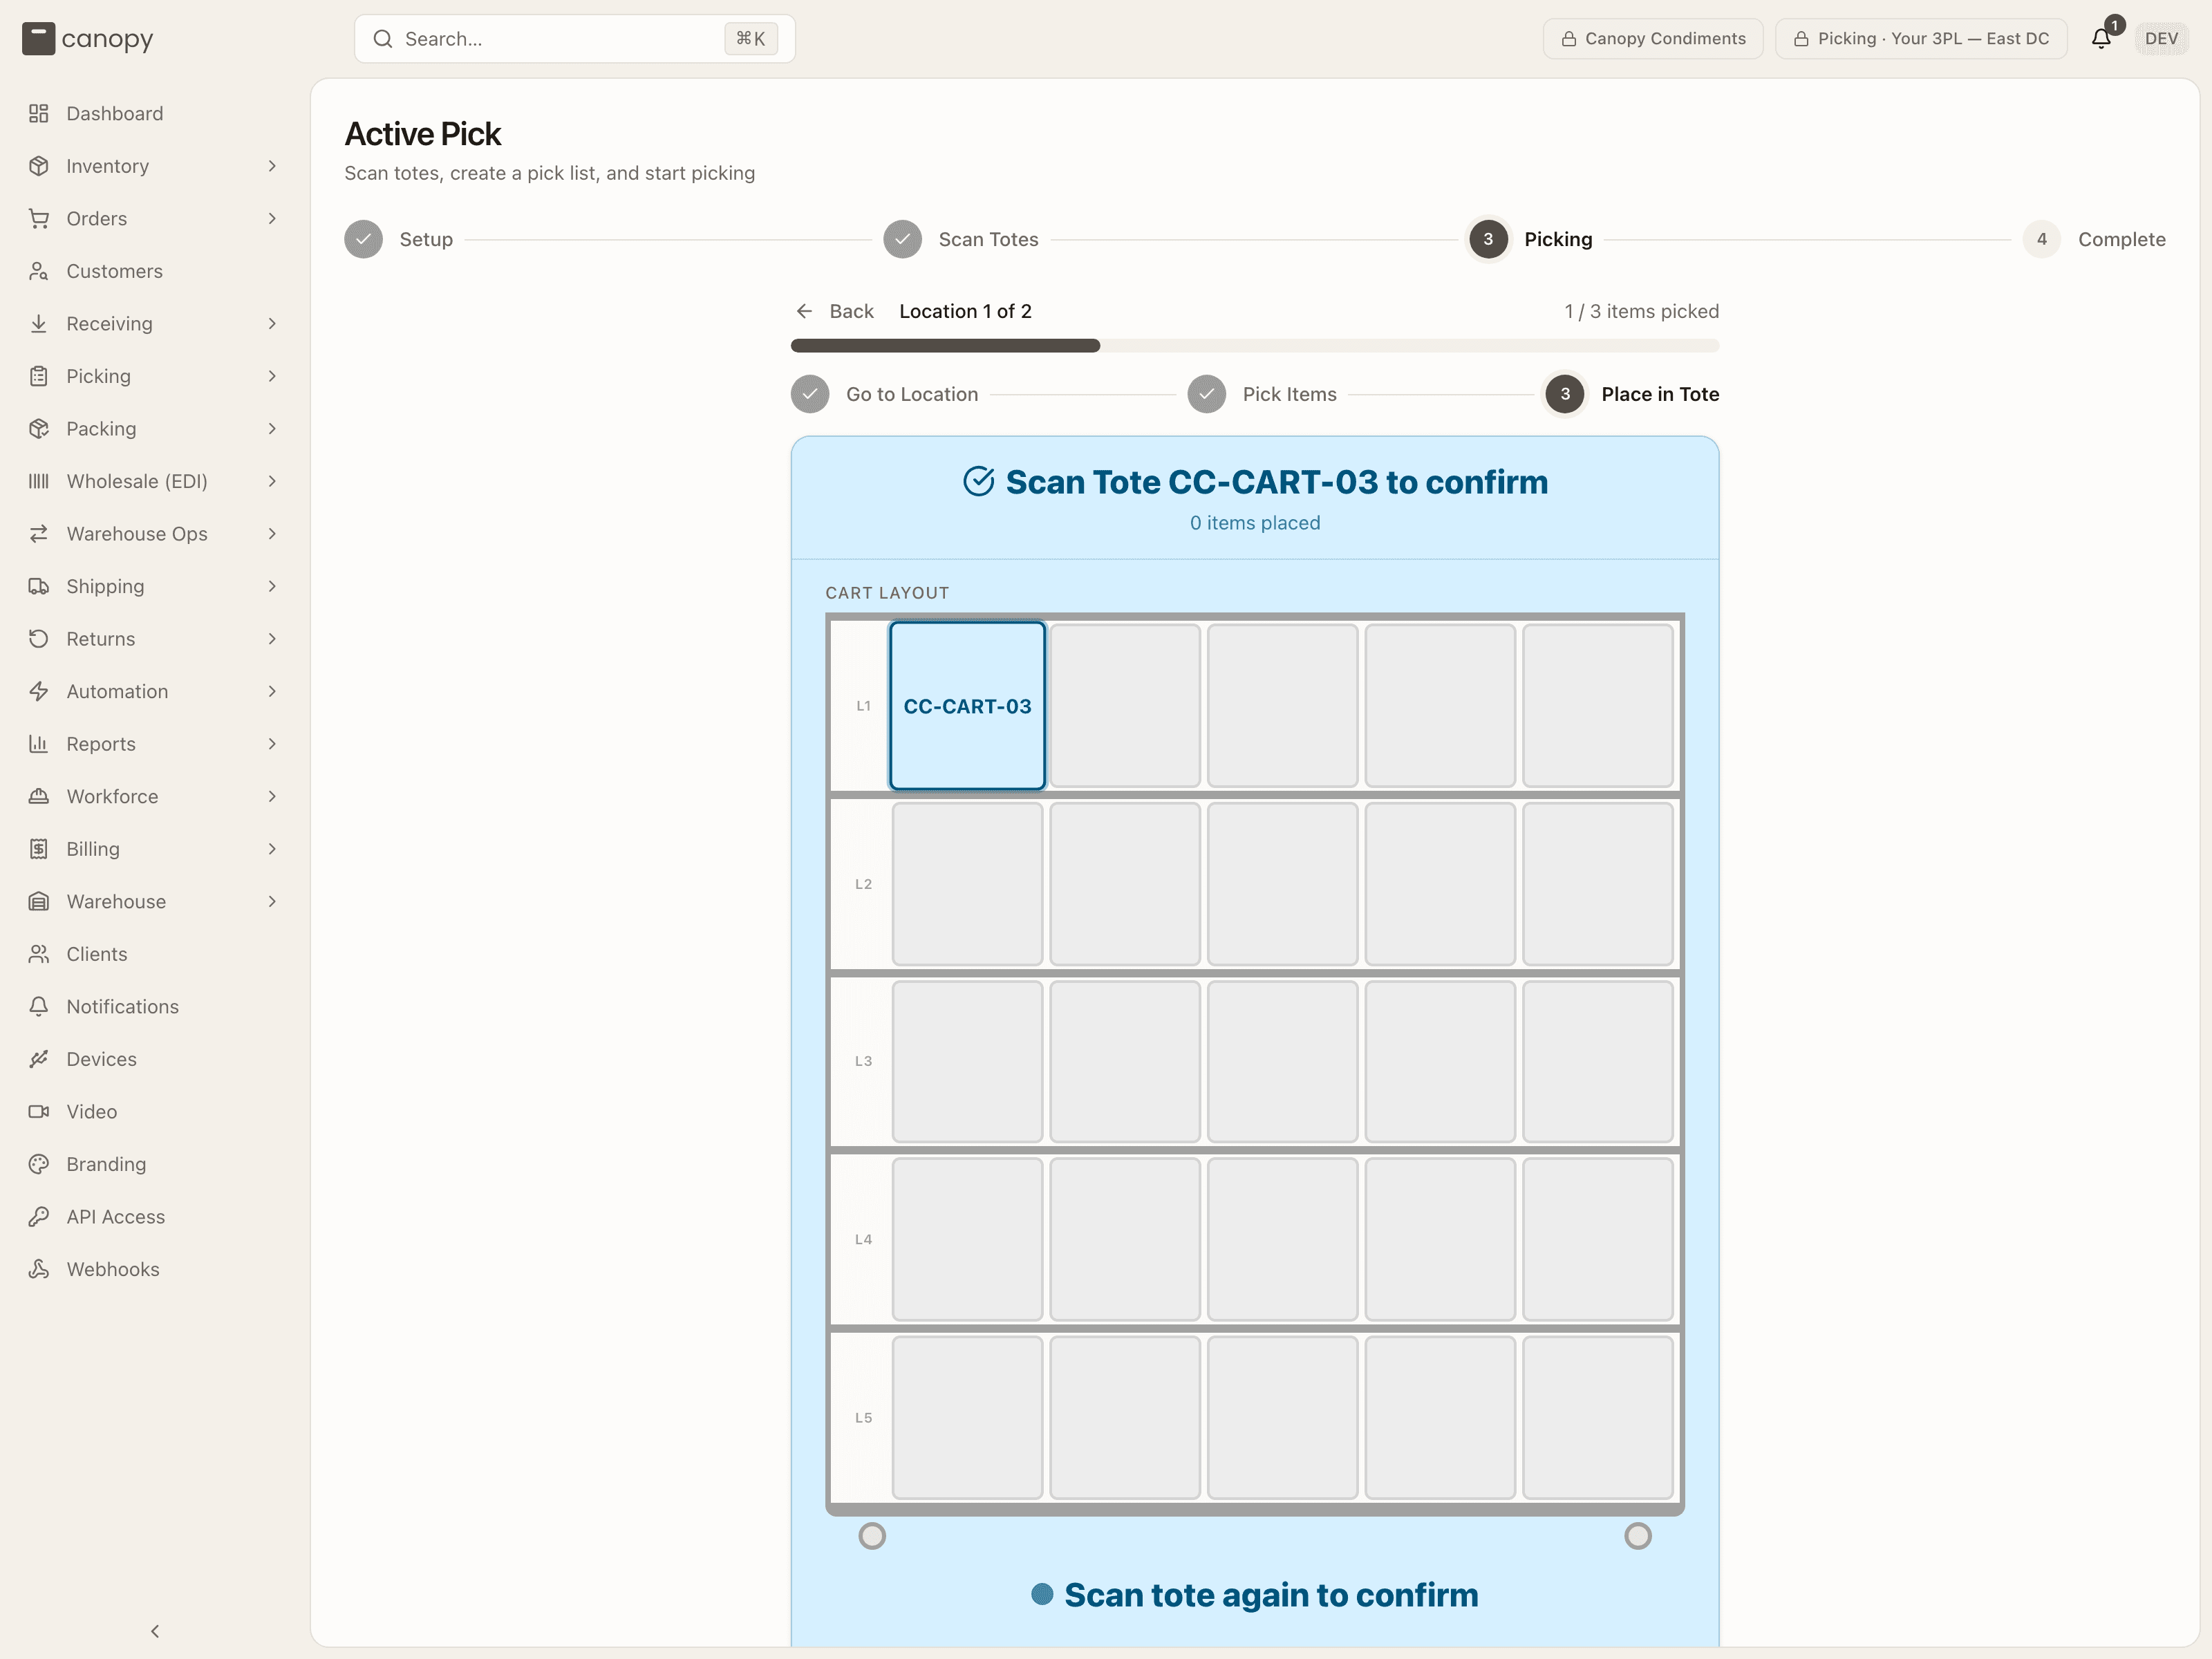
The app then routes you to the next bin and repeats. When the next order needs something from the bin you are already standing at, the card turns to Same location · Stay here instead of telling you to walk — you still scan the bin once more to confirm it.
If a yellow On hold — finish the pick, then set the tote aside strip sits at the top of the card, keep picking that order as usual. See When an order on your cart is on hold.
Complete — close the list
After the last tote confirm, the session lands on Complete. You see "All picks complete!" with the items-picked and orders totals, plus a summary of any short picks that need resolution or unfulfillable orders whose totes should be set aside for supervisor review.
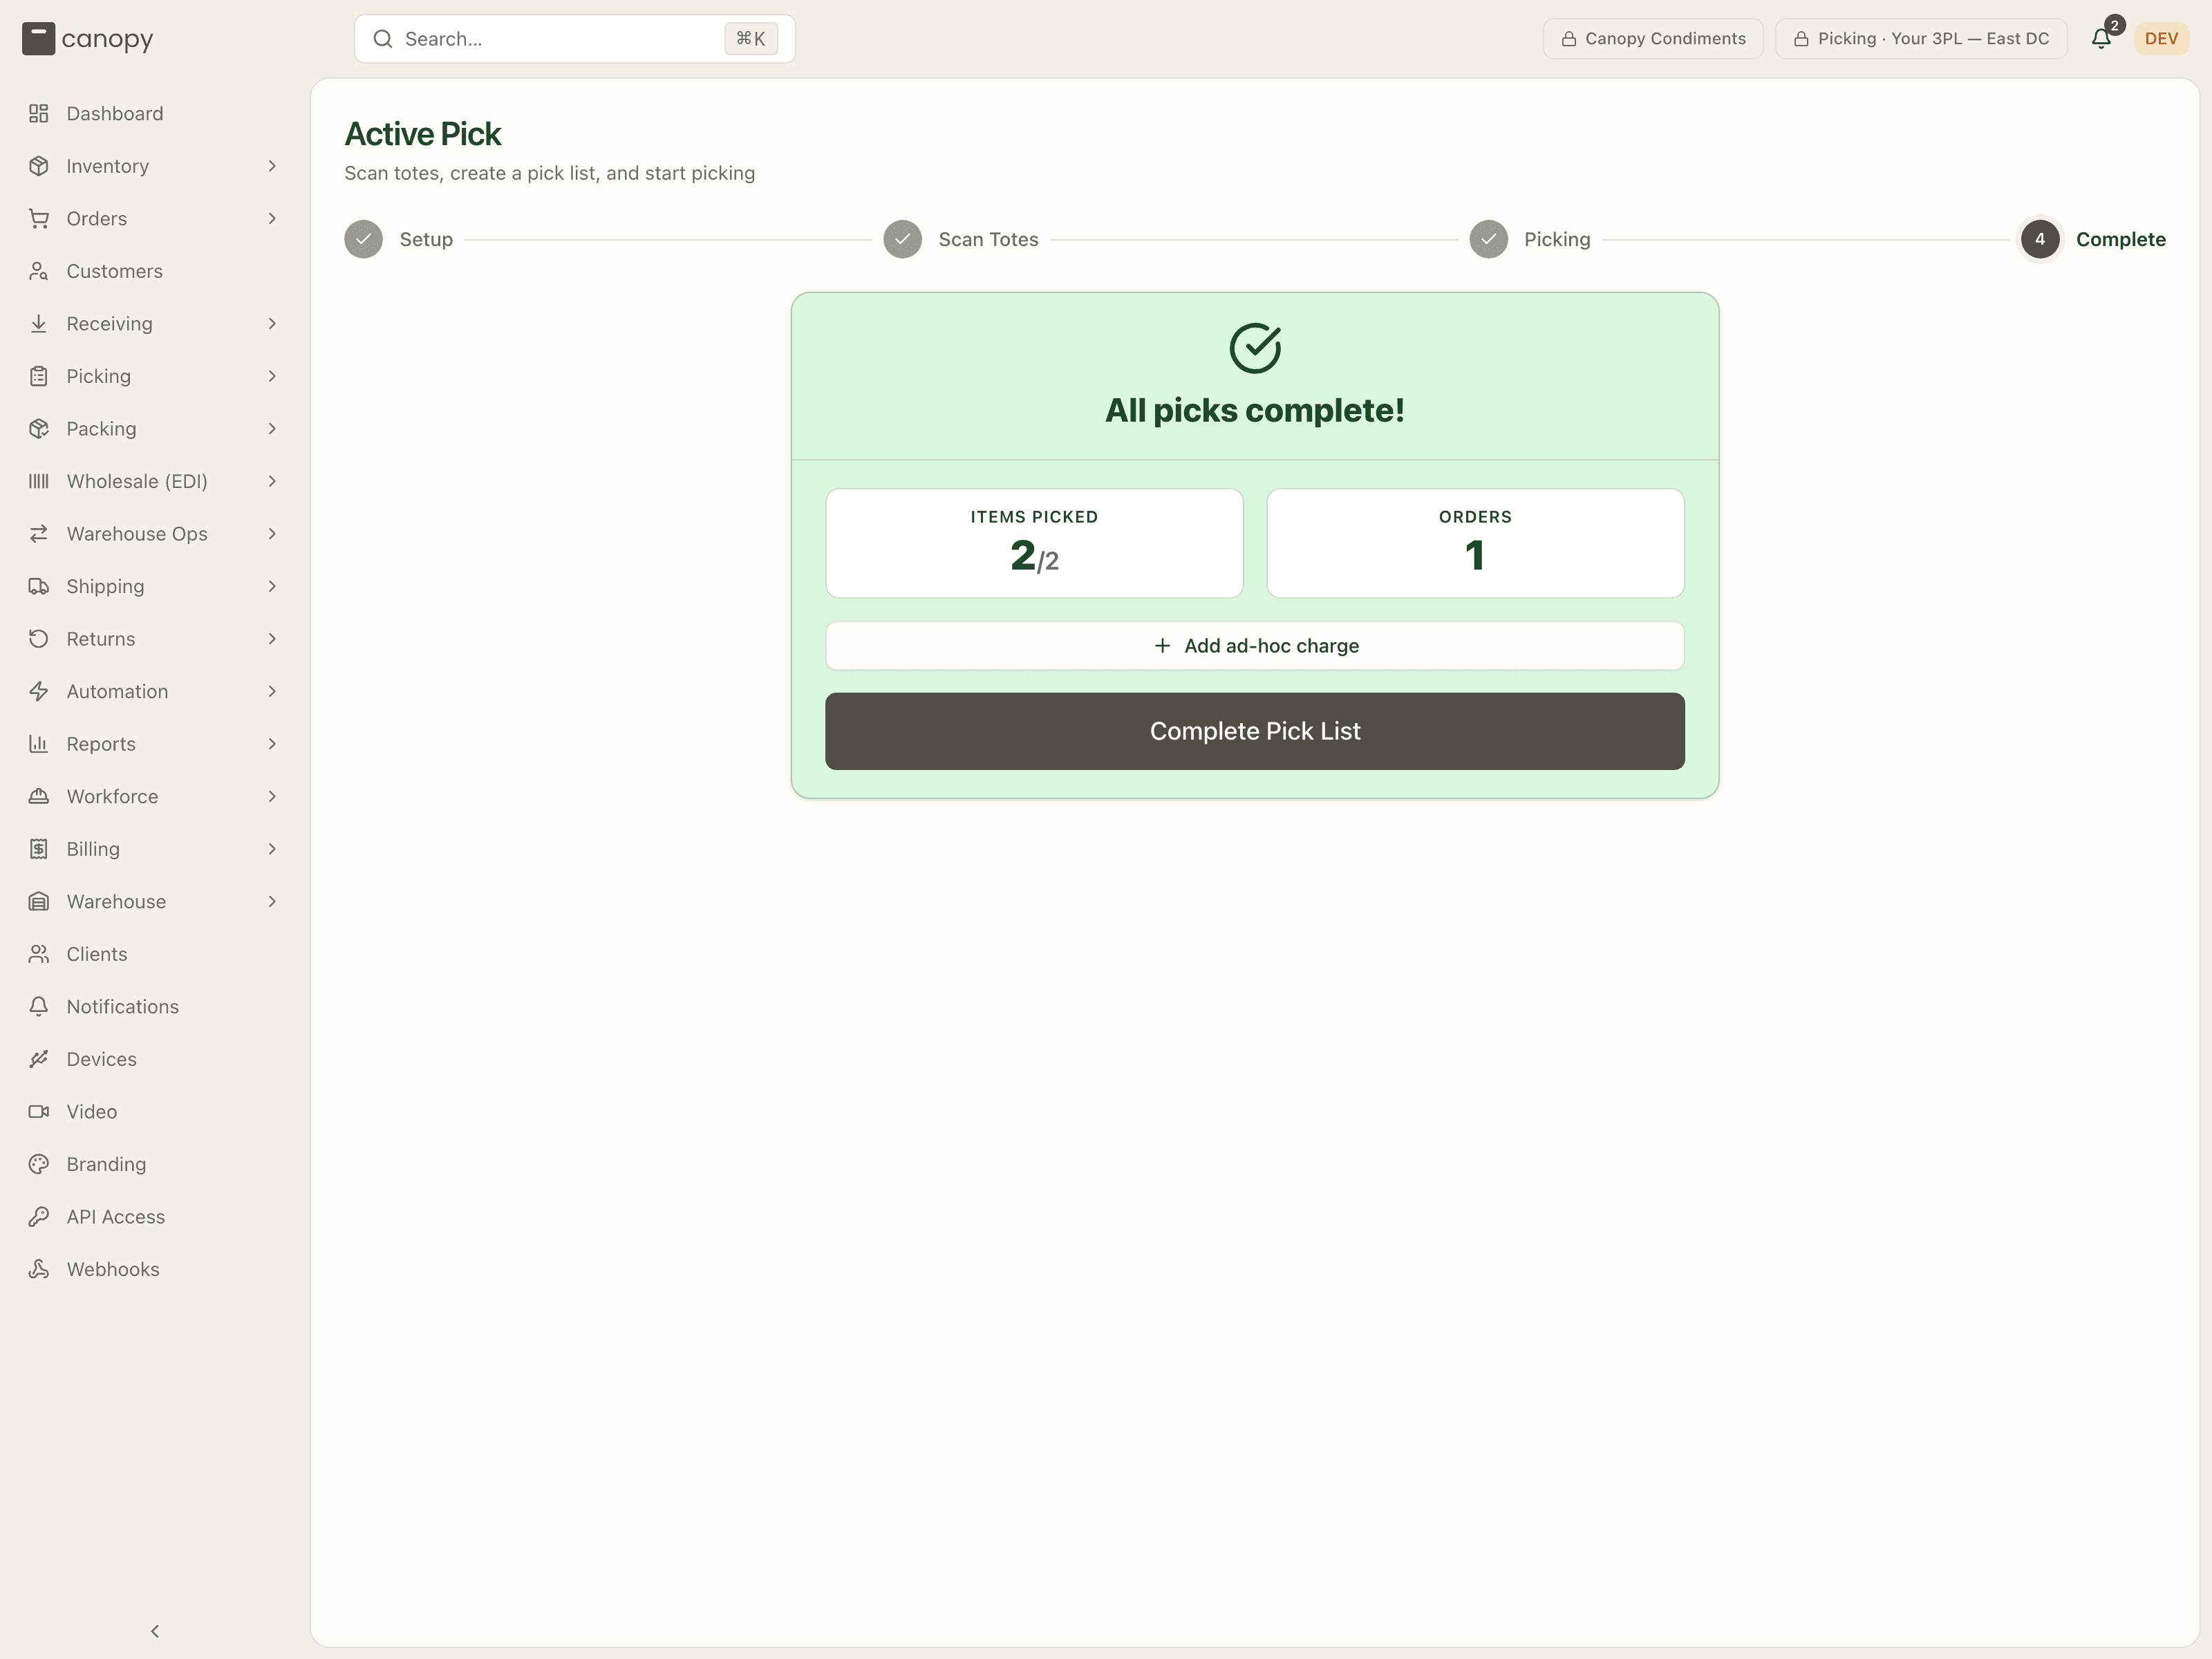
If billing is switched on for your tenant, an Add ad-hoc charge button sits above the close button — use it to record special handling against the brand before you finish. Press Complete Pick List. The picked totes are now ready for packing, except any tote the yellow 1 order on hold — set the tote aside notice names: put that one to one side. One thing refuses the close: an under-picked line that belongs to a reship's re-send, which ships whole or not at all — resolve it in Short Picks first. (A cart of a Bulk Ship batch ends on a different card and goes to the Bulk Ship bench instead; see Part 3.)
When an order on your cart is on hold
Keep picking. A hold is a stop put on an order, by a person or by the system, and it never stops a pick. If an order on your cart is on hold, its pick card shows a yellow strip, On hold — finish the pick, then set the tote aside, with the reason under it. Pick its units and confirm its tote as usual. The strip can appear partway through the list: the screen checks for holds every ten seconds and at each item scan.
At the end, the Complete screen lists the held orders under 1 order on hold — set the tote aside (or N orders), each with its Tote: badge, and says "The pack station turns these totes away until the hold is resolved." Press Complete Pick List as usual. Then put those totes to one side instead of taking them to packing, until the hold is resolved. The rule is in the Picking manual.
When stock is not there
If a bin is empty or short, press Can't Find Stock (or View Other Locations) on the Pick Items sub-step — or Choose Alternate Location on Go to Location. The Alternate Locations panel opens with the SKU, its current bin and zone, how many units are still to pick, and three ways out:
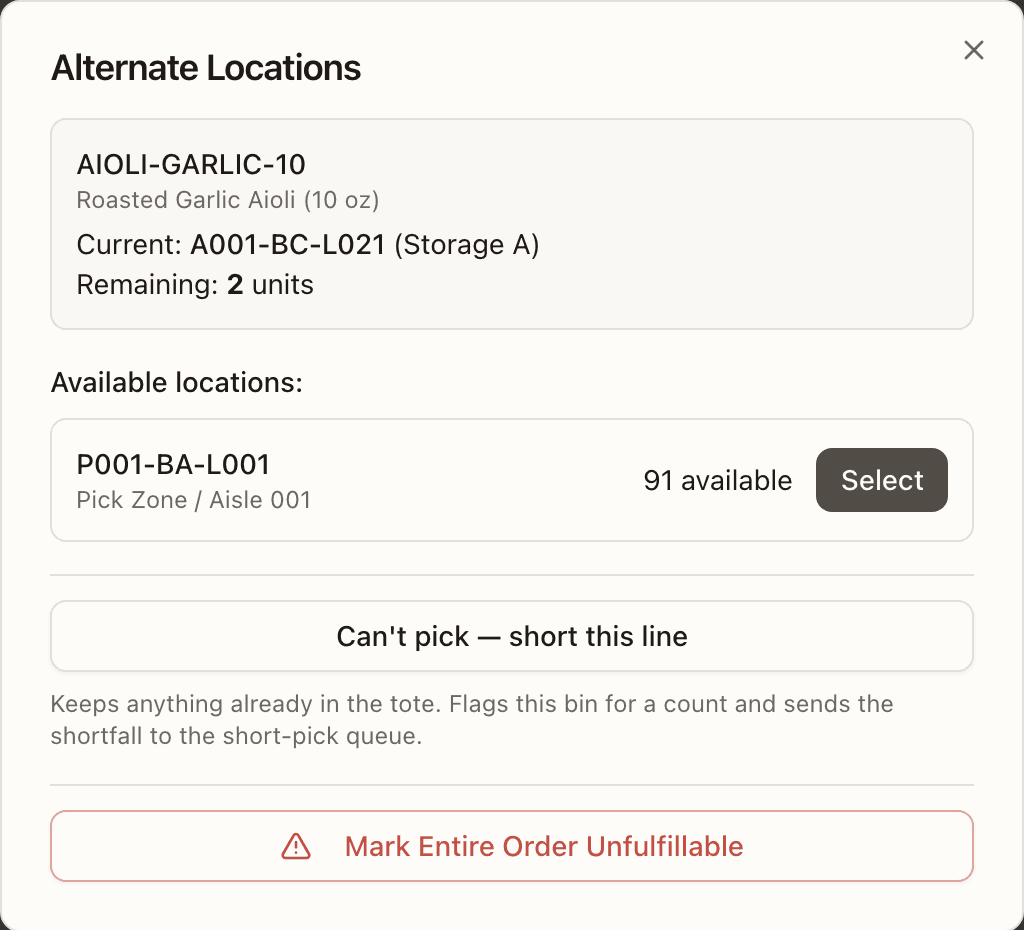
- Pick from another bin. If the SKU sits in other bins, they are listed with zone and aisle, lot and expiry, and what's available (plus any units in sealed packs that open at pick time). Press Select to reroute the pick there. When more than one order on your list needs this SKU from this bin, the panel says so — "3 orders need this SKU here (5 units total)" — and a bin that can cover them all offers Move all 3 here, with This order only as the narrower choice.
- Short this line. Press Can't pick — short this line (or, for a group, No stock — short all N orders here / Short only this order). It keeps anything already in the tote, flags the bin for a stock count, and sends the shortfall to the short-pick queue.
- Mark the whole order unfulfillable. Press Mark Entire Order Unfulfillable. The dialog takes an optional reason and lets you Report the stock discrepancies (system quantity versus what you actually found) as you do it.
Break-pack prompt
If the pickable quantity is short but there is sealed stock in the same bin, the app may prompt you to "Open N cases of SKU" — it explains how many loose units the bin has, how many the pick needs, and what opening adds. Open them and press I opened them — continue pick; the pick retries on its own. Cancel leaves the pick unrecorded.
A stop withdrawn under you
If a lot is recalled or an order cancelled while you are mid-list, the next scan on that stop shows a notice — "Lot X was recalled" or "This order was cancelled" — saying the stop has been removed from your list. Any units already in the tote stay where they are; an operator extracts them later from Short Picks. Press Continue picking to move to the next stop. A single line cancelled on an order is refused the same way at the scan: "<SKU> was cancelled on order … — nothing to pick for it. Leave it on the shelf and tell a supervisor."
After the pick
Two follow-up queues pick up anything the session flagged:
- Short Picks (Picking → Short Picks) is where shorted lines get resolved, grouped by order with the tote on the shelf as the way to find them. Per line, Pick now is the main action — choose a bin and the shortfall is picked straight into the order's tote — with Backorder and Cancel line as alternatives (neither on a reship's re-send; Cancel line is withheld on a line merged in from another order — the row wears from CC-… and says what it can take instead). Abandon & re-queue order on the order's header returns the picked units to stock and flags the tote for put-back while they are staged.
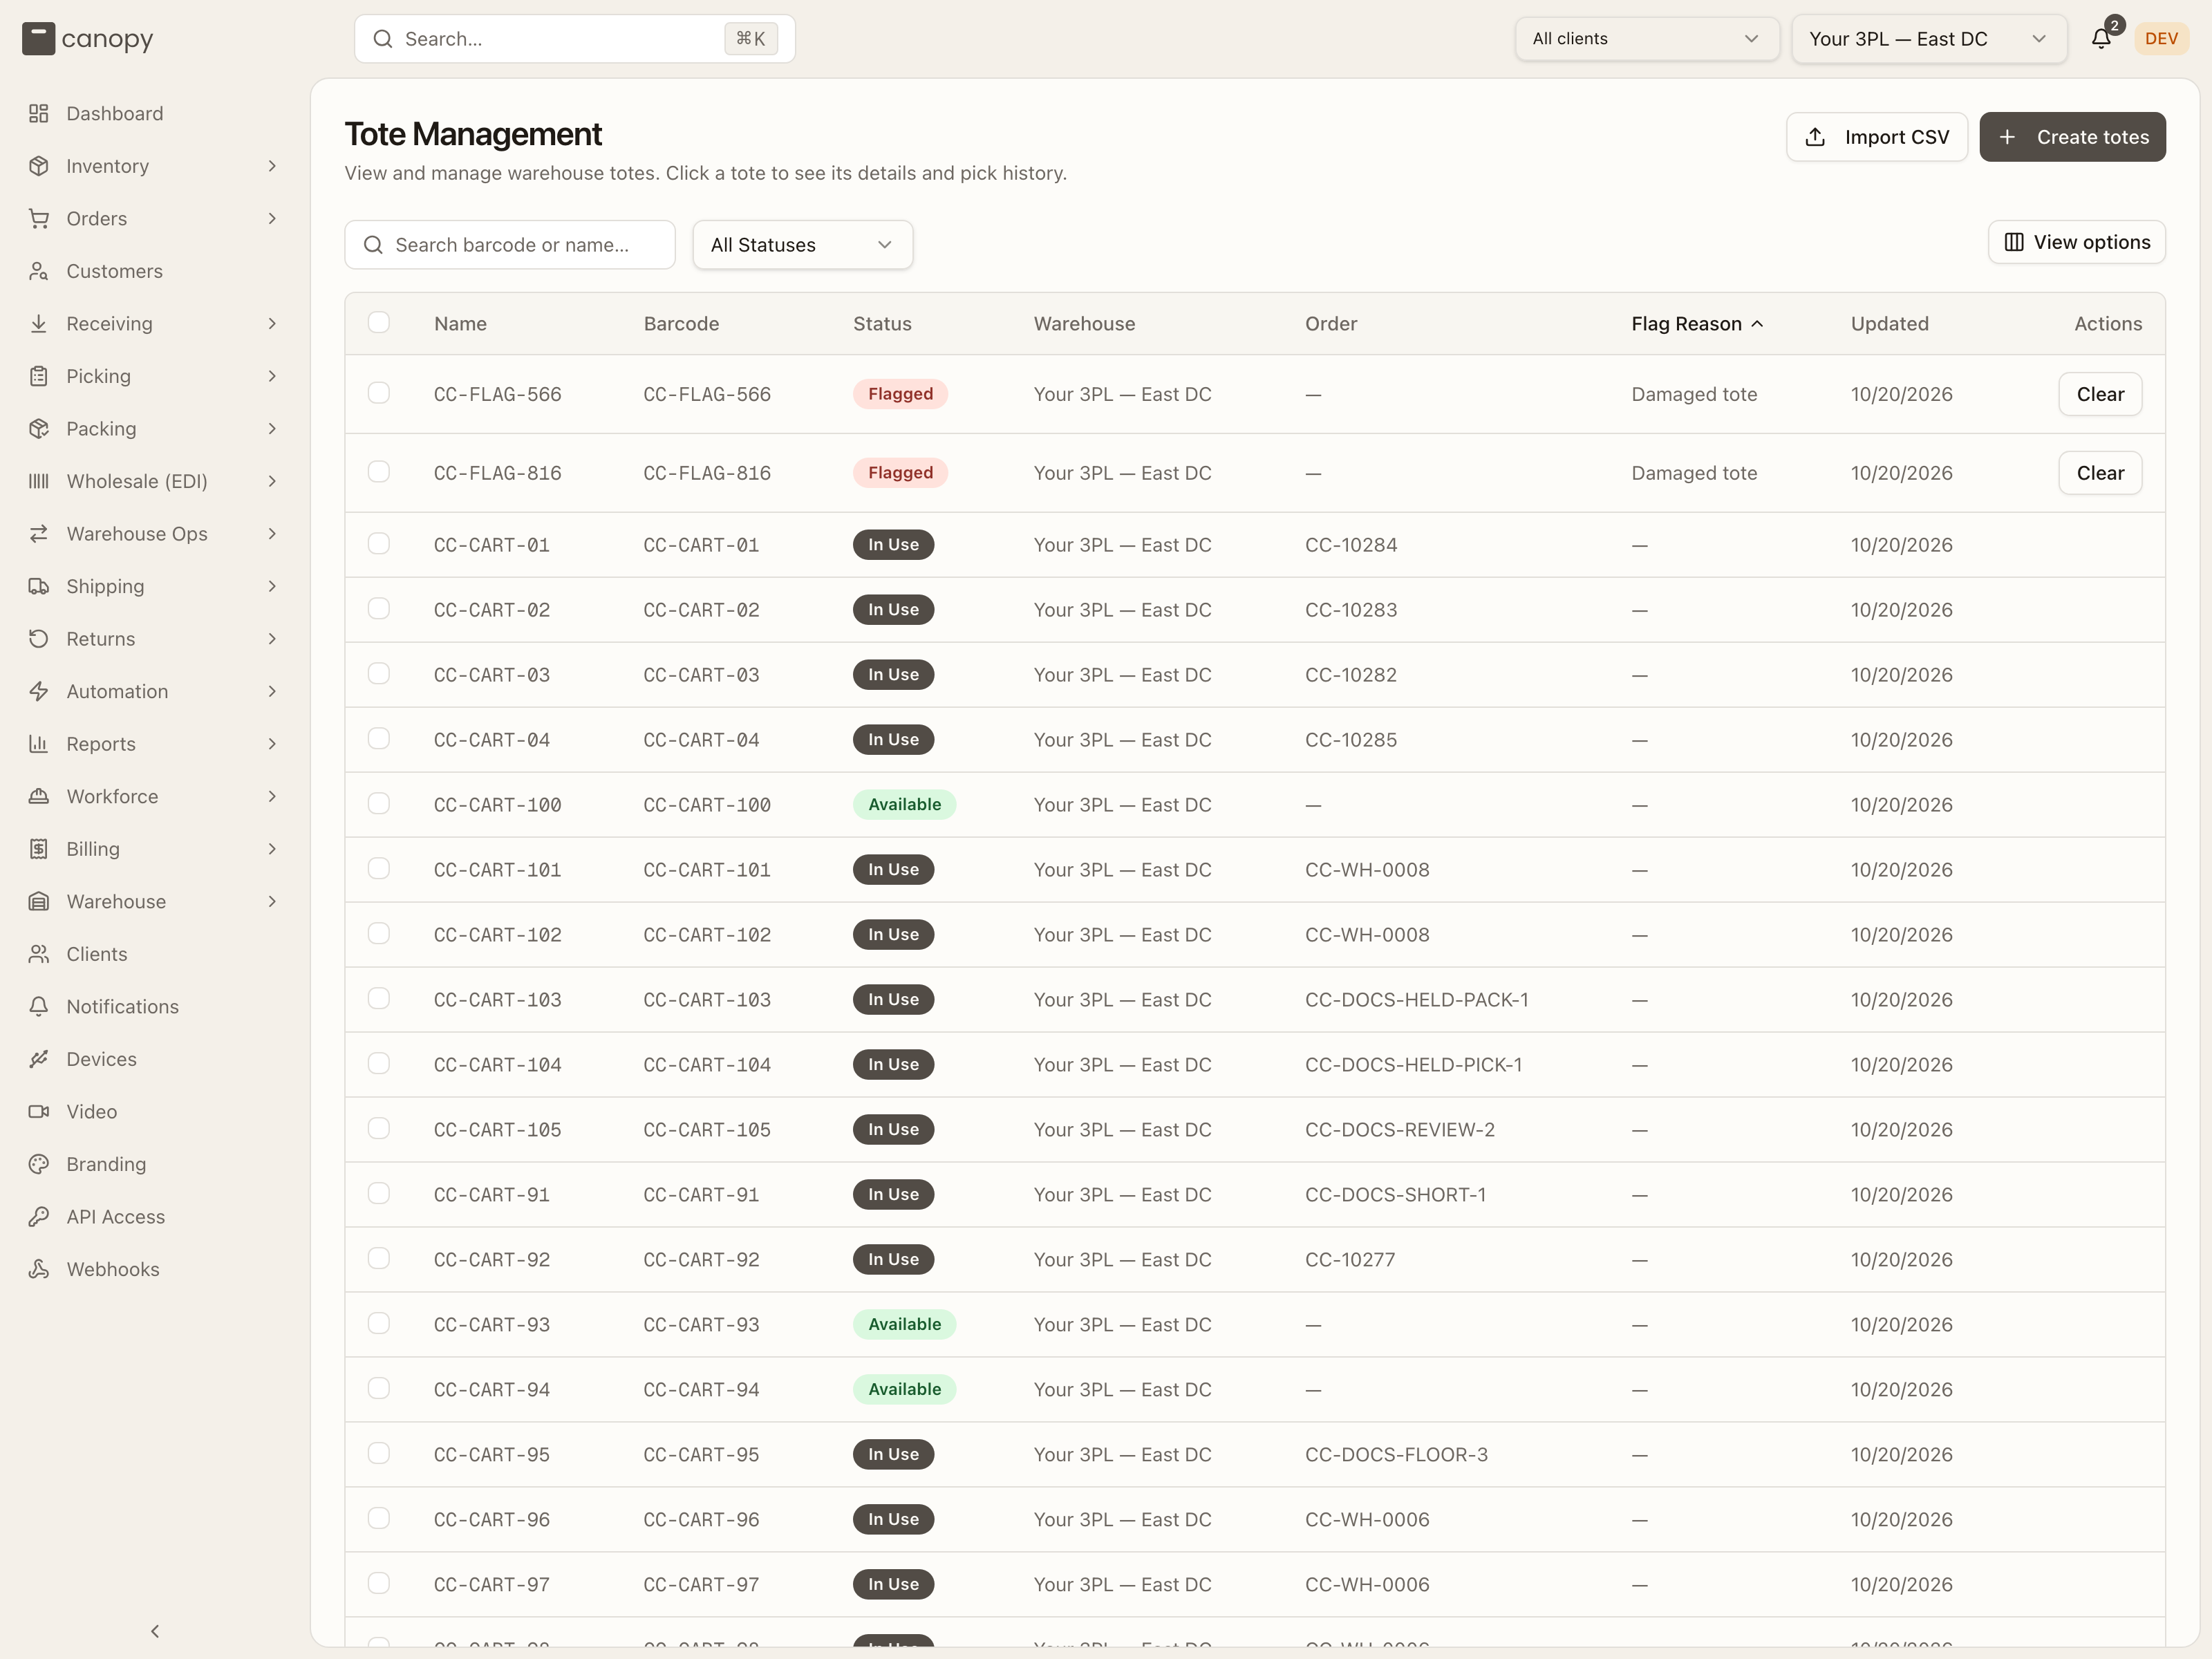
- Totes (Picking → Totes) lists every tote and its state. A tote still holding picked units when its pick list or order is cancelled shows as Flagged with the reason ("Pick list cancelled — items require put-back", "Order abandoned from its pick — items require put-back", or "An open put-back names this tote — items may require put-back"). Press Clear on its row (or open it and press Clear Tote): that is what empties it — the items move to the put-back staging bin and the tote goes back to Available. Shorting a line or marking an order unfulfillable does not flag the tote; its units stay put until the order is resolved — a resolution that stages a put-back, such as cancelling the last owed line of a split order, does.
Part 3 — Pick a cart of a Bulk Ship batch
A Bulk Ship batch that an operator has sent to the floor is picked here a cart at a time: one tote per order, as many orders as your cart holds. The cart is an ordinary pick list once it starts; only the setup and the end differ. The full rule is in the Picking manual.
Choose the batch
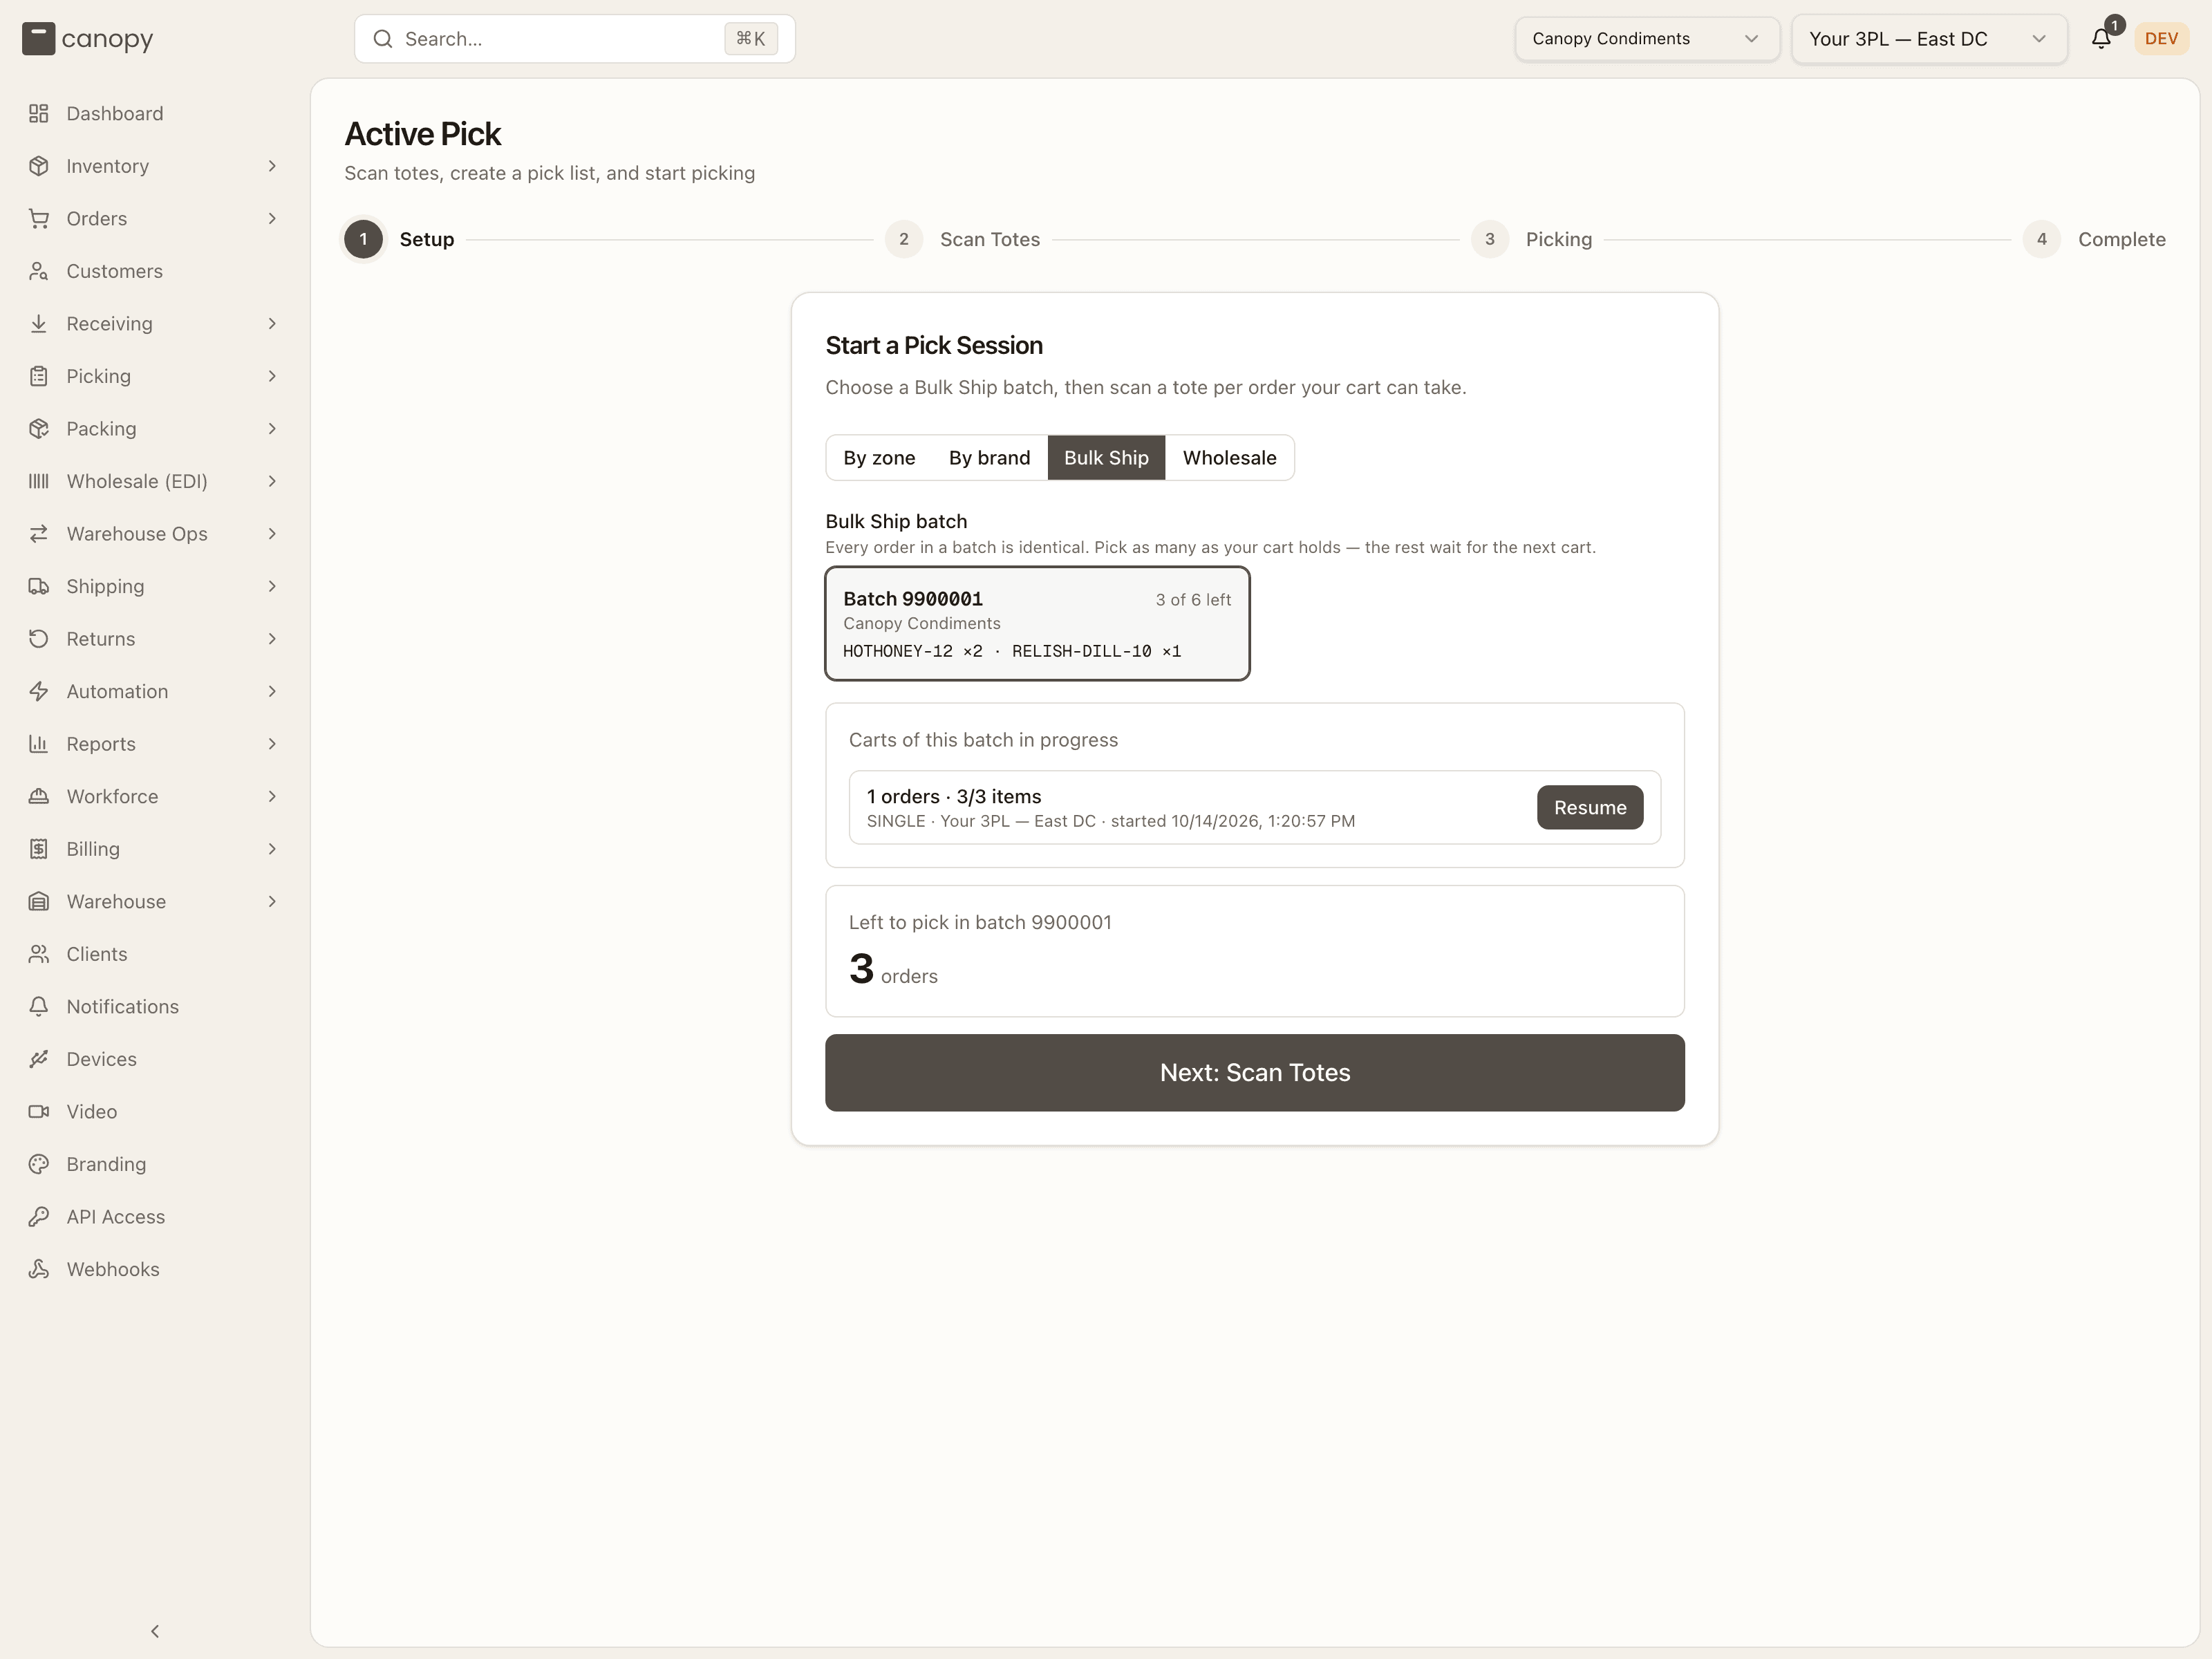
On the setup card press Bulk Ship. Under Bulk Ship batch, tap the batch's tile: it shows Batch <number>, "N of M left", the brand and the items every order contains. The count reads "Left to pick in batch <number>" over "N orders". Press Next: Scan Totes. (Coming from the batch page's Pick in Active Pick button, the tile is already chosen.) A batch whose orders are all on carts reads "Every order in this batch is already on a cart."; an open cart of yours is listed under Carts of this batch in progress with Resume.
Scan a tote per order and pick
Scan one tote for each order you will take, up to the orders left, and press Start Picking. Then walk the route exactly as in Part 2: bin, item, tote.
Take the cart to the Bulk Ship bench
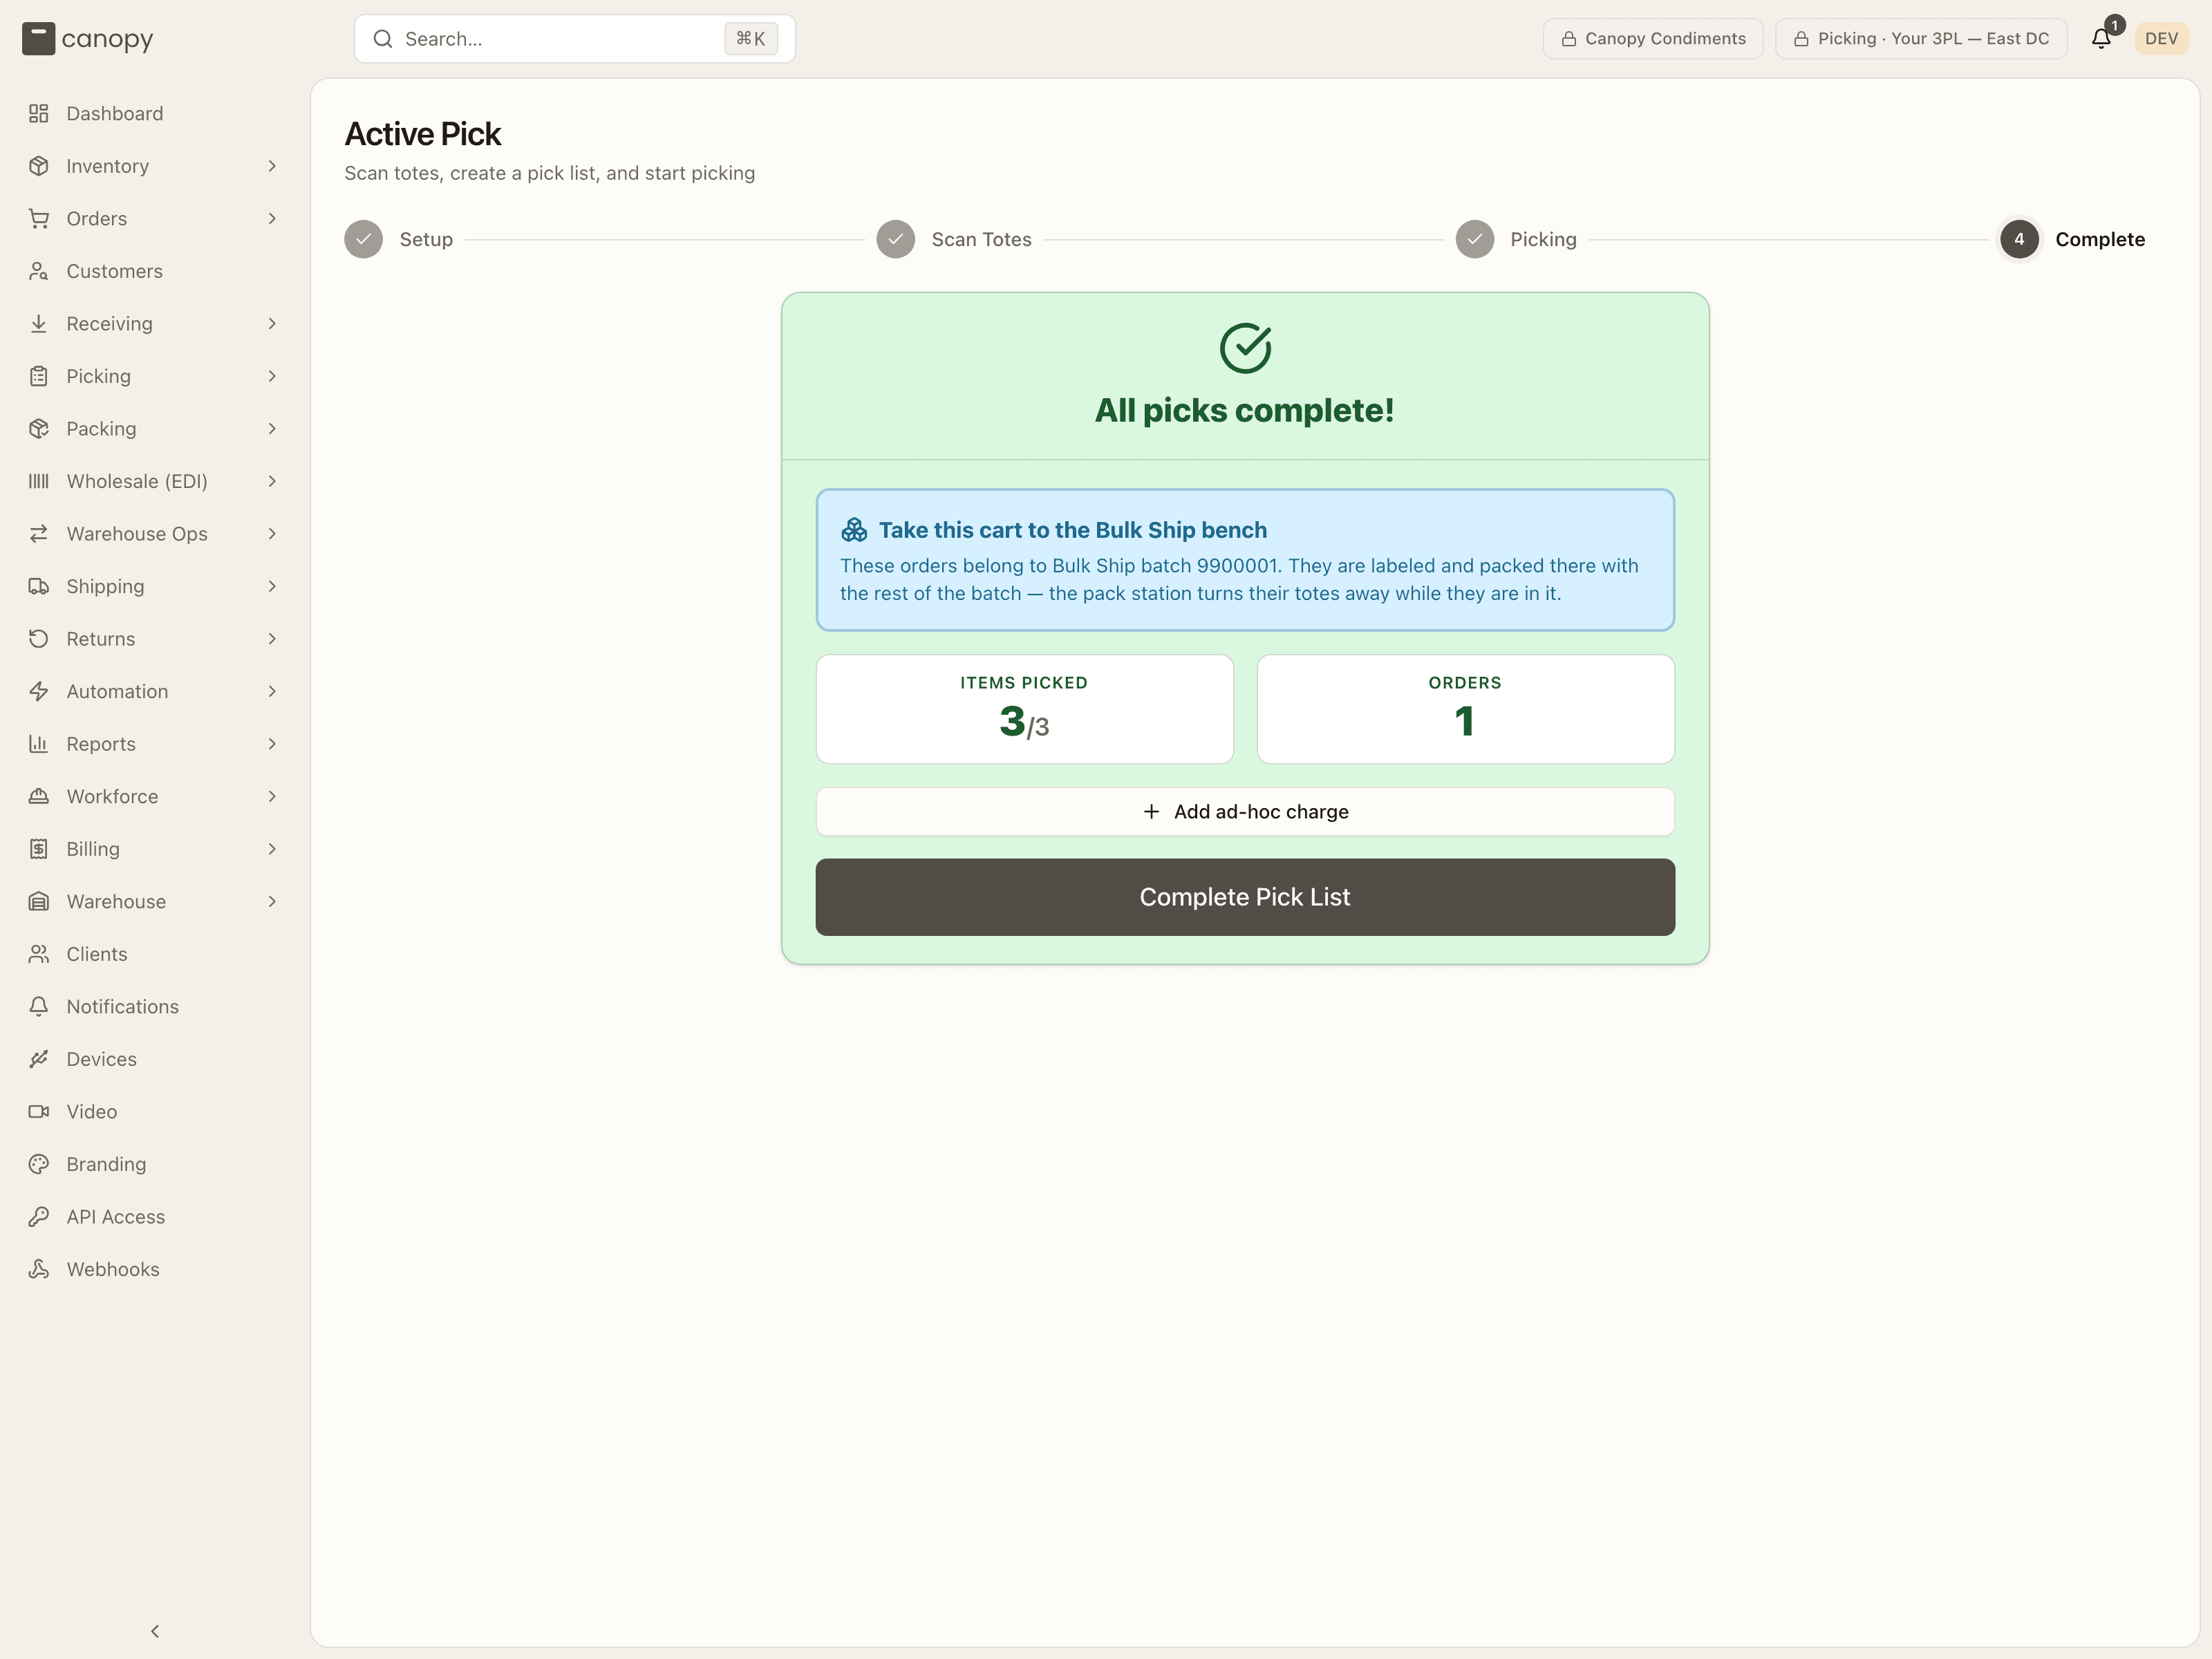
The closing screen adds a card: Take this cart to the Bulk Ship bench, "These orders belong to Bulk Ship batch <number>. They are labeled and packed there with the rest of the batch — the pack station turns their totes away while they are in it." Press Complete Pick List and wheel the cart to the bench; do not scan these totes at a pack station. If the card names some orders and says "the others go to the pack station", those orders left the batch while you picked and pack as usual.
Part 4 — Pick a wholesale order to staging
A wholesale order sent to picking is one order, picked by the case from the locations chosen on its order page, into any tote on your cart, and dropped at a staging location. The full rule, every message included, is in the Picking manual.
Choose the order
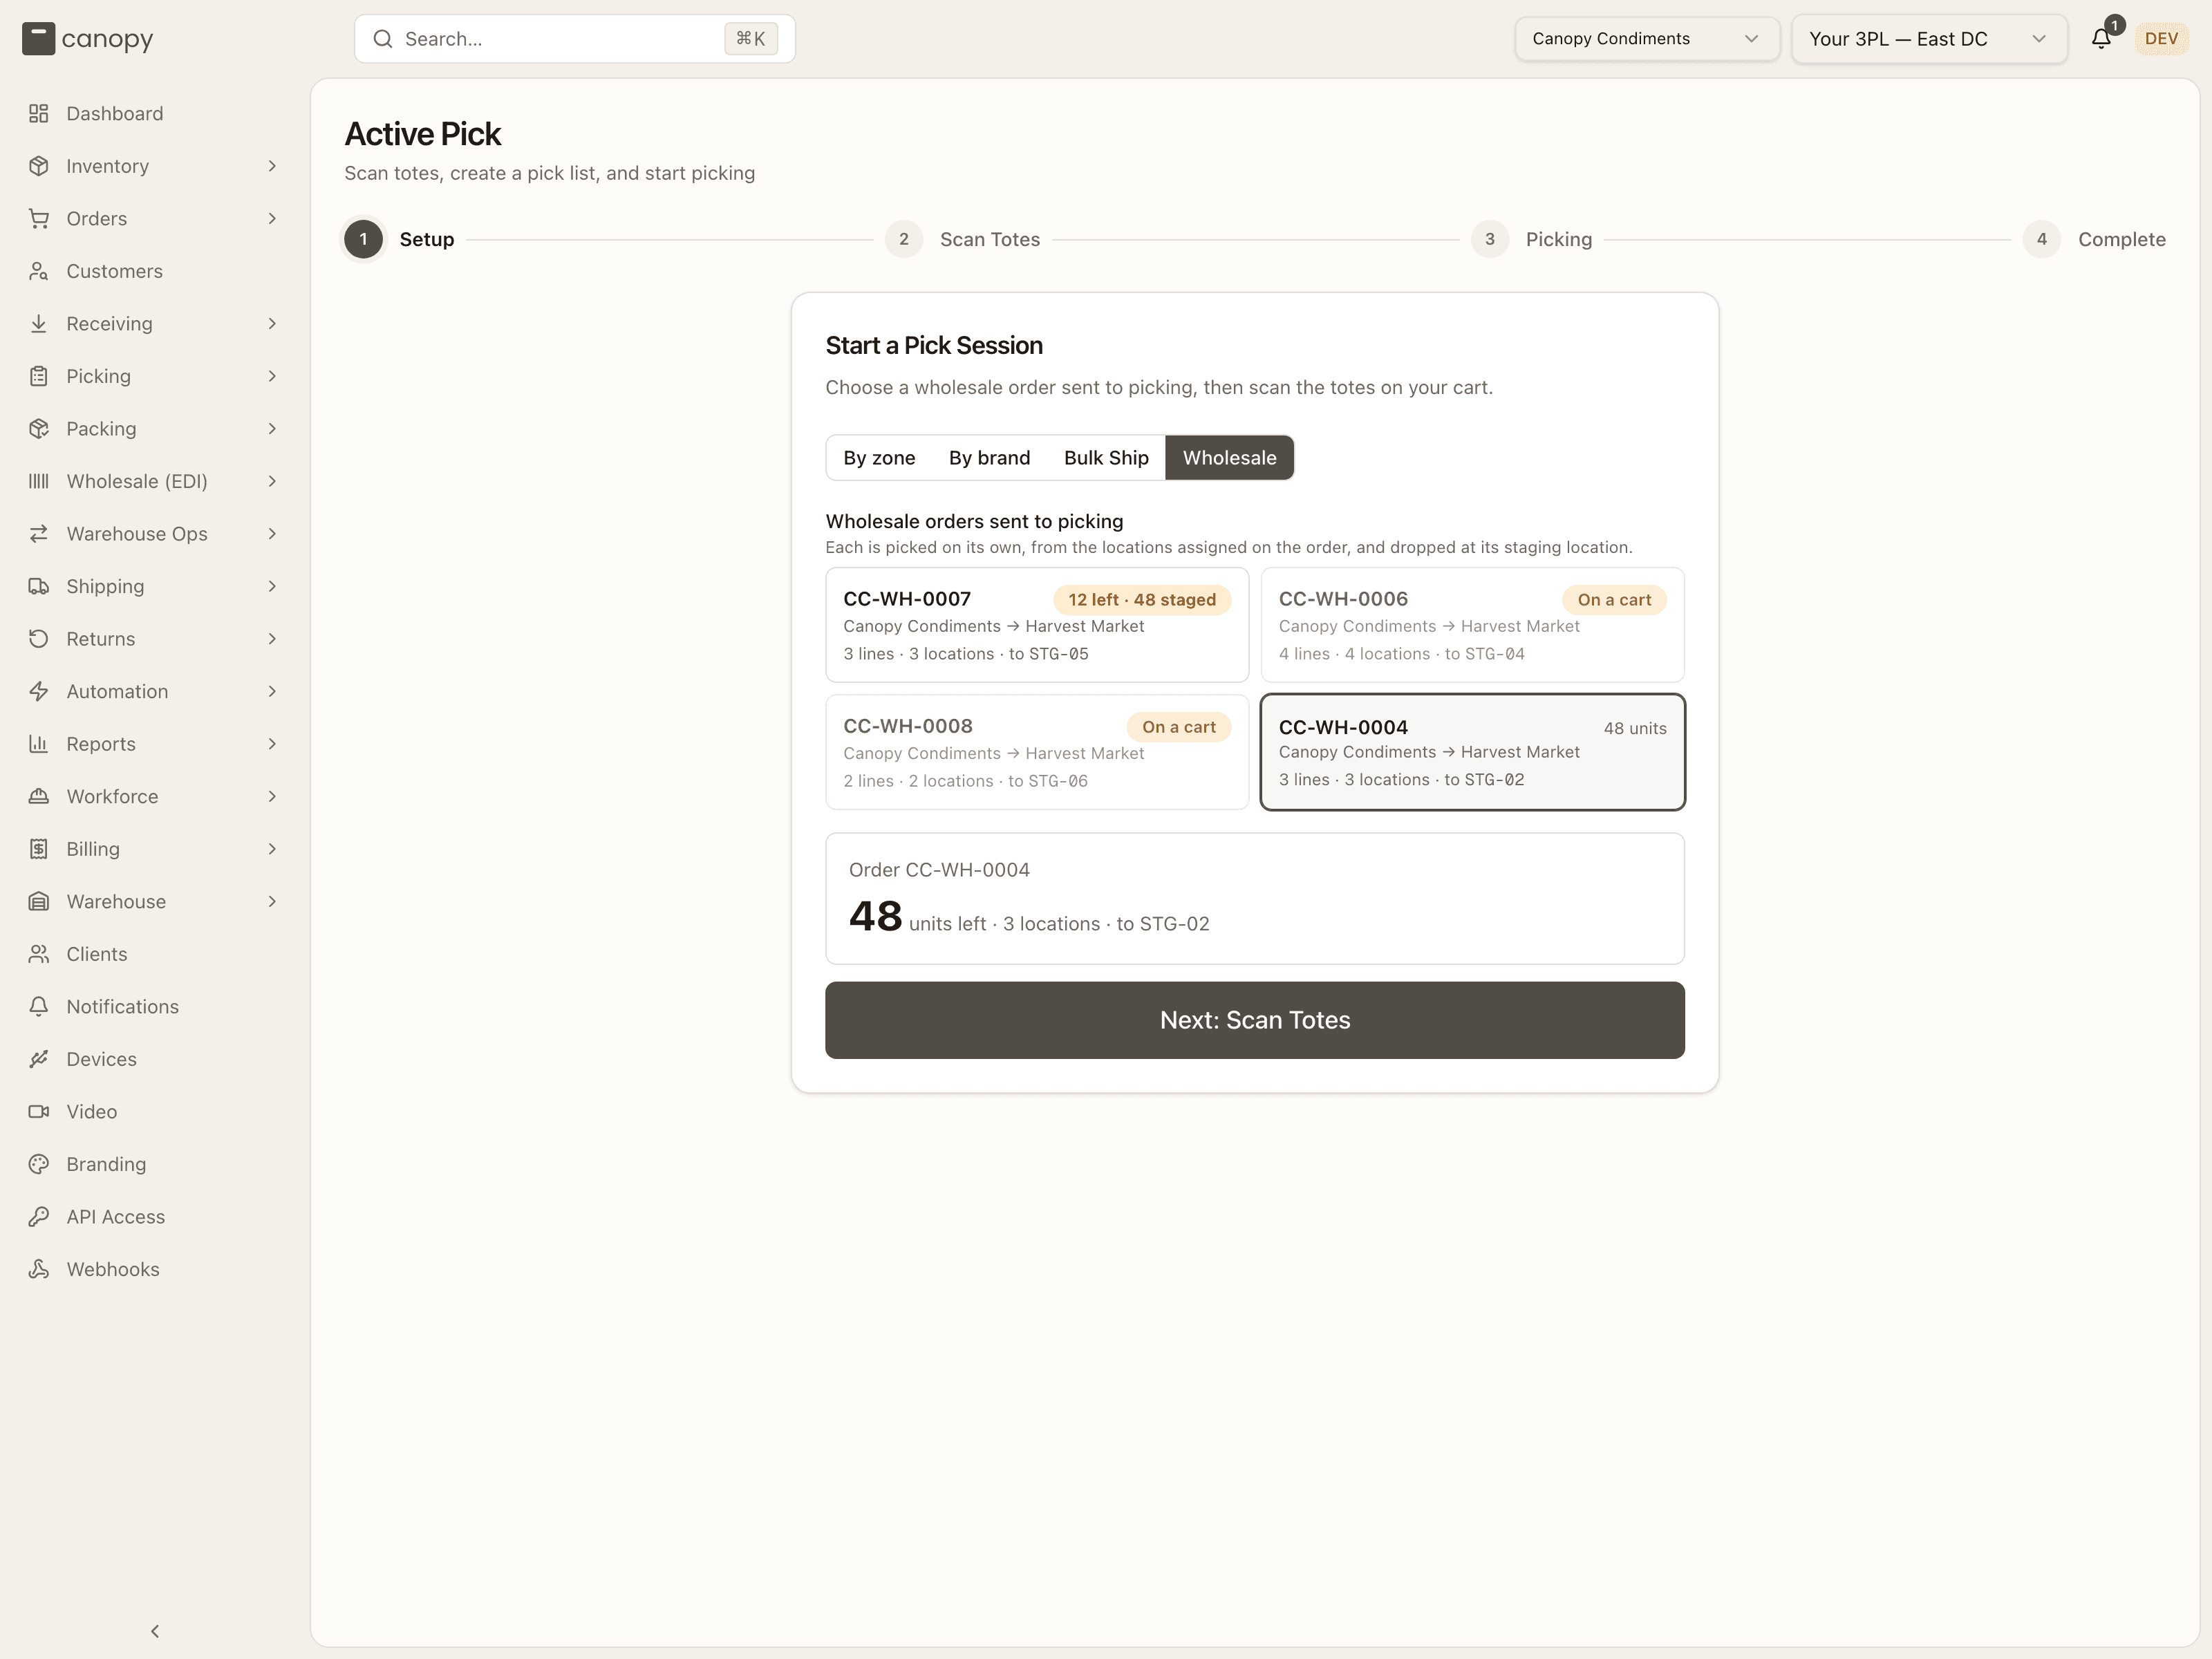
On the setup card press Wholesale. Under Wholesale orders sent to picking, tap the order's tile: its number, the brand and retailer, and "N lines · M locations · to <staging bin>". A tile reading On a cart is already out on a cart, yours or another picker's; one reading "N left · M staged" has had a trip dropped off already and needs another. If the cart out is yours, press Resume this cart above the tiles. Press Next: Scan Totes.
Scan the totes you need
Scan as many totes as the order needs ("Scan the totes you need for this order. Pick the required quantity, then scan any tote on this cart."), up to the cart's slots ("Cart full"), and press Start Picking (1 order · N totes).
Pick by the case, then scan any tote
Each stop reads "Pick N units, then scan a cart tote" with the pack form under it, such as "3 cases of 12". Scan a case barcode to record a whole case, or the unit barcode for one unit. When the count is reached (or sooner, with Place N picked units in tote), put the units in any tote on the cart and scan that tote's barcode; a tote not on your cart is refused. There is no View Other Locations: a bin that comes up short is marked short with Can't Find Stock, and the office re-plans it.
Drop the cart at staging
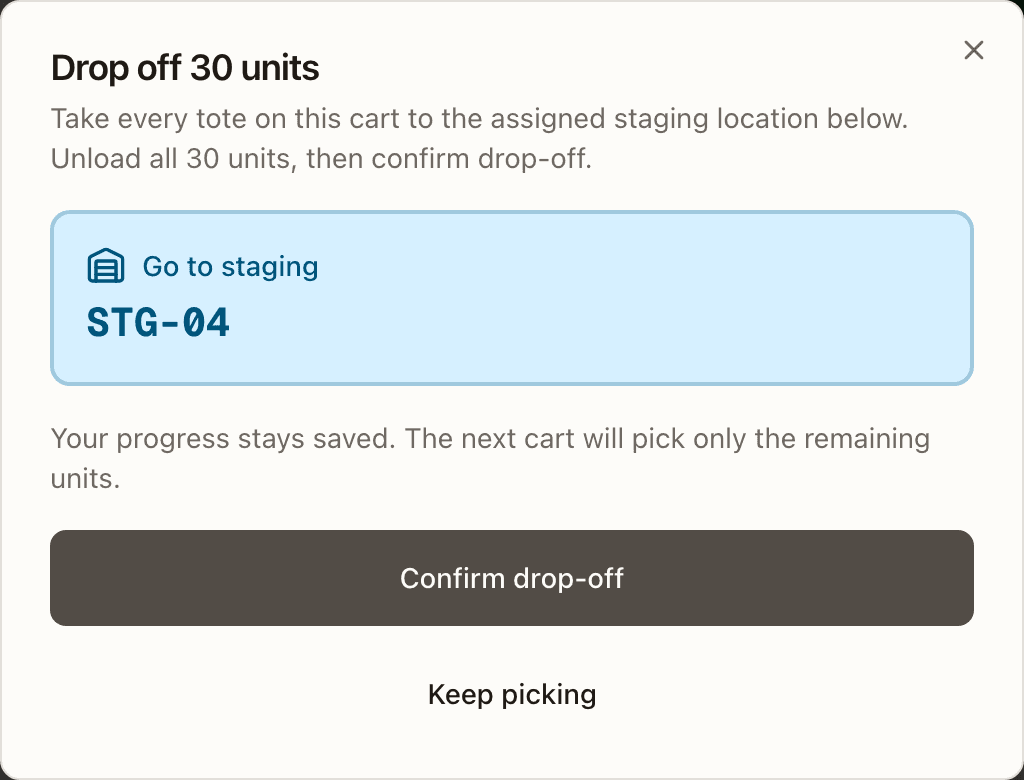
When the cart is full before the order is done, press Drop off cart, take every tote to the bin named under Go to staging, unload it, and press Confirm drop-off. Your progress is saved; the next cart picks only what remains. To pause without dropping off, press Save and exit. When the last stop is placed, the screen reads Ready for staging with "Take this cart to <bin>": take it there, unload, and press Dropped at <bin> · Complete pick list. The totes are released, and the order leaves the Wholesale queue once every unit is staged.
Status reference
A few statuses you will see on the pick screens and tables. The full set is in the Picking manual.
| Where | Values |
|---|---|
| Pick list | Pending · In Progress · Completed · Cancelled |
| Pick line | Pending · Picked · Short · Partial · Skipped · Relocated |
| Tote | Available · In Use · Flagged |