

Receiving
Track purchase orders across all clients and physically receive inventory onto the shelves.
Receiving covers inbound stock: the purchase orders clients send you, and the physical receiving of those units into bins. As an operator you see POs across all your clients, and you run the receiving itself.
Operator vs. client view
A brand creates POs, edits them while they're open, cancels them, and watches progress. You see every client's POs and you do the part they can't: the Receive flow that scans units into bins. The Receive link is hidden from brand accounts, the route is staff-only, and every receiving action (start, scan, unreceive, complete, blind receive) is refused for a client user server-side. The client sees the results — progress, discrepancies, the receiving report — but never which bin a unit went into.
The section has three pages under the Receiving sub-nav: Purchase Orders
(/receiving), Create PO (/receiving/create), and Receive
(/receiving/active, operator-only).
Purchase Orders
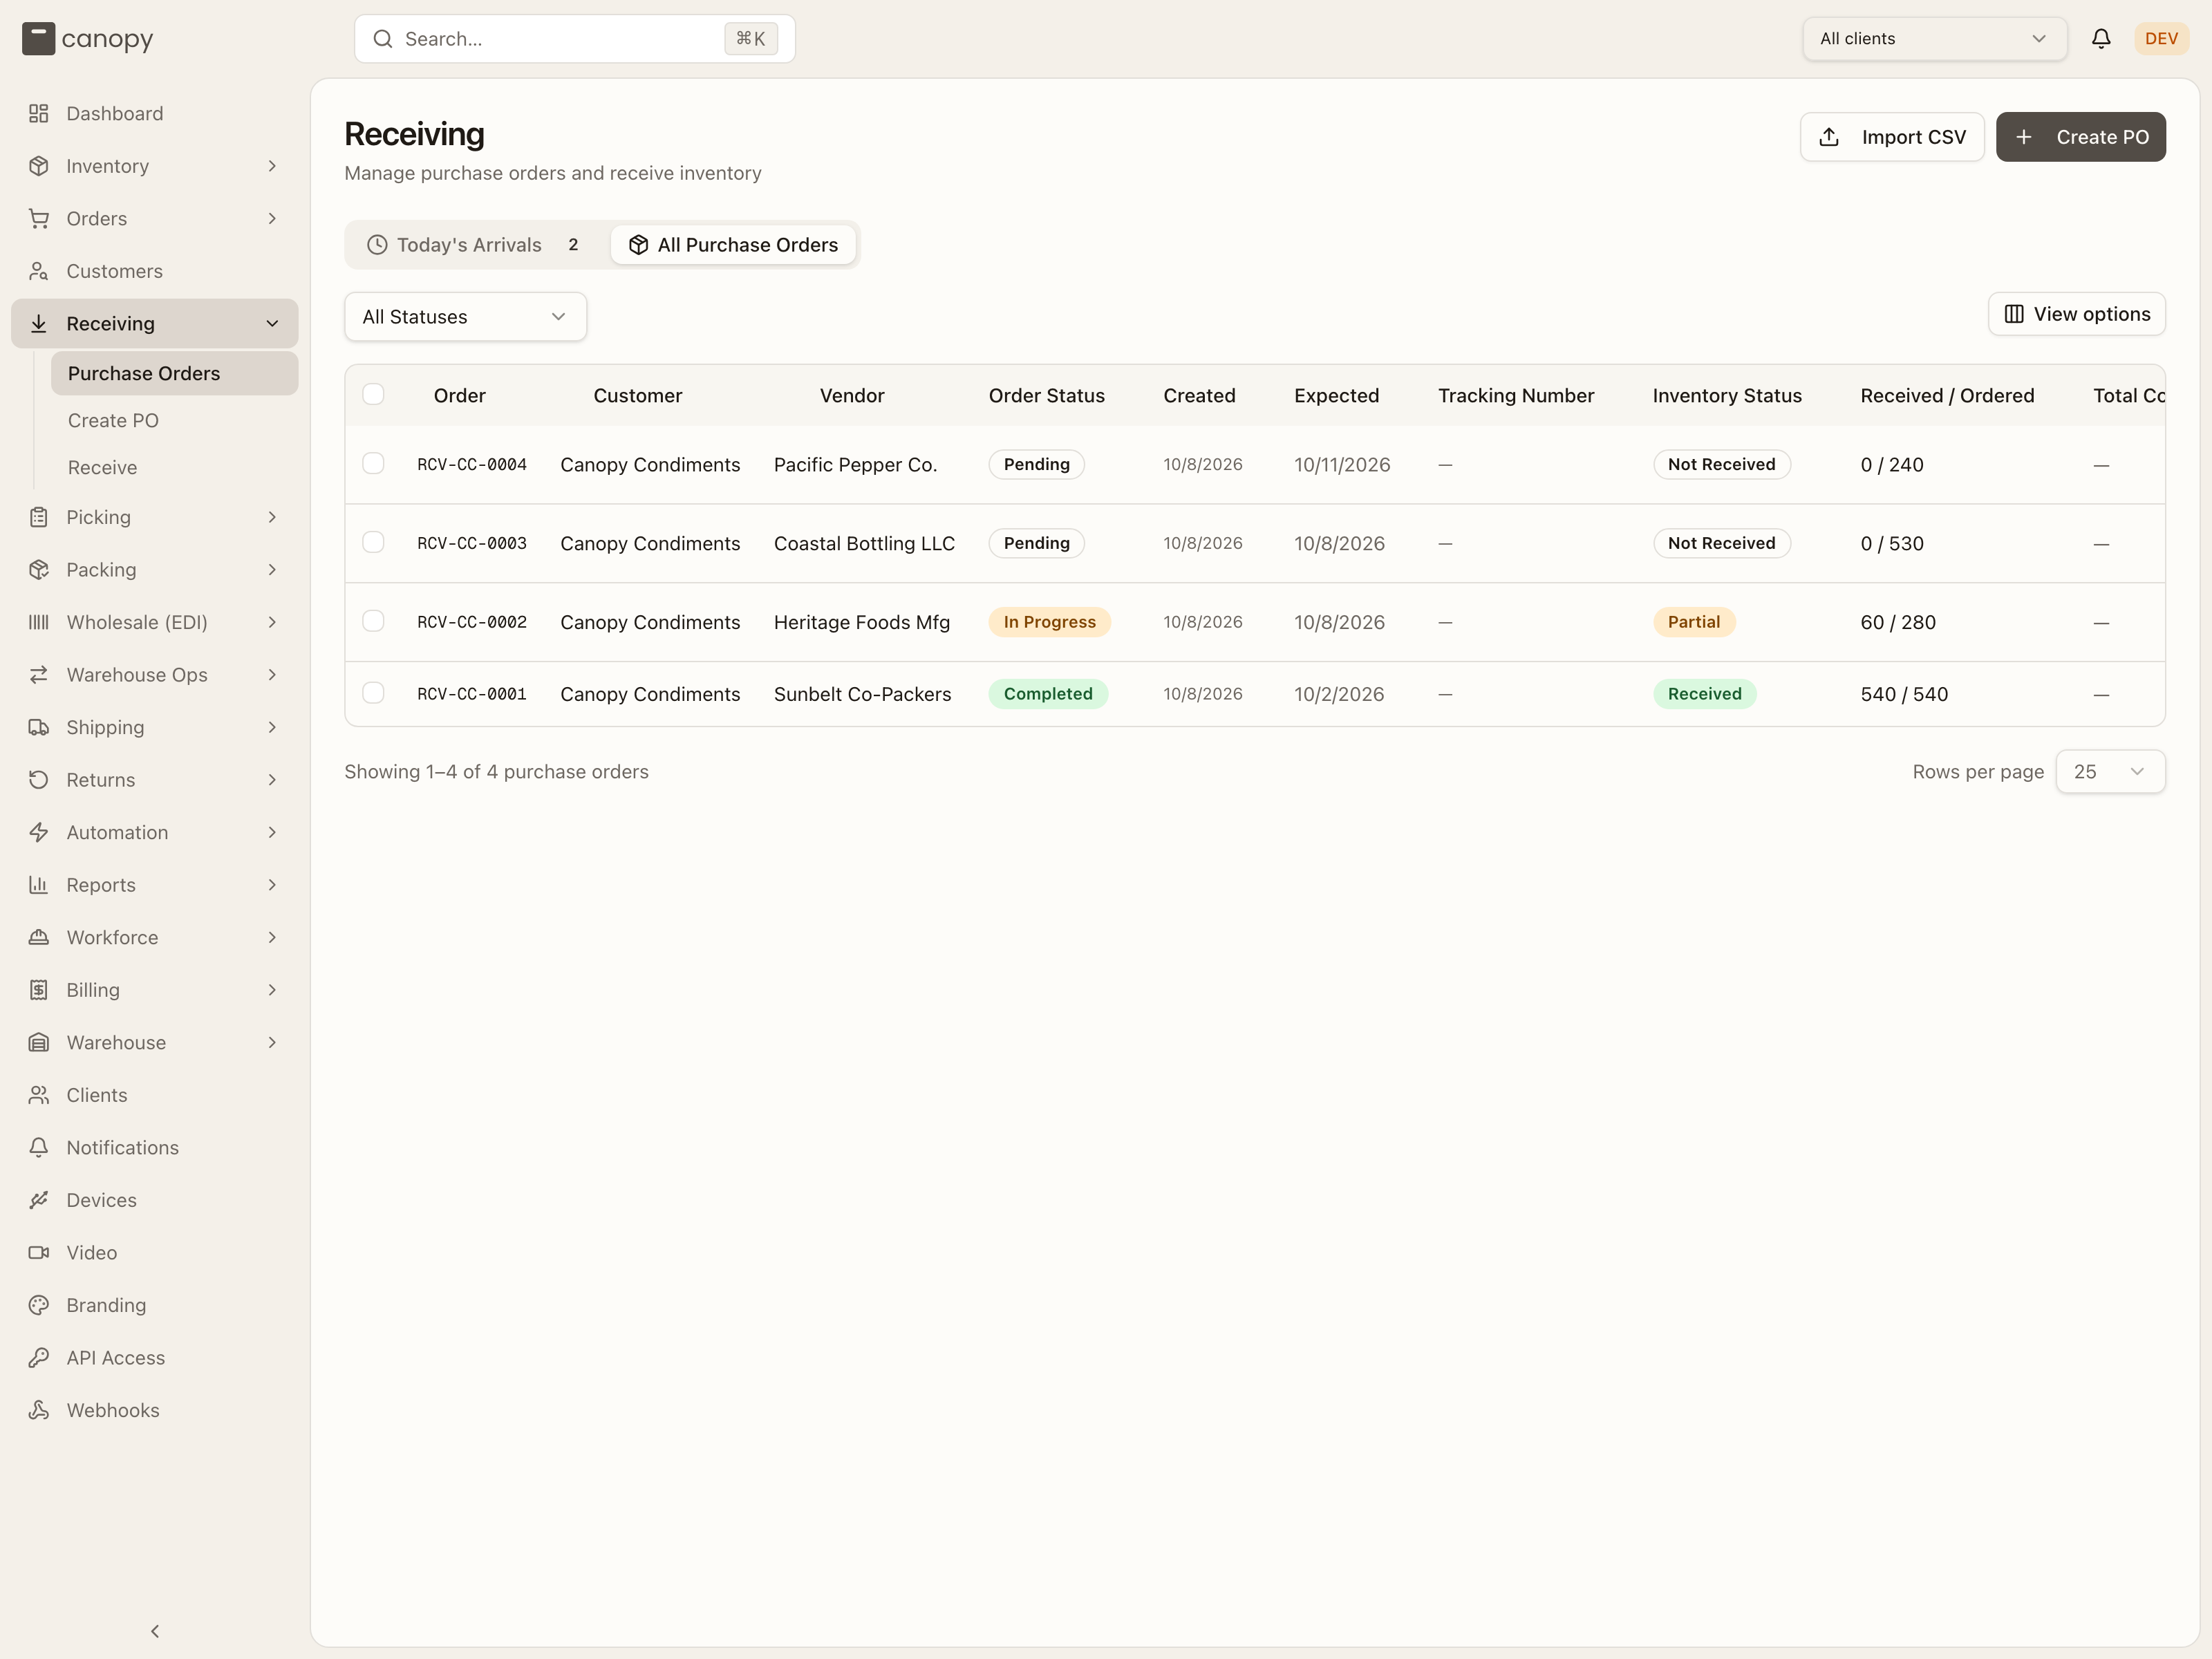
Receiving → Purchase Orders. Two tabs: Today's Arrivals (POs expected today, as cards, with a count on the tab) and All Purchase Orders (the full table). Import CSV and Create PO sit in the page header — the first creates POs in bulk from a file, see Importing purchase orders.
Today's Arrivals
One card per PO expected today: its number and status, the vendor, how many lines and units are expected, and a Details button. A Pending card gets Start Receiving, an In Progress one Continue Receiving — both open the Receive flow with that PO loaded. When nothing is due today the tab reads "No arrivals expected today".
All Purchase Orders
The table lists every PO in the active client scope — all clients, or the one
pinned in the top bar. Columns: Order (the PO number), Customer (the
client), Vendor, Order Status, Created, Expected, Tracking
Number (a carrier link when set), Inventory Status, Received / Ordered
(e.g. 60 / 280), Total Cost, and Warehouse Note. Every header sorts
except Total Cost, which always shows — (there is no per-line cost in the
system yet). View options hides or reorders columns, and the footer paginates
with a rows-per-page picker.
Filter with the status dropdown — All Statuses, Pending, In Progress, Completed, Cancelled. Click a row to open the PO. The operator addition is the action button at the end of the row: Start on a Pending PO, Continue on an In Progress one — both open the Receive flow. When nothing matches the table reads "No purchase orders found".
Tick rows to open the selection bar. The page checkbox selects the page; the bar offers Select all across every page. Cancel cancels the selected POs after a confirm — it applies to POs that are Pending, or In Progress with nothing received yet; anything else stays selected and the bar counts them as "N PO(s) cannot be cancelled". Cancelling is permanent. The bar counts good units only. A PO whose only receipts are rejected (damaged) units is offered, and the server then refuses it: "Cannot cancel a shipment with received or rejected items. Complete it, or unreceive them first." The toast reports it ("N could not be cancelled and are still selected. Refresh their status before retrying.") and the row stays selected.
Each PO carries two status signals:
| Order Status | Meaning |
|---|---|
| Pending | Created; receiving hasn't started. |
| In Progress | Someone has started receiving it. |
| Completed | Receiving finished. |
| Cancelled | Cancelled before completion. |
| Inventory Status | Meaning |
|---|---|
| Not Received | No units in yet. |
| Partial | Some units (good or damaged) received. |
| Received | Good plus damaged units meet or exceed the expected total. |
Creating a PO
Receiving → Create PO opens a form for the PO's details and its line items. Opening it from a PO's Duplicate button pre-fills everything from that PO (unexpected lines excluded) under the title Duplicate Purchase Order.
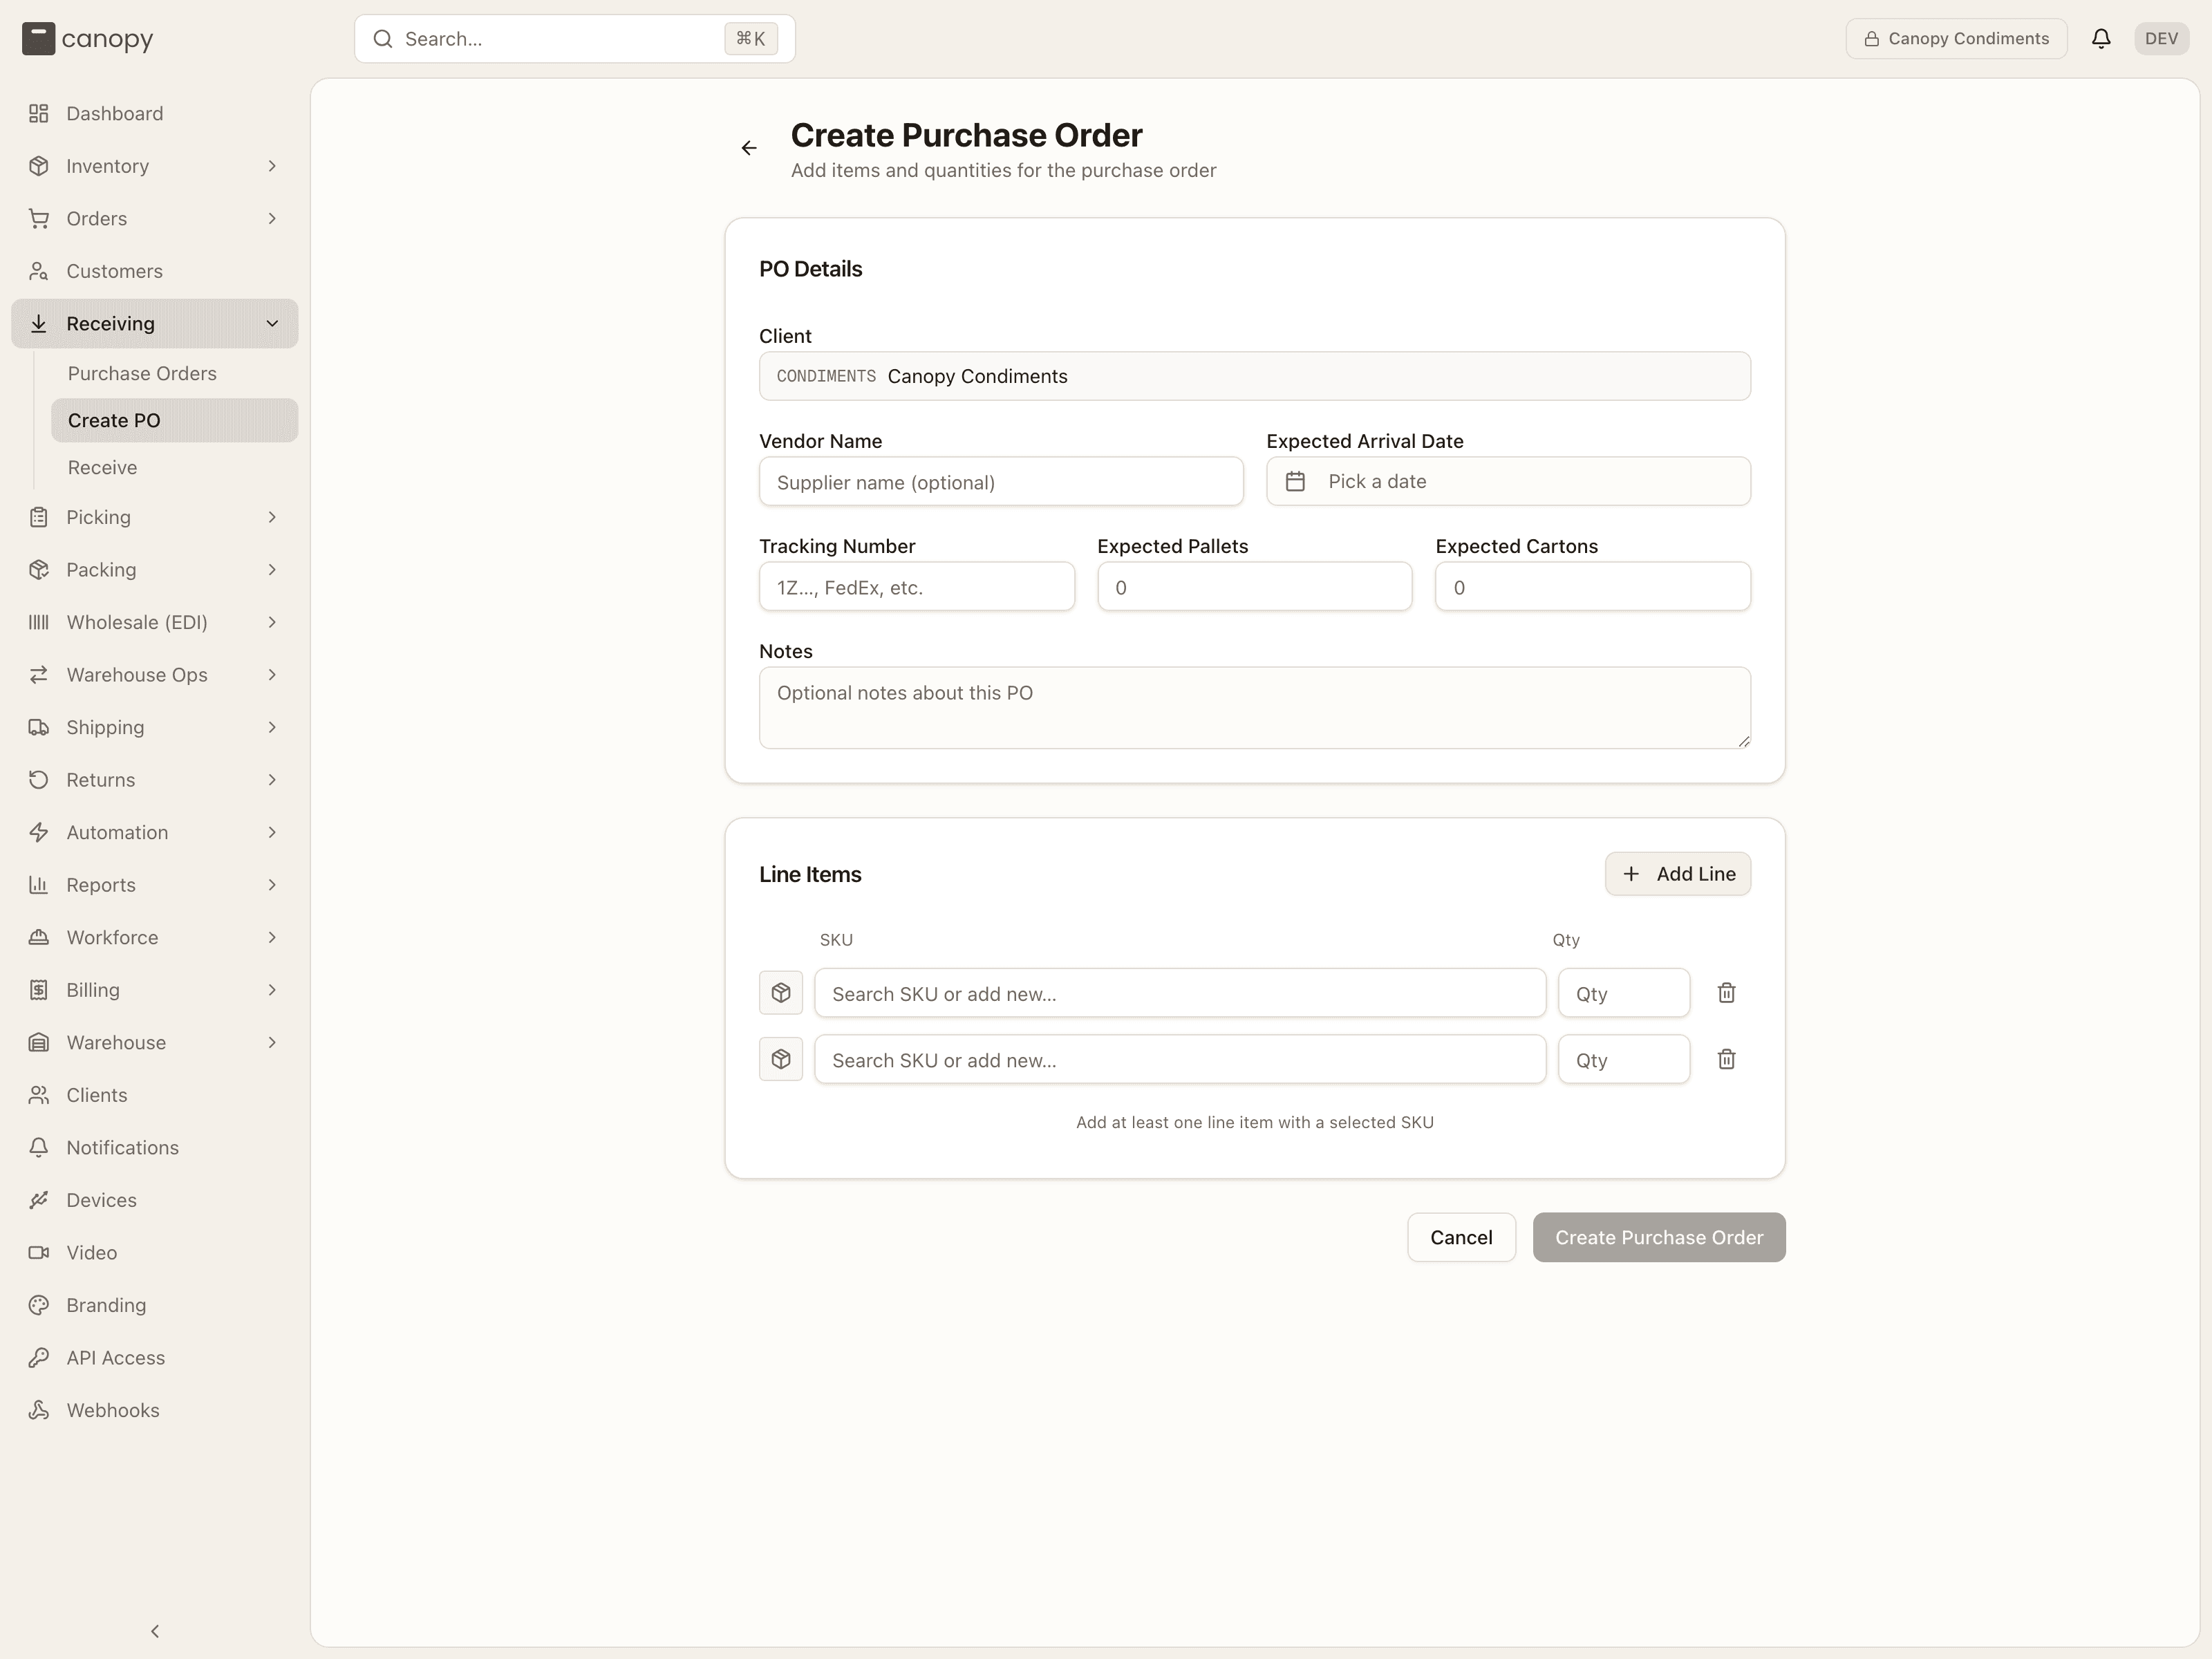
PO Details:
- Client — operators pick which client the PO is for; the picker follows the client pinned in the top bar.
- Warehouse — shown only when nothing else resolves one: the top bar is on All warehouses and the tenant runs more than one. It starts on Client's default warehouse, which sends no warehouse and files the PO at the client's default warehouse; pick a warehouse to send it elsewhere. With no default set (or the default deactivated), Create Purchase Order is refused — "Multiple warehouses are active — specify warehouseId on the shipment, set your session warehouse, or set the client's default warehouse."
- Vendor Name, Expected Arrival Date (a calendar), Tracking Number, Expected Pallets, Expected Cartons, and Notes — all optional. The pallet and carton counts pre-fill the receiver's counts at the end of the Receive flow.
Line Items: Add Line adds a row; each row has a SKU box, a Qty, and a remove button (disabled while there's only one row). The SKU box reads "Search SKU or add new…" — you can create a SKU inline from here, which a brand user can't. A client that's opted in to sell-ahead gets an extra Sell ahead column: units the brand may sell before the stock lands, capped at the line's quantity.
The form blocks submit and says why when a picked SKU has no quantity ("Enter a quantity for every SKU line"), when sell-ahead exceeds a line's quantity, or when no line is complete. Create Purchase Order saves the PO as Pending and opens its detail page. A PO's warehouse has to agree with the one pinned in the top bar: a mismatch is refused — "Warehouse conflict: form selected … but session is …. Switch your active warehouse to match." — rather than routed silently. The same rule refuses a CSV import.
Importing purchase orders
Import CSV, beside Create PO, creates purchase orders from a file — one row per PO line, rows that share a PO Number becoming one PO, so a file can hold many. It runs on the import dialog every CSV import in Canopy shares (the same one as Import inventory CSV) and, like Create PO, it is open to brand users too. The dialog is titled Import purchase orders CSV; the columns it accepts are in the table below. A client must be pinned ("Please select a client before importing purchase orders."), and the warehouse comes from the top bar or a Warehouse picker asks "Which warehouse are these POs for?".
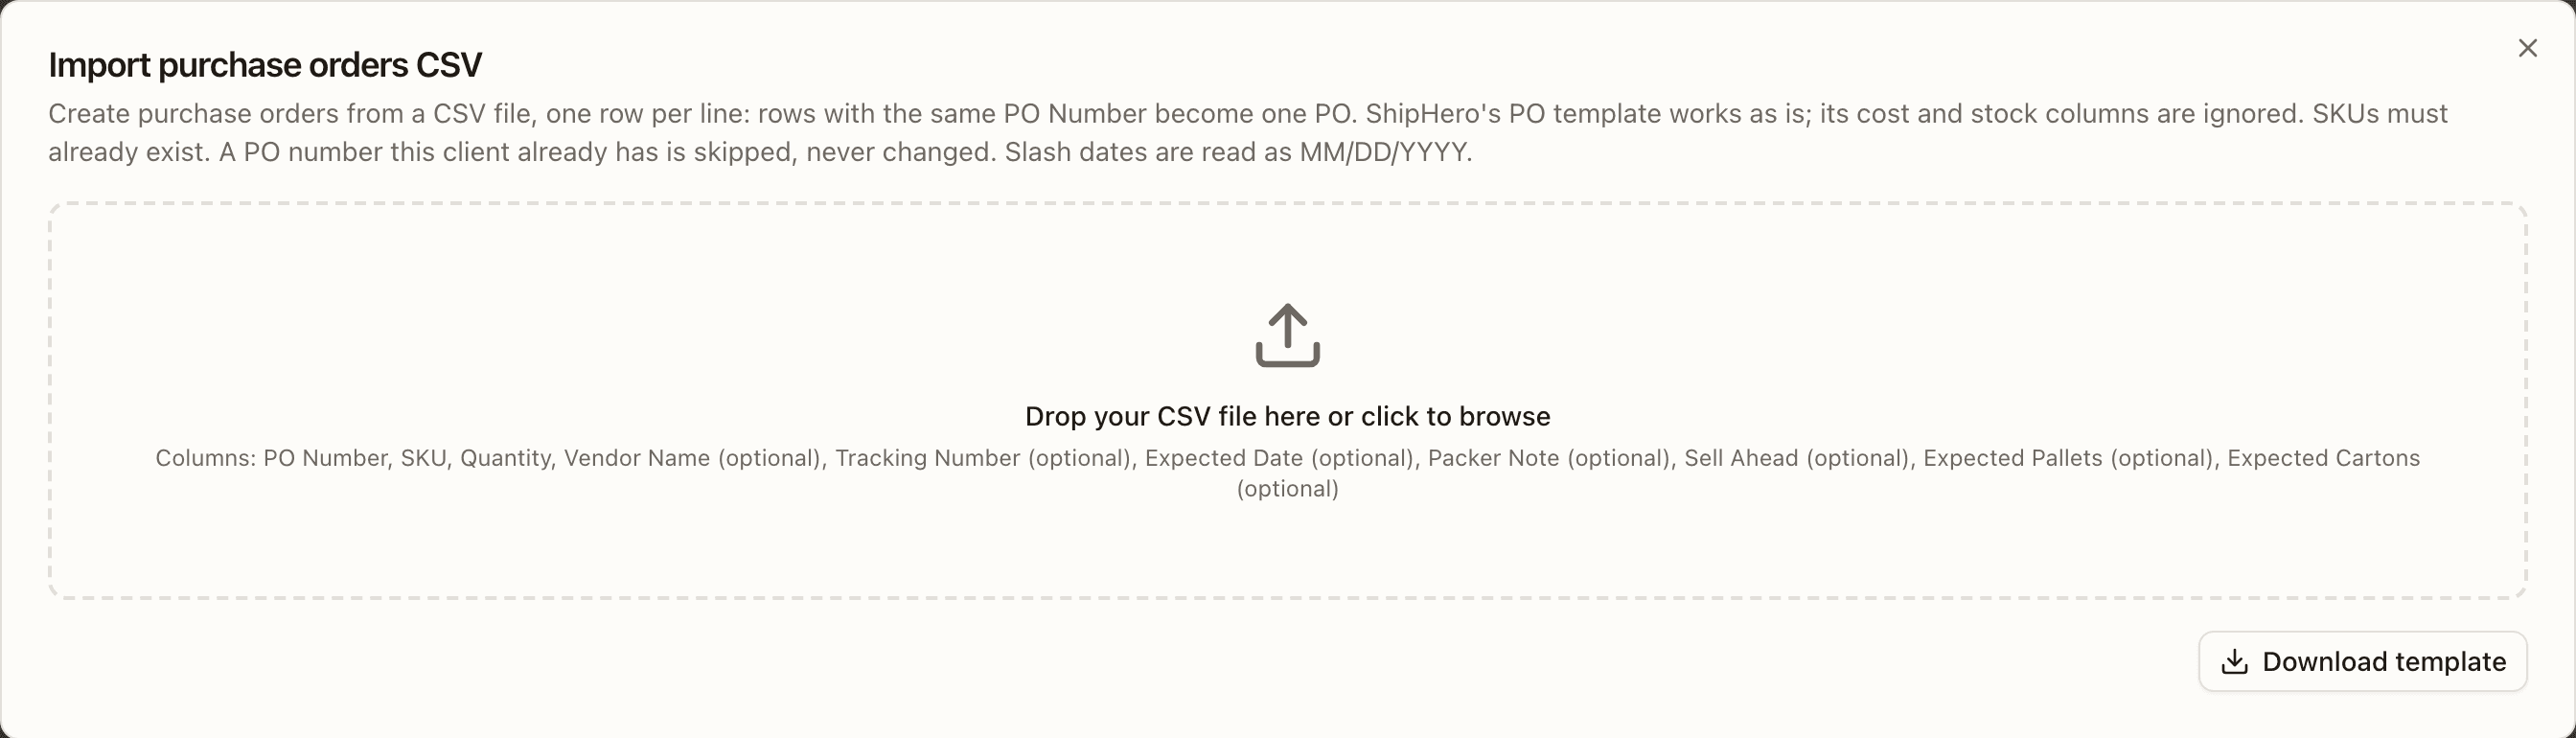
Download template gives a purchase-orders-template.csv with one example
row. The columns are matched loosely by name — po, qty, supplier, eta,
notes and pallets are accepted spellings, and a column the import doesn't
know is ignored with a banner (so is a spare alias beside the column's own
name, while the own name twice, or two aliases with no own name, refuse the
file as duplicates). A blank row — an empty line, or the ,,, Excel leaves
for a cleared row — is skipped but keeps its number, and N rows read counts
the rest:
| Column | Required | Rule |
|---|---|---|
| PO Number | yes | Your reference for the PO — it becomes the PO's PO Number, while Canopy still mints the shipment number. A number this client already has is skipped on every row, never added to. |
| SKU | yes | Must exist (SKU X not found — create it in Inventory › SKUs first) and be active; a code merged into another SKU lands on that SKU, with a note. The same SKU twice in one PO is an error. |
| Quantity | yes | A whole number of at least 1. |
| Vendor Name, Tracking Number, Expected Date, Packer Note, Expected Pallets, Expected Cartons | no | The PO's header, read from the first row that fills each; later rows may repeat them or leave them blank, and a row that gives a different value is an error (Vendor Name differs from row 3 for PO …). Dates are YYYY-MM-DD, or MM/DD/YYYY with slashes. |
| Sell Ahead | no | Units the brand may sell before the stock lands — never more than the line's quantity (Sell ahead cannot exceed the quantity), and dropped with a warning for a client that isn't opted in (Sell ahead ignored: this client is not opted in to sell ahead). |
A PO in the file can't hold more lines than the Create PO form allows — the row that would exceed it is refused and says to move the rest to another PO number — and a file holds up to 1,000 rows. The preview gives every row a verdict, the first row of each PO reading create PO …, line … and the rest add line … to PO …, rejected rows first. The import is all-or-nothing: nothing is written while any row is rejected, and Download errors.csv returns the file with the reason on each rejected row. Create N (or Create N, skip M) then writes each PO in one transaction, field for field what Create PO writes — Pending, its lines, the Created PO with N line(s) timeline row and, for a line that starts with sell ahead, its sell ahead 0 → n row — and SKUs given sell ahead re-sync their availability to the sales channels afterwards. A PO number that lands between preview and import (someone else importing the same file) is skipped, not a failed import.
Following a PO
Click a PO to open its detail — the number and status, the vendor, a row of header actions, and four tabs: Details, Lines (N), Attachments (N), and Timeline.
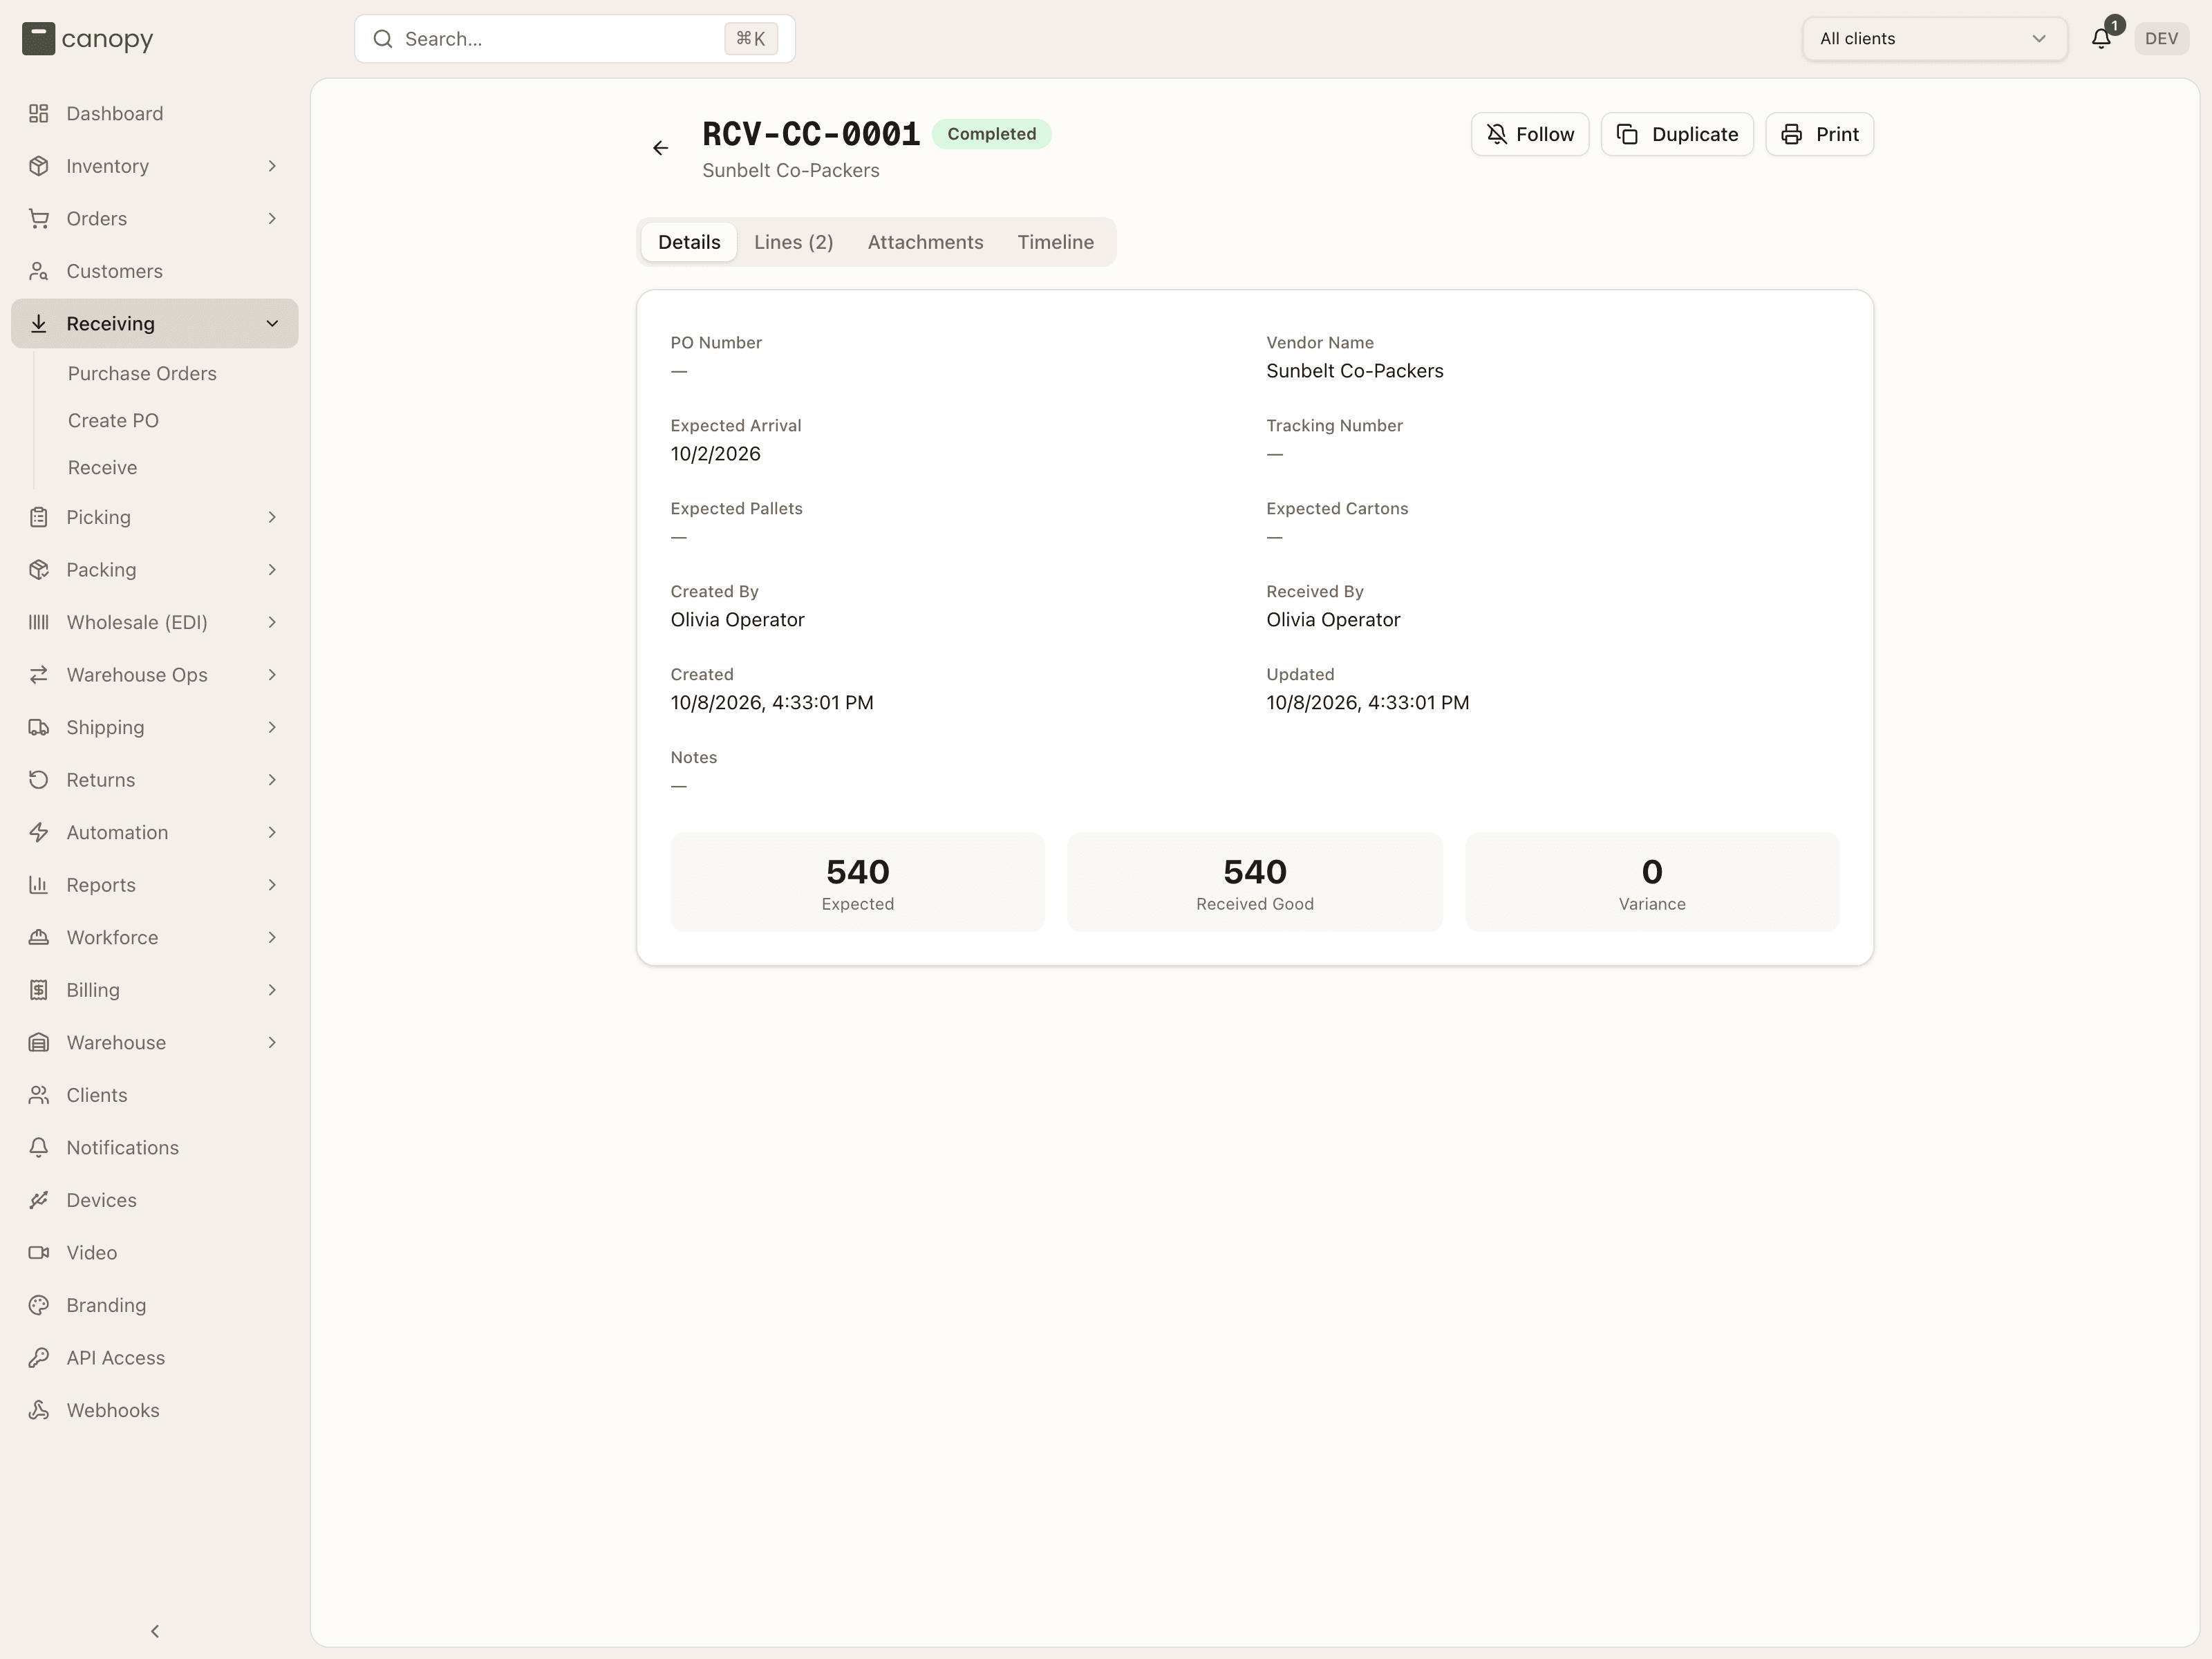
The header actions depend on the PO's state. Start Receiving appears on a Pending PO and Continue Receiving on an In Progress one (operators only — both open the Receive flow). Cancel appears while the PO is Pending, or In Progress with nothing received yet, and asks for a confirm. It counts good units only: on a PO whose only receipts are rejected (damaged) units the button still shows, and the confirm comes back with "Cannot cancel a shipment with received or rejected items. Complete it, or unreceive them first." Unreceive the damaged receipt first, or complete the PO. Duplicate opens Create PO pre-filled.
Print prints the PO at any status — an in-progress PO prints a summary derived live from its lines. Follow tells you about everything that happens to this PO from then on; see Notifications.
Details
PO Number (the partner's own PO reference — set when the PO is created by a partner integration, read-only here), Vendor Name, Expected Arrival, Tracking Number, Expected Pallets and Expected Cartons (each showing received N once counted), Created By, Received By, Created, Updated, and Notes. While the PO is Pending or In Progress, a pencil beside vendor, arrival, tracking, pallets, cartons, and notes edits that field inline.
The totals row shows Expected, Received Good, Damaged (only when there are damaged units), and Variance (good plus damaged, minus expected).
Lines
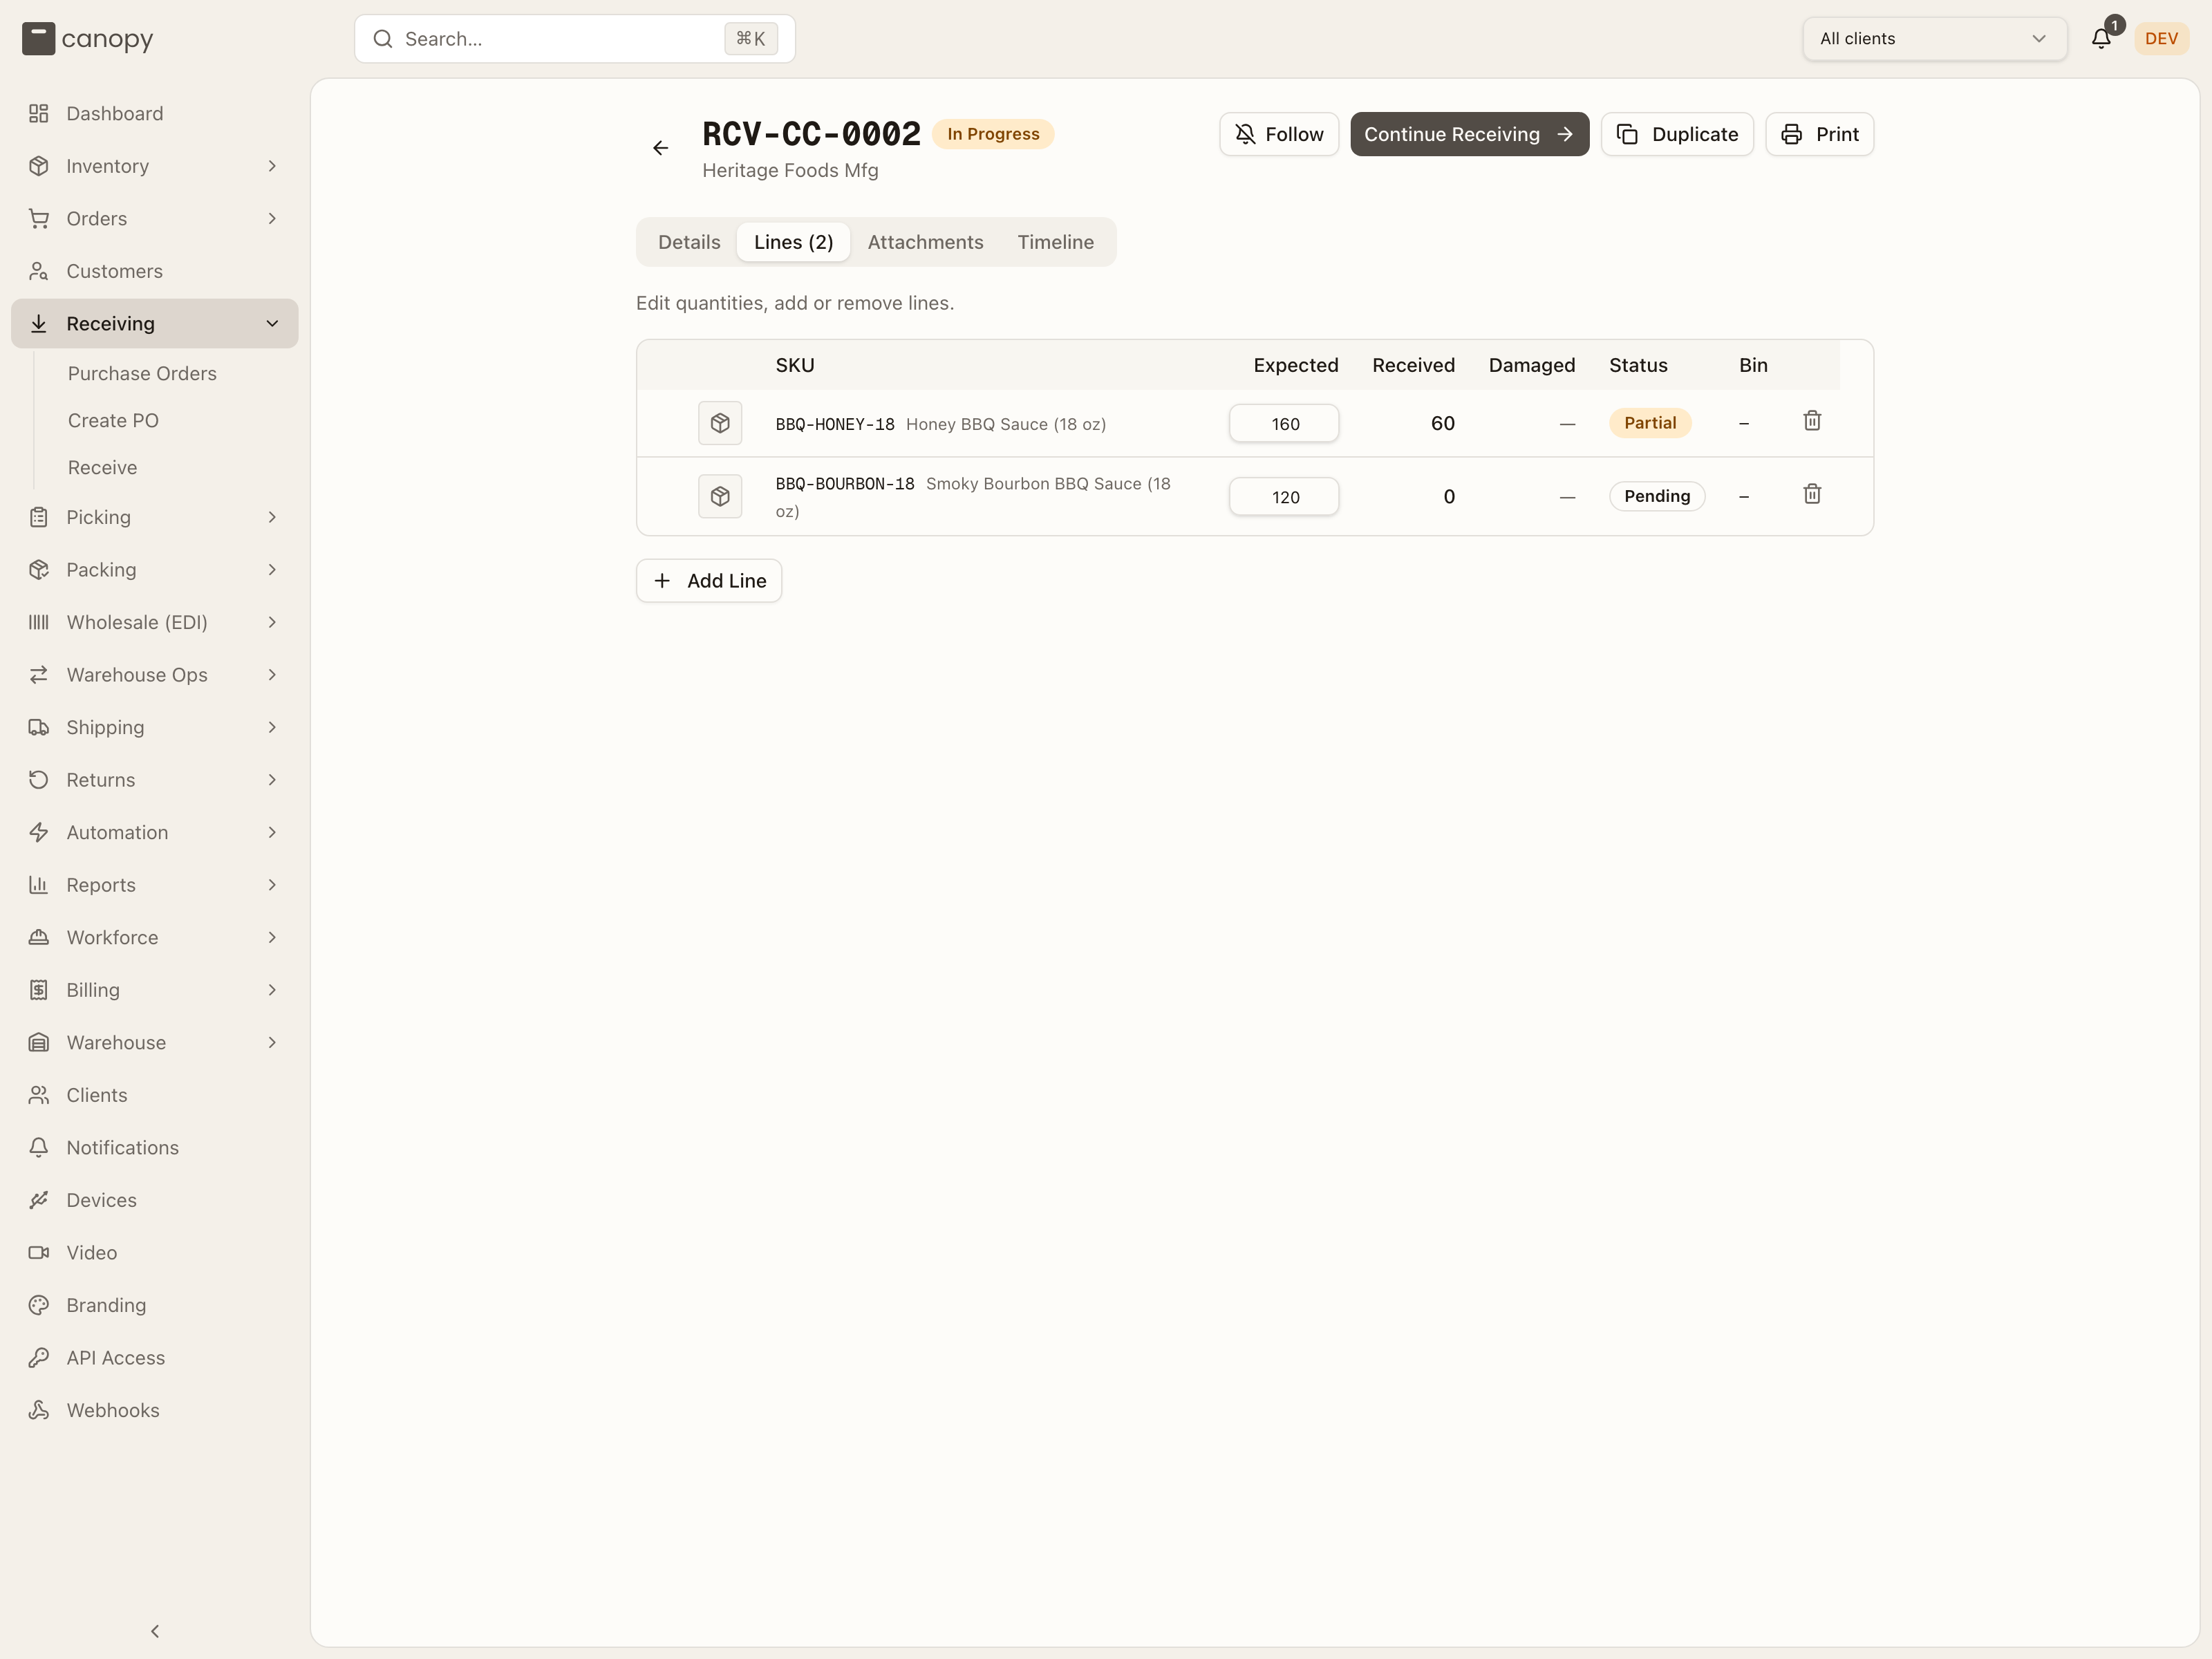
One row per SKU: its image and code, Expected, Received, Damaged, Variance (completed POs only, coloured by sign), Status, and — for operators only — Bin: where the good units landed, or N locations when a line was split across bins. The API strips bin labels for a client user, so the brand never sees this column. A line that wasn't on the original PO carries an Unexpected badge.
| Line status | Meaning |
|---|---|
| Pending | Not received yet. |
| Partial | Some of the expected quantity received. |
| Complete | Received in full. |
| Over | More received than expected. |
| Short | Finished receiving with fewer than expected. |
While the PO is Pending or In Progress the tab is editable: Expected (and Sell ahead, for opted-in clients) become inputs, a trash icon removes a line, Add Line adds a row with a SKU search, and Save Changes appears once something has changed. Changing Expected re-judges the line's Status at once against what is already in, good plus damaged: lower it to what came in and the line reads Complete; lower it below that and it reads Over. Adding a line for a SKU already on the PO adds to that line's Expected instead; if the line was Unexpected, the badge comes off and its status is judged the same way. A line with receipts expands to show each receipt — when it was booked, how many good units to which bin, and how many damaged units to which quarantine bin — with an Unreceive button on an In Progress PO (see Fixing a mistake below).
On a Completed PO with any short, over, damaged, or unexpected line, a Discrepancy Notes card lists those lines with a note box each — type a note and it saves when you leave the field, for vendor follow-up. Below it, the Receiving Report totals the lines that were Complete, Short, Over, Damaged, and Unexpected, with Print Report and Export CSV (the CSV includes the putaway and quarantine bin columns for operators).
Attachments
Drag in packing lists, invoices, or photos (PDF, image, or spreadsheet). Anyone who can open the PO can download them; the delete button appears on the files you uploaded yourself.
Problem reports
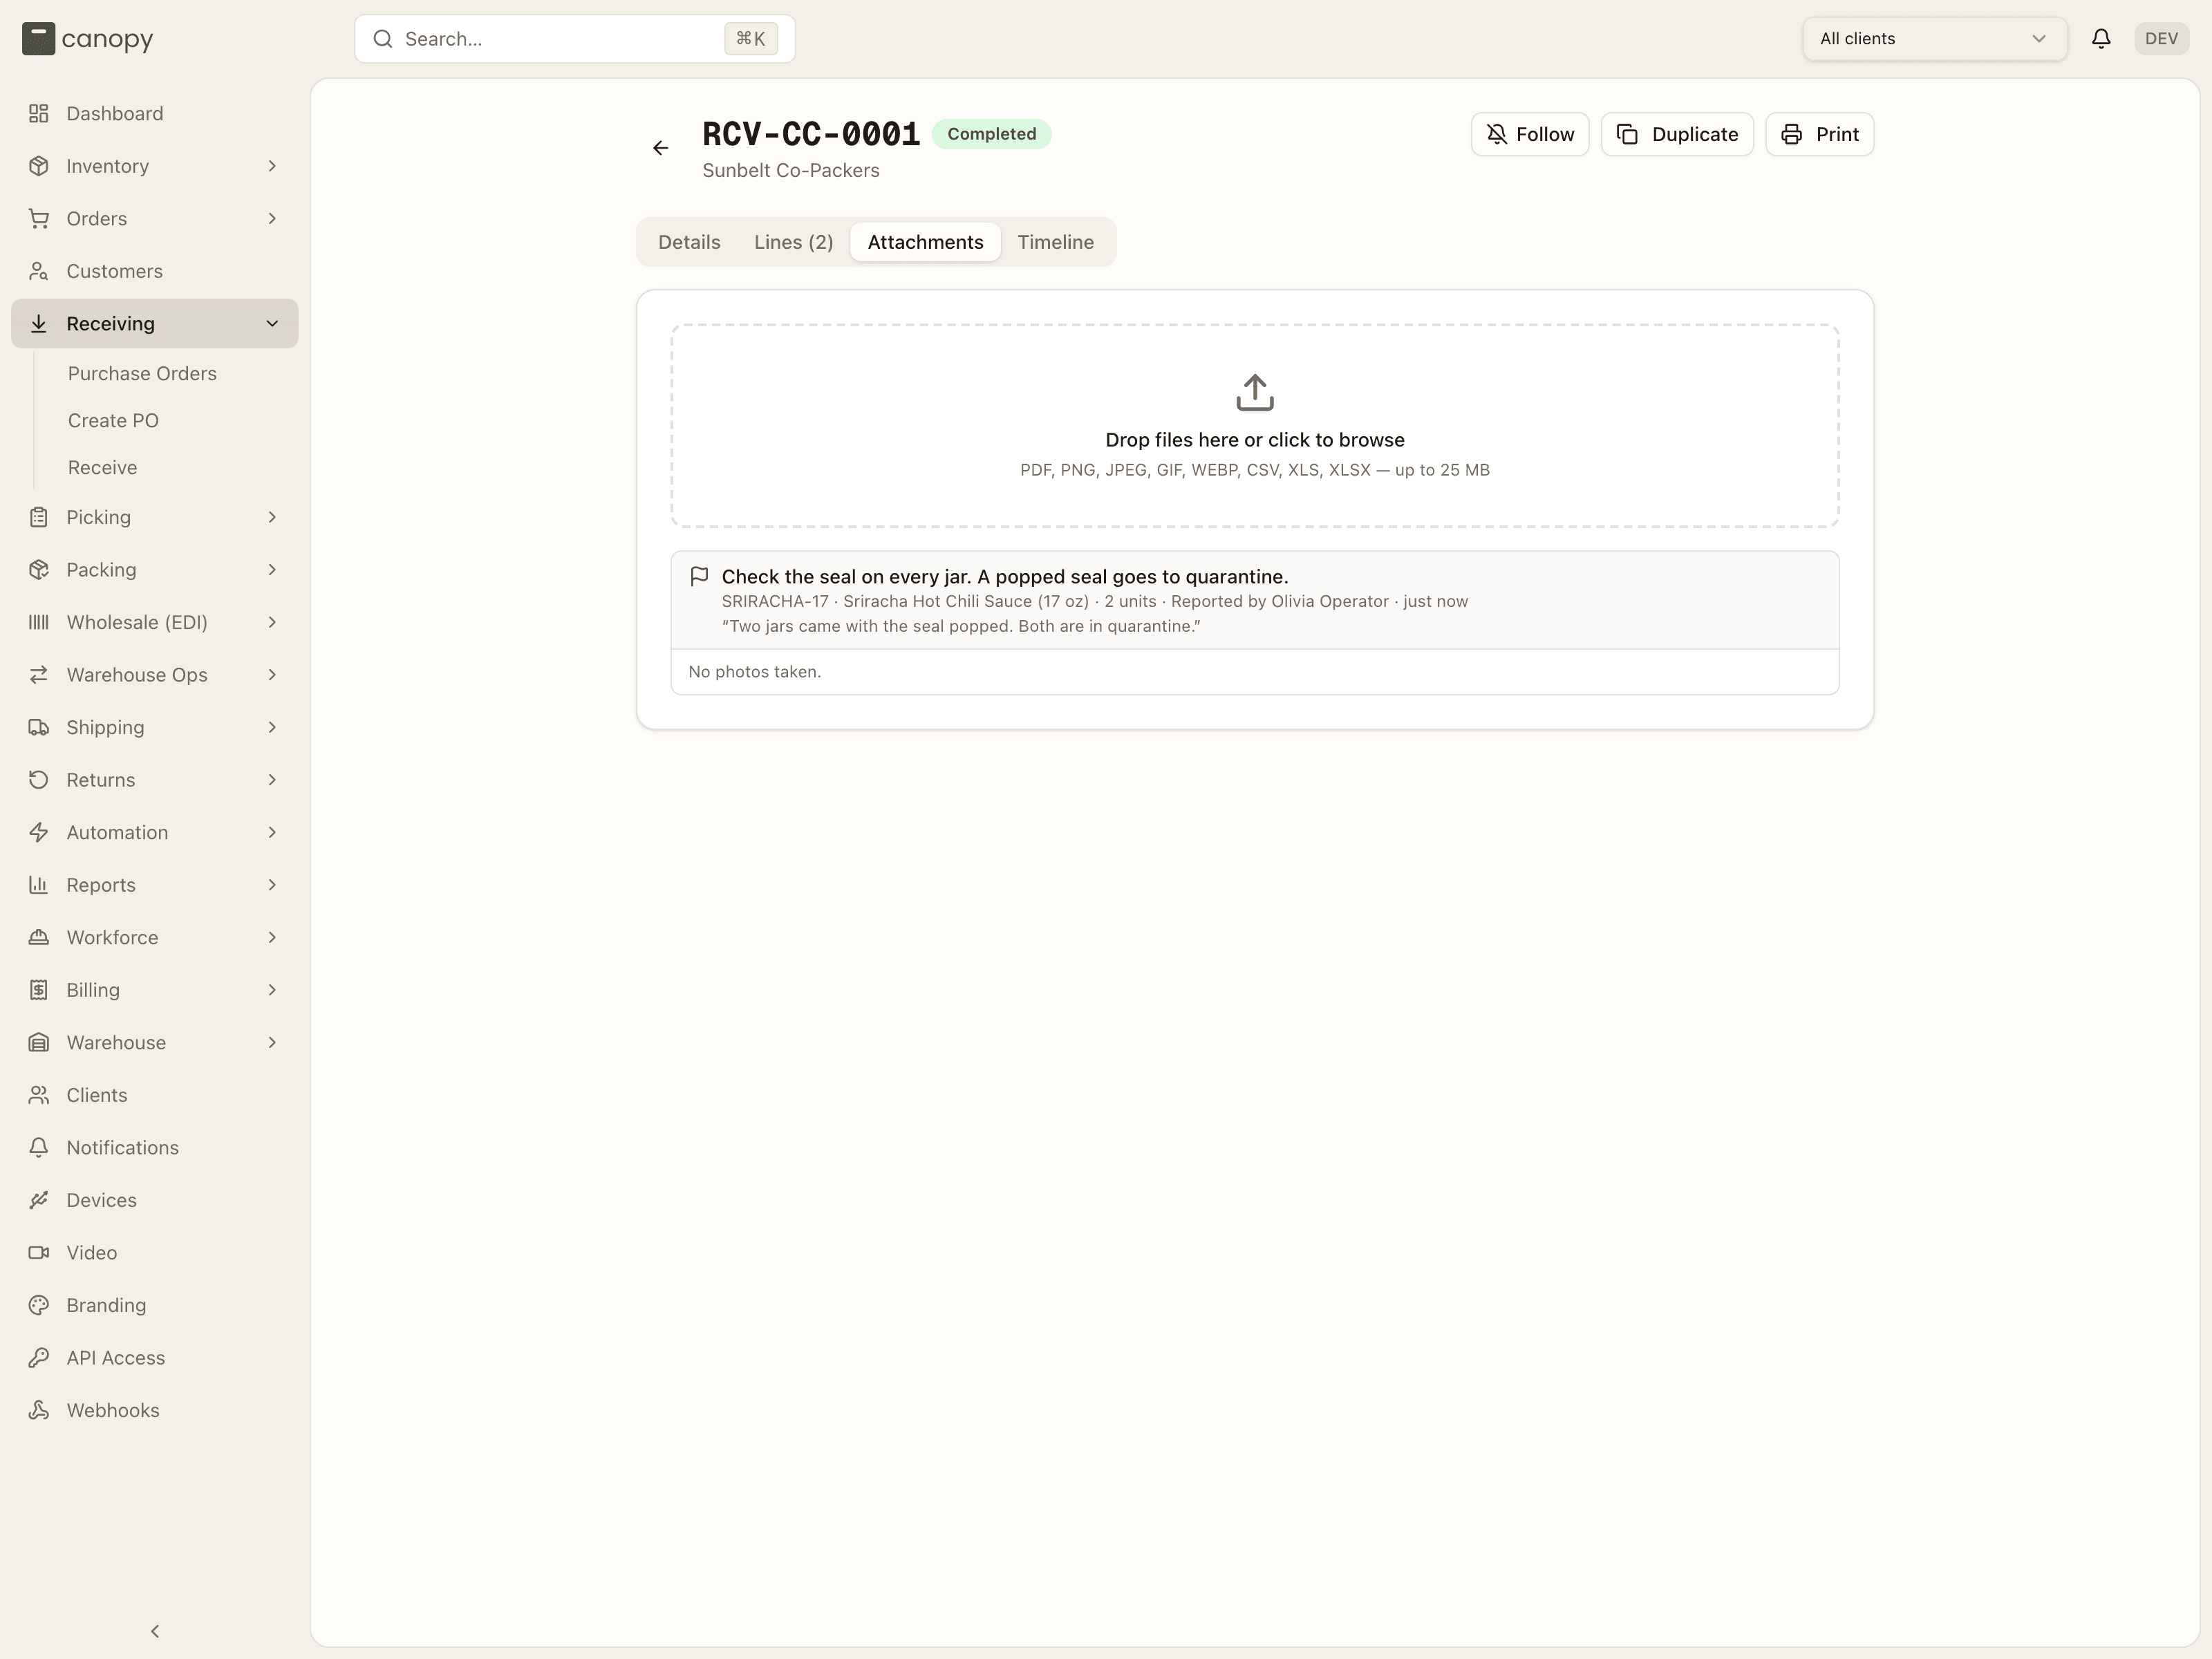
Photos a receiver took while rejecting units sit under the report they belong to: what was wrong (the notes that broke, or Other: …), the product and the units, who reported it and when, and the comment. A report with no photos reads No photos taken. Every other file is listed after the reports, under Other files. Show opens a photo in a viewer; Download saves it.
Timeline
Everything that happened to the PO — creation, edits, receipts, status changes, a Problem reported by the receiver — interleaved with notes. The "Add a note..." composer at the top posts a note that brand users see too, and you can edit your own notes afterwards.
Receiving stock
Receiving → Receive (or Start / Continue on a PO) opens the
scan-guided flow at /receiving/active. The page is headed Receive Inventory —
Scan items against a purchase order or start a blind receive, and a stepper
tracks four phases: Select PO → Scan Items → Review → Complete.
One receiver per PO
Starting a PO claims it for you. If someone else already holds it, a banner says "This purchase order is currently being received by …" (naming who has it) with Cancel and Take over — take over only if they've left the station.
Select PO
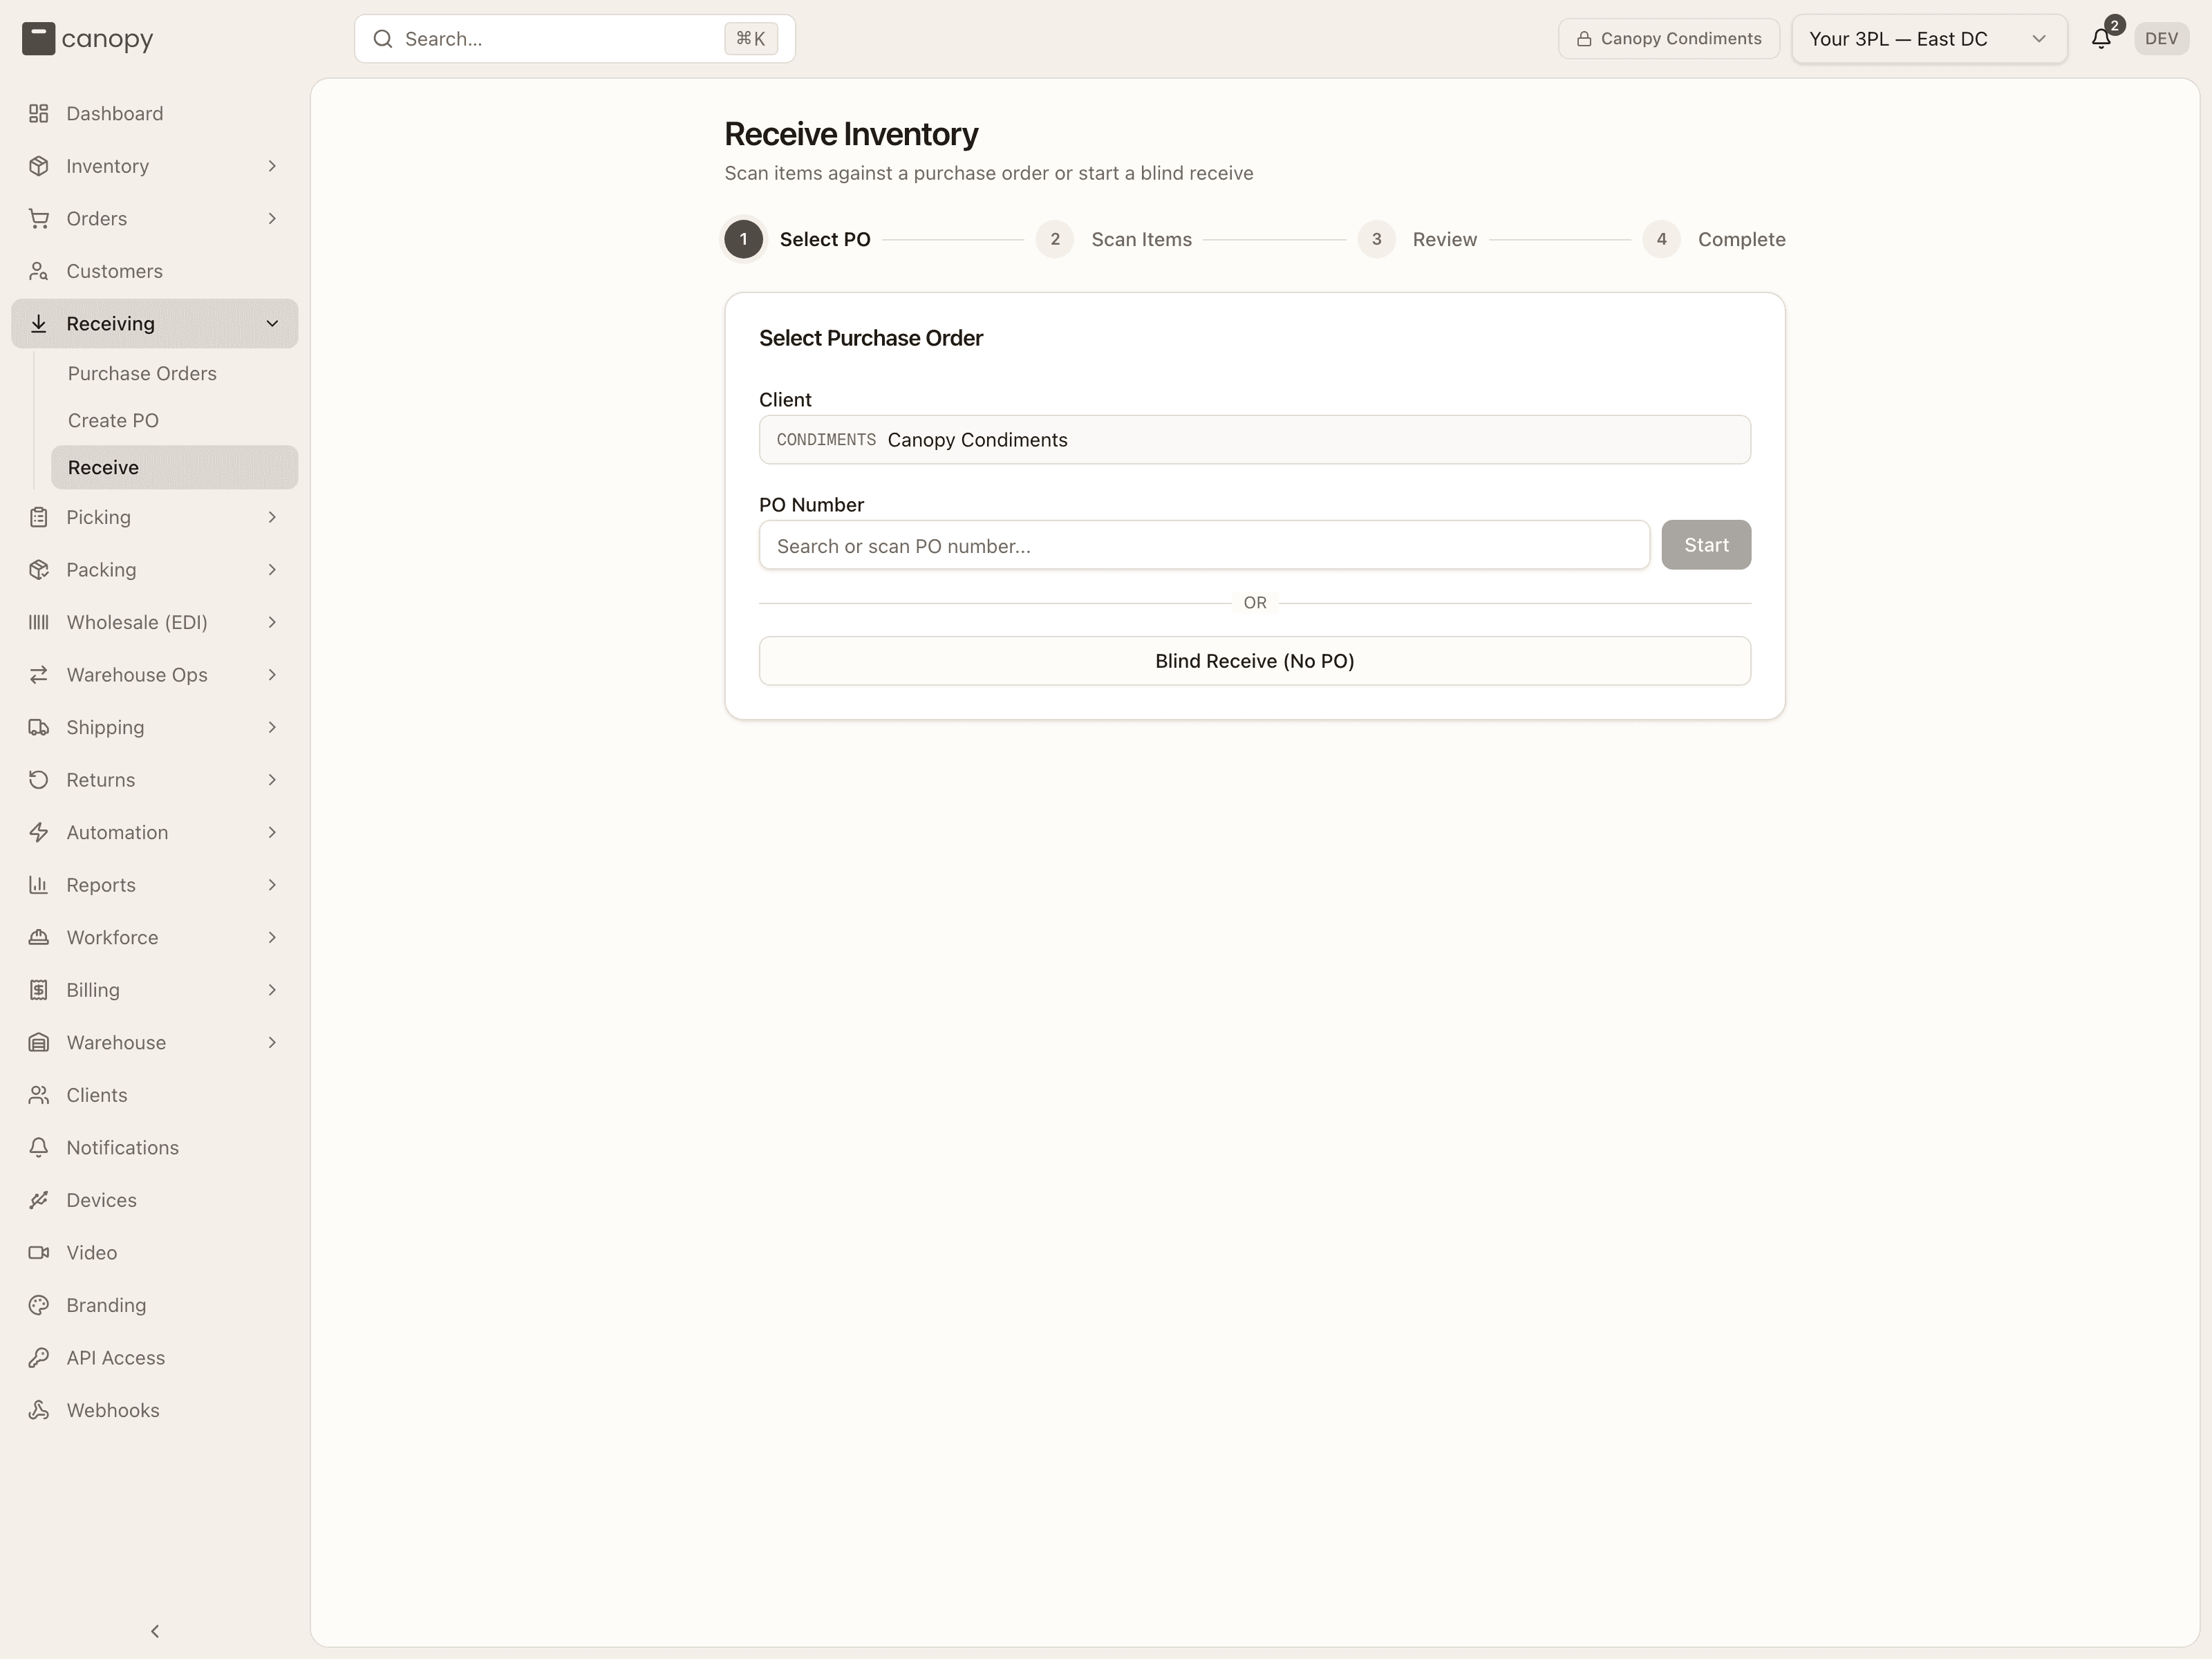
Pick the Client (the picker follows the top-bar pin), then find the PO in the PO Number box — type or scan a number, or open the dropdown of Pending and In Progress POs, each with its vendor, unit count, and status badge. Picking a Pending PO starts it; picking an In Progress one resumes it. Start does the same for a typed number. Arriving from a PO's Start/Continue button skips this step.
Below the or divider, Blind Receive (No PO) starts a zero-expected shipment for an unplanned arrival — you scan freeform into it, and the Expected and Variance columns are hidden downstream. If nothing resolves a warehouse (top bar on All warehouses, several warehouses active) a Warehouse picker appears first: "Which warehouse are you receiving at?".
Scan Items
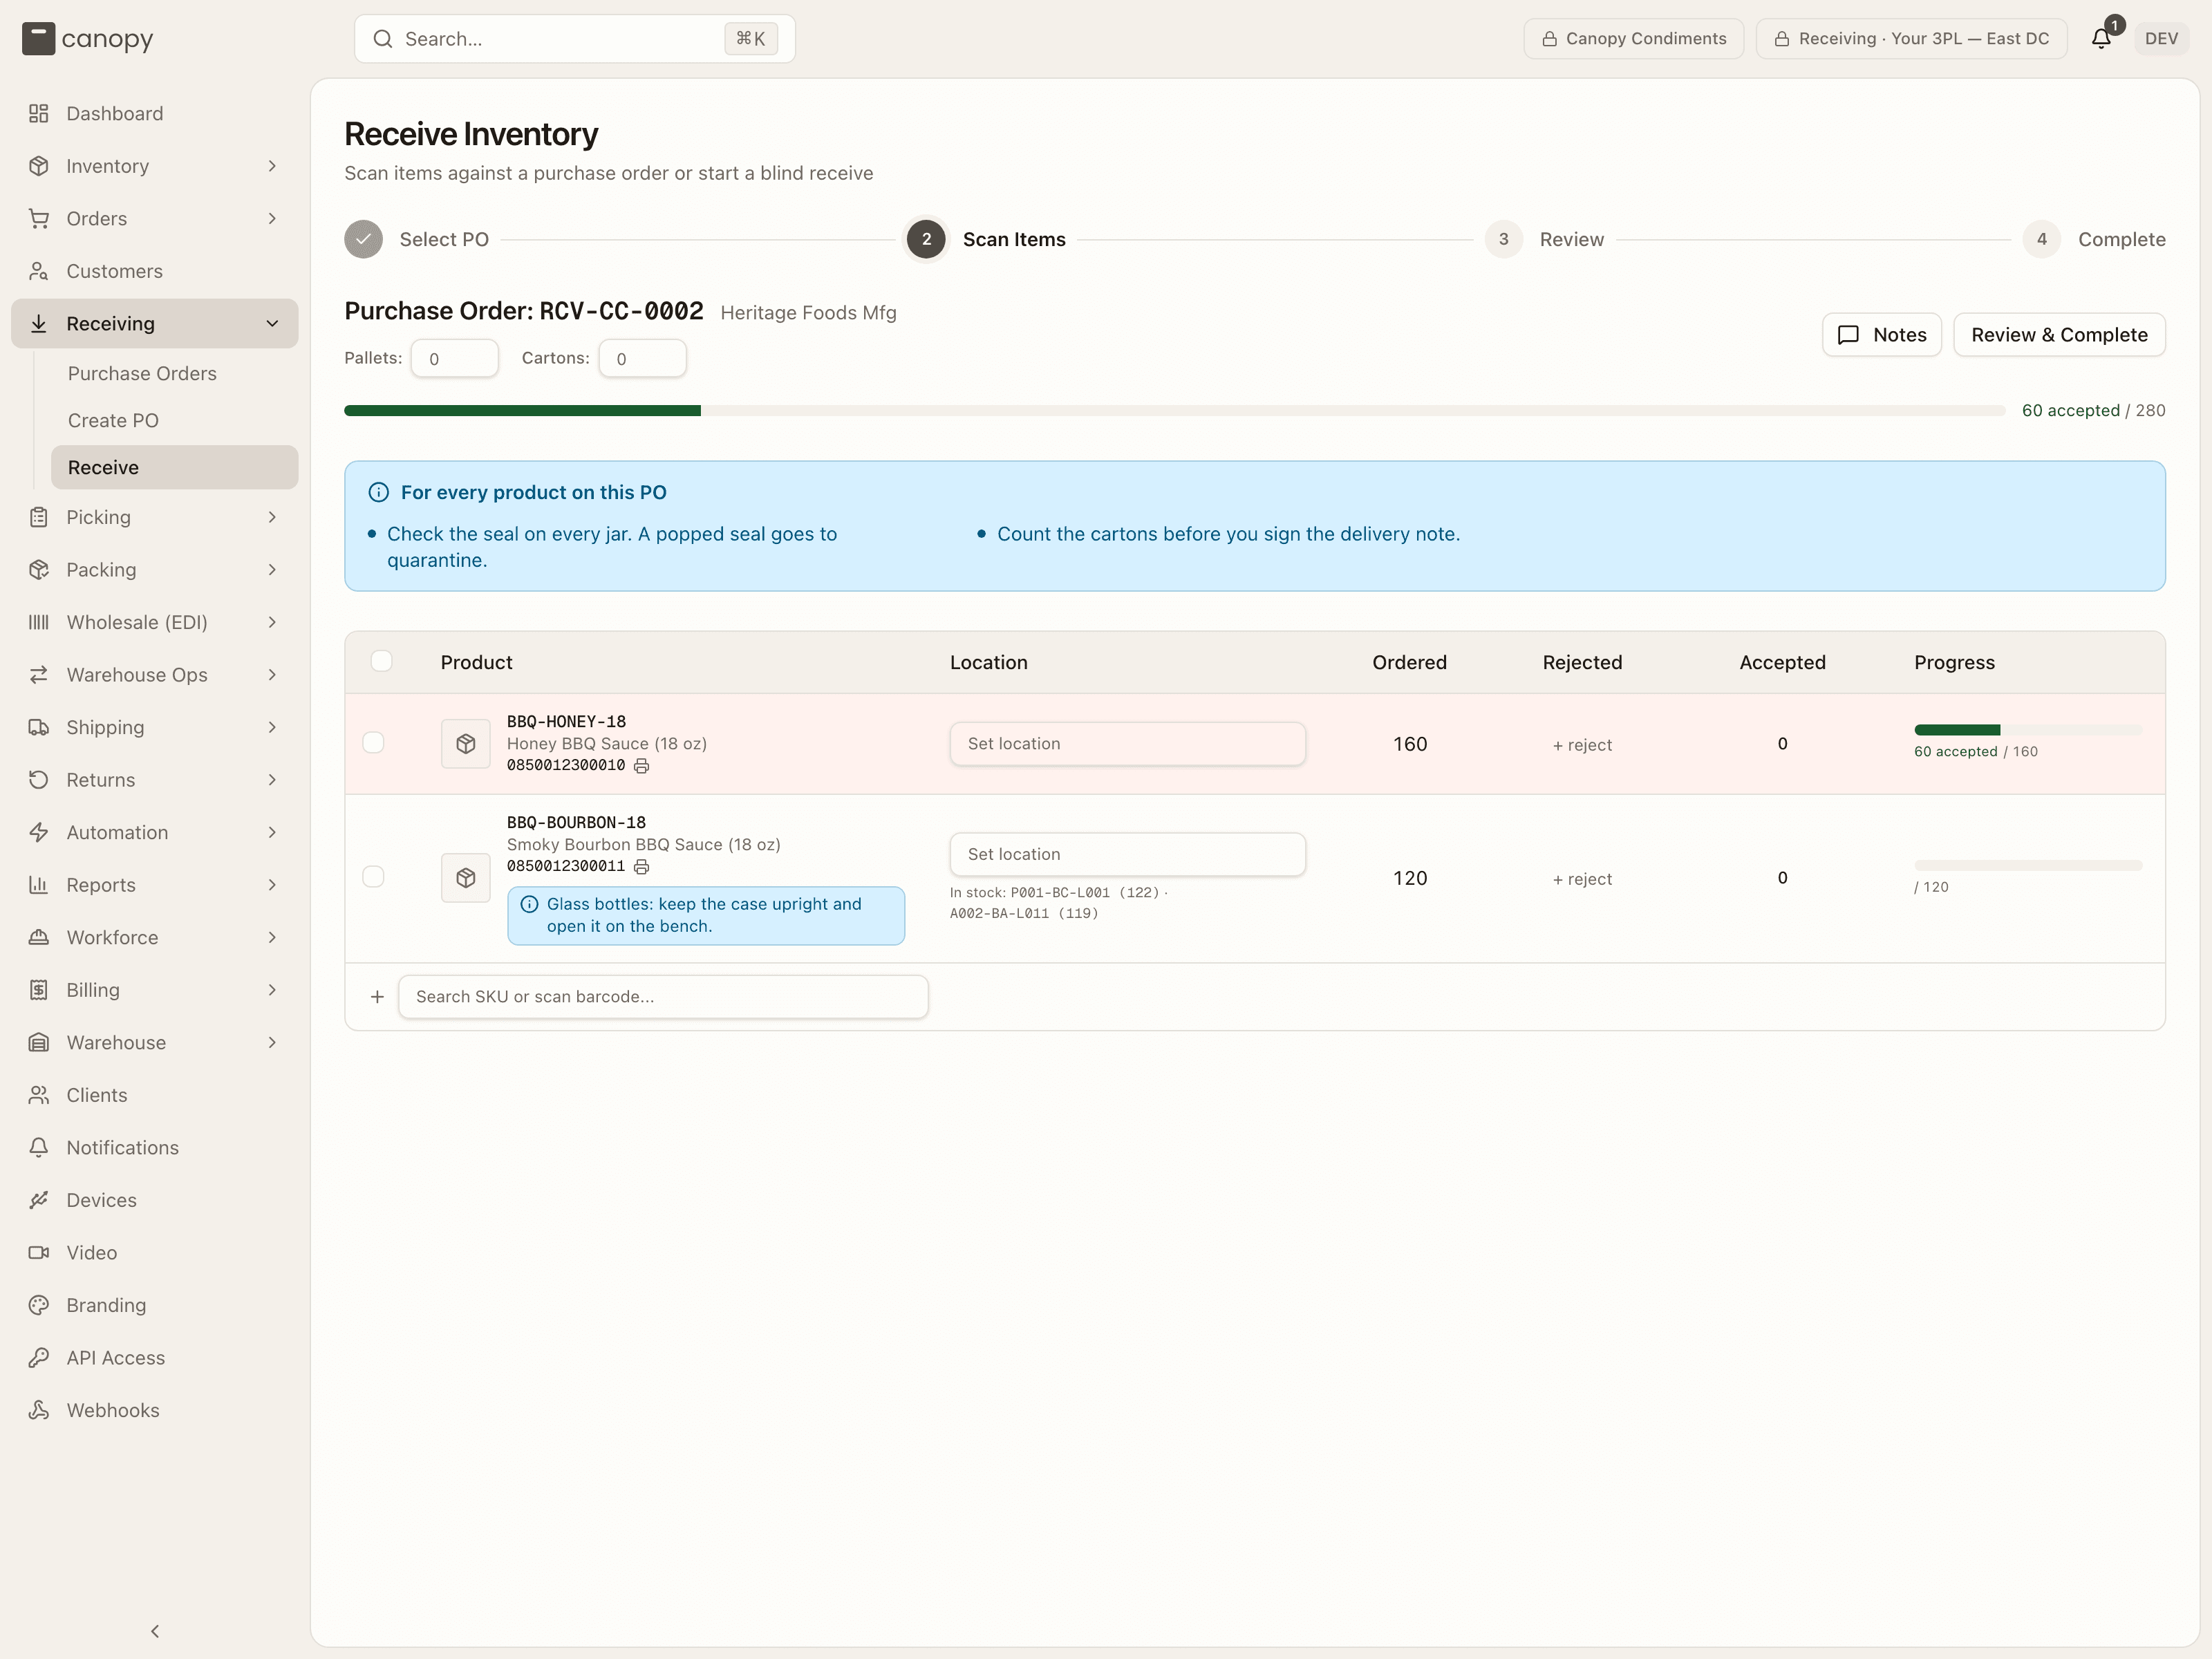
The header names the PO and vendor, with inline Pallets and Cartons counts (placeholders show the expected numbers) that carry through to Review. On the right, Notes opens the PO's notes with an "Add a note..." box, and Review & Complete moves on. Under the header a progress bar tallies N accepted · N rejected / expected · N over across the whole PO, and a green line confirms your last scan.
Receiving notes
Above the lines, a blue bar titled For every product on this PO lists the brand's receiving notes that apply to everything on the PO. It stays pinned while you scroll, and nothing in it needs a tick or a click. A note for one product sits on that product's row as a blue tag, bolder while that row is the one you are scanning. The notes come from the brand's Receiving rules. They tell you what to look for. They never block a scan or the PO.
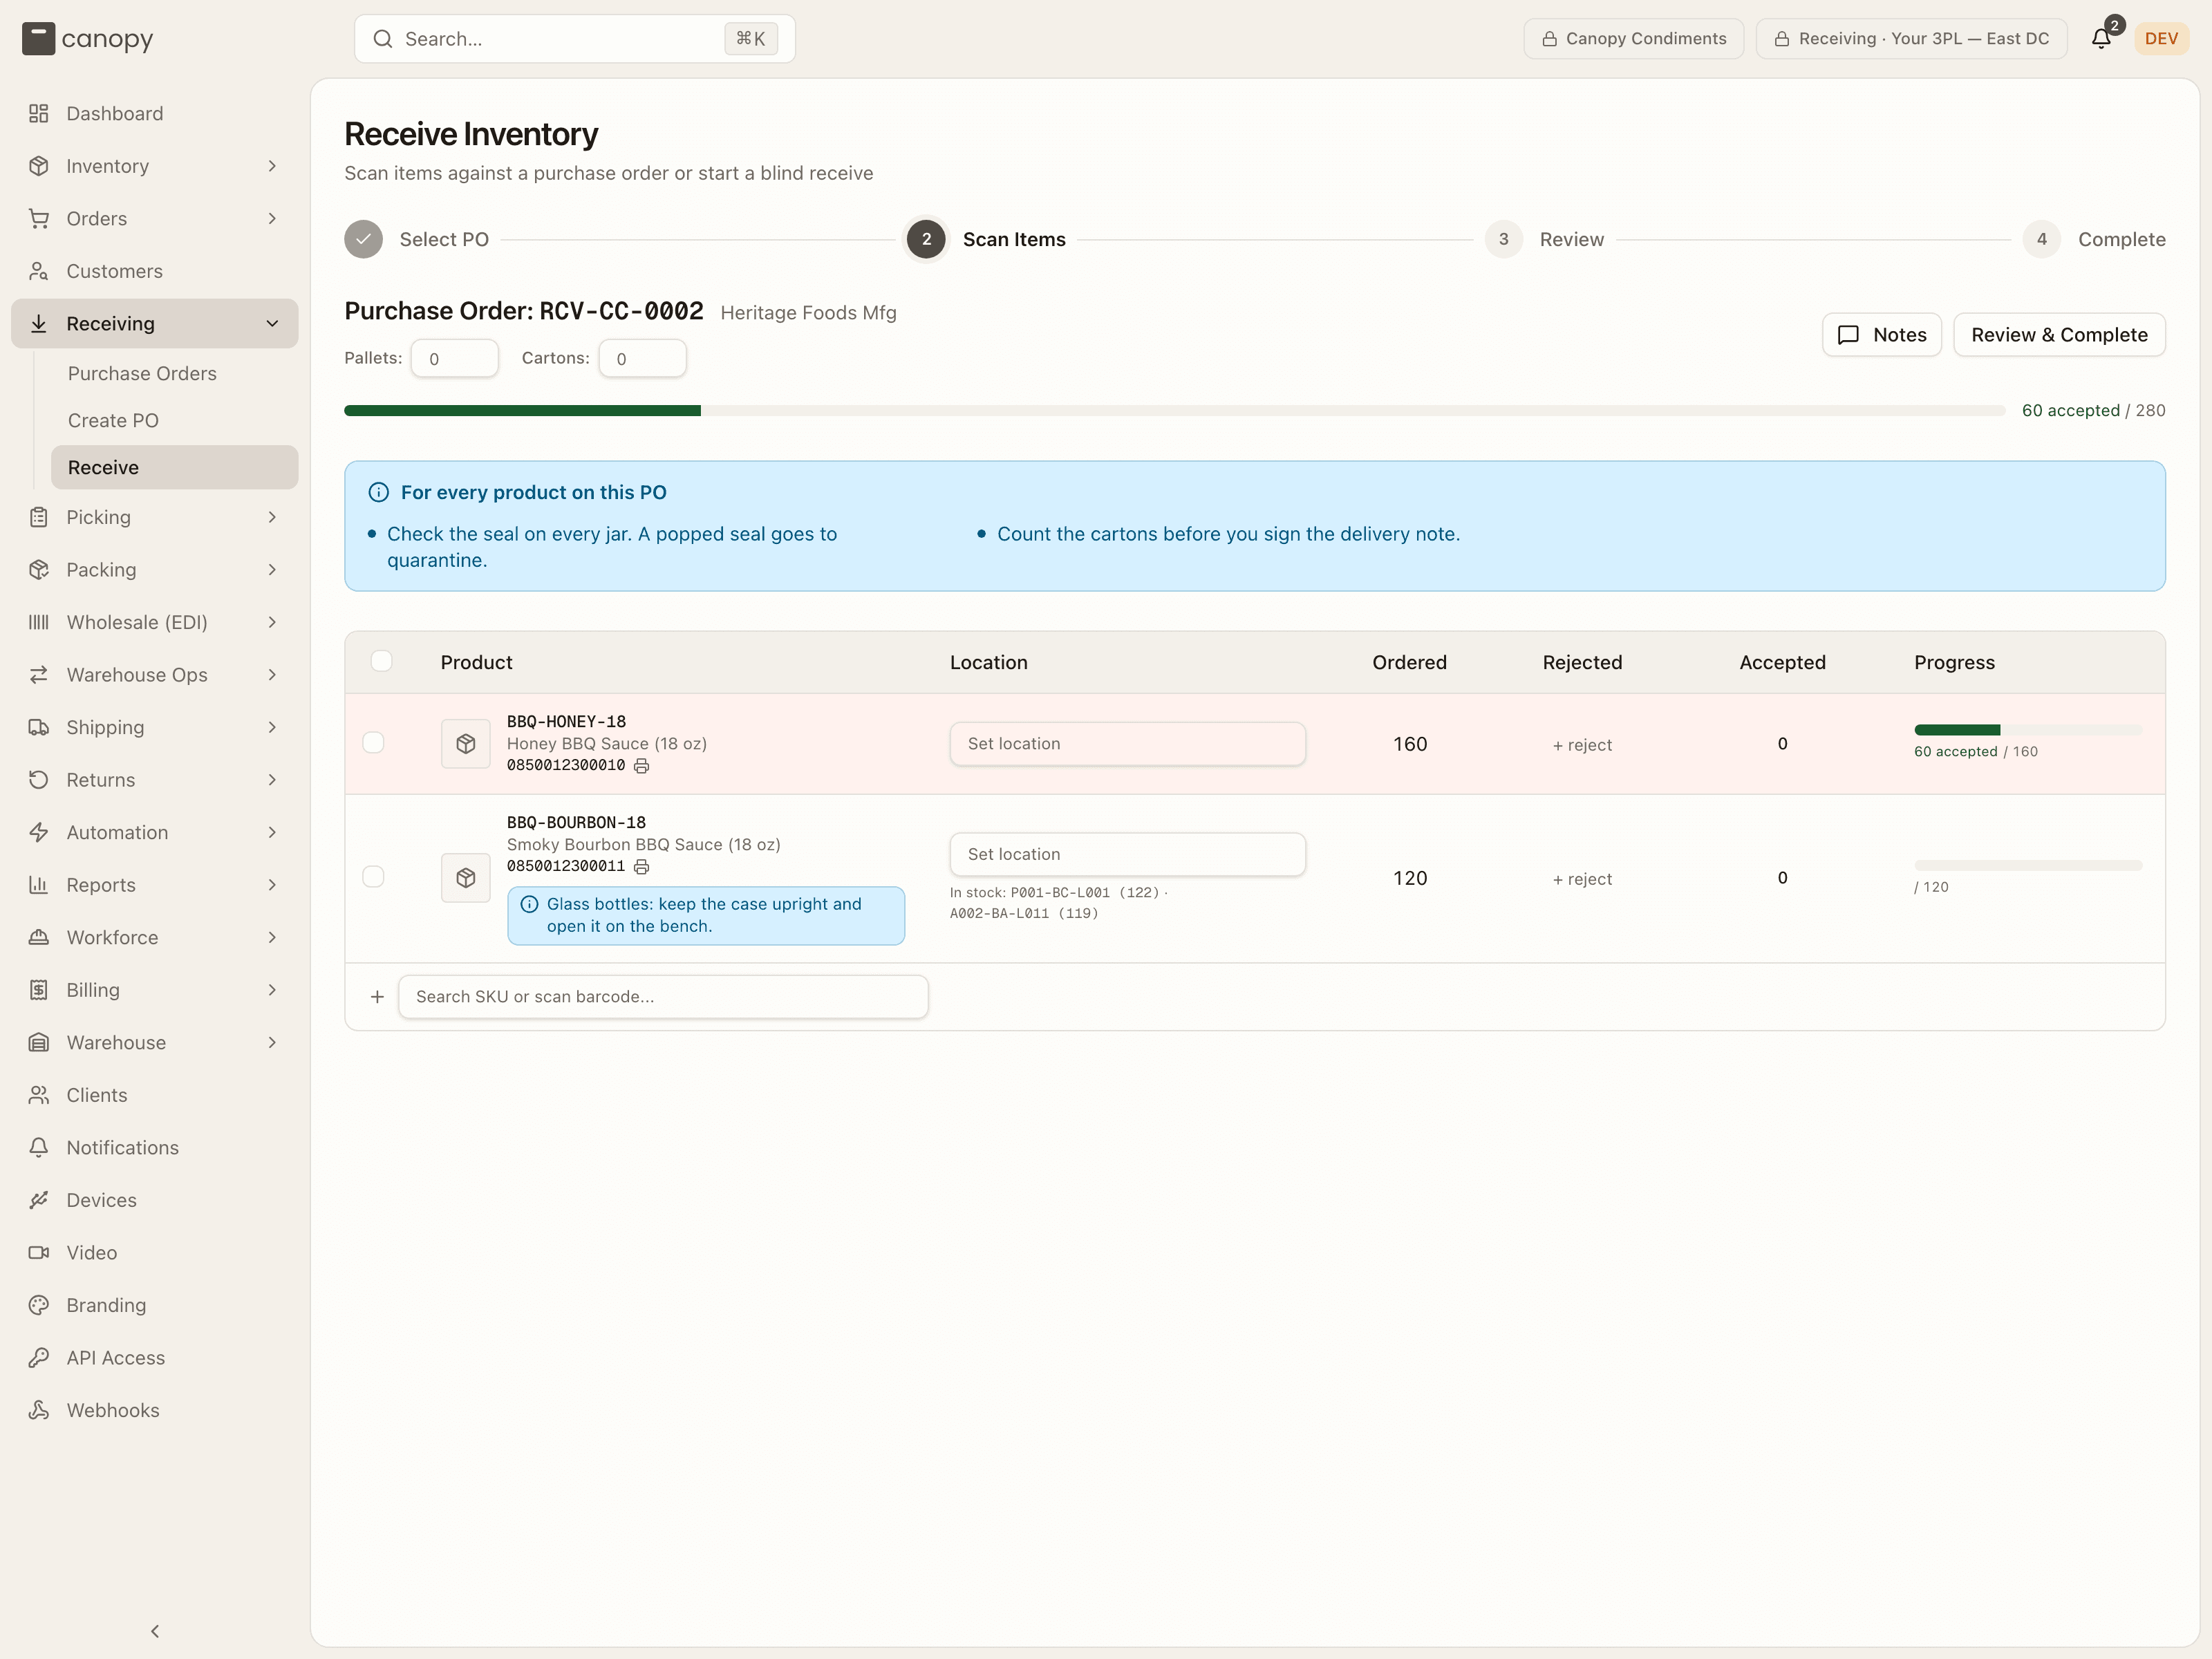
The line table has a sticky header and these columns:
- Product — image, SKU code (click it to open the SKU's detail modal — edit its barcode or dimensions without leaving the flow), name, and barcode with a print-label icon. A SKU with pack forms gets +1 case (12)-style buttons that receive one sealed pack at a time. A line added mid-receipt carries a New badge.
- Location — the storage bin the line receives into. Until a line has received into a bin, the main row holds a Set location picker (it only offers bins the SKU's storage tags allow, never returns bins) with In stock: BIN (qty) shortcuts where the SKU already lives. After the first receipt the bin is shown locked with an X (removes that location — unreceiving its units) and a + to receive part of the SKU into another bin; a split line reads N locations below with one sub-row per bin.
- Lot — only when the PO has lot-tracked SKUs. The picker reads Set location first until a bin is chosen; a bin already holding a lot pins it (one live lot per bin). A scan that needs a lot number opens a Lot details required dialog for the lot and, if the SKU requires it, an expiry date.
- Ordered — the expected quantity.
- Rejected — + reject opens the Reject units form: what is wrong, the units, and the quarantine bin. Those units are booked into the quarantine bin, not the storage bin, and the reason is saved on the PO.
- Accepted — the good count for the location. Click the number to type a count; scans add to it. The count is per location and, for pack forms, per form (loose and each sealed level get their own counter).
- Progress — a bar plus N accepted, N rejected, N scanned, needs location, the expected total, and · N over when you've exceeded it. The row tints blue while you're on it, then green (exact), amber (over), or red (started but short).
Reject units
Press + reject on a line to reject some of its units. One form asks for everything at once, so every rejection says why.
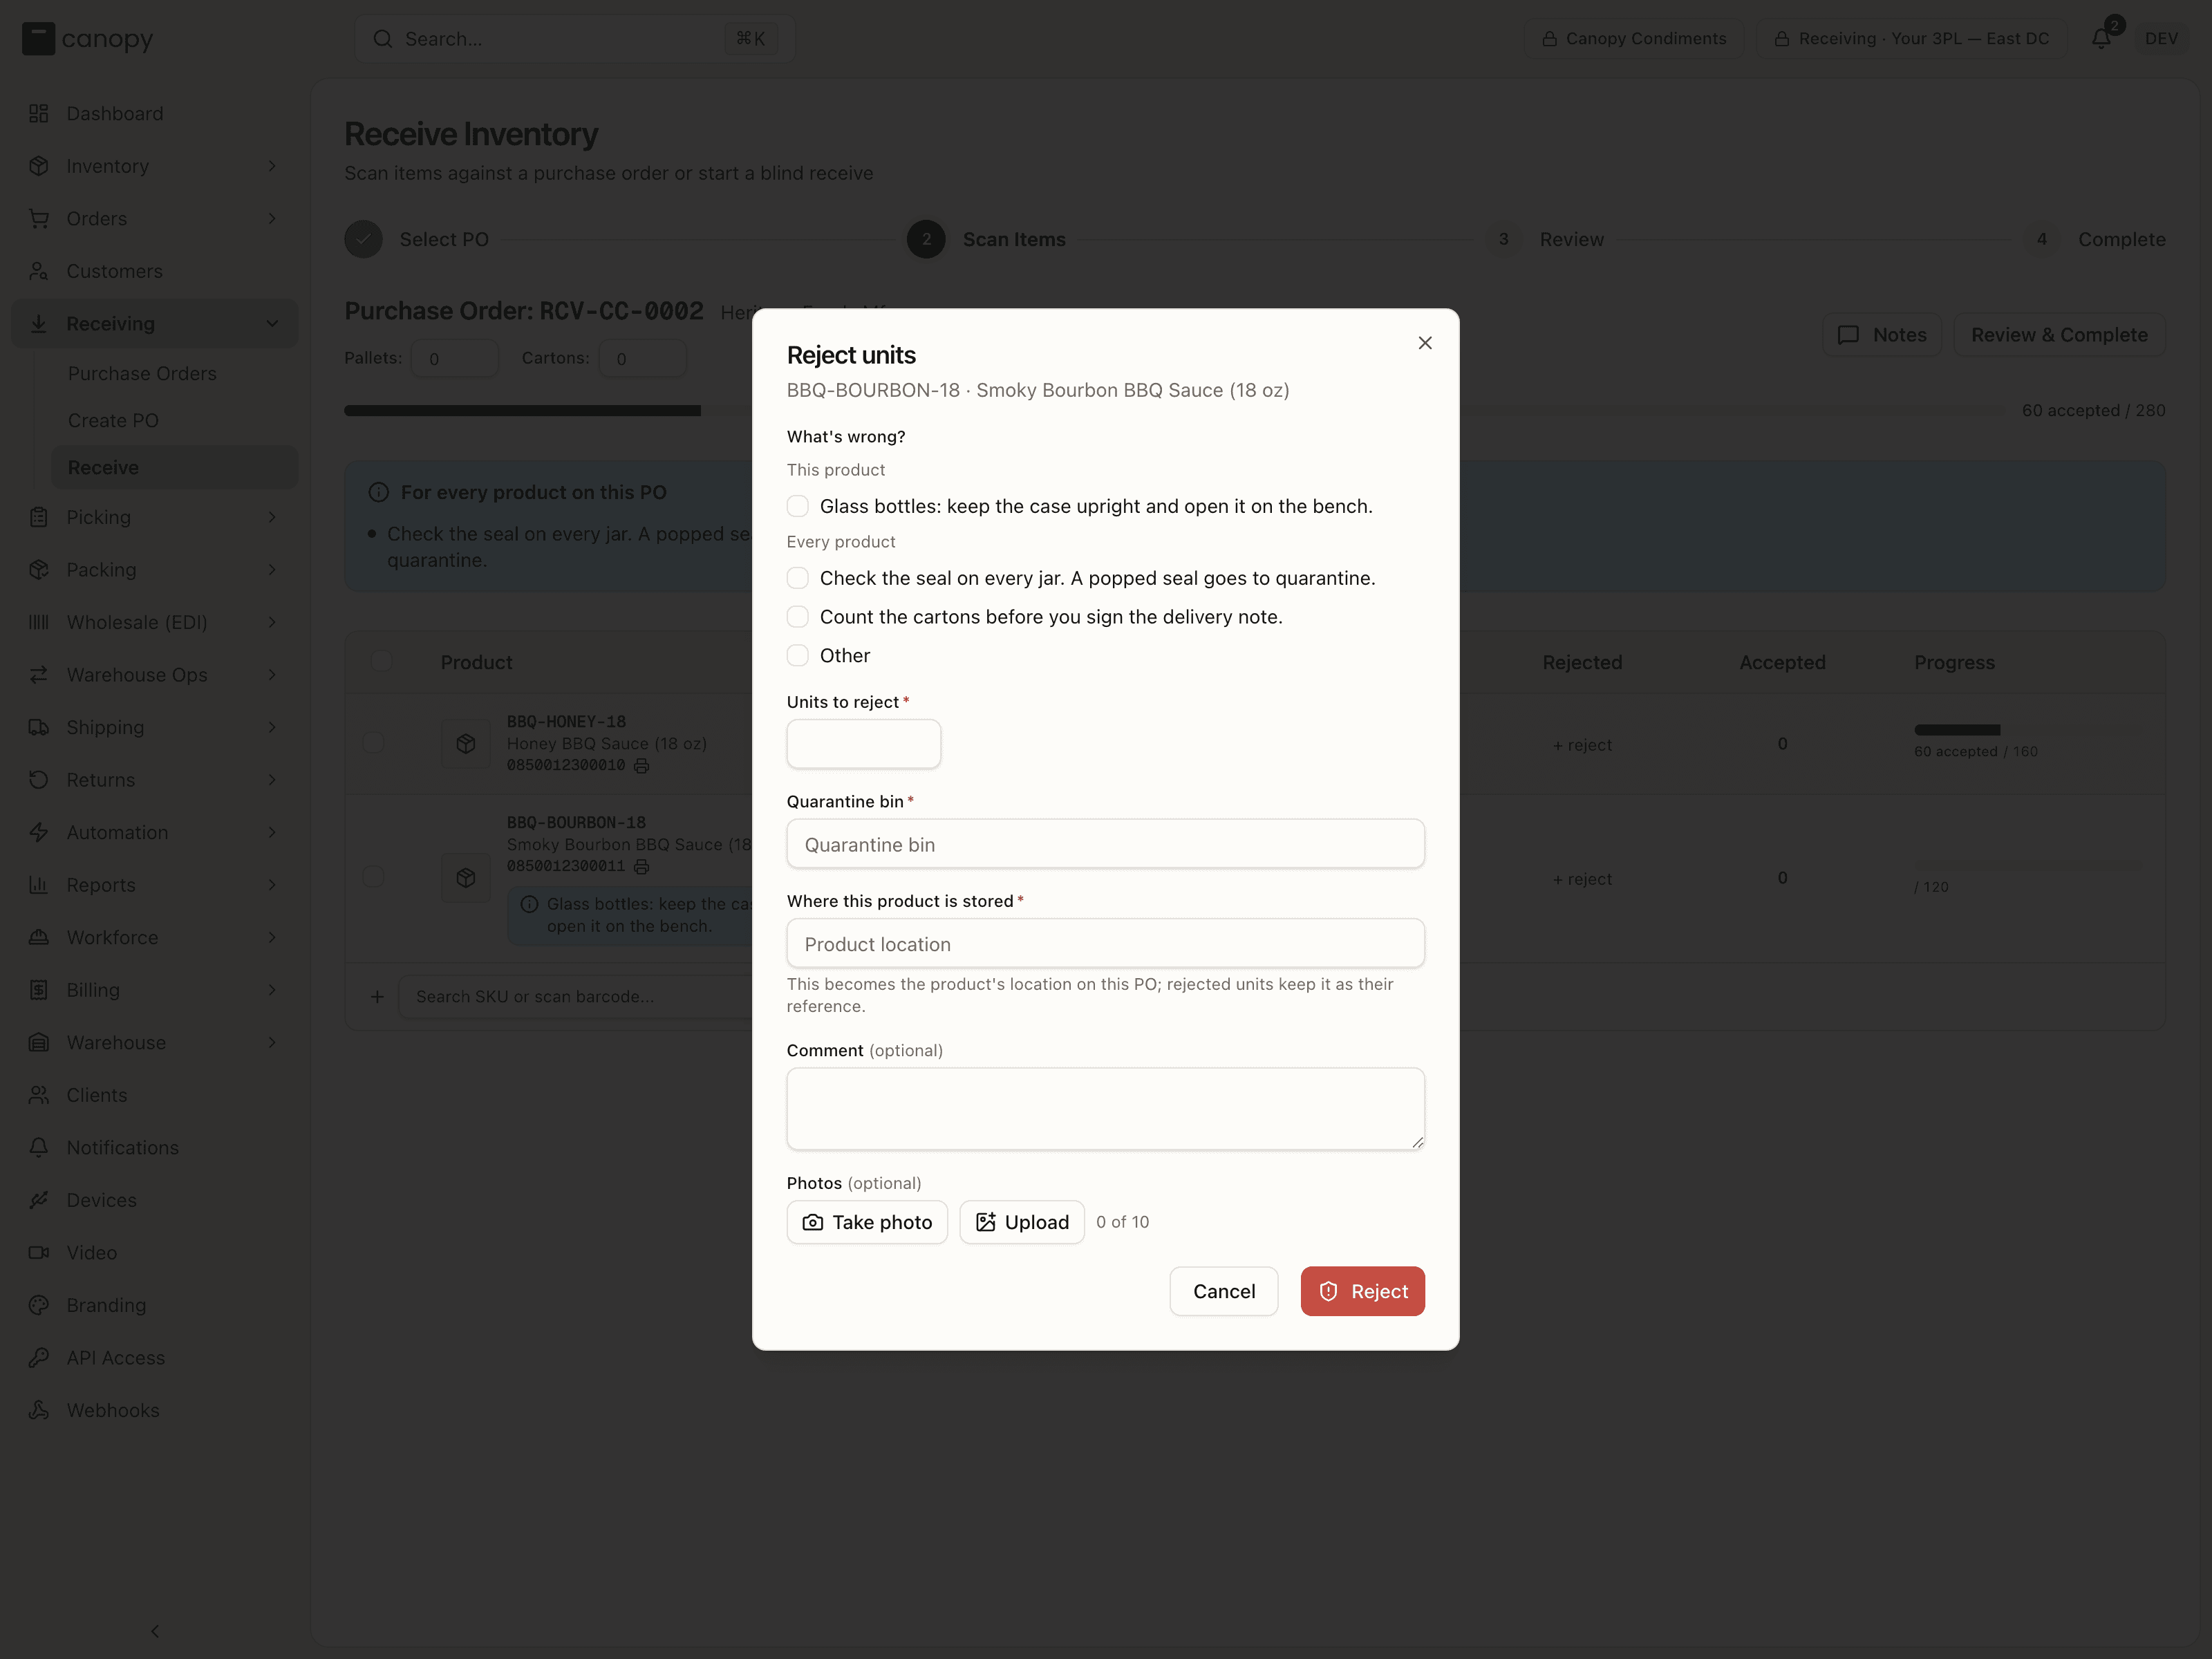
- What's wrong? The brand's receiving notes for this product and for every product, each with a tick box, plus Other with a box to describe the problem. Pick at least one.
- Units to reject, and the Quarantine bin they go to. Only bins in a Quarantine zone are offered. A product with no location yet also asks Where this product is stored. A lot-tracked product asks for its Lot number and, when the SKU needs one, the Expiry date.
- Comment and Photos, both optional. A photo is taken with the station's camera and saved to the PO with the reason.
Reject saves the reason first, as a problem report on the PO with its photos, and only then books the units into the quarantine bin. A report changes no stock and no count; the units are the rejection's, as before. If the save is interrupted, the form keeps what it sent, and a retry sends the same report and the same booking, never two. Rejecting more units from a row that already has rejections opens the same form with those units and that bin filled in.
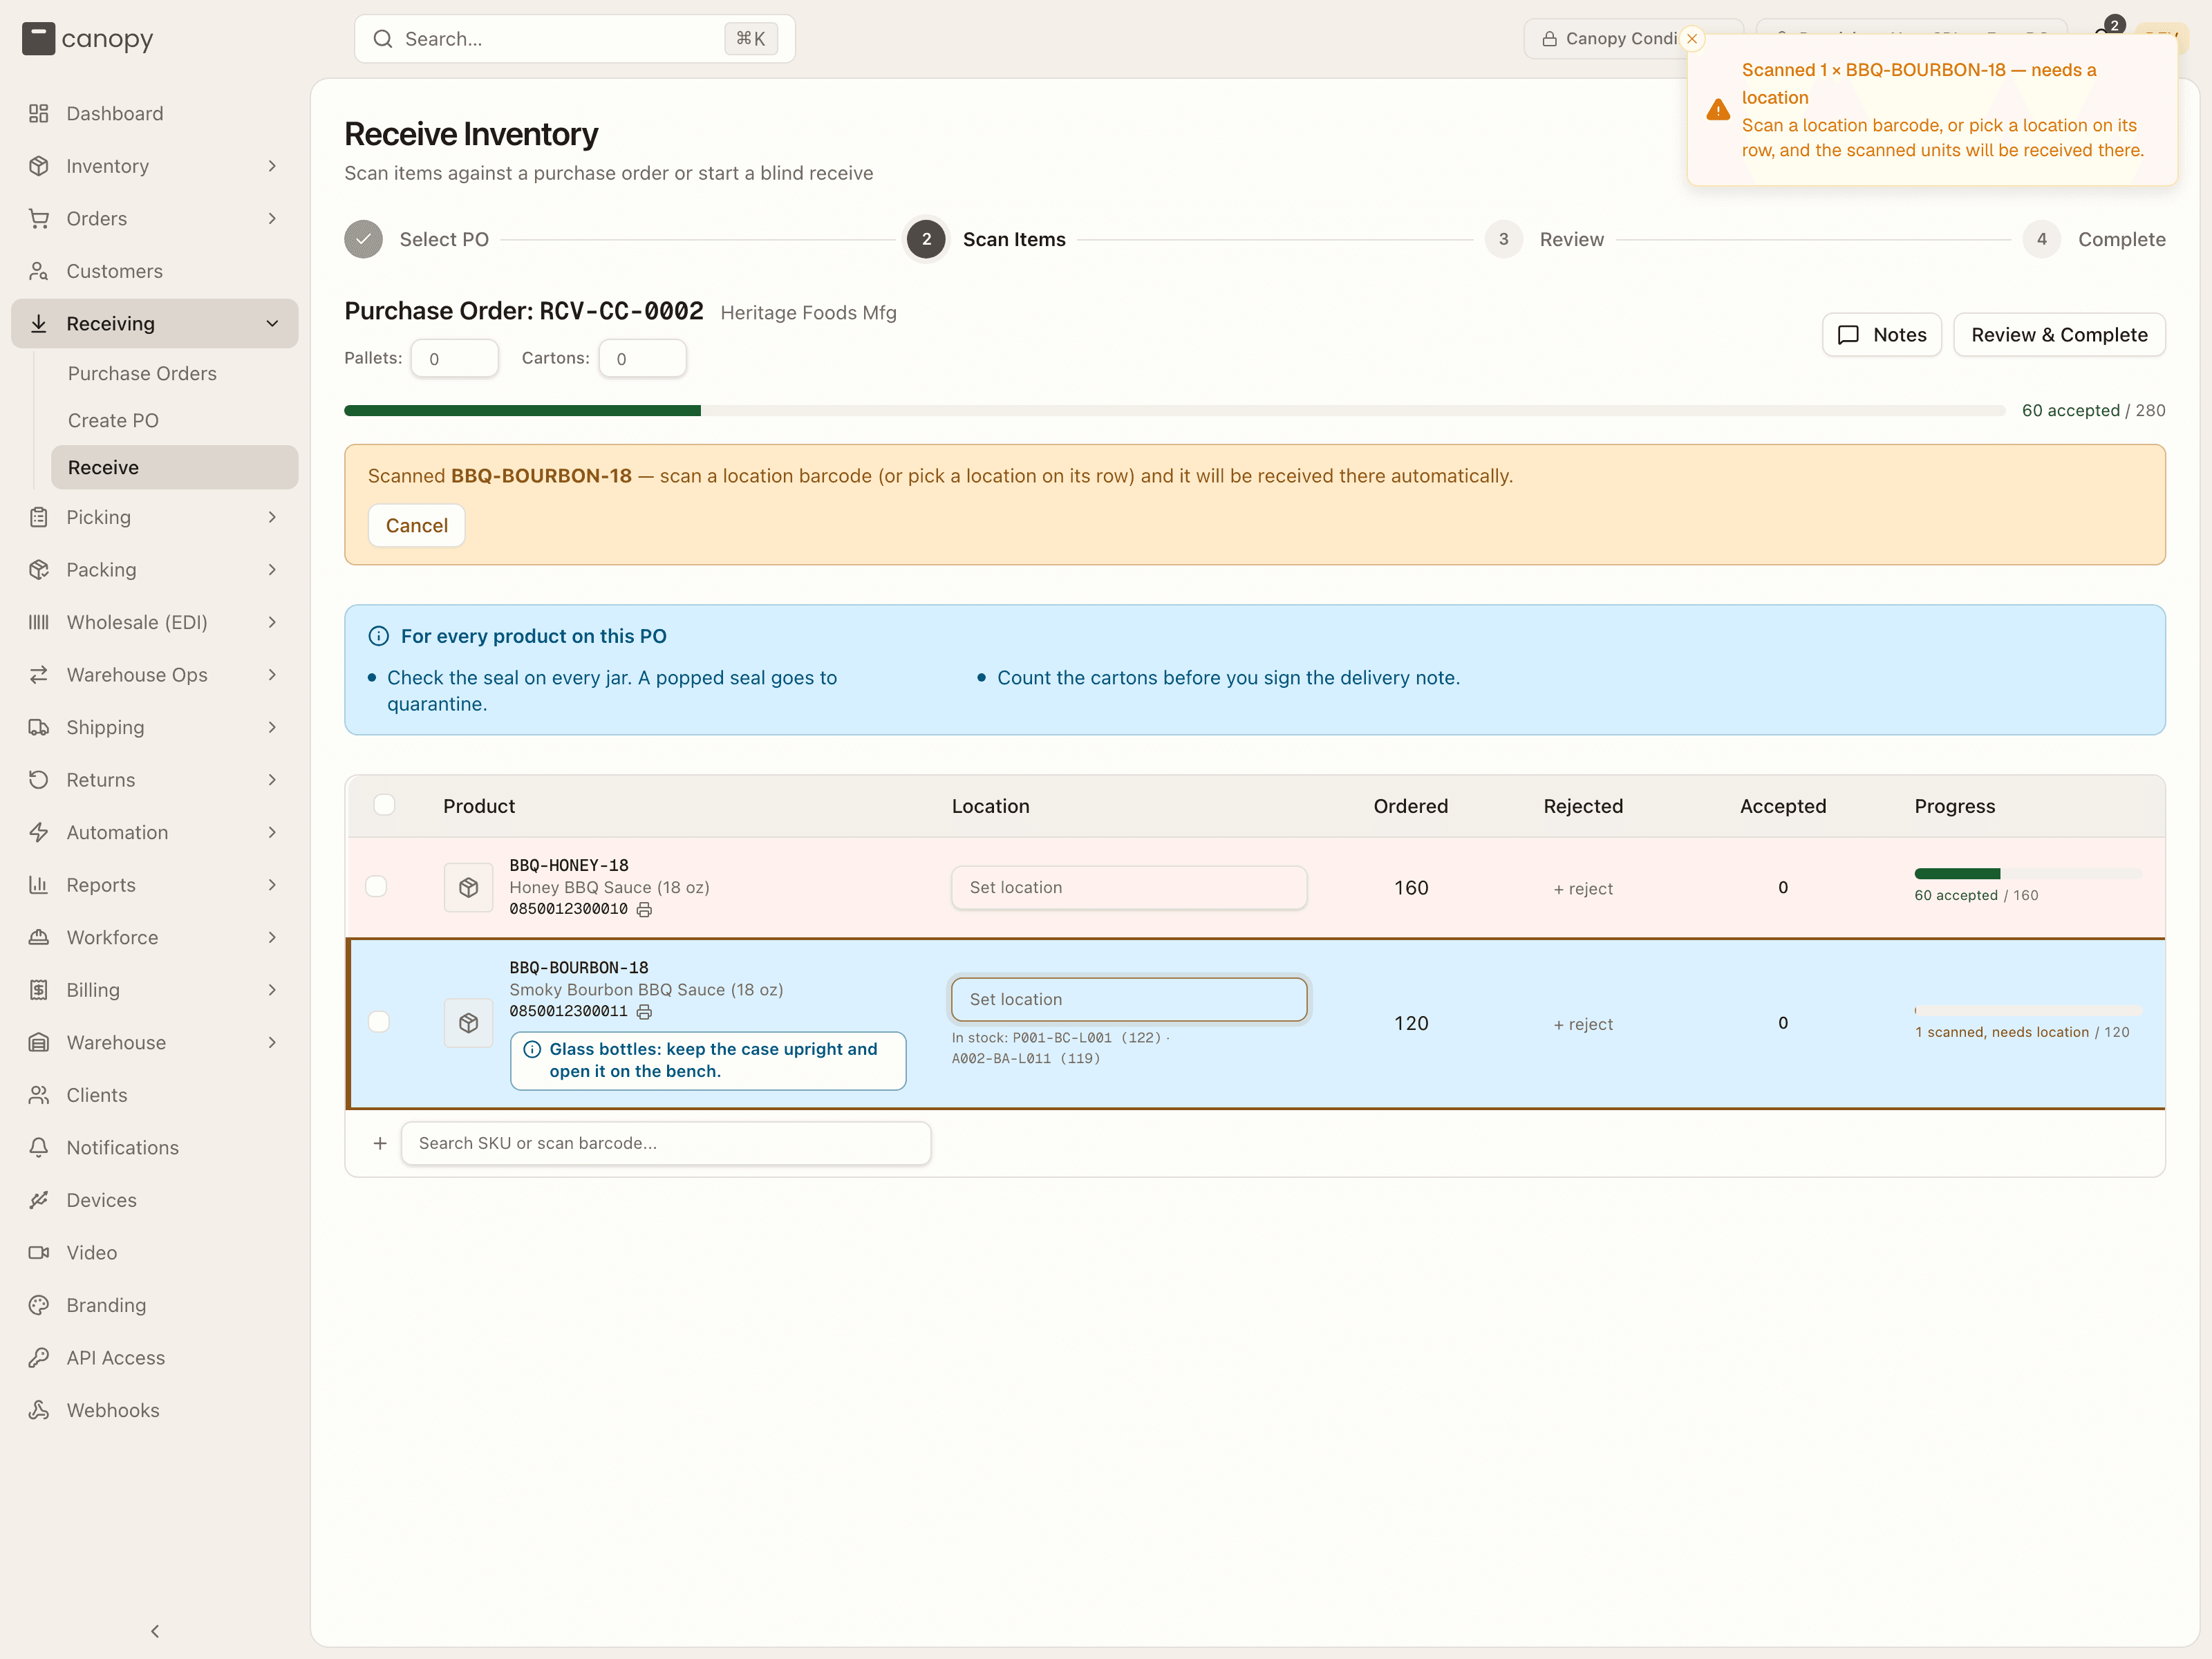
Scanning. Scan a SKU barcode (or a pack barcode) and the unit books into the line's location. If the line has no location yet, the scan is parked: the row goes amber, a banner reads "Scanned N × SKU — scan a location barcode (or pick a location on its row) and it will be received there automatically", and nothing else can be scanned until you scan a location, pick one on the row, or Cancel the parked scan. Re-scanning the same SKU stacks more units onto the parked count. A parked scan is not stock — Review & Complete refuses to leave the step while one is open.
Bulk actions. Tick lines (or the header checkbox) and a bar appears:
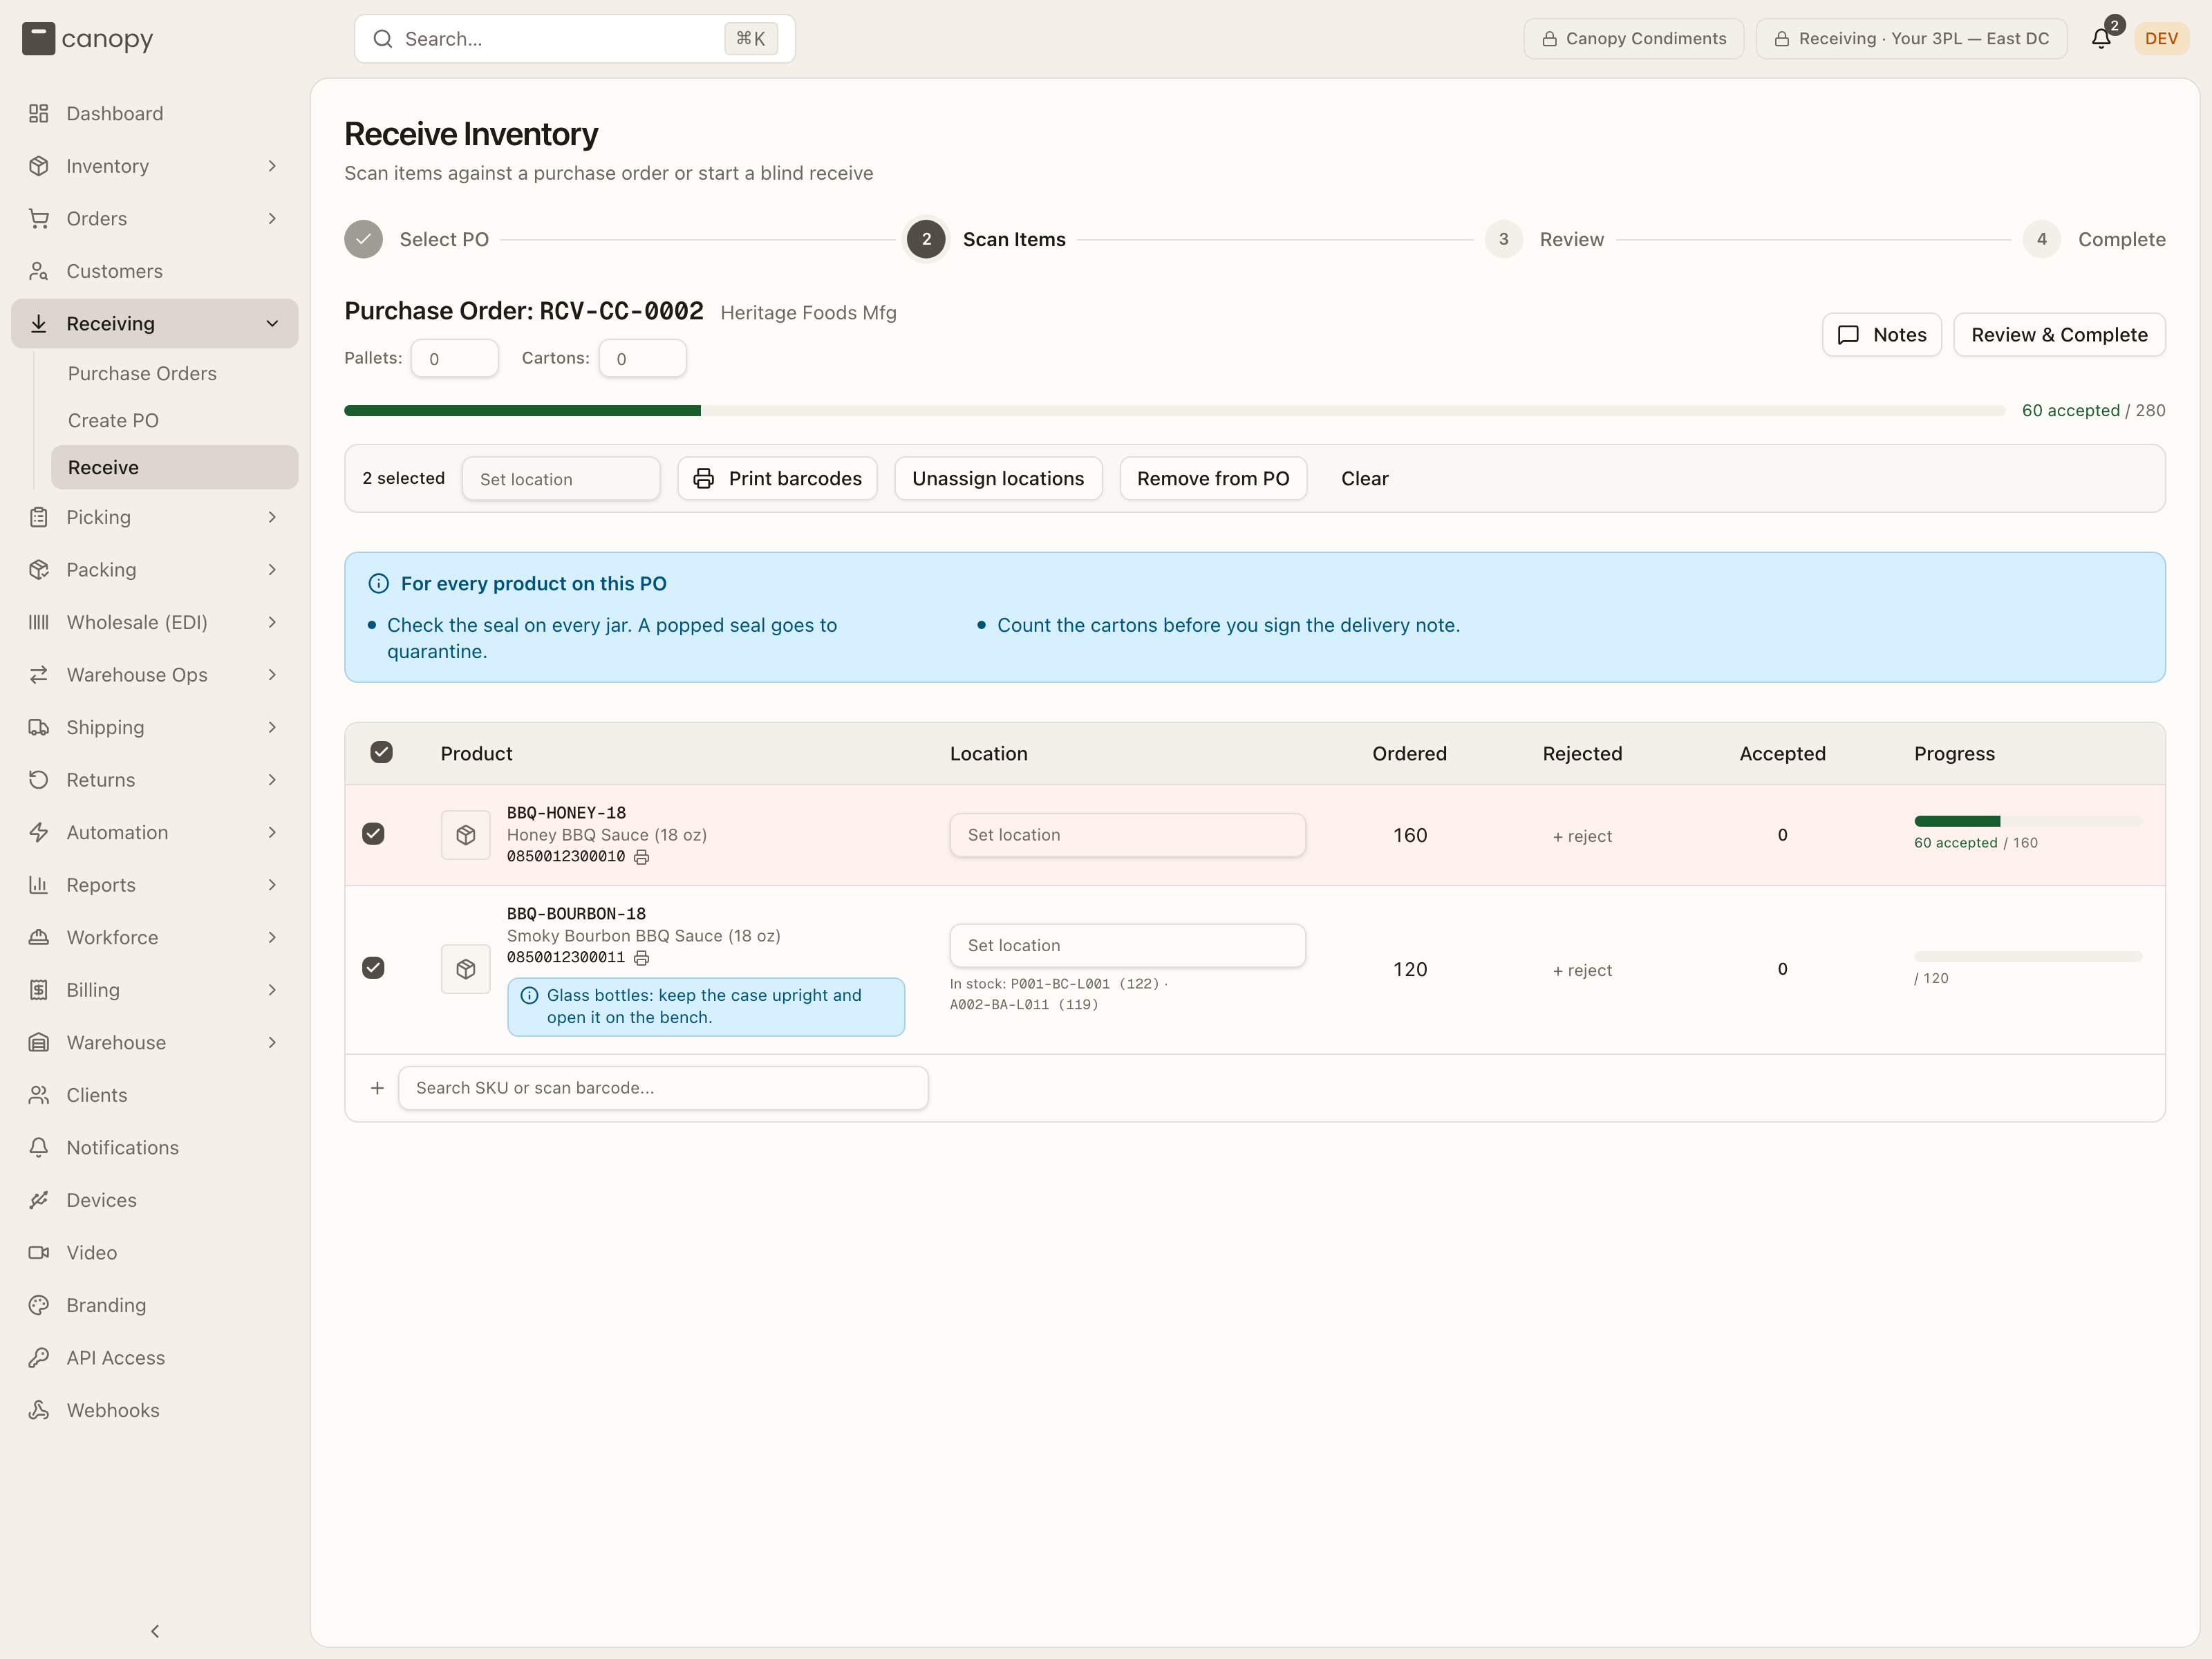
- Set location — assign one bin to every checked line. If any of them already has a different location, a confirm explains how many already-received units would move.
- Print barcodes — a label sheet for the checked SKUs.
- Unassign locations — clears the checked lines' locations and unreceives everything booked against them (a mixed receipt's damaged units come back out of quarantine too); the confirm states the counts.
- Remove from PO — takes the checked lines off the PO. Only lines with nothing received or rejected can go; the others are kept and named.
- Clear — deselect.
Adding a SKU. The last row, "Search SKU or scan barcode...", adds a SKU that isn't on the PO (expected 0, flagged Unexpected). An unknown code offers + Add "…" (creates a new SKU if unknown), which opens the same Add SKU form as the SKUs page; the new SKU is added to the PO and the scanned unit parks until you give it a location.
Review
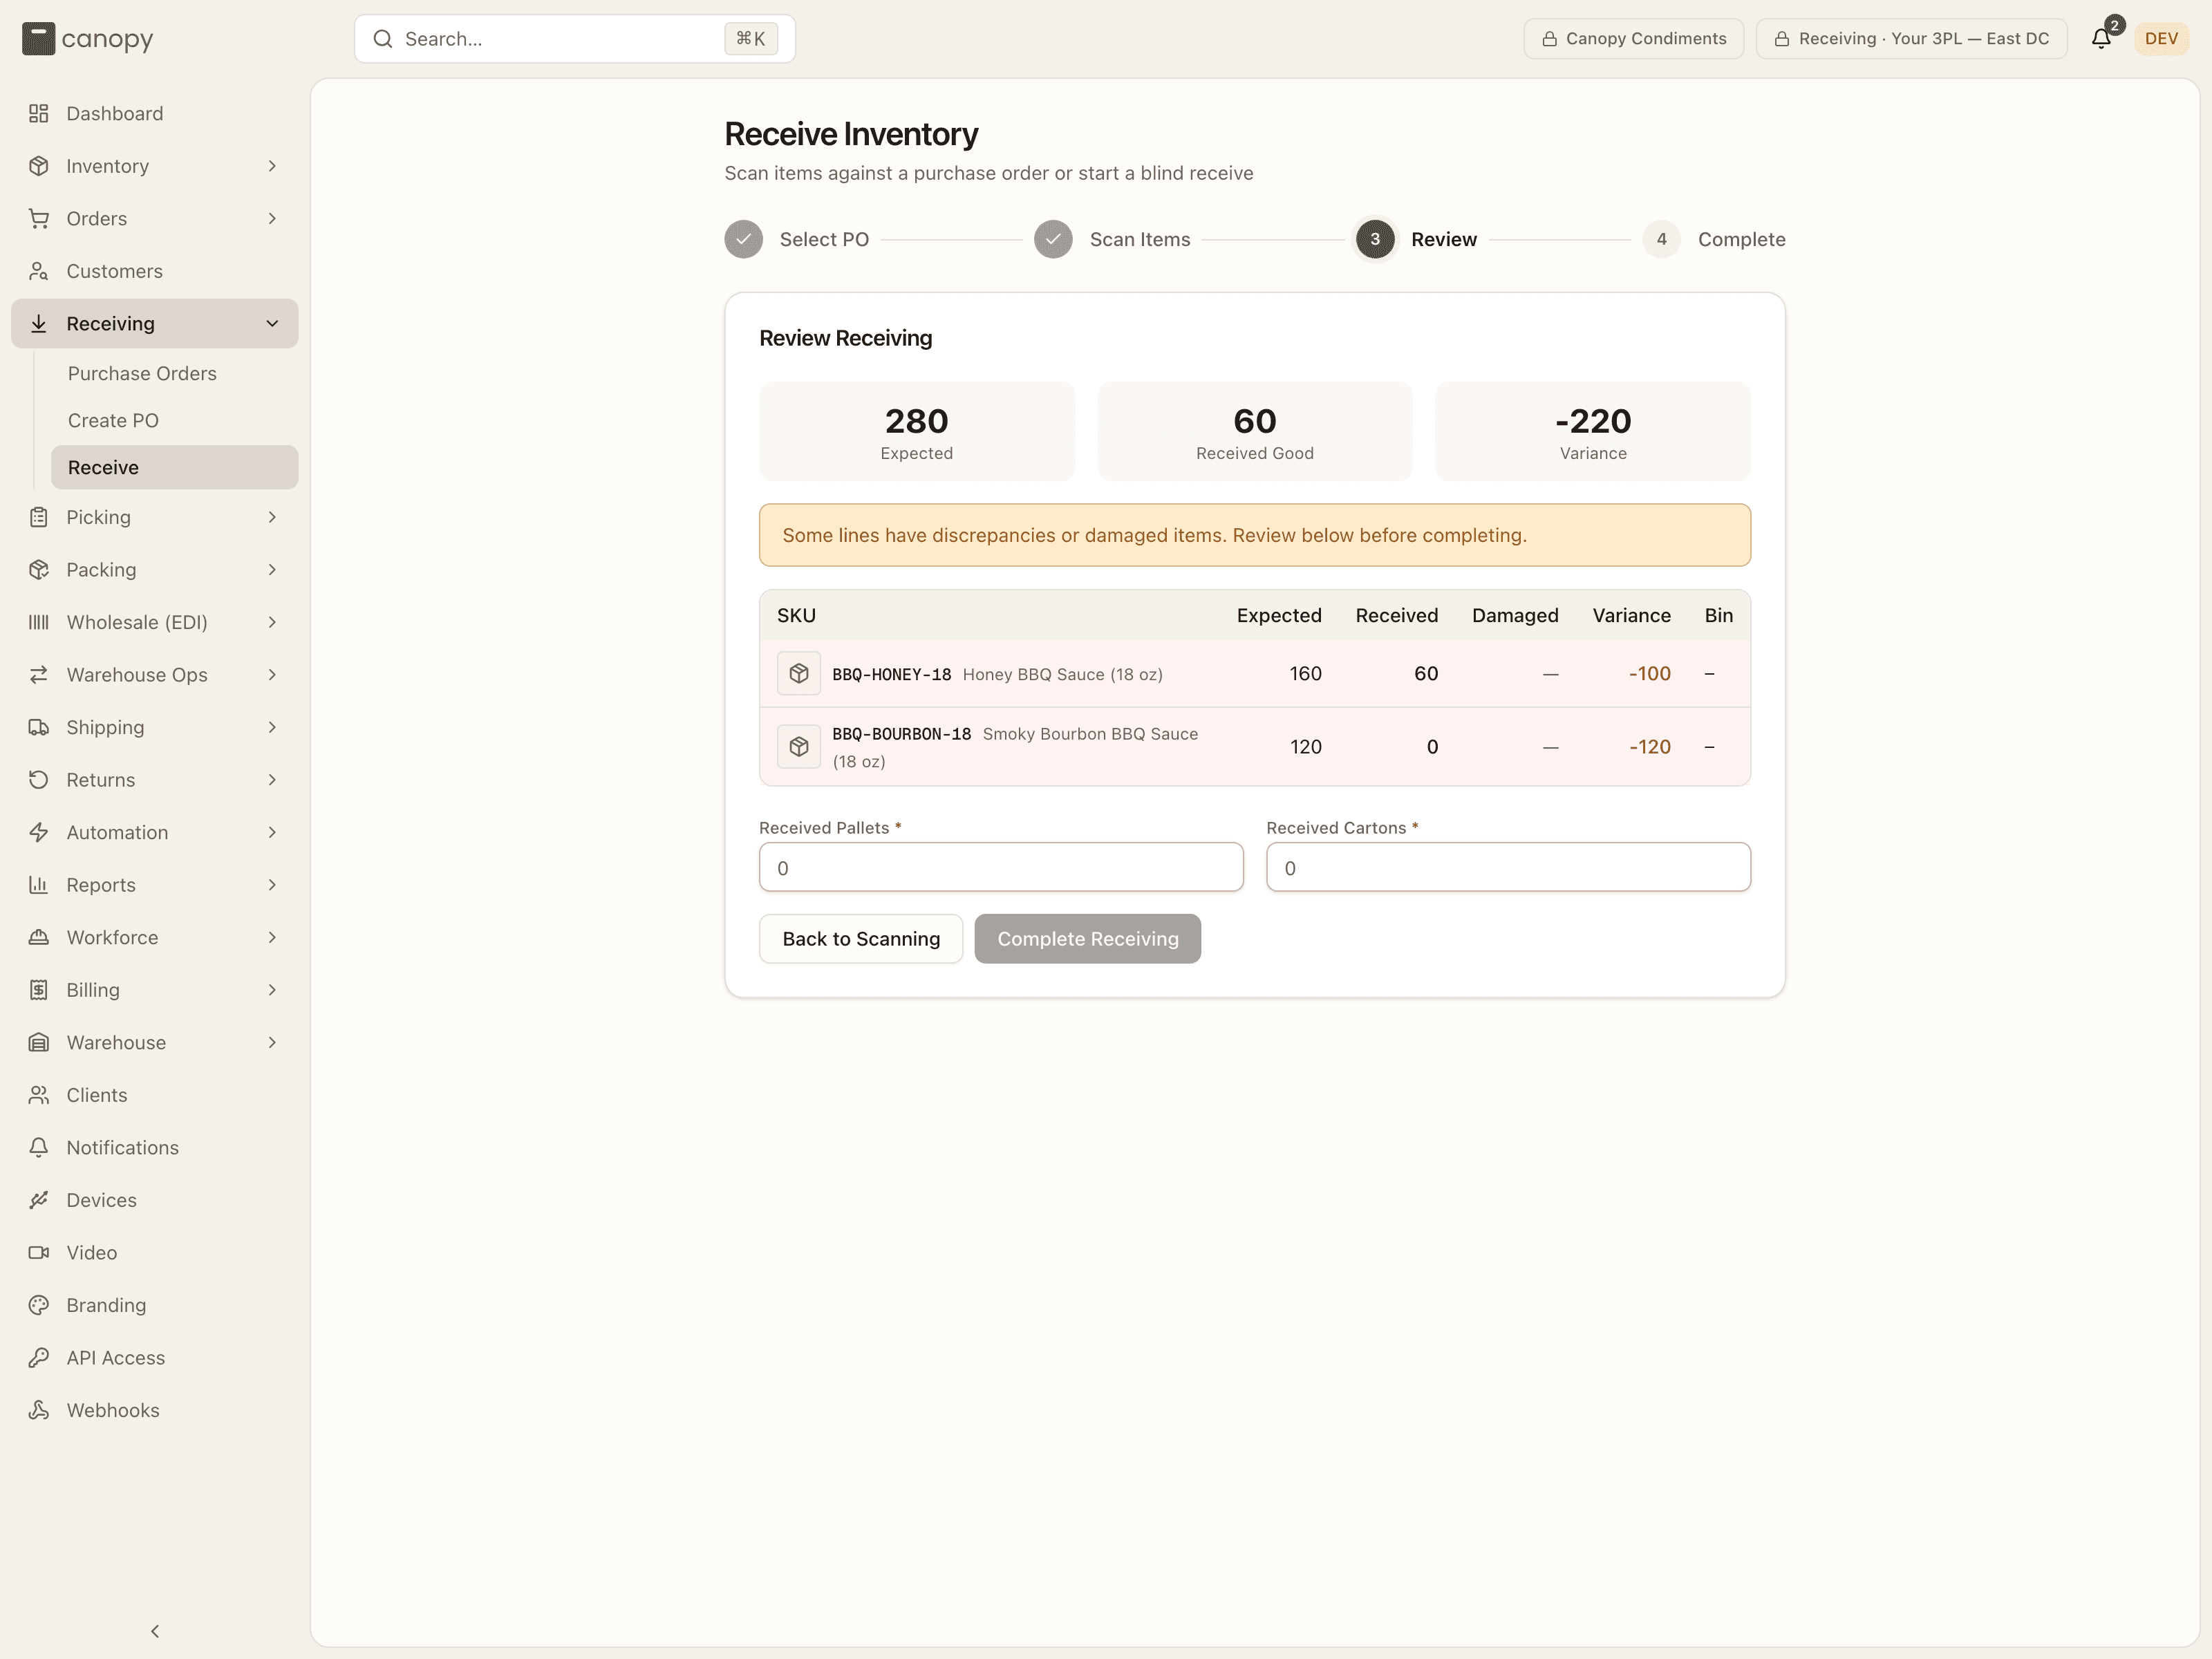
Tiles show Expected, Received Good, Damaged (when any), and Variance; a warning banner flags lines with discrepancies or damage. The table lists each line's SKU, Expected, Received, Damaged, Variance, and Bin (blind receives hide Expected and Variance). Then two required fields — Received Pallets and Received Cartons — pre-filled from the PO's expected counts (or whatever you typed in the Scan Items header), with a note when they differ from what was expected. Any PO notes are listed underneath. Back to Scanning returns to the table; Complete Receiving stays disabled until both counts are filled.
Complete
Receiving Complete — the PO's totals, a summary of how many lines were Complete, Short, Over, or Damaged, and two buttons: Return to Purchase Orders and Receive Another (back to Select PO).
Where the stock goes
Every accepted unit is booked into the bin you set on its line the moment it's received — it is on hand there immediately, and the ledger gets an adjustment. Rejected units go to the quarantine bin you picked. Receiving creates no putaway task: if the receiving bin isn't the unit's final home, move it with an ad-hoc putaway in Warehouse Ops → Active Tasks.
Fixing a mistake
To reverse a receipt: in the session, press the X on a location row (or use Unassign locations in the bulk bar); on an In Progress PO's Lines tab, expand the line and Unreceive that receipt. Each pulls the stock back out of its bin and logs a reversing adjustment. Rejected units are reversed the same way from their quarantine row.
How to receive a purchase order
Open the PO. Press Start (Pending) or Continue (In Progress) on the Purchase Orders list, or go to Receiving → Receive and find the PO in the PO Number box. Take over only if the previous receiver has left the station.
Set a location on each line. Pick a bin in the Set location box (or use an In stock shortcut), or tick several lines and use Set location in the bulk bar. A lot-tracked SKU also needs its lot.
Scan the units. Scan each barcode — or click the Accepted count and type it. Read the brand's notes in the blue bar first. Use + reject for damaged units: say what is wrong, the units, and their quarantine bin. If you scan before setting a location, give the parked scan a location before continuing.
Review. Press Review & Complete, check the variances, and confirm Received Pallets and Received Cartons.
Complete Receiving. The PO moves to Completed, its lines take their final status, and the stock is already on hand in the bins you chose.