

Warehouse Ops
Move received and returned stock into bins, keep counts accurate, and top up pick faces.
Warehouse Ops is the home for the moves that keep stock in the right place: putting away stock, putting back what came off a cancelled pick, counting bins to keep inventory honest, and topping up pick faces before they run dry. It's operator-only end to end — the sidebar hides it from brand accounts, the whole route tree is staff-only, and the putaway and replenishment APIs refuse client users.
The section has five pages under the Warehouse Ops sub-nav:
Task Queue
Every putaway and put-back task, with live counts and one-click start.
Active Tasks
The scan-guided screen where a task actually gets done.
Cycle Count
Pickable bins ranked by how long since they were last counted.
Replenishment
The per-SKU worklist of pick faces to top up, and the history of what moved.
Replen Rules
Per-SKU min/max thresholds that drive replenishment.
Task Queue
Task Queue → /warehouse-ops/putaway. The list of putaway and
put-back tasks. Replenishment has its own page (below) and is excluded from
this queue; the header carries one action, Transfer Contents, which opens
the same dialog as a
Locations row's Transfer, with the source left for you to search or scan.
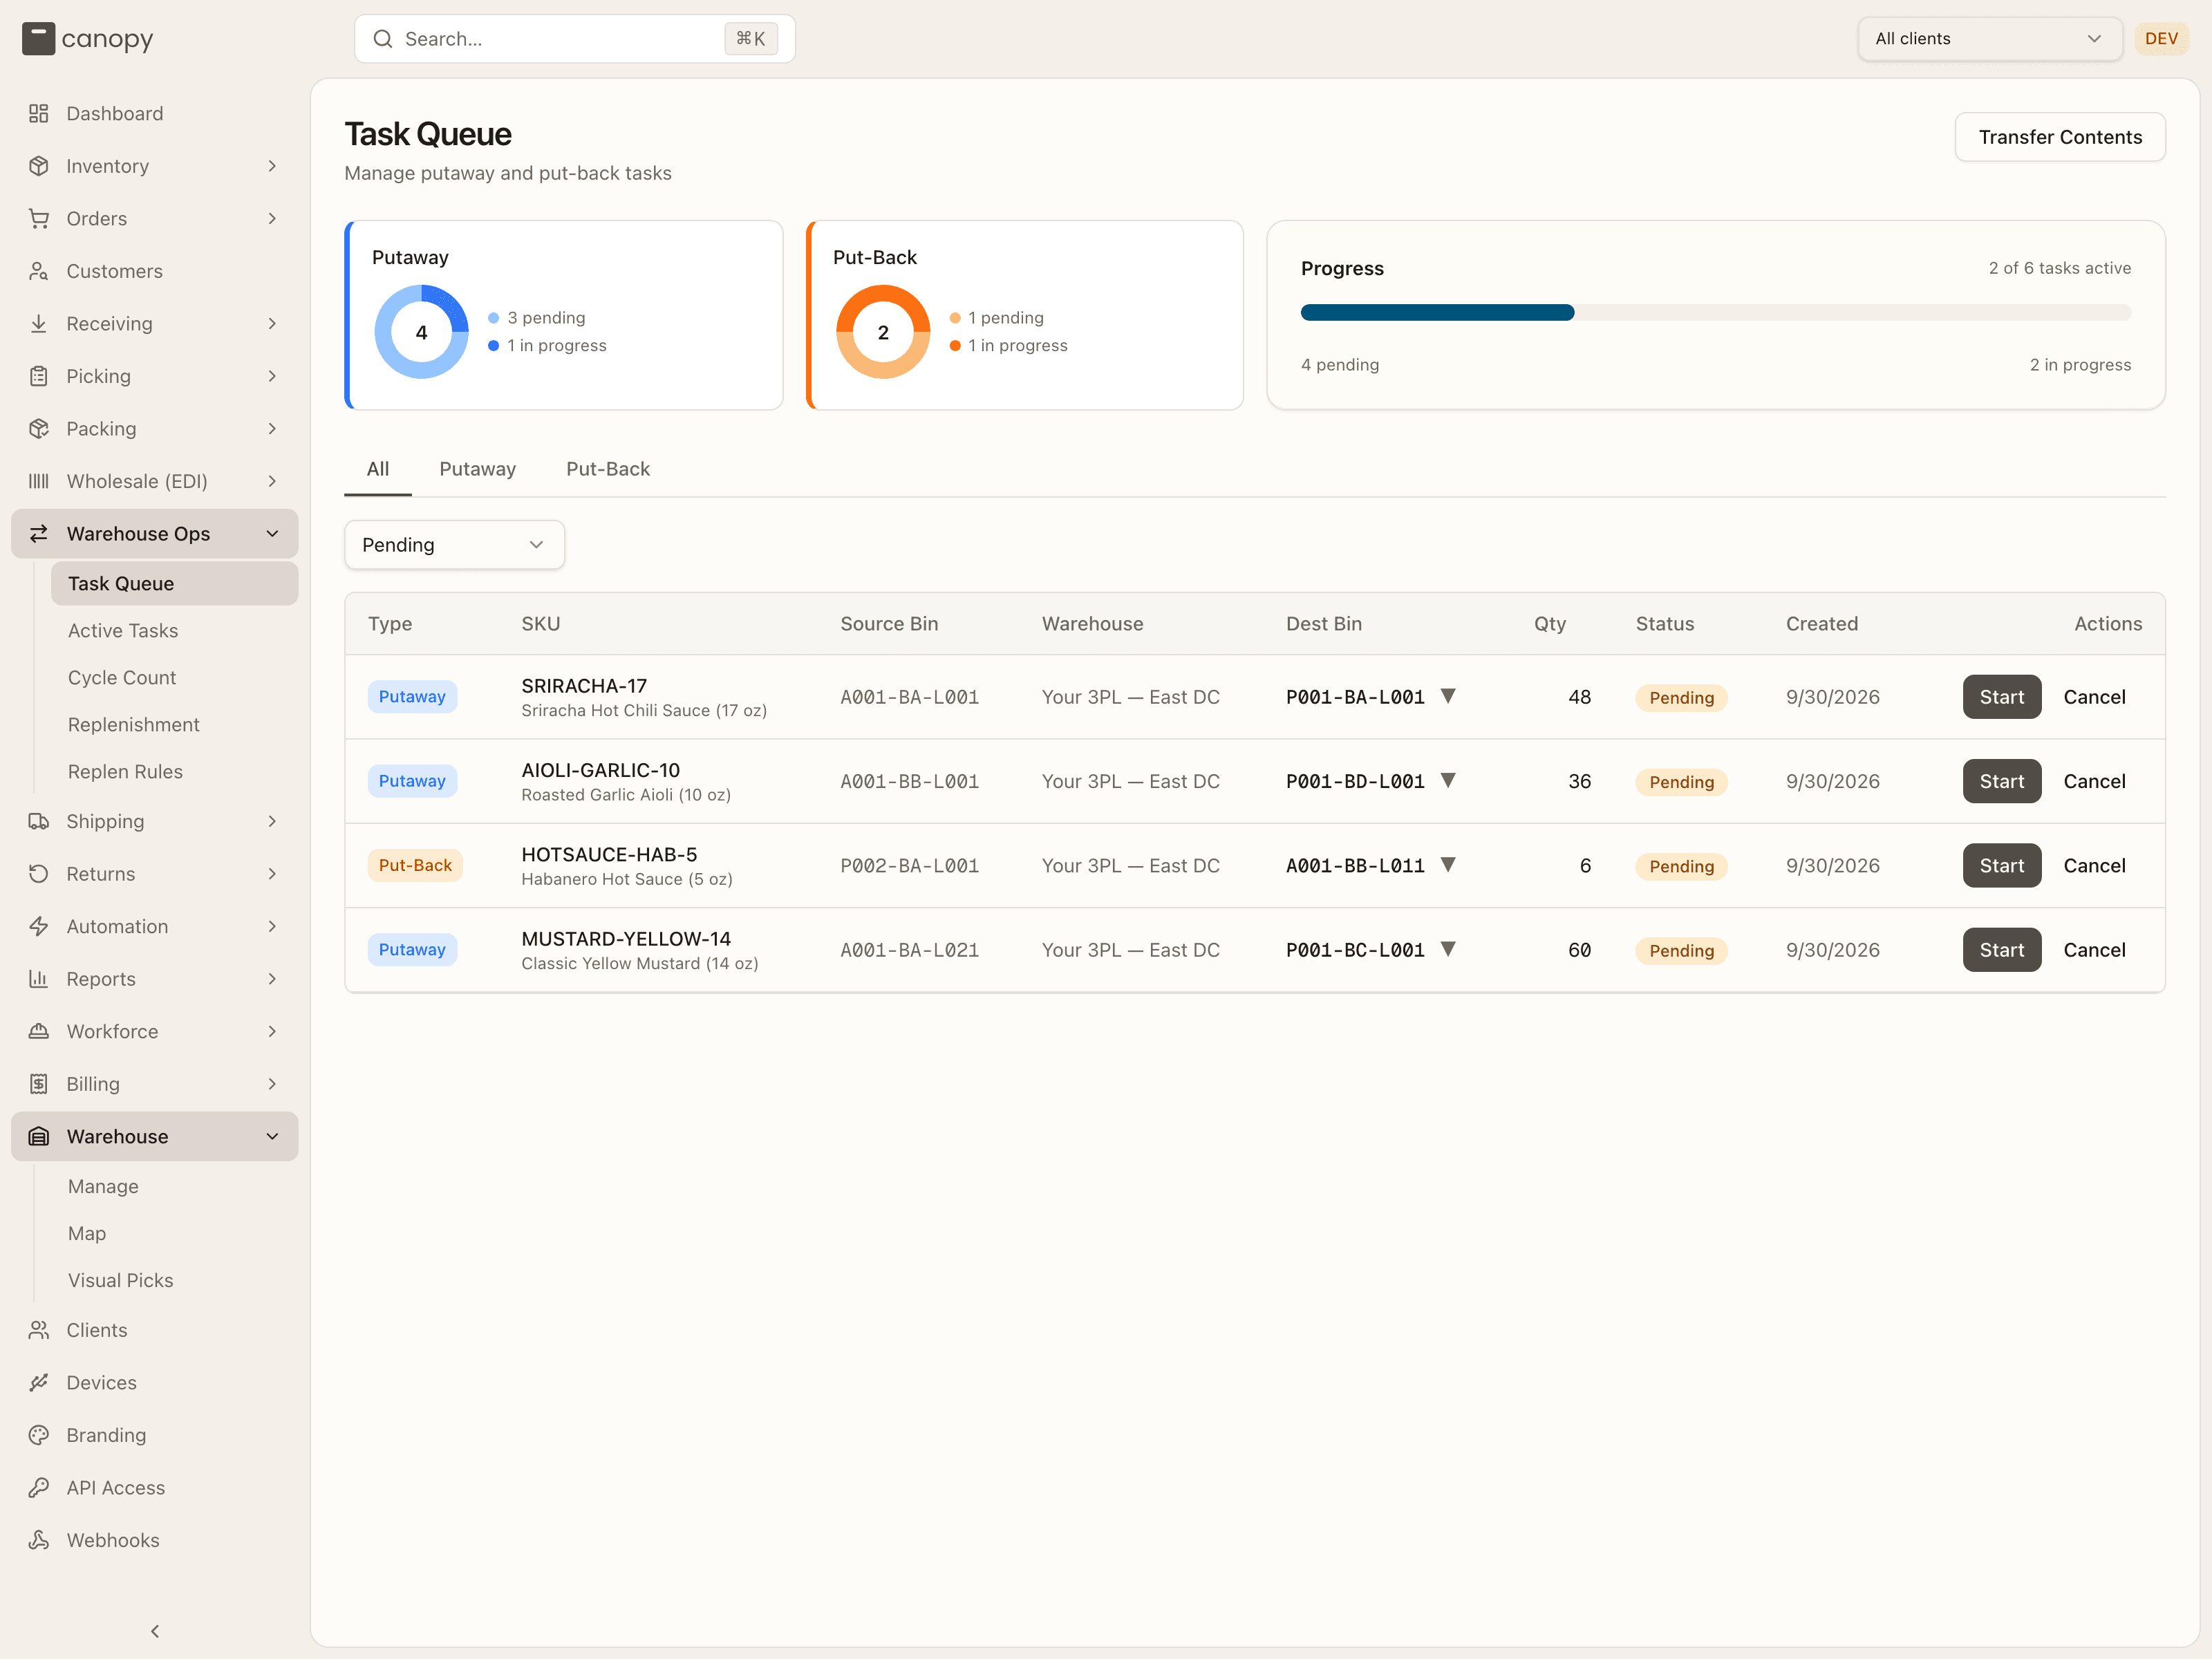
Across the top, two donut cards — Putaway and Put-Back — each show how many tasks are pending versus in progress, and a Progress panel reads N of N tasks active with a bar.
| Type | What it is |
|---|---|
| Putaway | Move stock from one bin into a storage or pick bin. |
| Put-Back | Return stock to its bin after a pick was cancelled or short. |
Filter the table with the type tabs (All / Putaway / Put-Back) and the status dropdown, which defaults to Pending and also offers All Statuses, In Progress, Completed, and Cancelled. Every task carries one of those four statuses.
The table lists the task's Type, SKU, Source Bin, Warehouse (bin labels are only unique within a warehouse, and the queue spans all of them unless one is pinned in the top bar), Dest Bin, Qty, Status, and Created; every header sorts. Qty shows moved / total once work has started, and a Picked N hint when units are sitting on someone's cart waiting to be dropped off. On a pending or in-progress putaway or put-back task you can click the destination to change it (a combobox with suggestions, limited to bins the SKU can be placed in). Start opens the Active Tasks screen with the task loaded and Cancel drops it from the queue — both only on pending and in-progress tasks. When there's nothing queued the table reads "No tasks found"; longer queues page with Page N of M.
Active Tasks
Active Tasks → /warehouse-ops/putaway/active. The hands-on, scan-guided
screen where a move actually happens, built for a scanner or tablet. It has two
modes, and which one you get depends on how you arrive.
Working a queued task (guided)
Pressing Start on a task — in the Task Queue, on the Replenishment worklist, or by tapping a task in this page's list — opens the Active Task screen: the task type as a badge, a Close button, and a Pick Up → Drop Off → Done stepper.
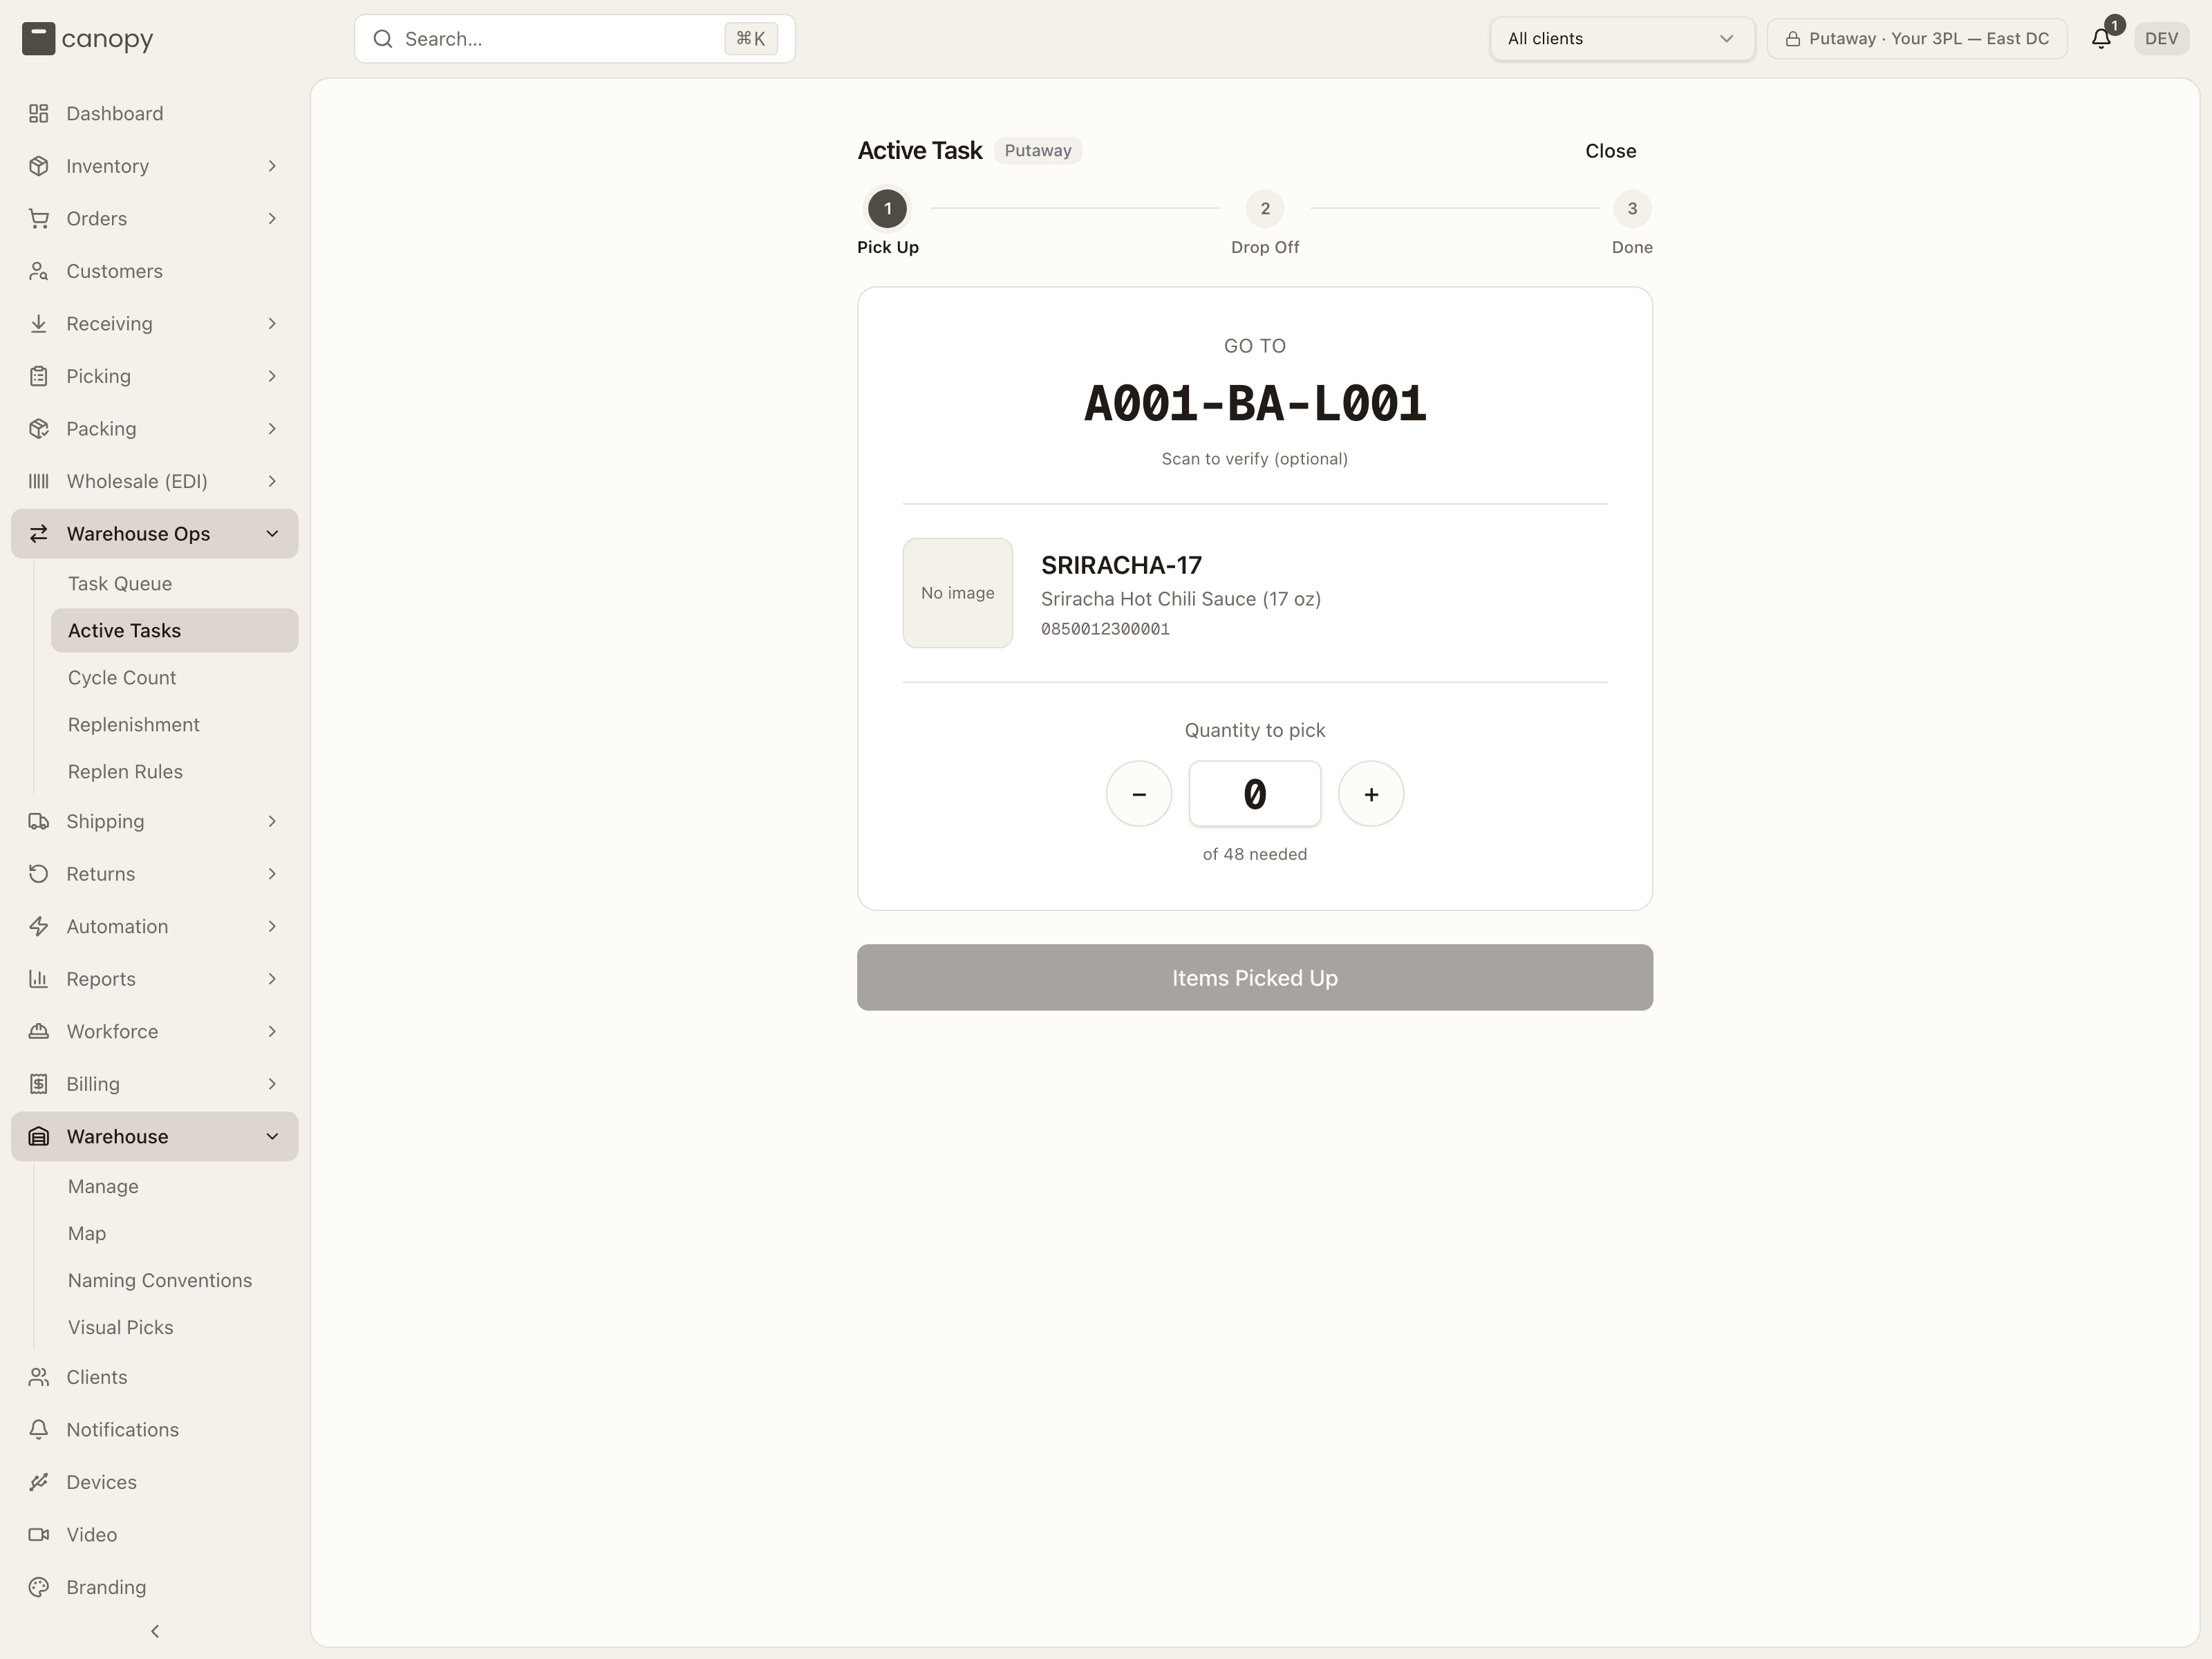
Pick Up shows Go to with the source bin large — tap it or scan it to verify (optional; it turns green with Location confirmed) — then the product with its image and barcode, and a count. The count starts at 0 and climbs as you scan items or press +; you can also type it. It's capped at what the bin actually holds, and the hint under it reads of N needed (or N needed — taking N extra if you go over) plus how many the source bin holds. Items Picked Up needs a count of at least one.
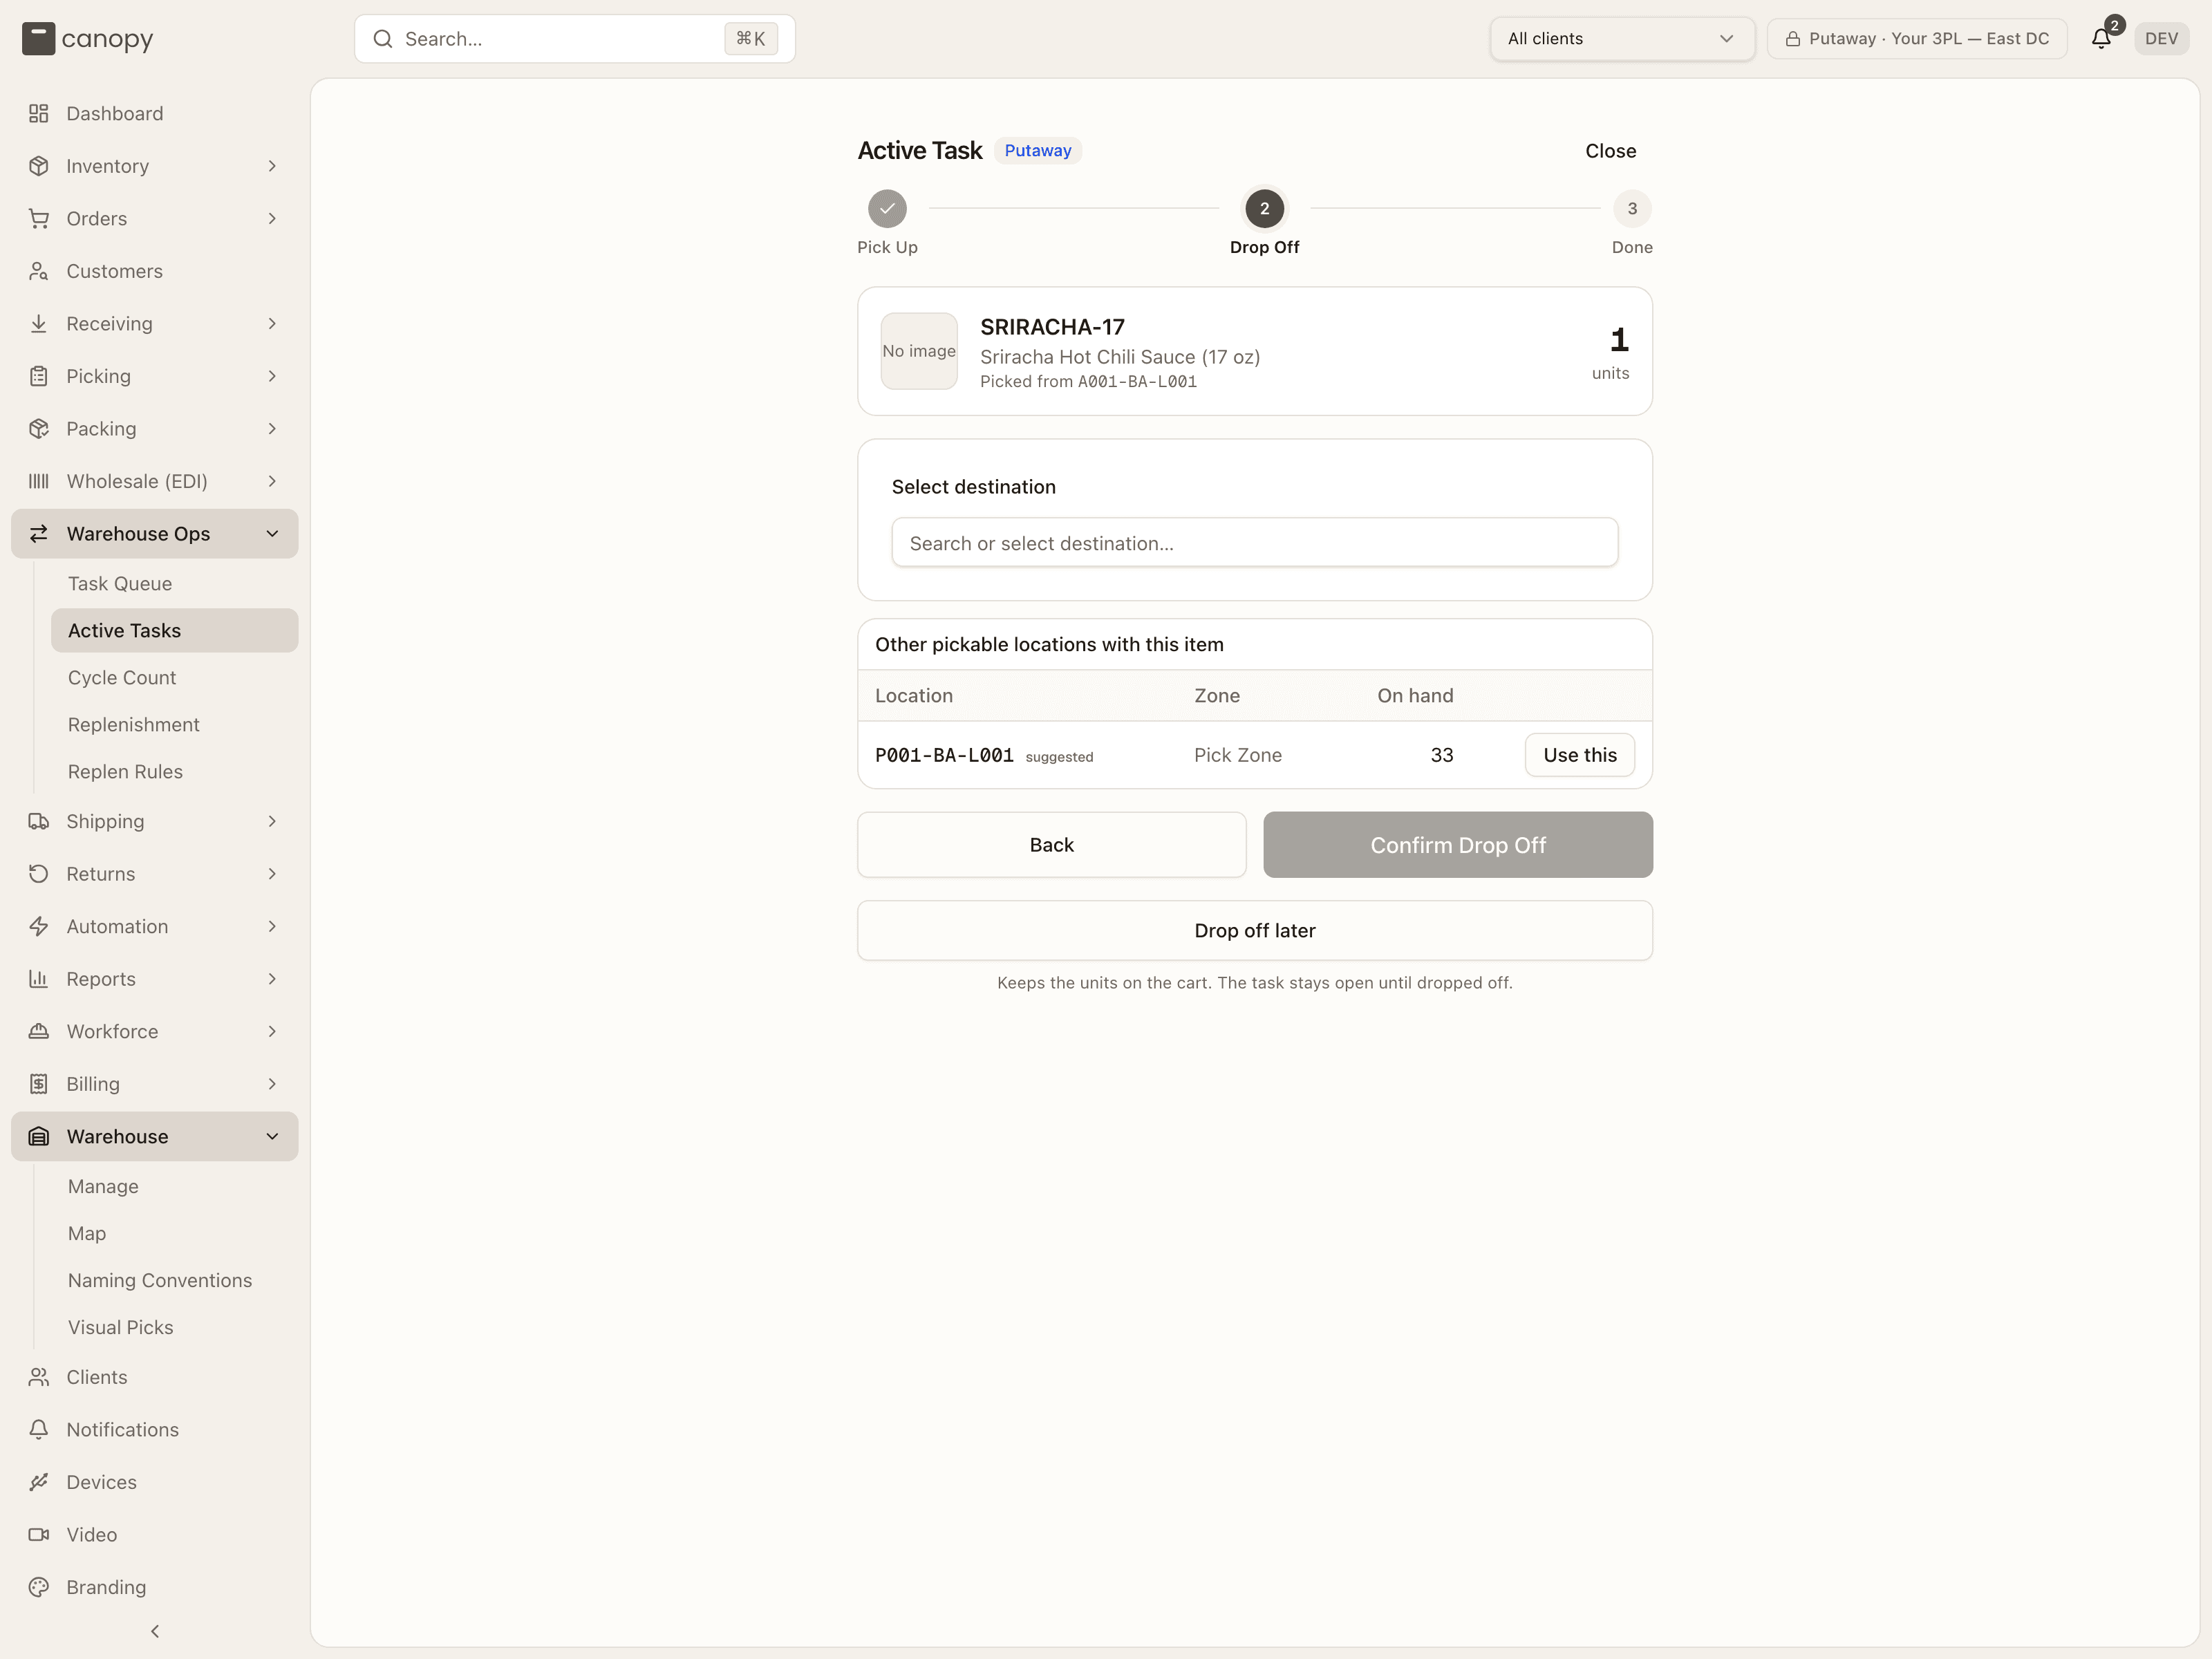
Drop Off shows what's in hand (Picked from the source bin, and the unit count) and asks where it goes:
- A replenishment task shows Bring to with the rule's pick bin — a suggestion, not a lock: "Suggested — scan to verify, or pick another below". Scan it or tap it to confirm.
- A putaway or put-back task shows a Select destination combobox with suggestions (and a banner of the SKU's storage tags when it has any). Choosing one switches to a confirmed Bring to with a Change location link.
Under either, Other pickable locations with this item lists every other pick face already holding the SKU, fullest first (the task's own suggestion stays in the list so you can go back to it), with a Use this button per row.
Confirm Drop Off executes the move. Back returns to Pick Up. Drop off later keeps the units on the cart — the count is saved, the task stays open, and the queue shows it as Picked N until someone drops it off; Close in the header does the same when a count has been entered. If the source bin no longer holds the stock the task expects, the error explains it and offers Cancel This Task to clear it from the queue.
Done confirms Task Complete — Nx SKU moved from A to B with Back to Task Queue.
Ad-hoc moves and tote put-backs
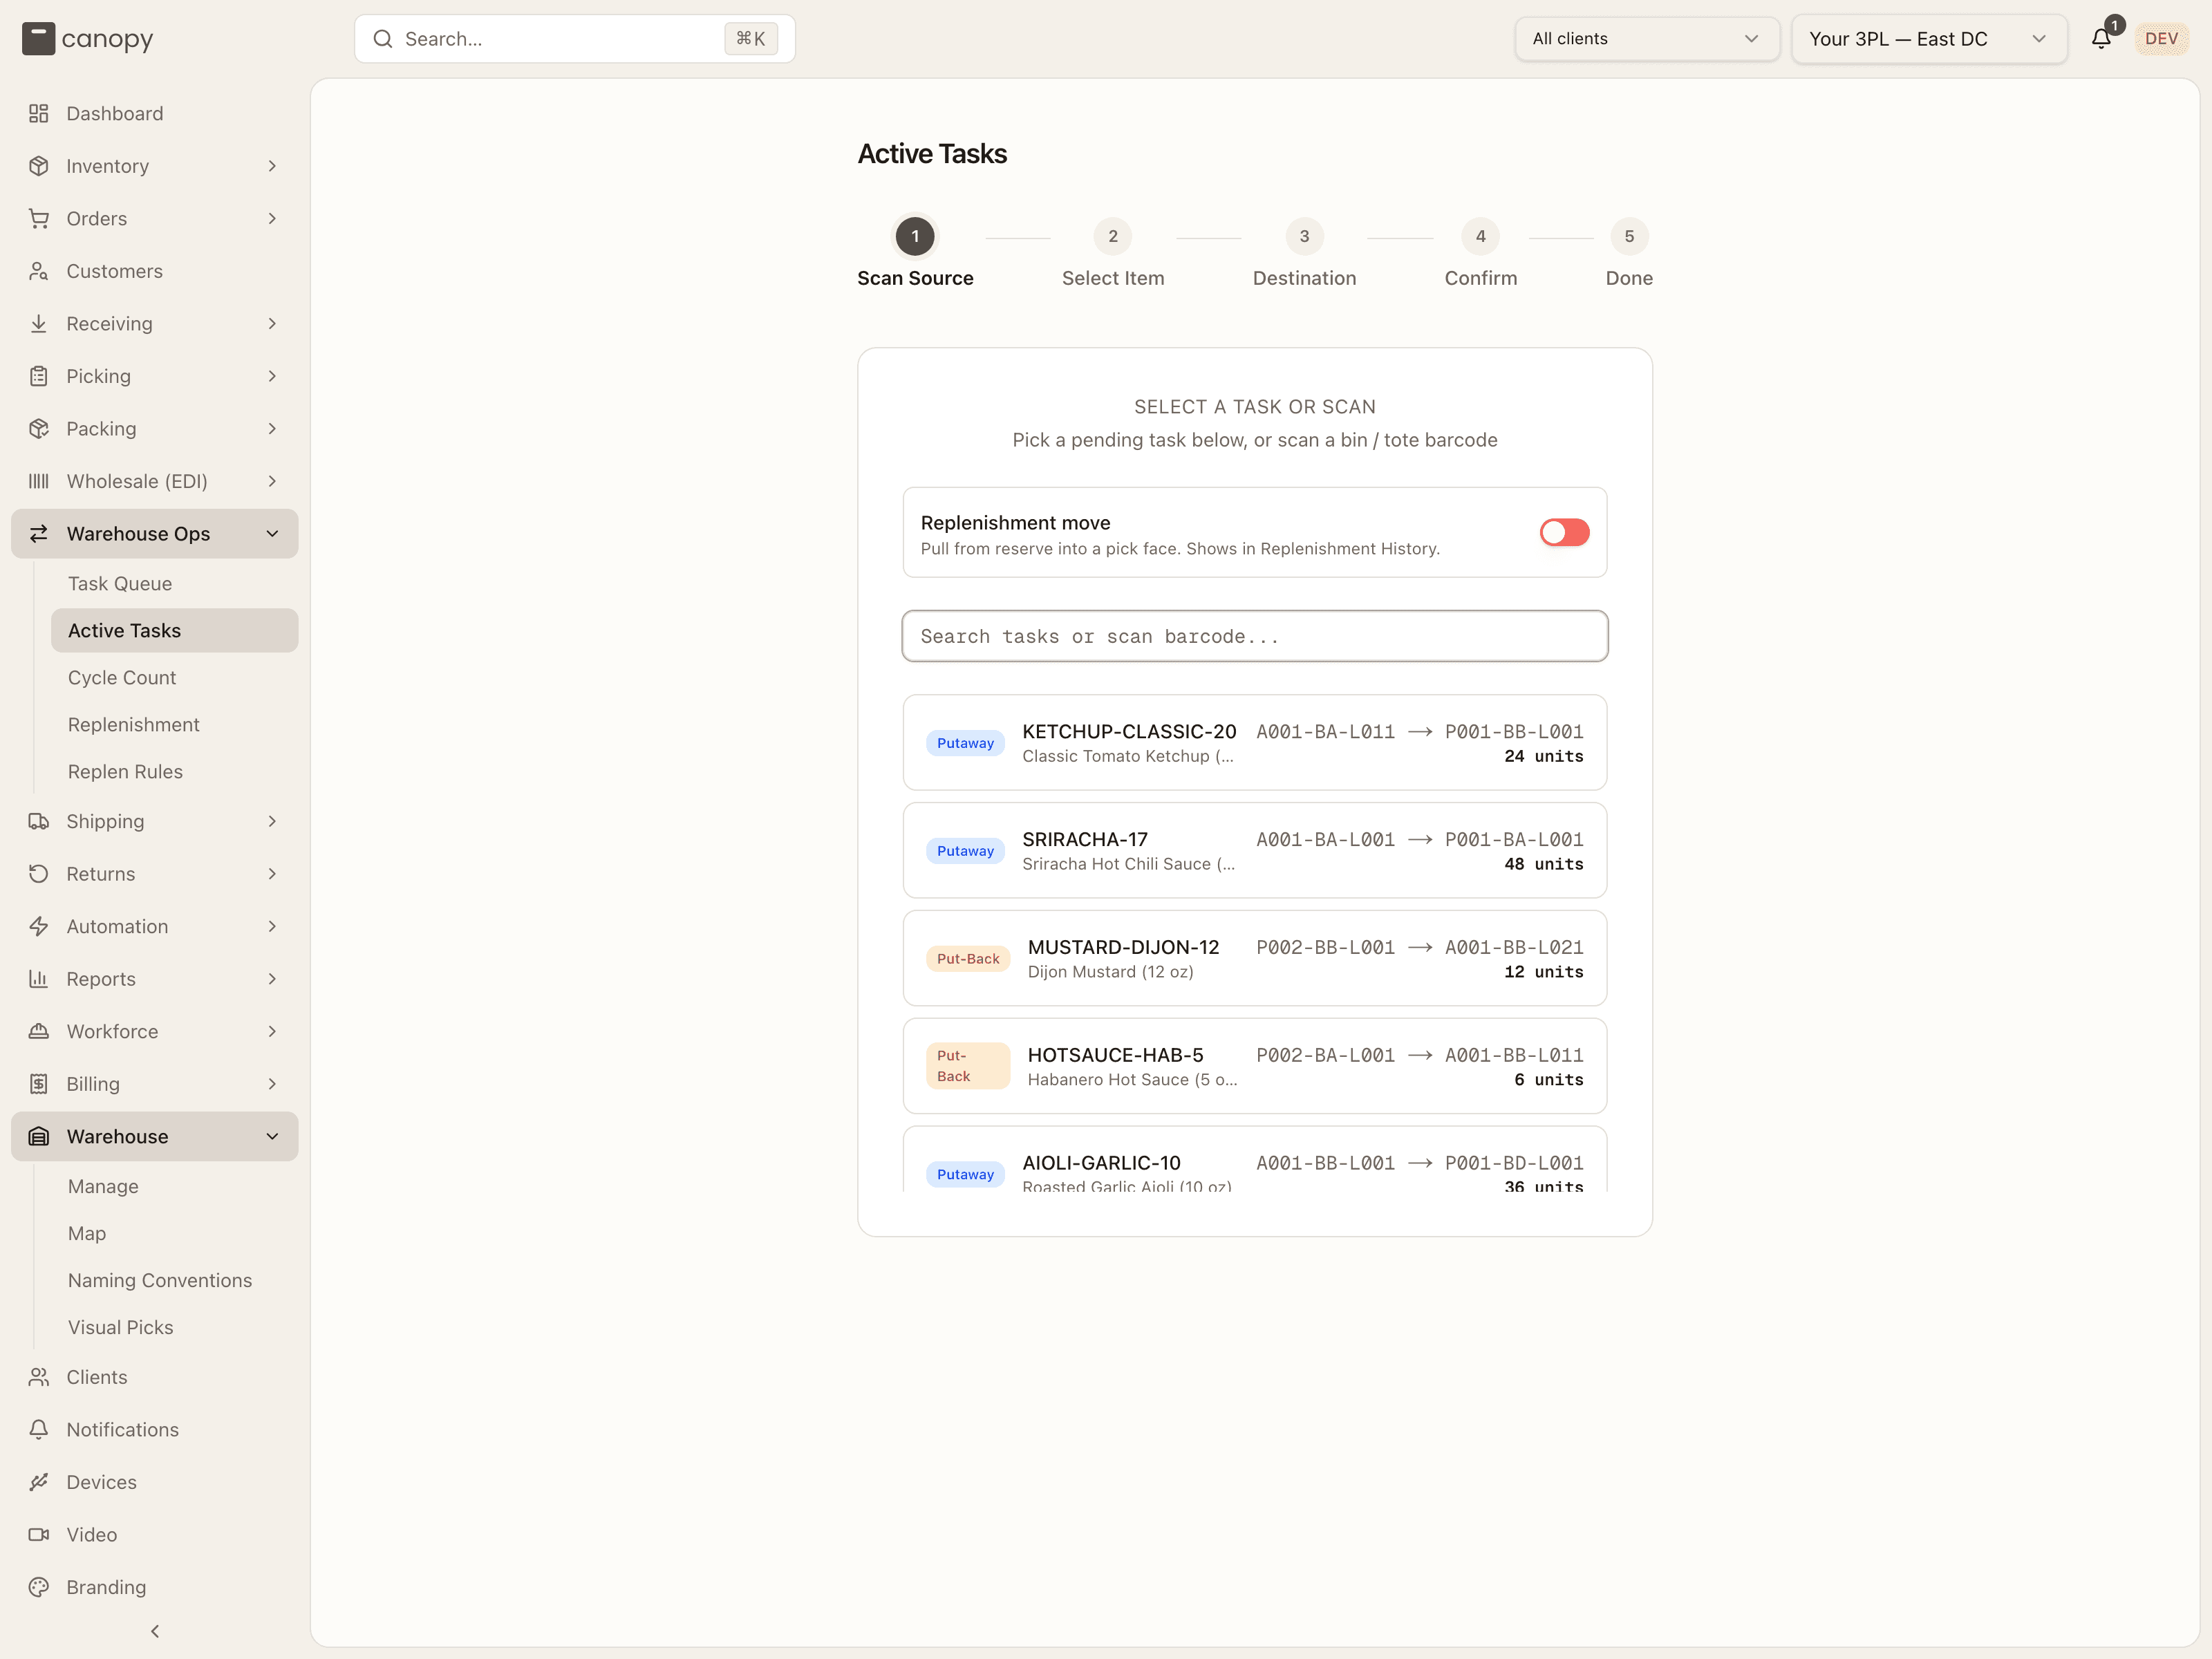
Opening the page fresh and scanning a bin or tote — no task — runs the five-step flow below, which ends on a Done screen offering Put Away More from Same Bin / Scan New Source. The screenshots show this path.
Scan Source. The screen opens on Select a Task or Scan: a search-or-scan box and a list of pending and in-progress tasks — each with its type badge, SKU, source → destination, and units remaining — that you can tap to start guided. Scan the bin or tote you're pulling from instead to go ad-hoc. If nothing pins a warehouse yet (top bar on All warehouses, several active), a "Which warehouse are you working in?" picker appears first and the scan box stays disabled until you choose — bin labels are per warehouse, and the pick locks this session to it.
Above the scan box sits a Replenishment move switch, "Pull from reserve into a pick face. Shows in Replenishment History." Leave it off for an ordinary put-away. Turn it on when the move tops up a pick face: the same five steps run, with the differences under Replenishment moves below.
Scanning a flagged tote instead shows the tote's flag reason and the items in it, then two options: Empty & Release Tote (unload at the staging area and release the tote; its put-back tasks stay in the queue) or Put Back Now (walk each item back to its original bin from this tote).
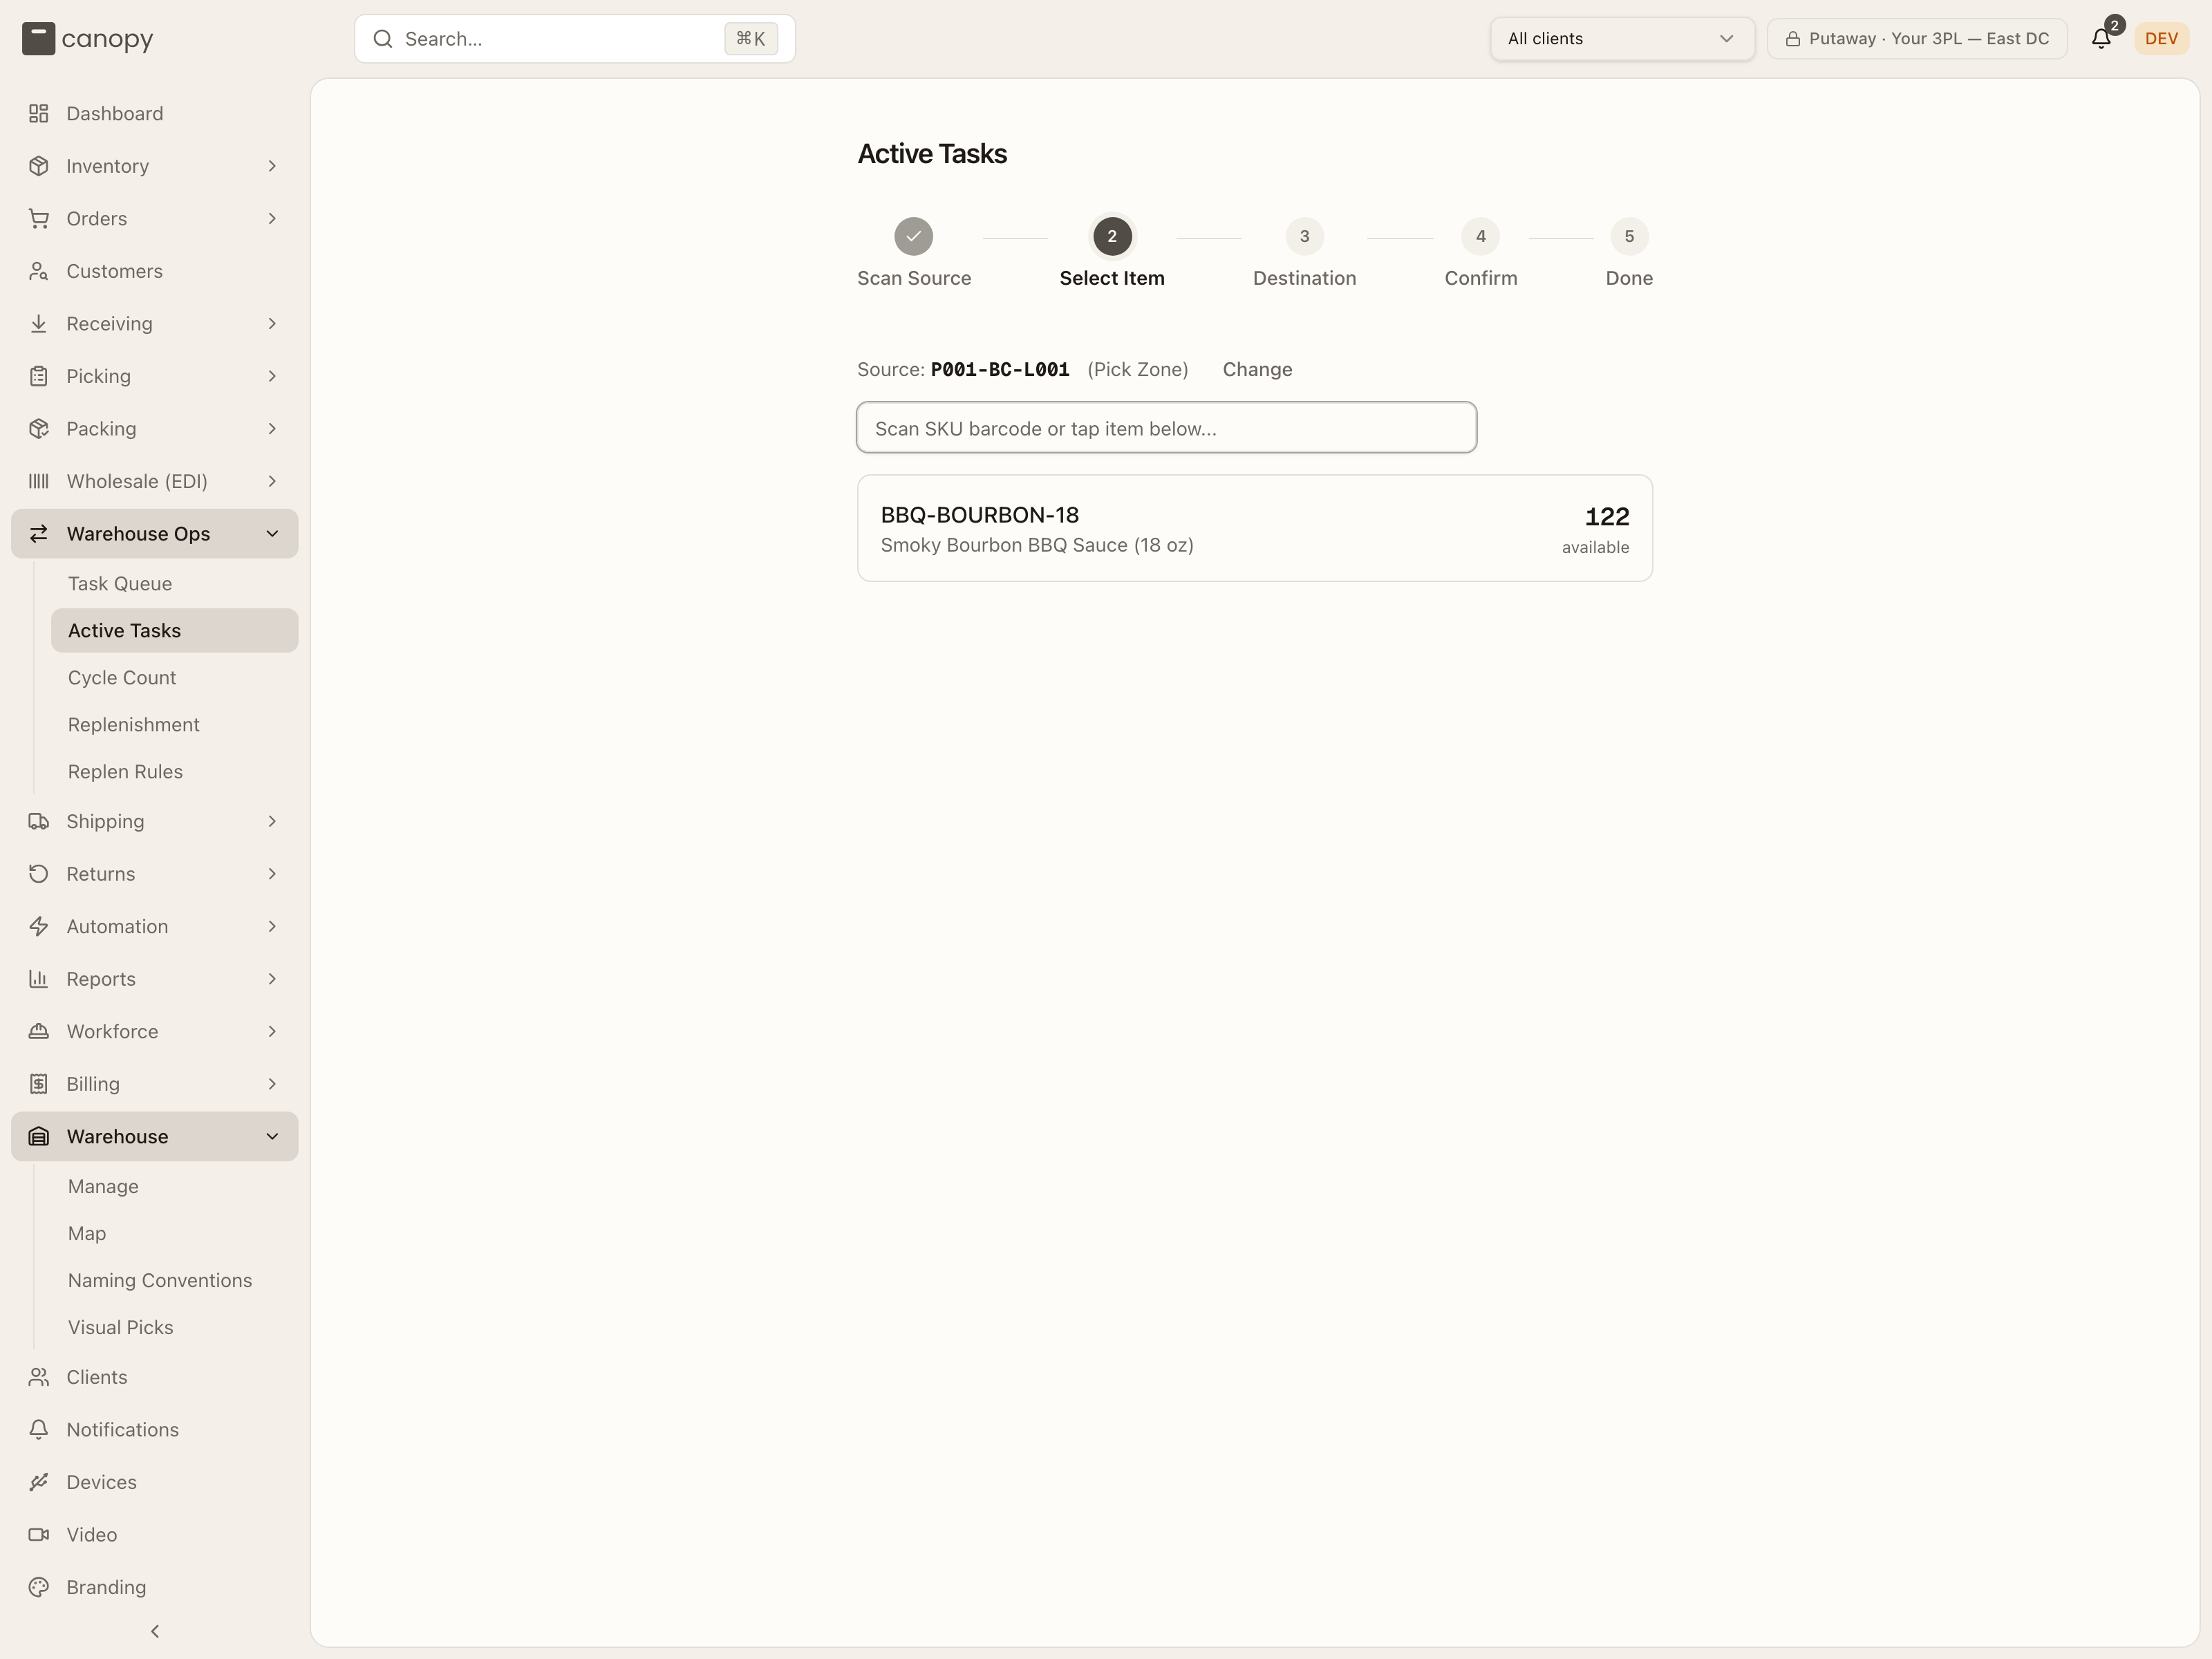
Select Item. The bin's contents appear with each SKU's available quantity and any pending task on it. Scan the SKU barcode or tap the item. If a bin holds several pools (lots, or a lot plus untracked stock), you pick exactly which pool to move.
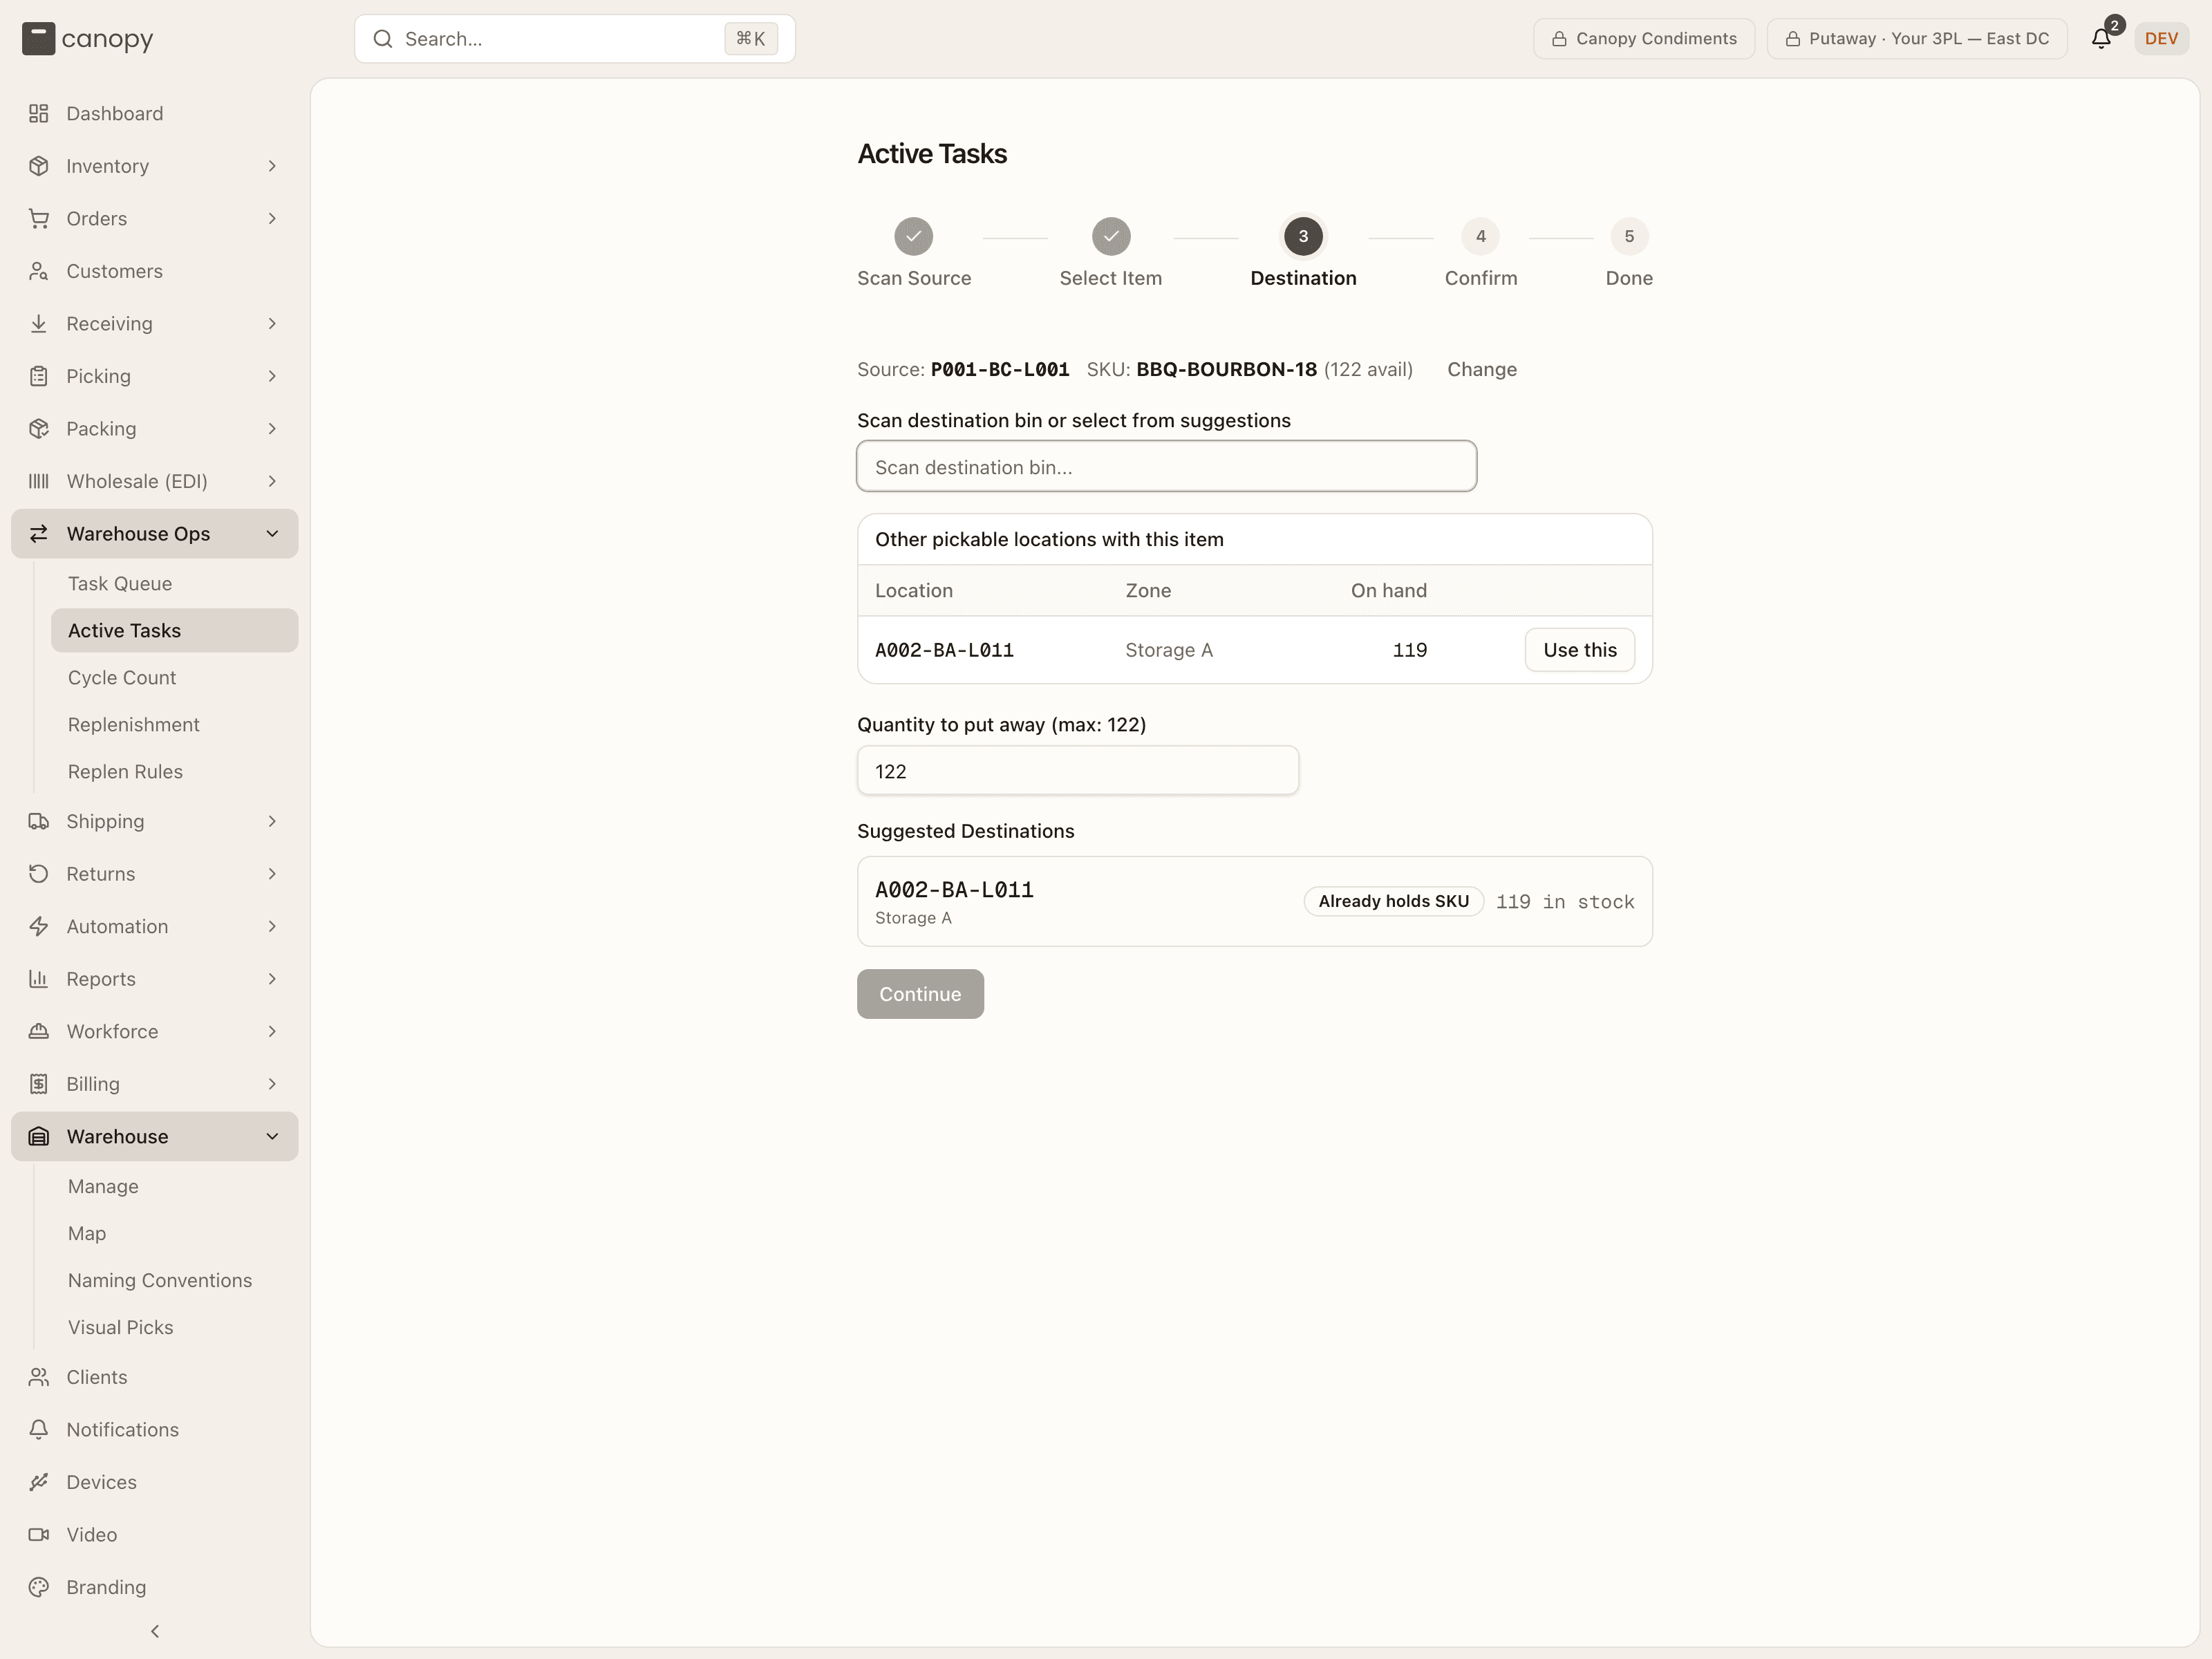
Destination. Scan the destination bin, or pick one from Suggested Destinations — which flags bins needing replenishment (Need N units), notes which already hold the SKU, and shows current stock — or from Other pickable locations with this item. Set the quantity (capped by the selected pool). A tote put-back shows the item's Original location to return it to. Dropping onto a pallet location shows a pallet banner, lets you label a new pallet, and refuses a pallet that belongs to another client.
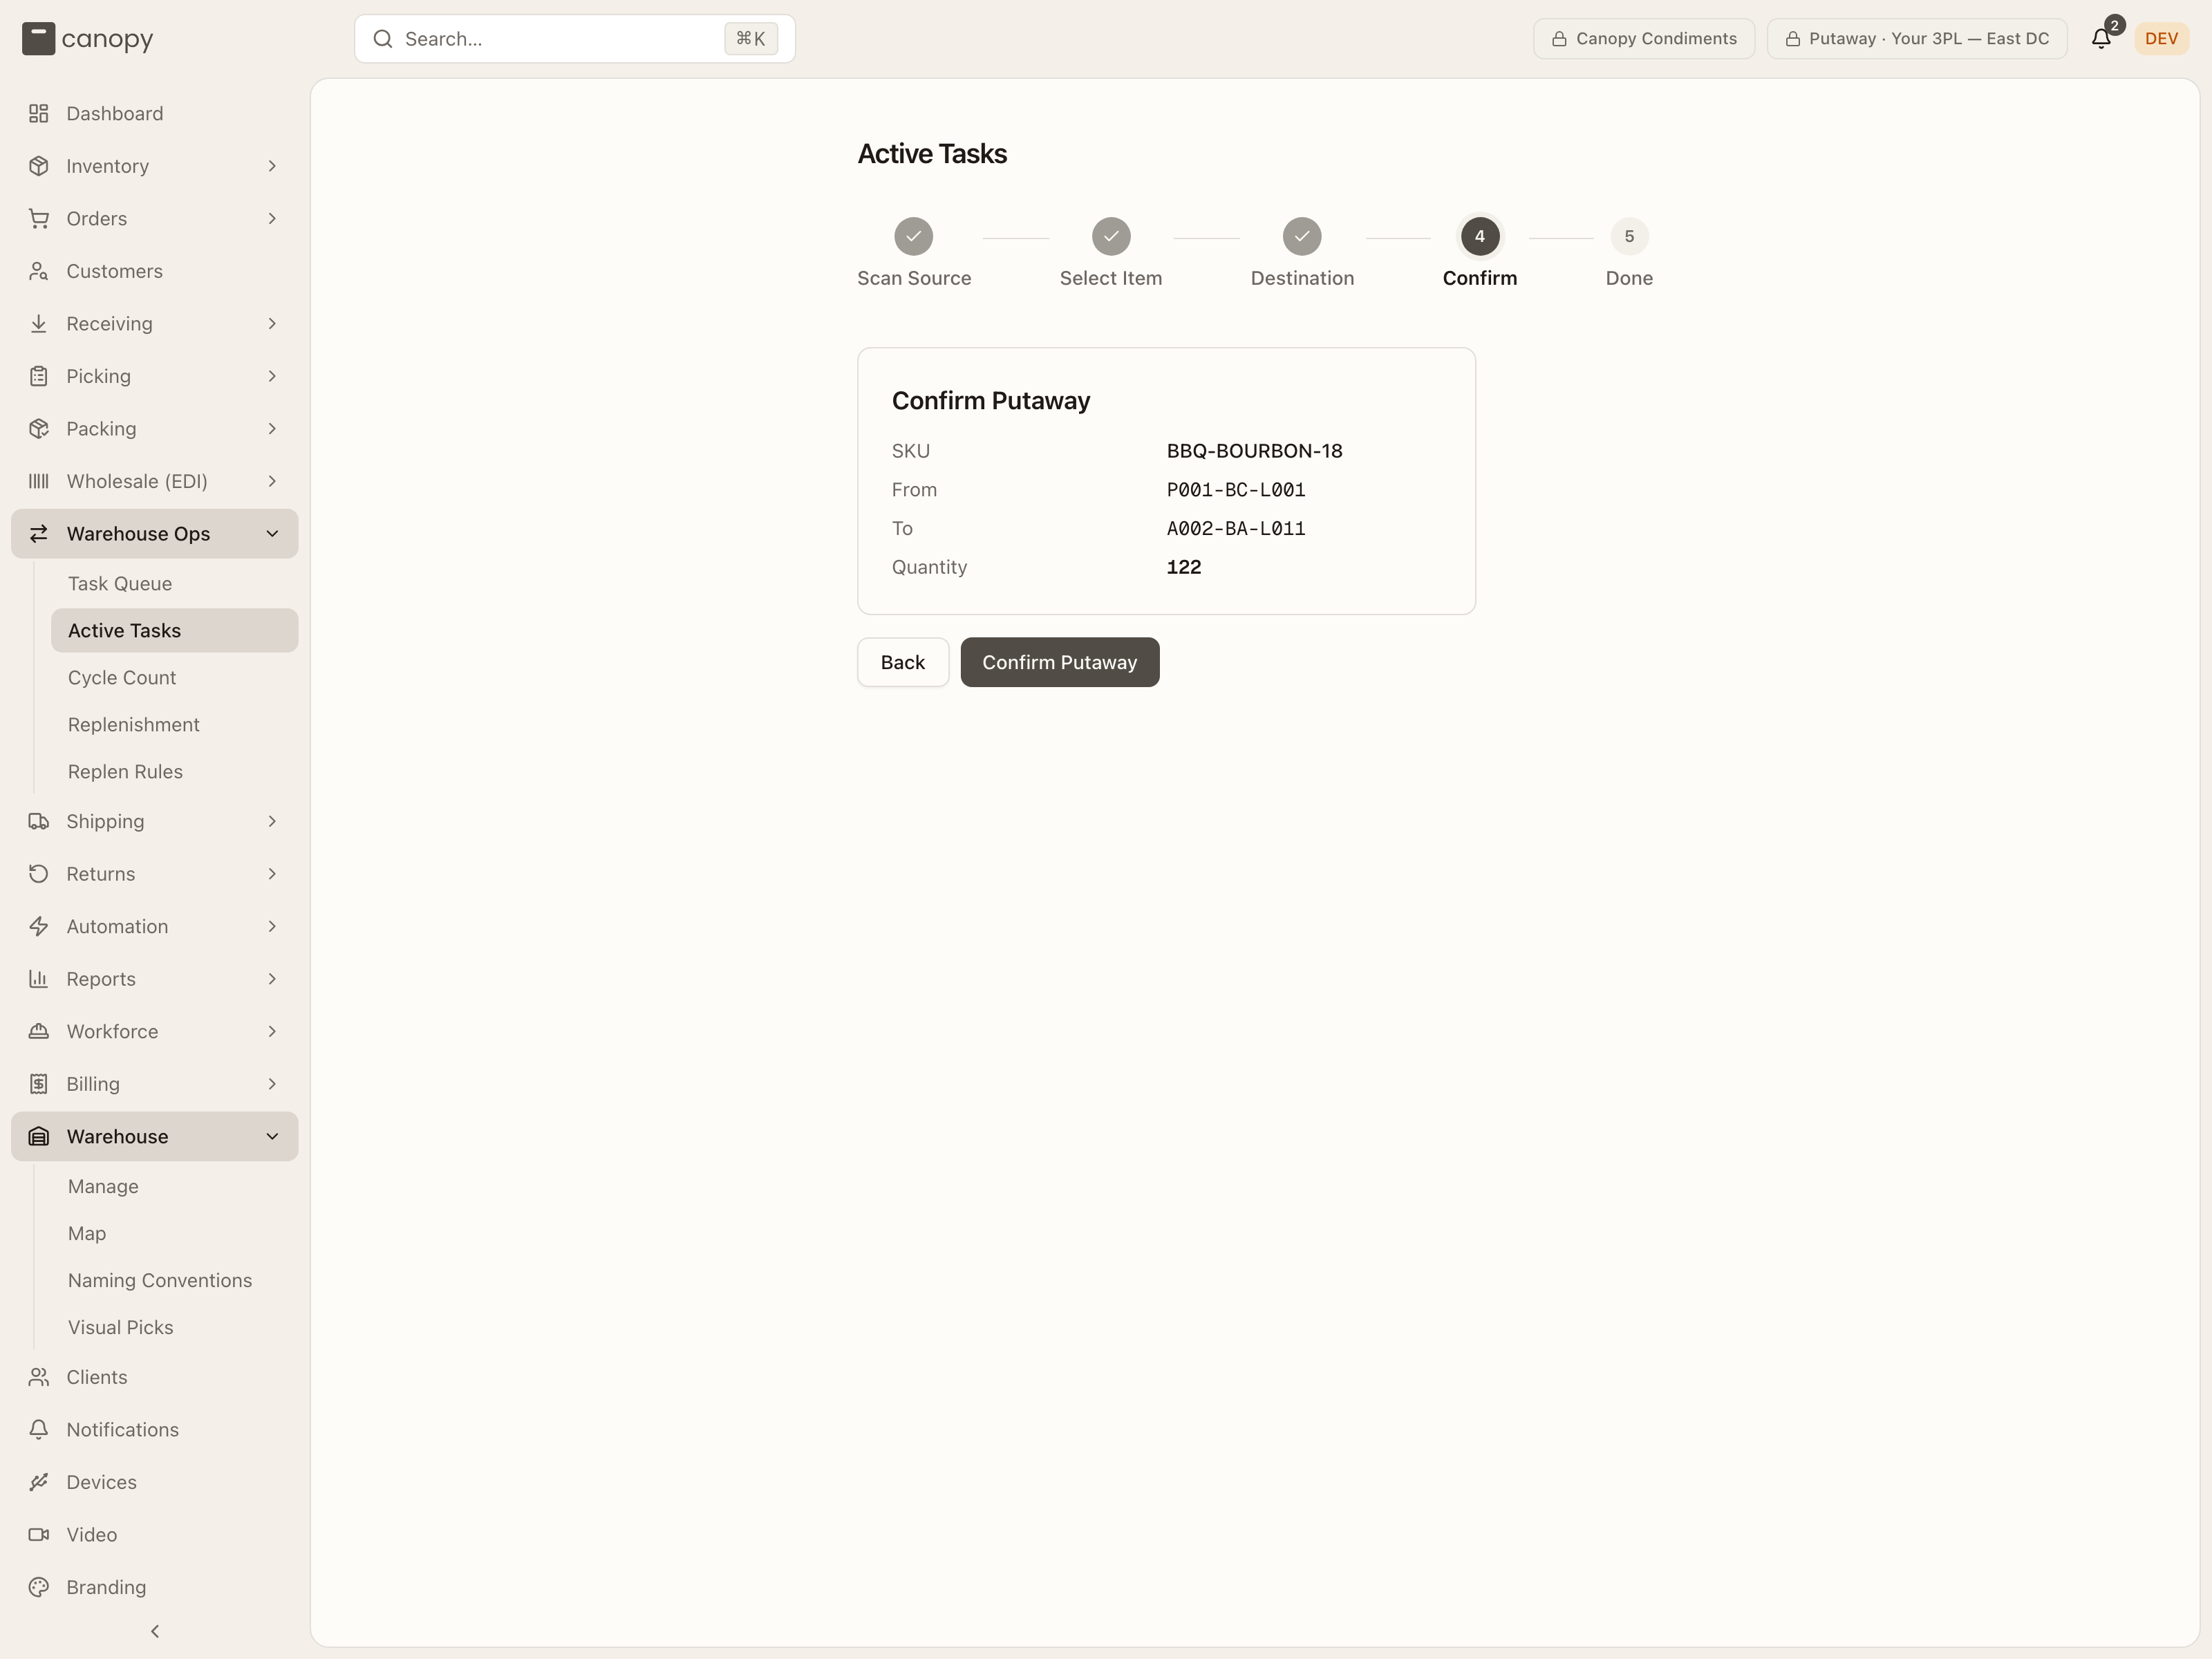
Confirm. A summary shows the SKU, the from-bin, the to-bin, and the quantity. Confirm Putaway (or Confirm Put-Back) executes the move and updates stock.
Replenishment moves
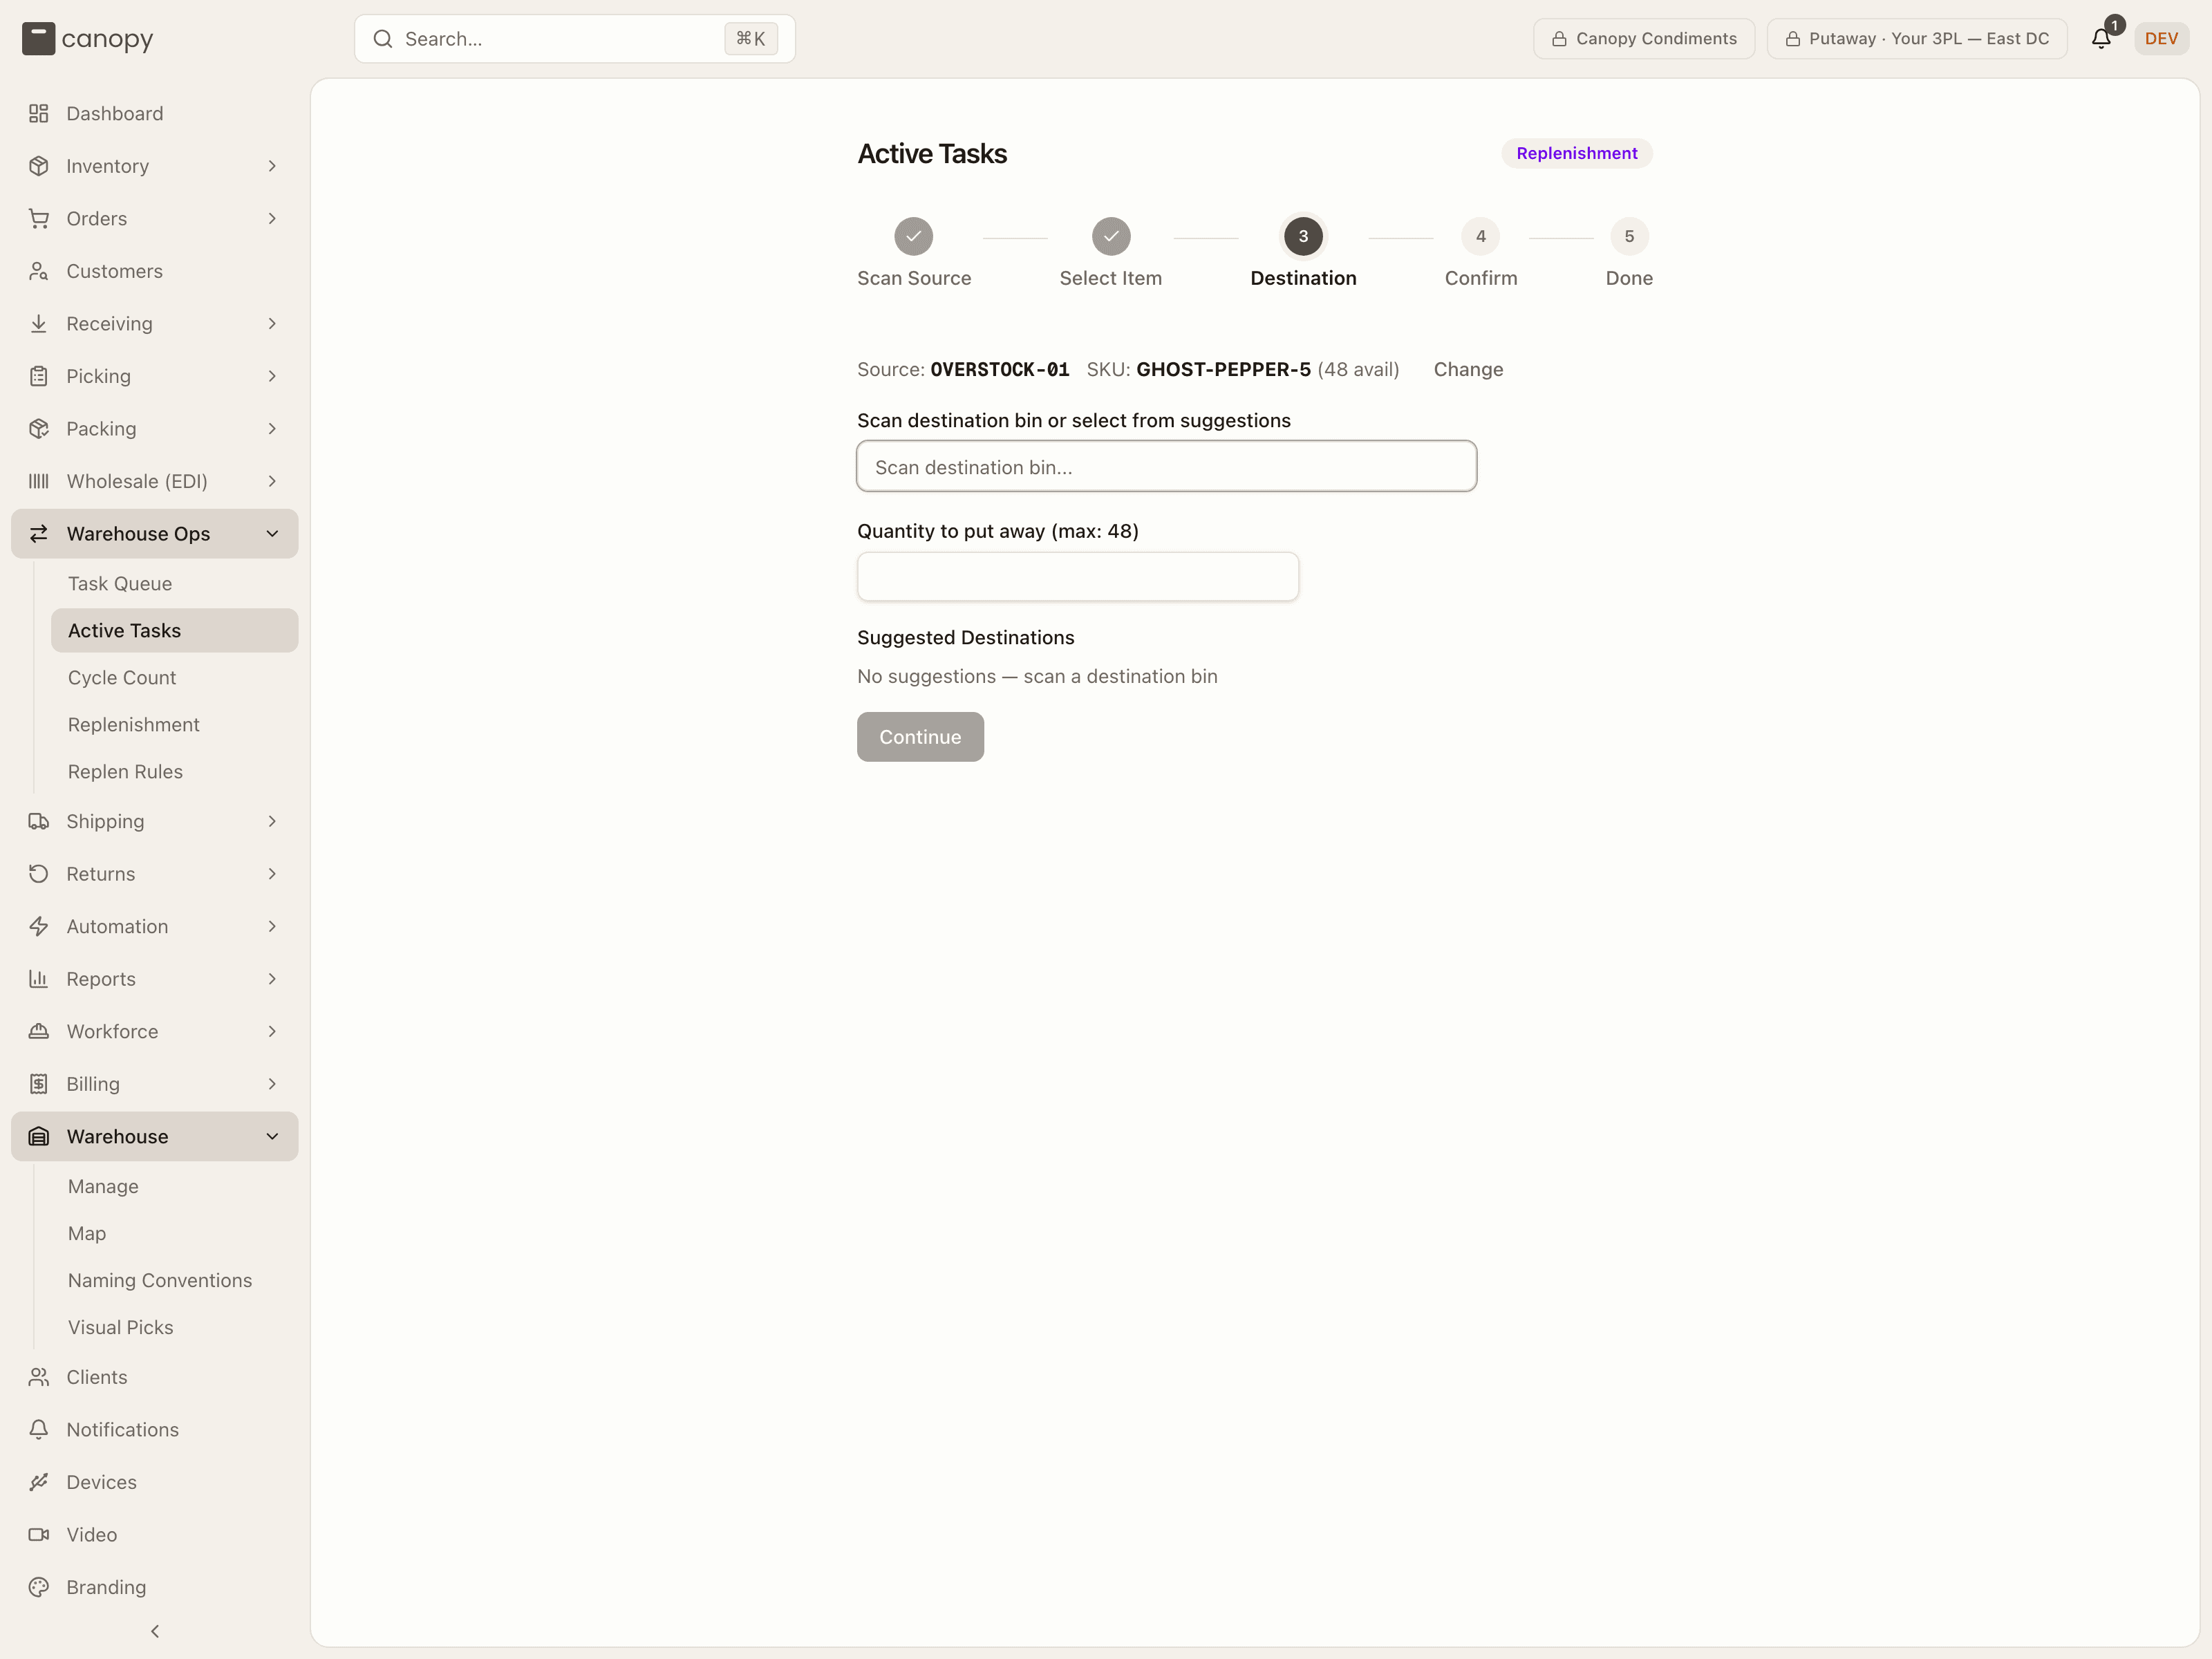
A replenishment move is an ad-hoc move that tops up a pick face and is recorded as a finished replenishment, with no task raised first. It is how a SKU with no rule gets replenished. Two things start one: the Replenishment move switch on Scan Source, for work off the printed worksheet, and Replenish → Pull from on a Replenishment needs row, which opens this page with the switch already on. A Replenishment badge beside the page title shows the mode is on.
The five steps are the same. What changes:
- Scan Source. The source has to be reserve. A pickable bin is refused ("BIN is a pickable location, so it is a pick face rather than reserve to pull from."), and so is a bin that is not sellable, such as a quarantine bin ("BIN is not a sellable location, so its stock can't go to a pick face."). Arriving from a worklist row, the pull-from bin is scanned for you, in that bin's warehouse whatever the top bar says.
- Select Item. Arriving from a worklist row, the SKU is picked for you. A bin holding several lots still asks which lot.
- Destination. Suggested Destinations offers pick faces only, among them a rule's face below its minimum, faces holding the SKU now, empty pick bins, and faces the SKU emptied in the last 90 days (up to five, badged Recently held SKU). A face since taken over by another product, or by another SKU's rule, is left out. A bin that is not pickable is refused ("BIN is not a pick face — replenishment fills pickable locations. Turn replenishment off to move stock into reserve."). The quantity box starts empty instead of at the whole pool. From a worklist row it starts at that row's shortfall, capped at what the pool holds.
- Confirm. The button still reads Confirm Putaway. The stock move and the replenishment record land together: a transfer with the reason Replenishment (ad-hoc), and a replenishment task written already Completed, put away by you. Nothing is left open in the queue.
- Done. The screen reads Replenishment Complete. From a worklist row it also offers Back to Replenishment.
The move then shows on the Replenishment page's History tab like any finished task. A tote put-back is never a replenishment move, whatever the switch says, and scanning a bin that has an open task for the SKU attaches that task as before.
Cycle Count
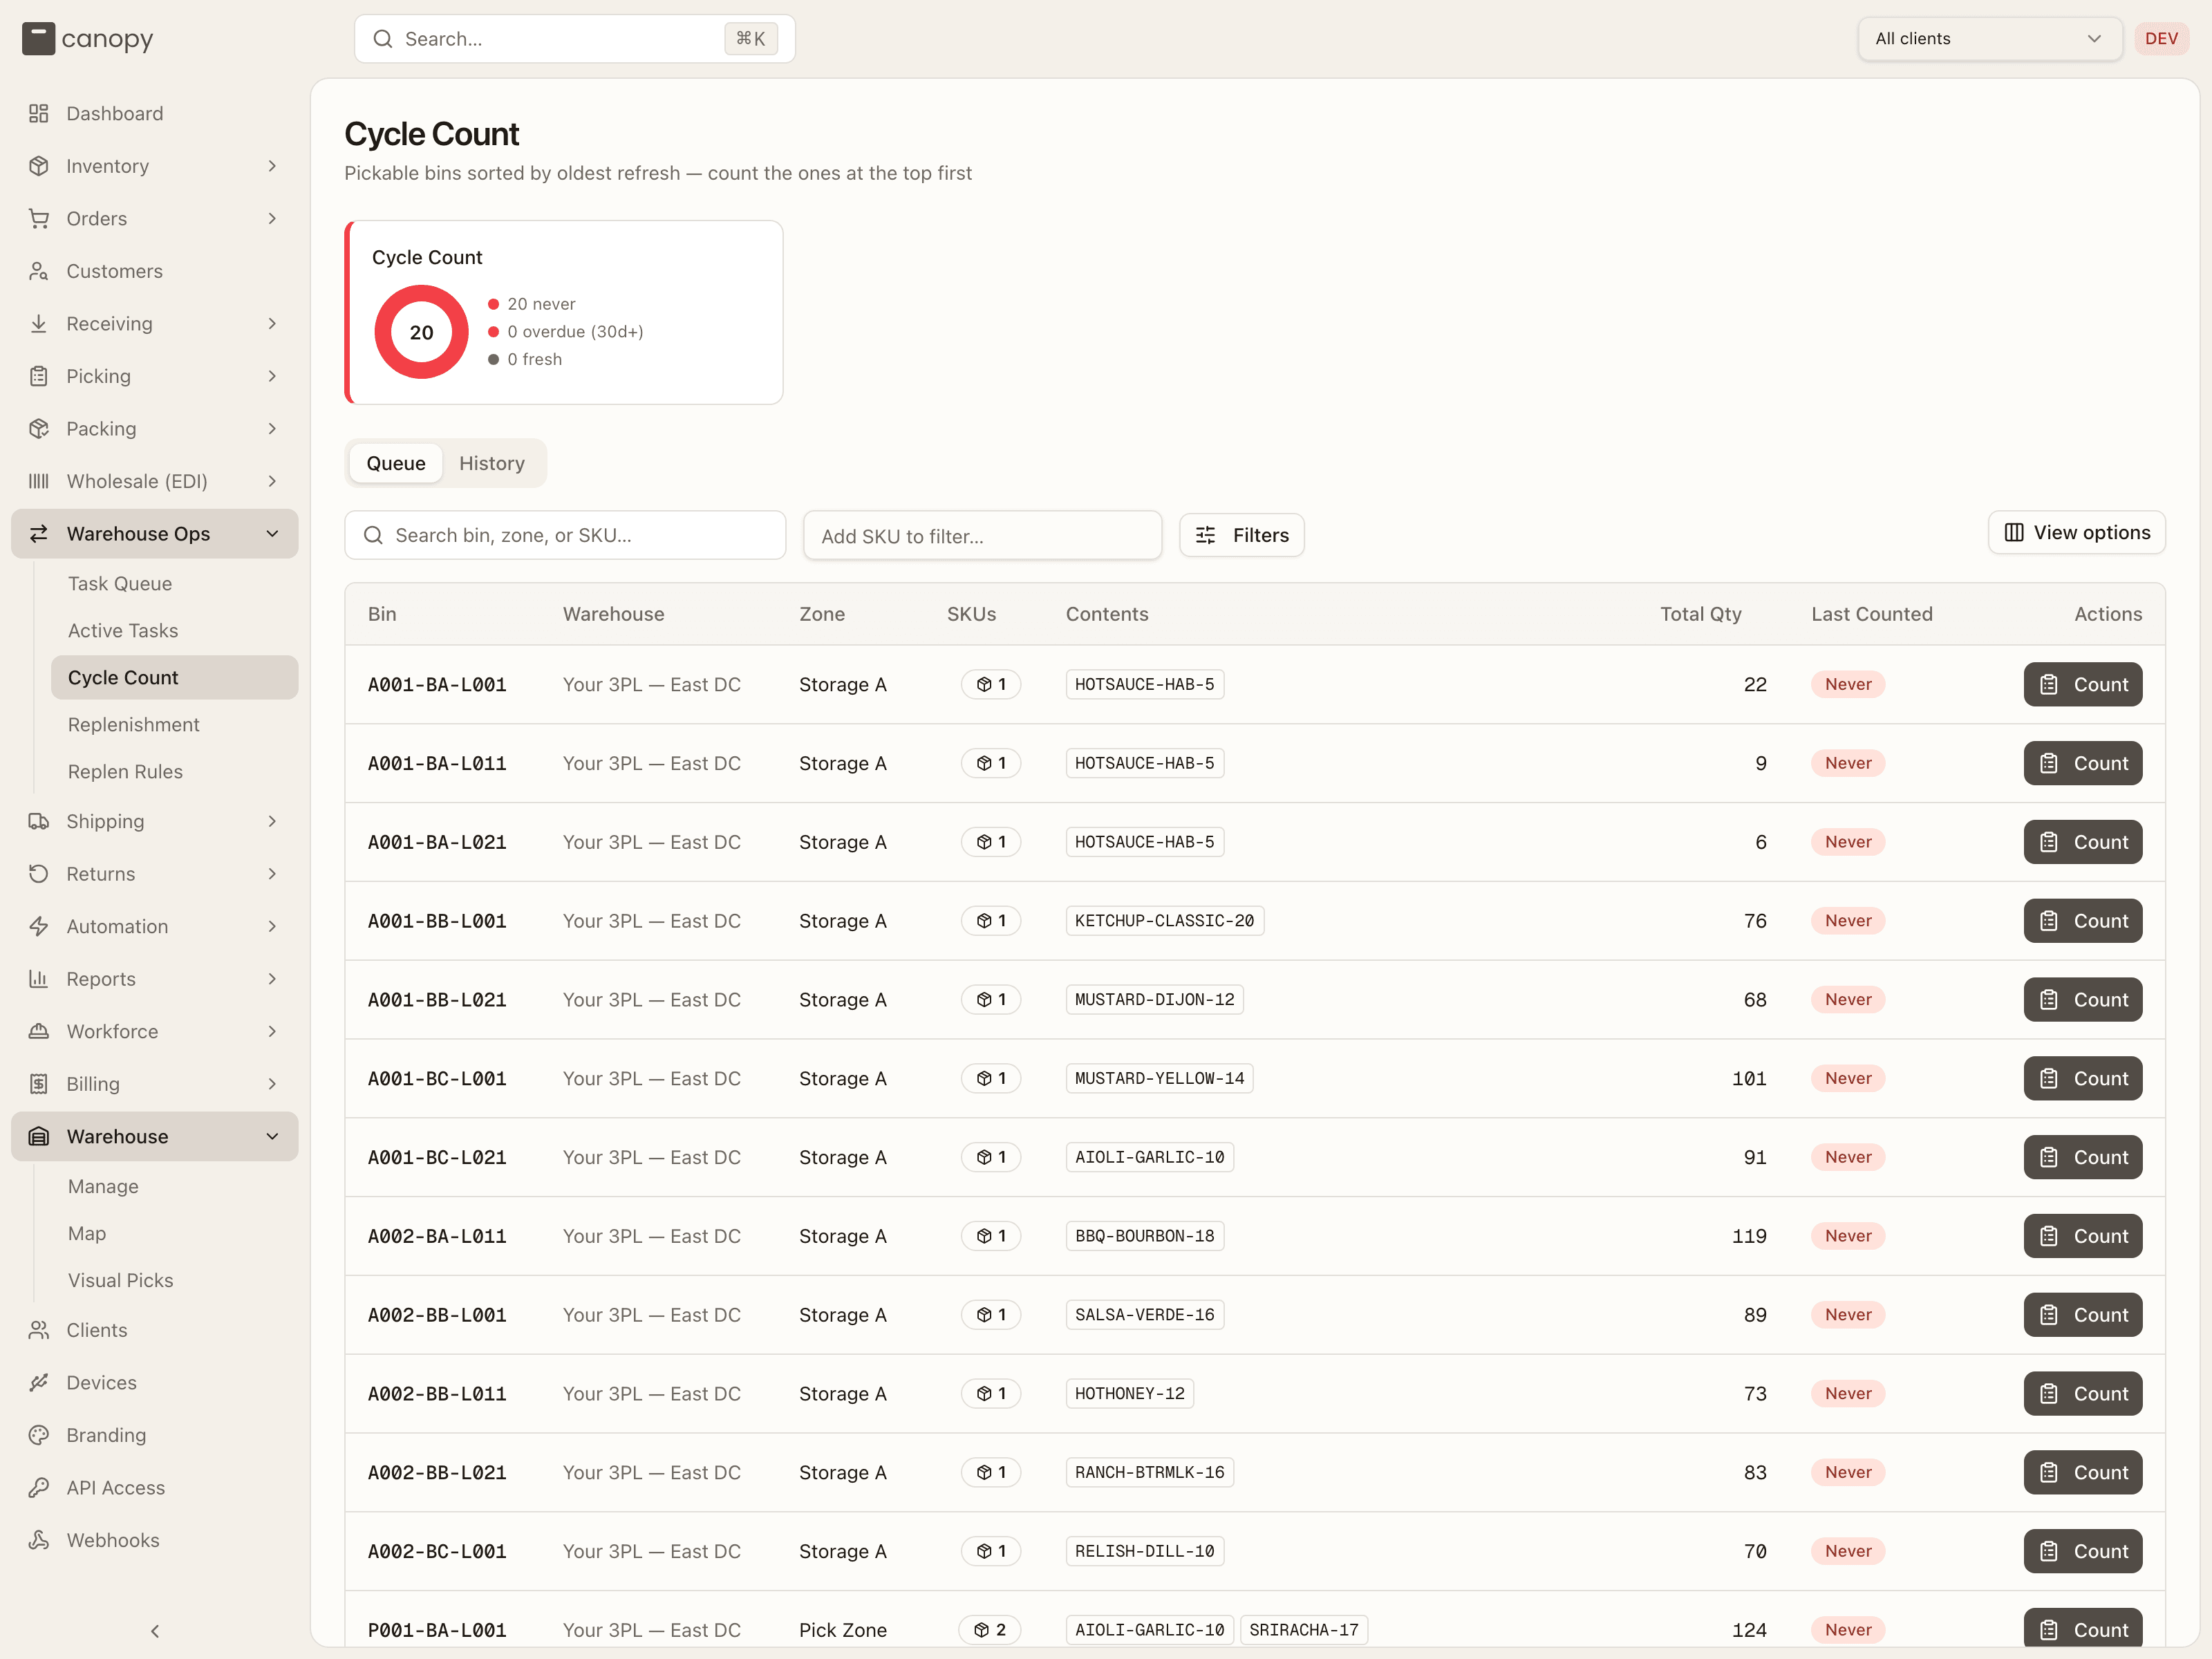
Cycle Count → /warehouse-ops/cycle-count. Two tabs: Queue, the worklist
of bins still to count, and History, the log of counts already done.
Queue
Pickable bins sorted by how long since they were last counted, so the most stale bins float to the top. The idea is simple: count the ones at the top first.
A donut at the top breaks the bins into Never counted (red), Overdue (amber, 30 days or more), and Fresh (green). Search by bin, zone, or SKU to narrow the list.
Each row shows the bin, its warehouse and zone, the number of SKUs and total units in it, which SKUs are in it, and when it was last counted, shown as a color-coded pill (Never, Today, or N days ago — green under a week, amber under a month, red beyond) with the exact weekday, date, and time beside it.
The Contents column names the SKUs rather than just counting them, heaviest first, so you know what you're walking to before you get there. Click any SKU code to open that product's detail. Bins holding more than three SKUs show the first three and a +N more hint; hover it to see the rest.
Press Count to open a count dialog already pointed at that bin, where you record what you actually find. If there's nothing to count, the list reads "No pickable bins with stock to count." The table has View options and paginates with a rows-per-page picker.
Filters. Beside the search box, an Add SKU to filter… picker narrows the queue to bins holding particular SKUs — each pick becomes a chip and the box clears for the next one. A Filters popover carries the rest:
- Last counted — Never counted, Not in 2+ weeks, Not in 4+ weeks, Not in 8+ weeks, or Custom range, which reveals a From / To date pair. The day-count presets also include bins that have never been counted at all.
- SKU list — Upload CSV to filter by a list of SKU codes instead of picking them one at a time. One code per row; a header row named SKU / SKU Code / Code is detected and skipped, otherwise the first column is used. Codes are trimmed and de-duplicated, so the count shown is the number of distinct SKUs the filter will match. A file with no codes in it, more than 250 codes, or more than 10,000 characters of codes is refused with a message — a list applies whole or not at all, since a quietly trimmed one would hide rows you asked for.
The popover is closed most of the time, so everything it sets also shows below the bar as a removable chip, and the Filters button carries a count of what's active. Removing a chip clears that filter; Clear all drops the lot. Any filter change returns you to page 1.
The queue is scoped to the warehouse selected in the top bar. A tenant whose stock lives in another building lands on the empty state, which says so.
History
Every counted line, newest first: when it was counted, the bin, the SKU, the quantity Before and After, the Result, and who counted it.
The result is a Match badge when the count agreed with the system, or a
signed variance (+3, -2) when it corrected one. Counts that found nothing
wrong are recorded too, which is what makes count accuracy measurable — a bin
that was verified and correct is a different thing from a bin nobody has
touched. Search by bin or counter.
History has the same Add SKU to filter… picker and the same SKU list upload as the Queue, plus two filters of its own:
- Counted by — narrow to one person, listed from everyone who has actually recorded a count in this warehouse.
- Counted — Last 2 weeks, Last 4 weeks, Last 8 weeks, or Custom range (a From / To pair). The presets are measured as UTC calendar days, matching how the report underneath reads them.
As on the Queue, every active filter shows as a removable chip under the bar, the Filters button counts them, and changing one returns you to page 1. History is scoped to the top-bar warehouse too — and, since it has no Warehouse column to give that away, the empty state says so explicitly. It paginates like the Queue.
The same rows appear on a product's Activity tab, so you can read a single SKU's count history from the SKU itself.
Replenishment
Replenishment → /warehouse-ops/replenishment. The per-SKU worklist of pick
faces to top up, separate from the rules that drive it.
It's also where the home dashboard's Low-stock bins / Pending
replenishments exceptions land.
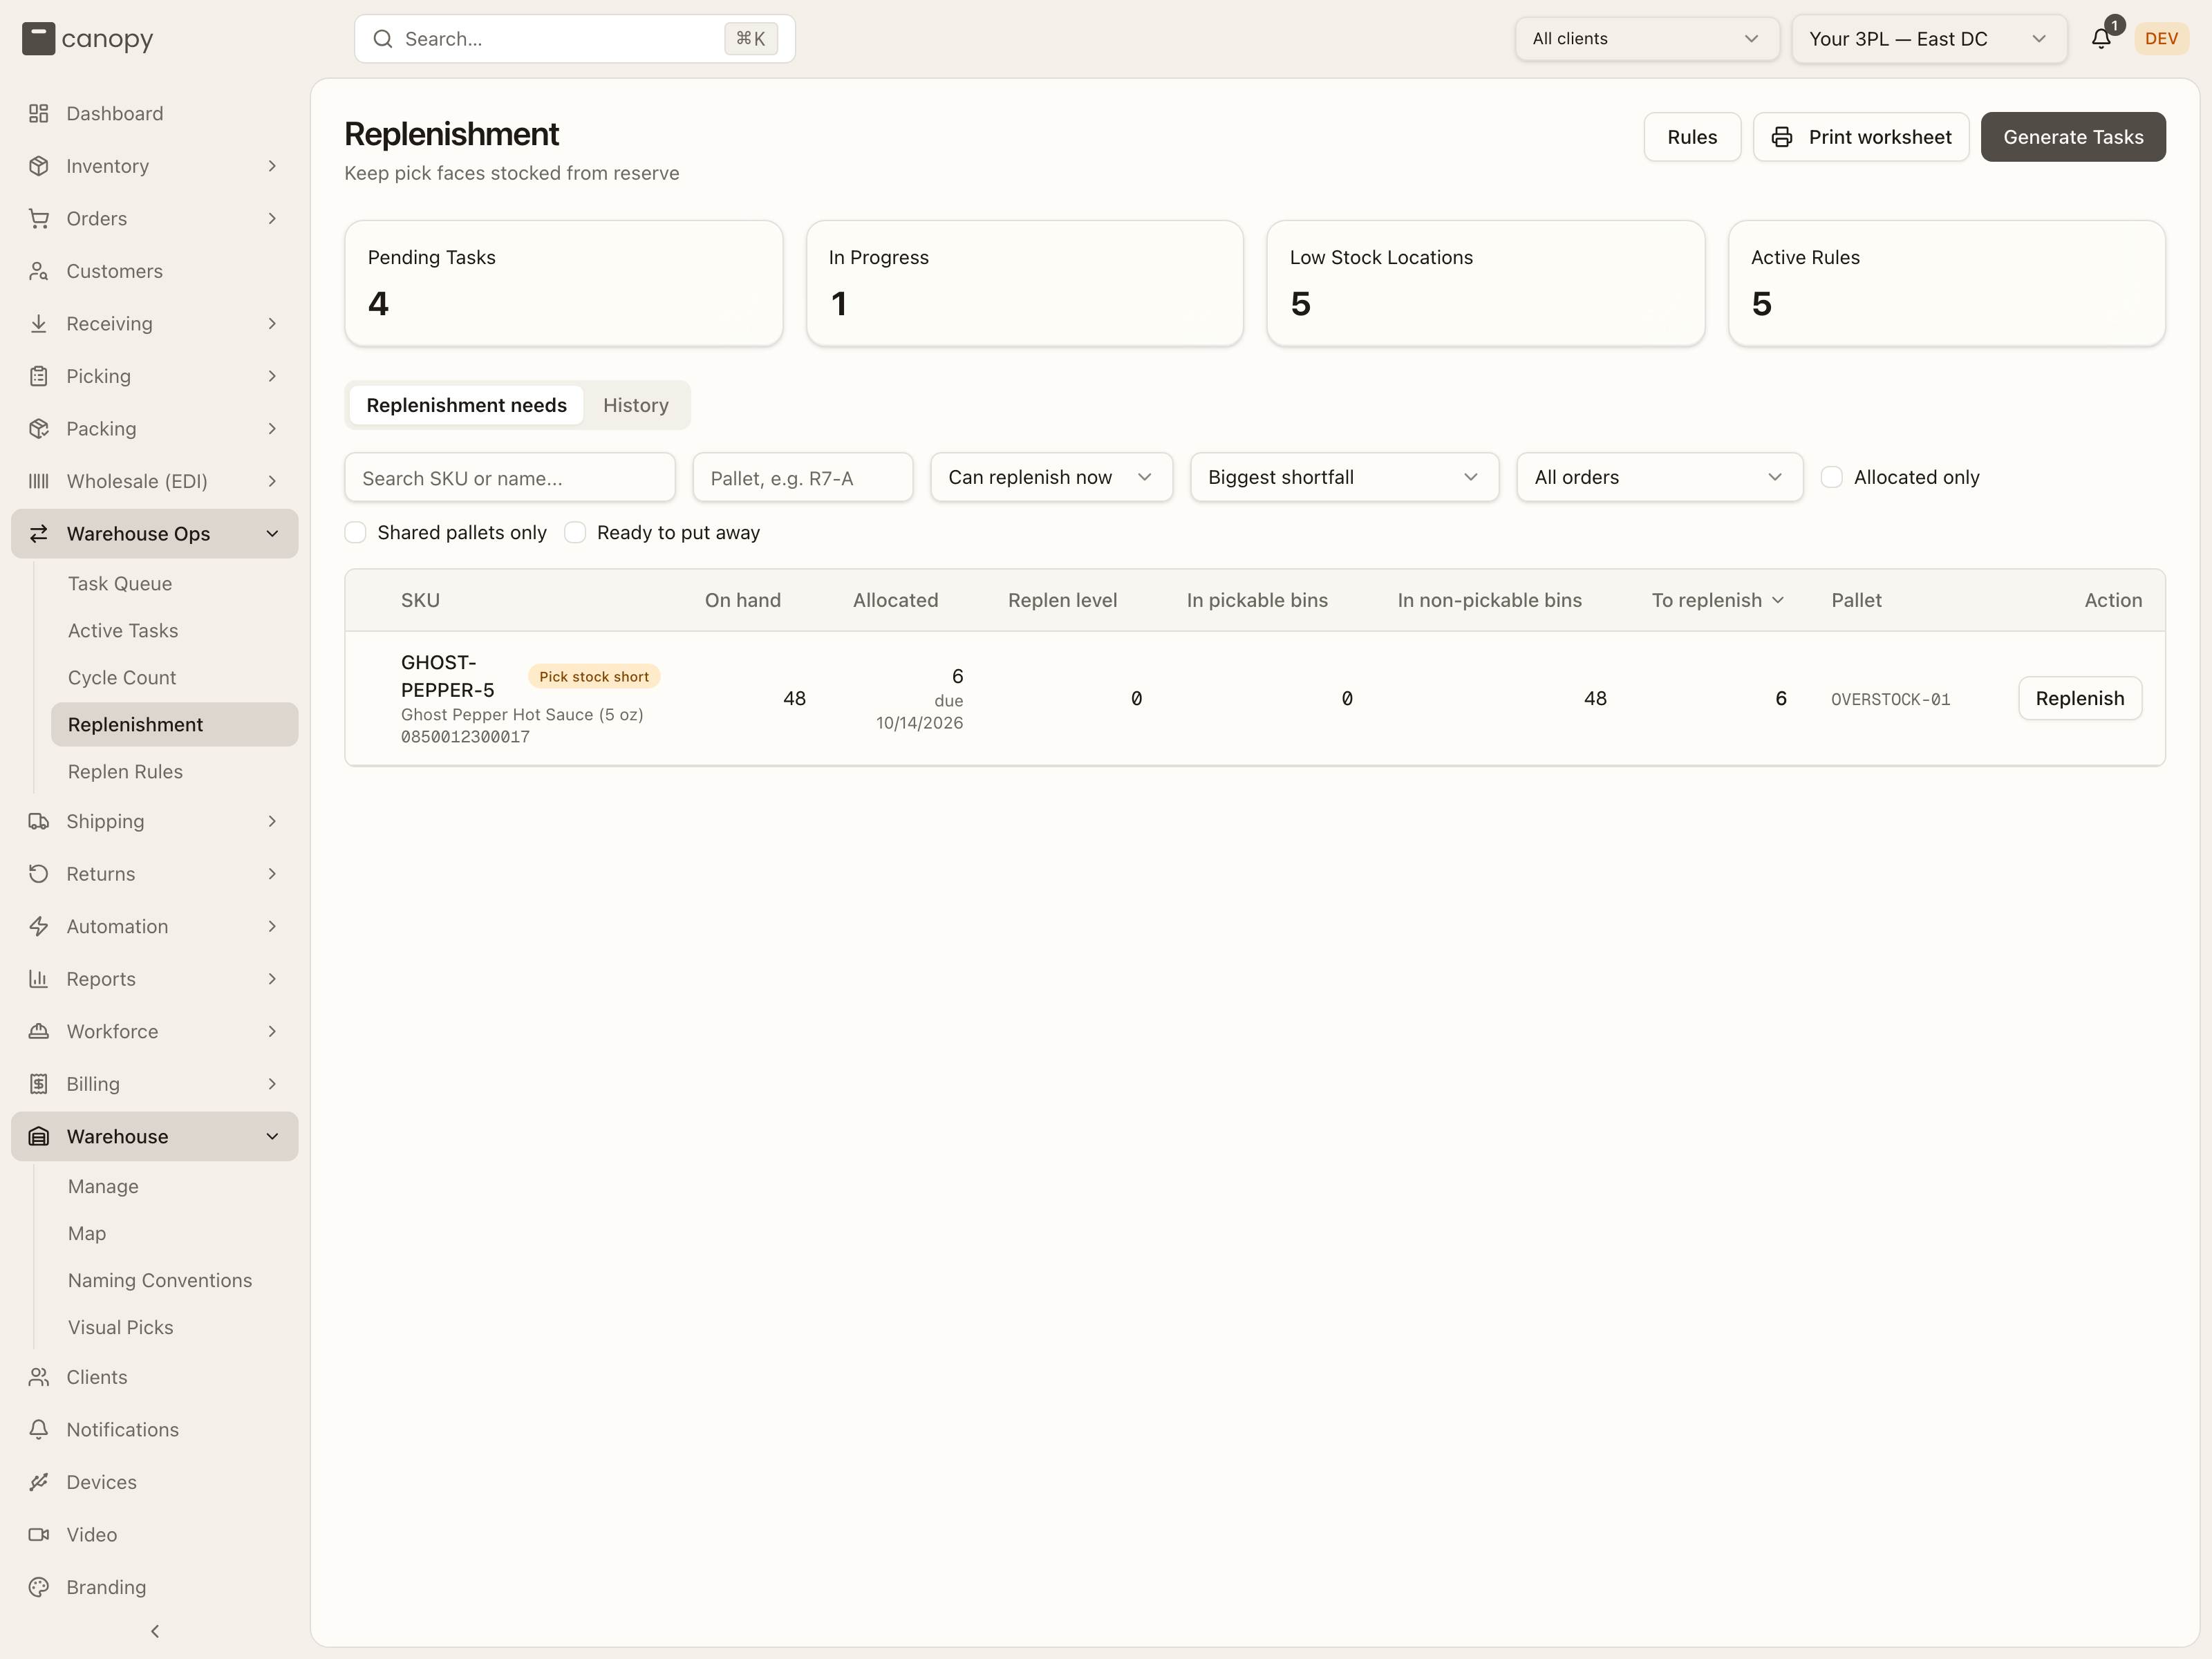
Four KPIs head the page — Pending Tasks, In Progress, Low Stock Locations, and Active Rules — and the header holds Rules (a link to the rules page), Print worksheet (on the needs tab: the whole filtered worklist on paper, not just the visible page, stamped with the filters it was taken under), and Generate Tasks, which checks every active rule and raises tasks for each pick face below its minimum. Two tabs: Replenishment needs and History.
Replenishment needs
One row per SKU that needs topping up — driven by its rule's level or by open demand, whichever is larger (an order merged into another is no demand of its own — its units are reserved on the order it ships in). A SKU with no rule earns a row only while its open demand outruns its pick face, or while a task of its is still out. Columns: a colour spine and SKU (code, name, barcode; a Pick stock short badge when reserved units need replenishment before normal picking — hover it for the count), On hand, Allocated (with the oldest required ship date underneath; hover it for "Units reserved for open orders, including Replenish orders.", since a reservation may be sitting in overstock rather than at the face), Replen level, In pickable bins, In non-pickable bins (reserve a move could use: active, sellable bins outside a Quarantine zone; damaged stock in quarantine and a bin marked unsellable never count), To replenish (red when there isn't enough sellable reserve to cover it — that one needs a receipt, not a move), Pallet, and Action. Click a SKU code to open its detail.
A kit's parent line and a non-physical line are never demand on this tab. Neither holds stock in a bin, so no move could cover them. A kit's own component lines already ask for the units it needs.
Filters across the top: a SKU search, a Pallet search, a rows-to-show picker (Can replenish now, Needs replenishing, All tracked SKUs), a sort preset (Biggest shortfall, Group by pallet, Inventory quantity low to high, Oldest required ship date — column headers sort too), a demand scope (All orders, Wholesale orders only, Hide wholesale orders — wholesale ships as cartons off reserve, so hiding it takes it out of the maths), a Client picker when you're tenant-wide with more than one client, and three checkboxes: Allocated only, Shared pallets only, Ready to put away.
The worklist opens on Can replenish now: a SKU short at its pick face that also has reserve to pull from, or a task already out. A SKU short with nothing in reserve needs a receipt, not a move, so it waits under Needs replenishing, which lists every short SKU. All tracked SKUs lists every SKU with a rule as well, short or not. When the table is empty it says which view is empty: "Nothing to move right now — anything still short is waiting on stock (see Needs replenishing)", "Every tracked pick face is stocked to its level and covers its orders", or "Nothing to track — no active rules and no uncovered demand". With a search, a pallet, a demand scope, a client or a checkbox narrowing the list it reads "No SKUs match these filters" instead, so an empty table under a filter never reads as an empty warehouse.
Pallets. When several short SKUs sit on the same reserve pallet, each gets a chip in the Pallet column — a shared code (P1, P2, …), the bin, and how many SKUs are on it — coloured the same down the table. Click a chip to filter to just that pallet (a Pallet P1 only — clear chip appears) and a banner offers Gather pallet: a sheet listing every short SKU on it with N on pallet · needs N and a quantity per SKU, defaulting to as much of the shortfall as the pallet can give. Gathered records what came off and raises the put-away tasks for it (one per SKU, split per lot when a pull spans lots). Nothing moves in the ledger yet: stock stays booked on the pallet until it's dropped off, so the count is right even if the cart sits. A SKU with no shared pallet shows its top reserve bin instead.
Actions. A row with no open task gets one of two buttons. A SKU with a rule gets Raise task, which raises a task for that SKU alone, or explains why not: "No task raised — the pick face is at or above its rule minimum, already has a task open, or there is no sellable reserve to pull from." A SKU with no rule gets Replenish: a Pull from menu of up to three reserve bins holding it, largest first, each with its units (and its warehouse, when the worklist spans more than one). Pick one and Active Tasks opens in replenishment mode with that bin scanned, the SKU picked and the row's To replenish figure as the quantity. With no reserve to pull from the button is greyed out: "No sellable reserve to pull from — this needs a receipt, not a move."
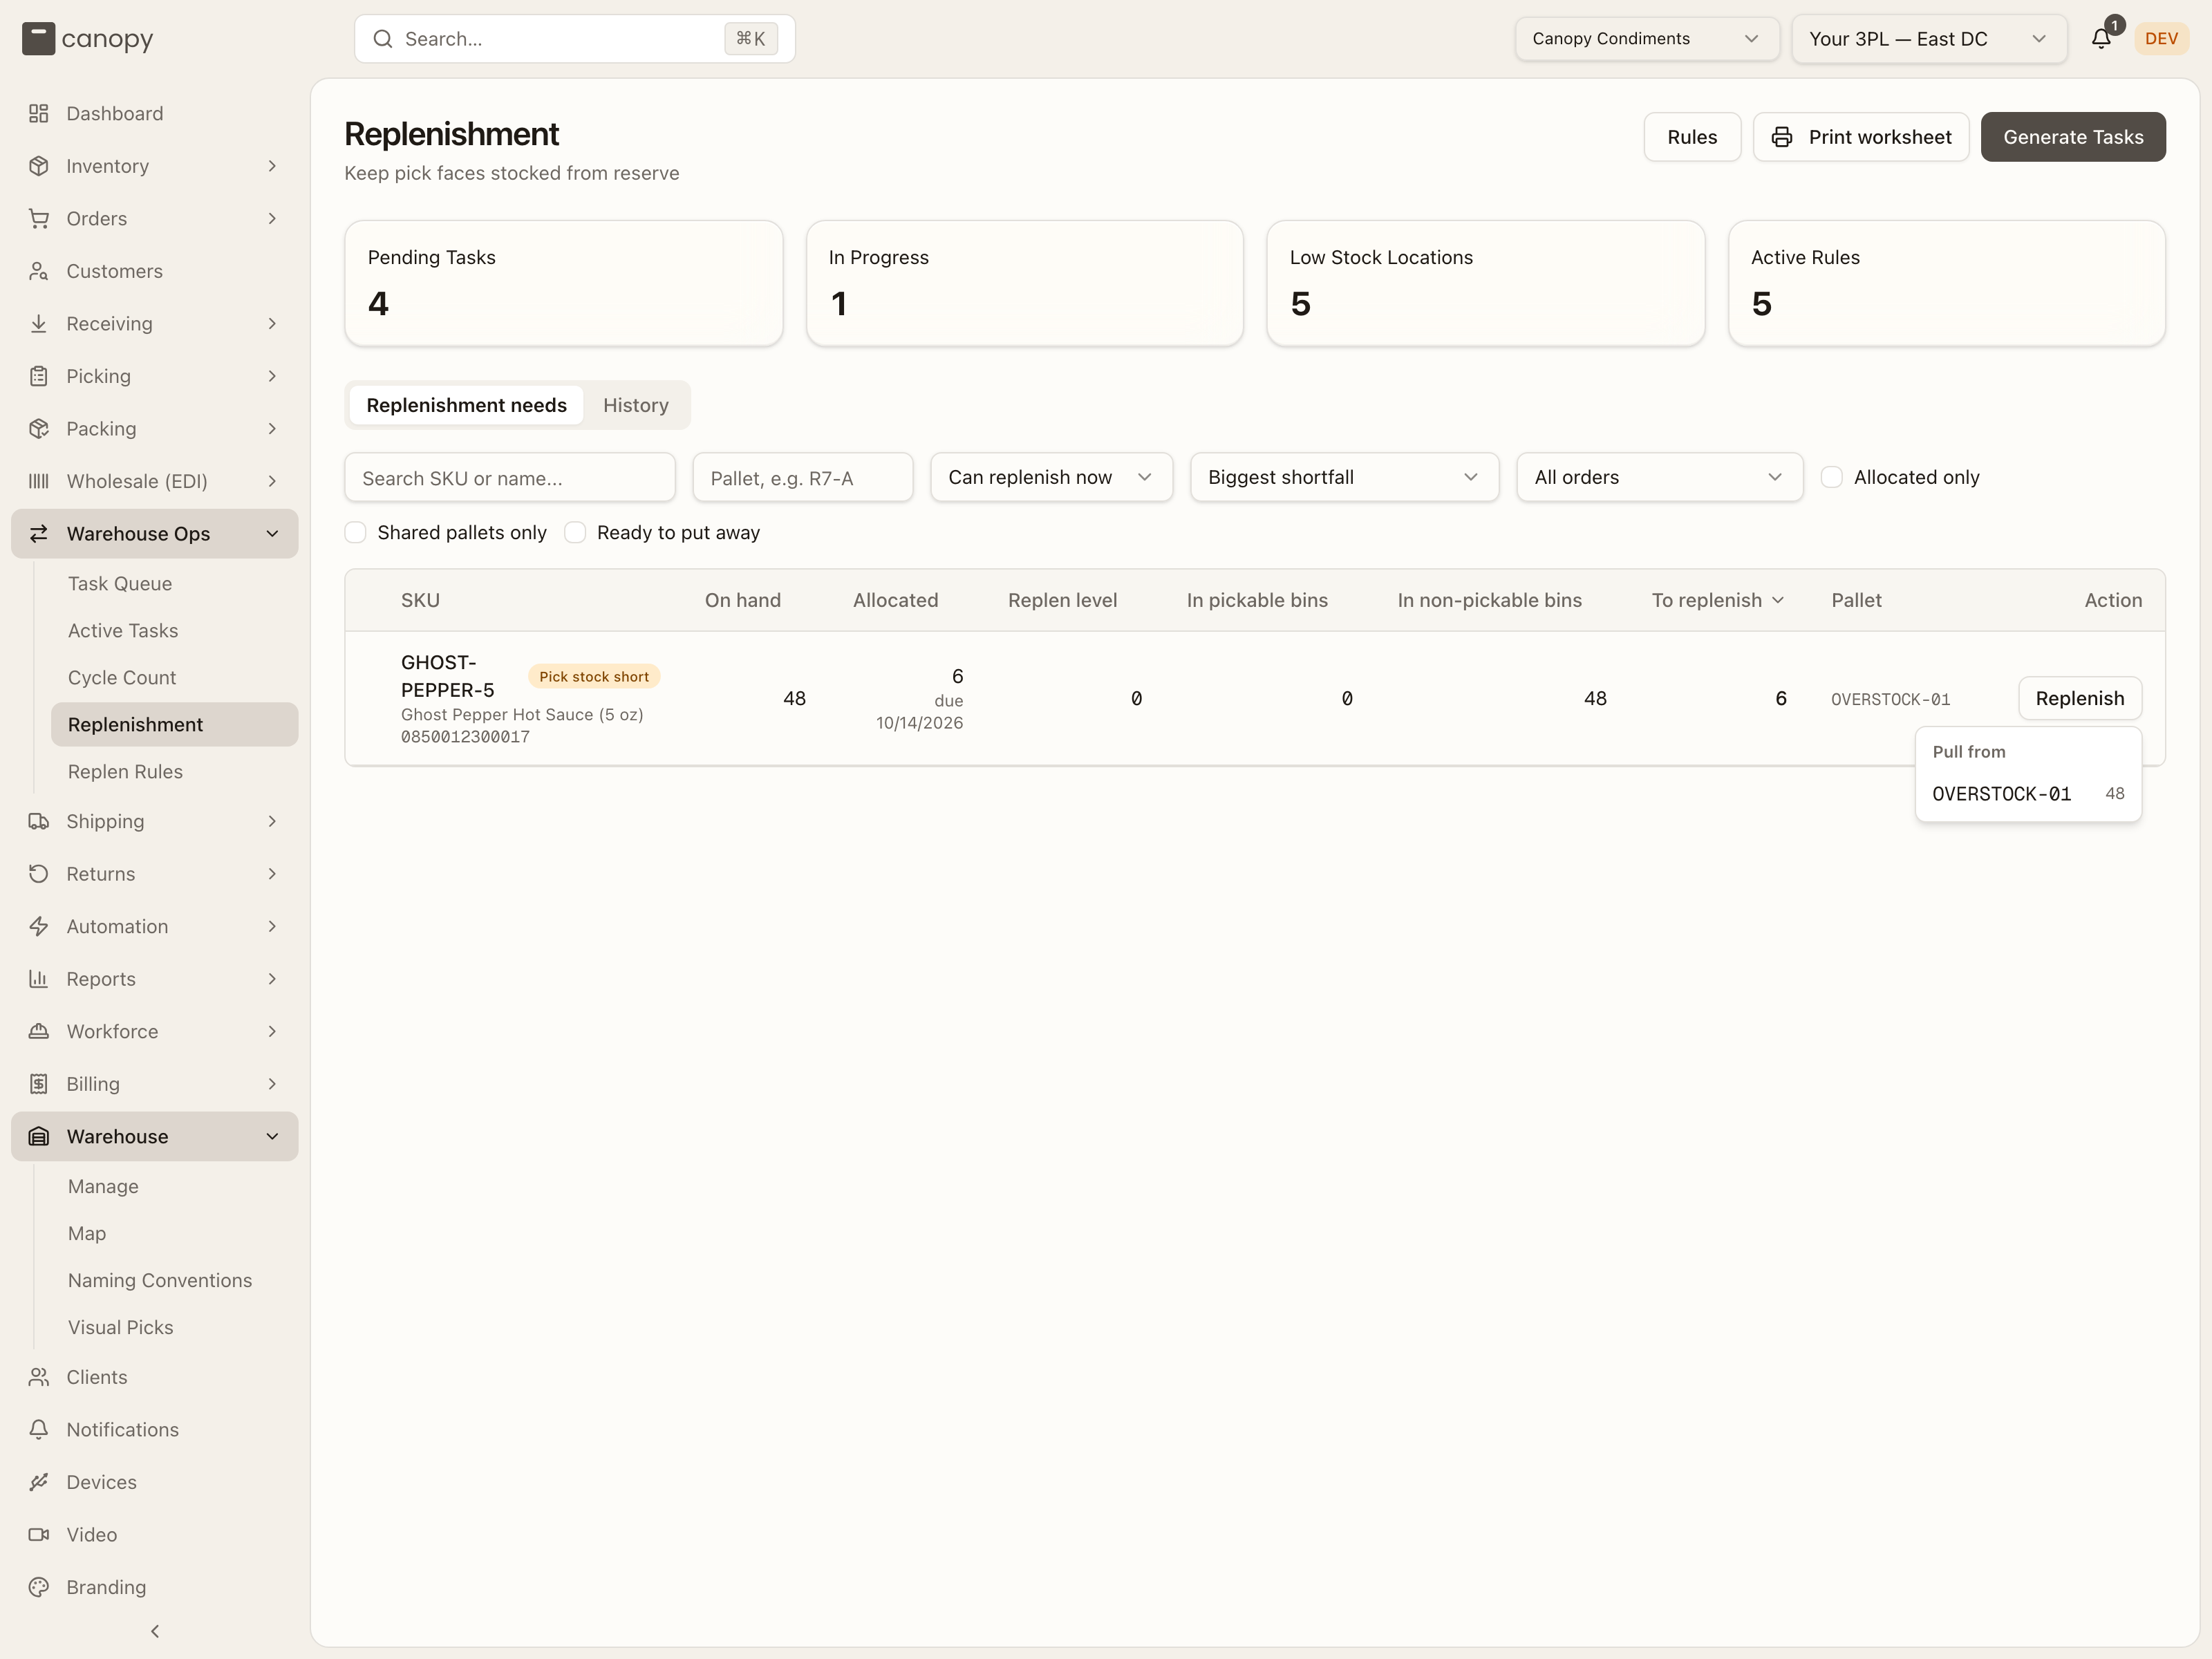
A row with open tasks lists one control per task: a status pill and Start (opens the guided flow, Pick Up first) for a task not yet picked, or a Picked N pill and Drop off (guided flow at Drop Off, with the count already filled) for units already on a cart. There is no cancel here — cancel a replenishment task from the guided screen when its source bin is empty.
History
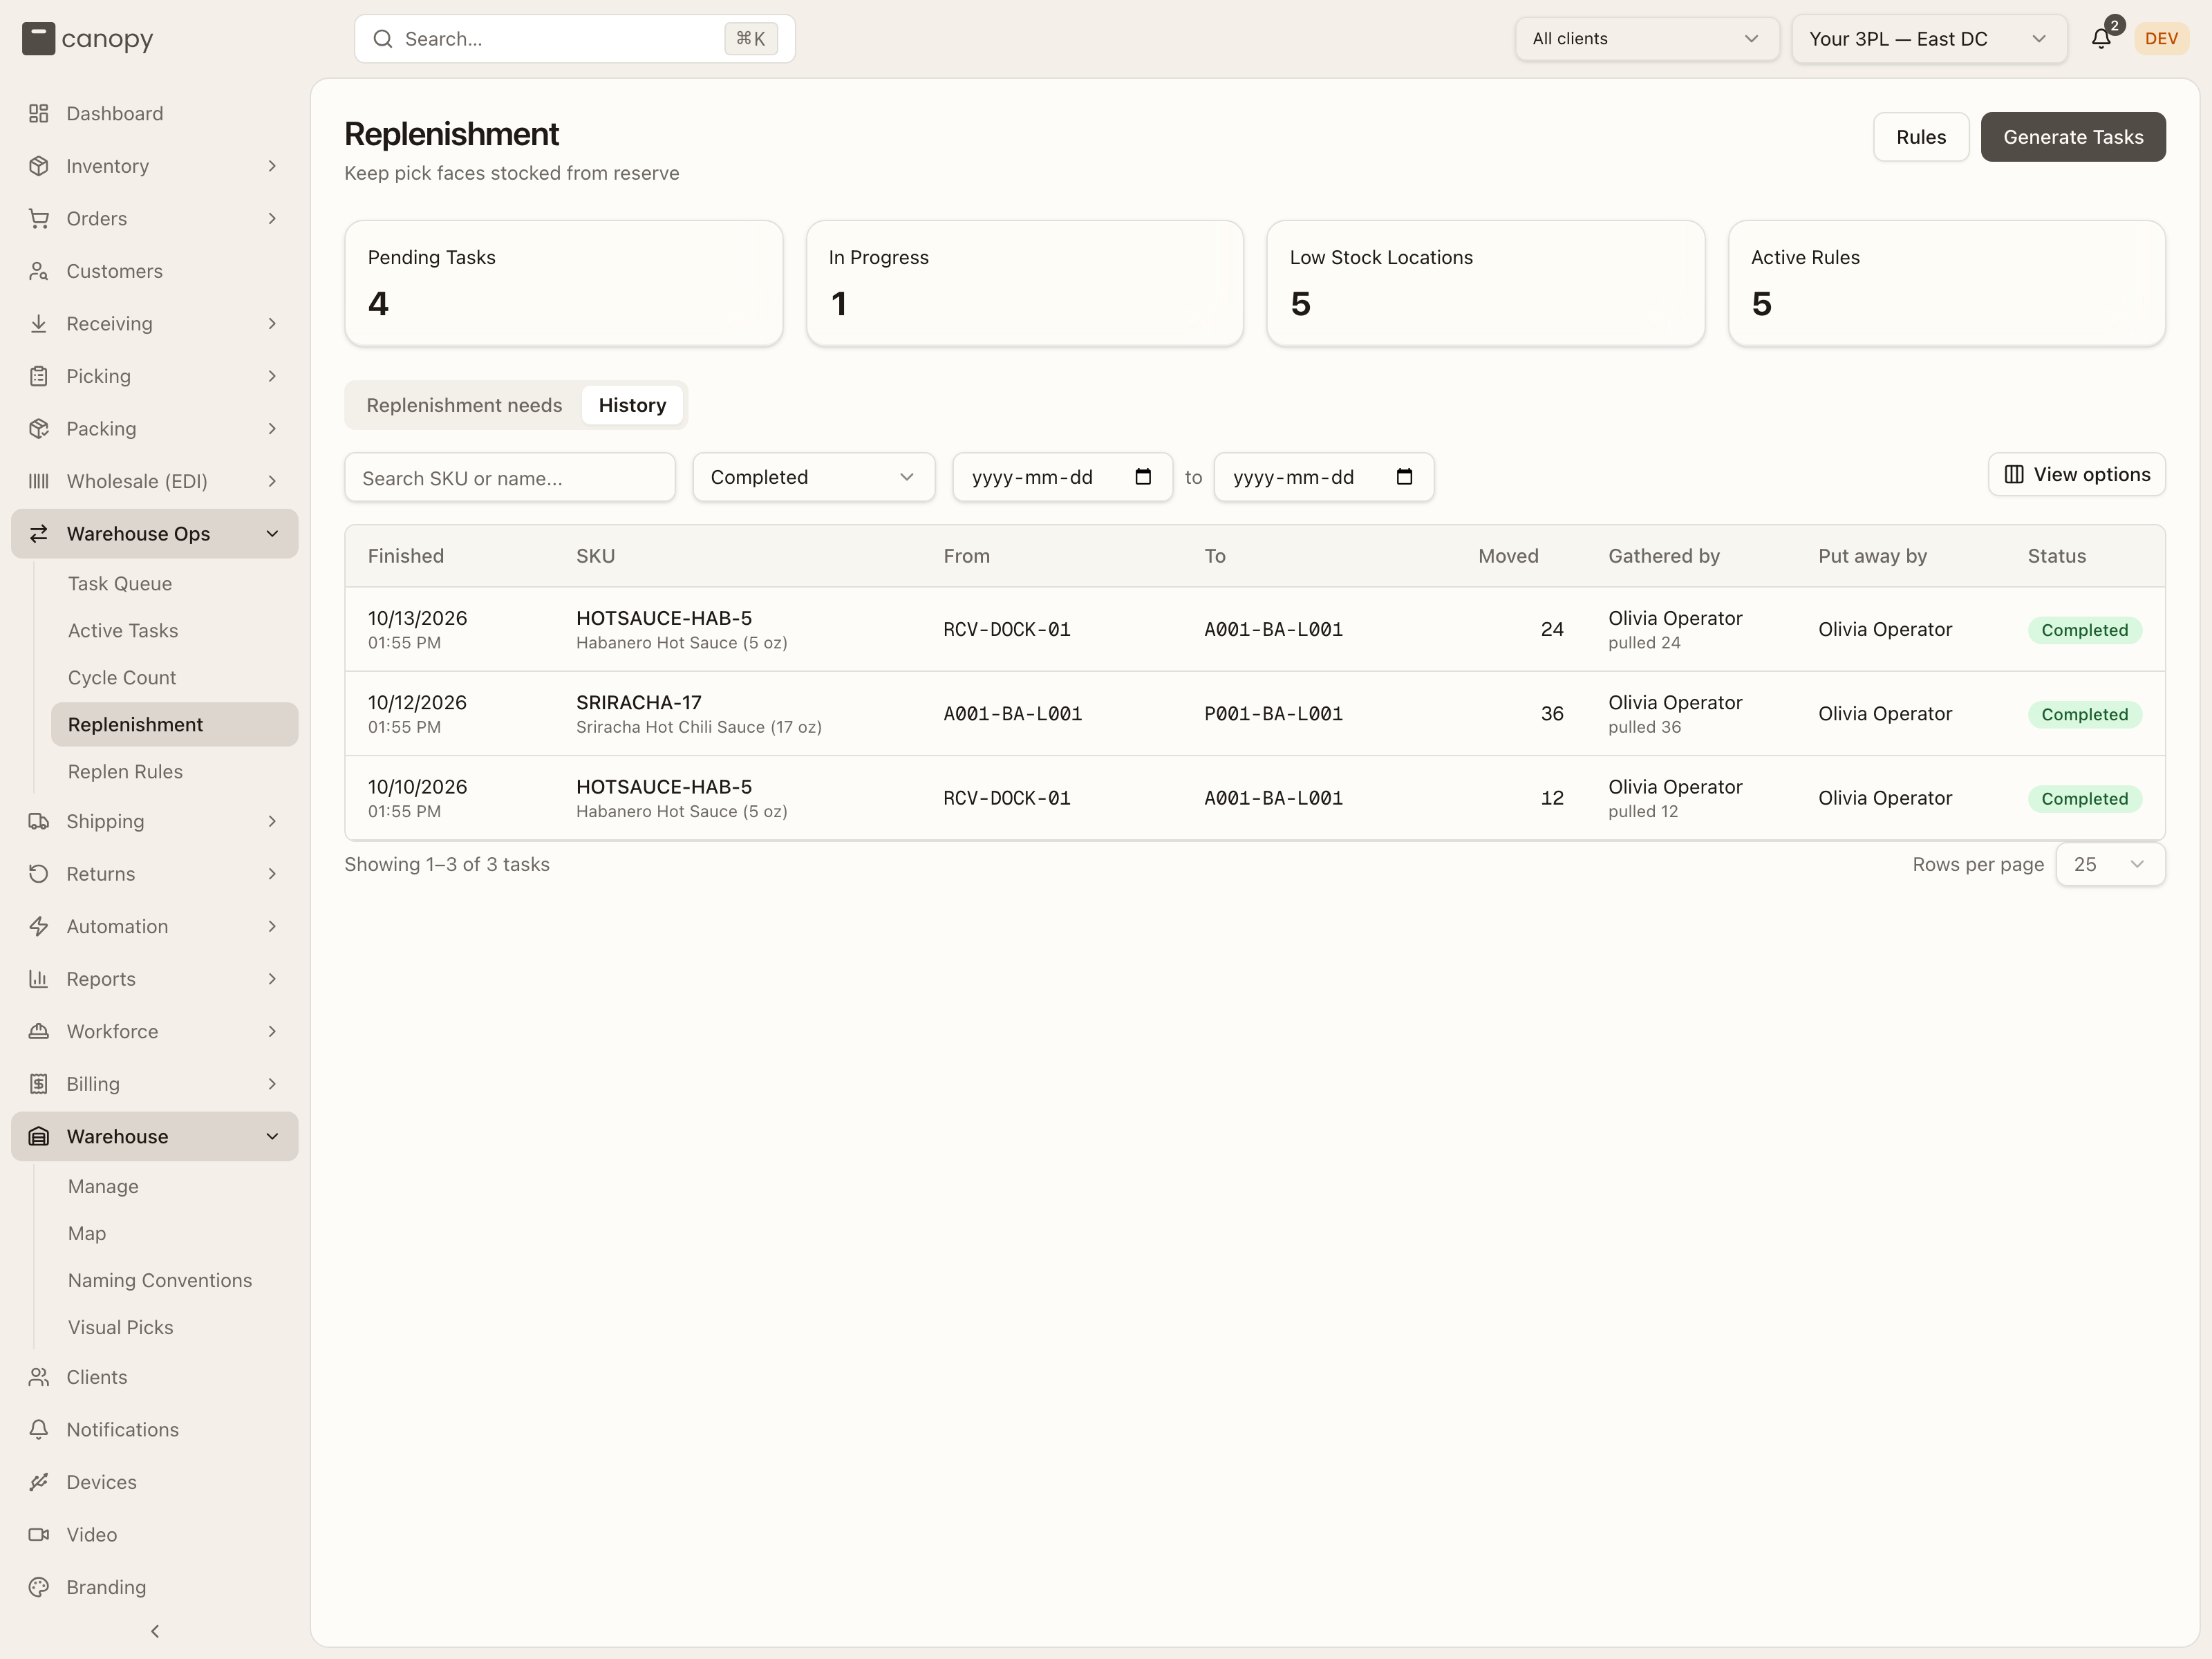
What replenishment has already moved: every finished task, newest first — Finished (date and time), SKU, From (with the lot, when tracked), To, Moved (shown as moved / target when a task was closed short), Gathered by (with pulled N), Put away by, and Status. Filter by SKU search, status (Completed, Cancelled, All finished), a finished date range, and client; the table has View options and paginates. When nothing matches it reads "No replenishment has finished in this range". A replenishment move made without a task is here too, already Completed, with you under Put away by and a dash under Gathered by: nothing was pulled ahead of the move.
Replenishment Rules
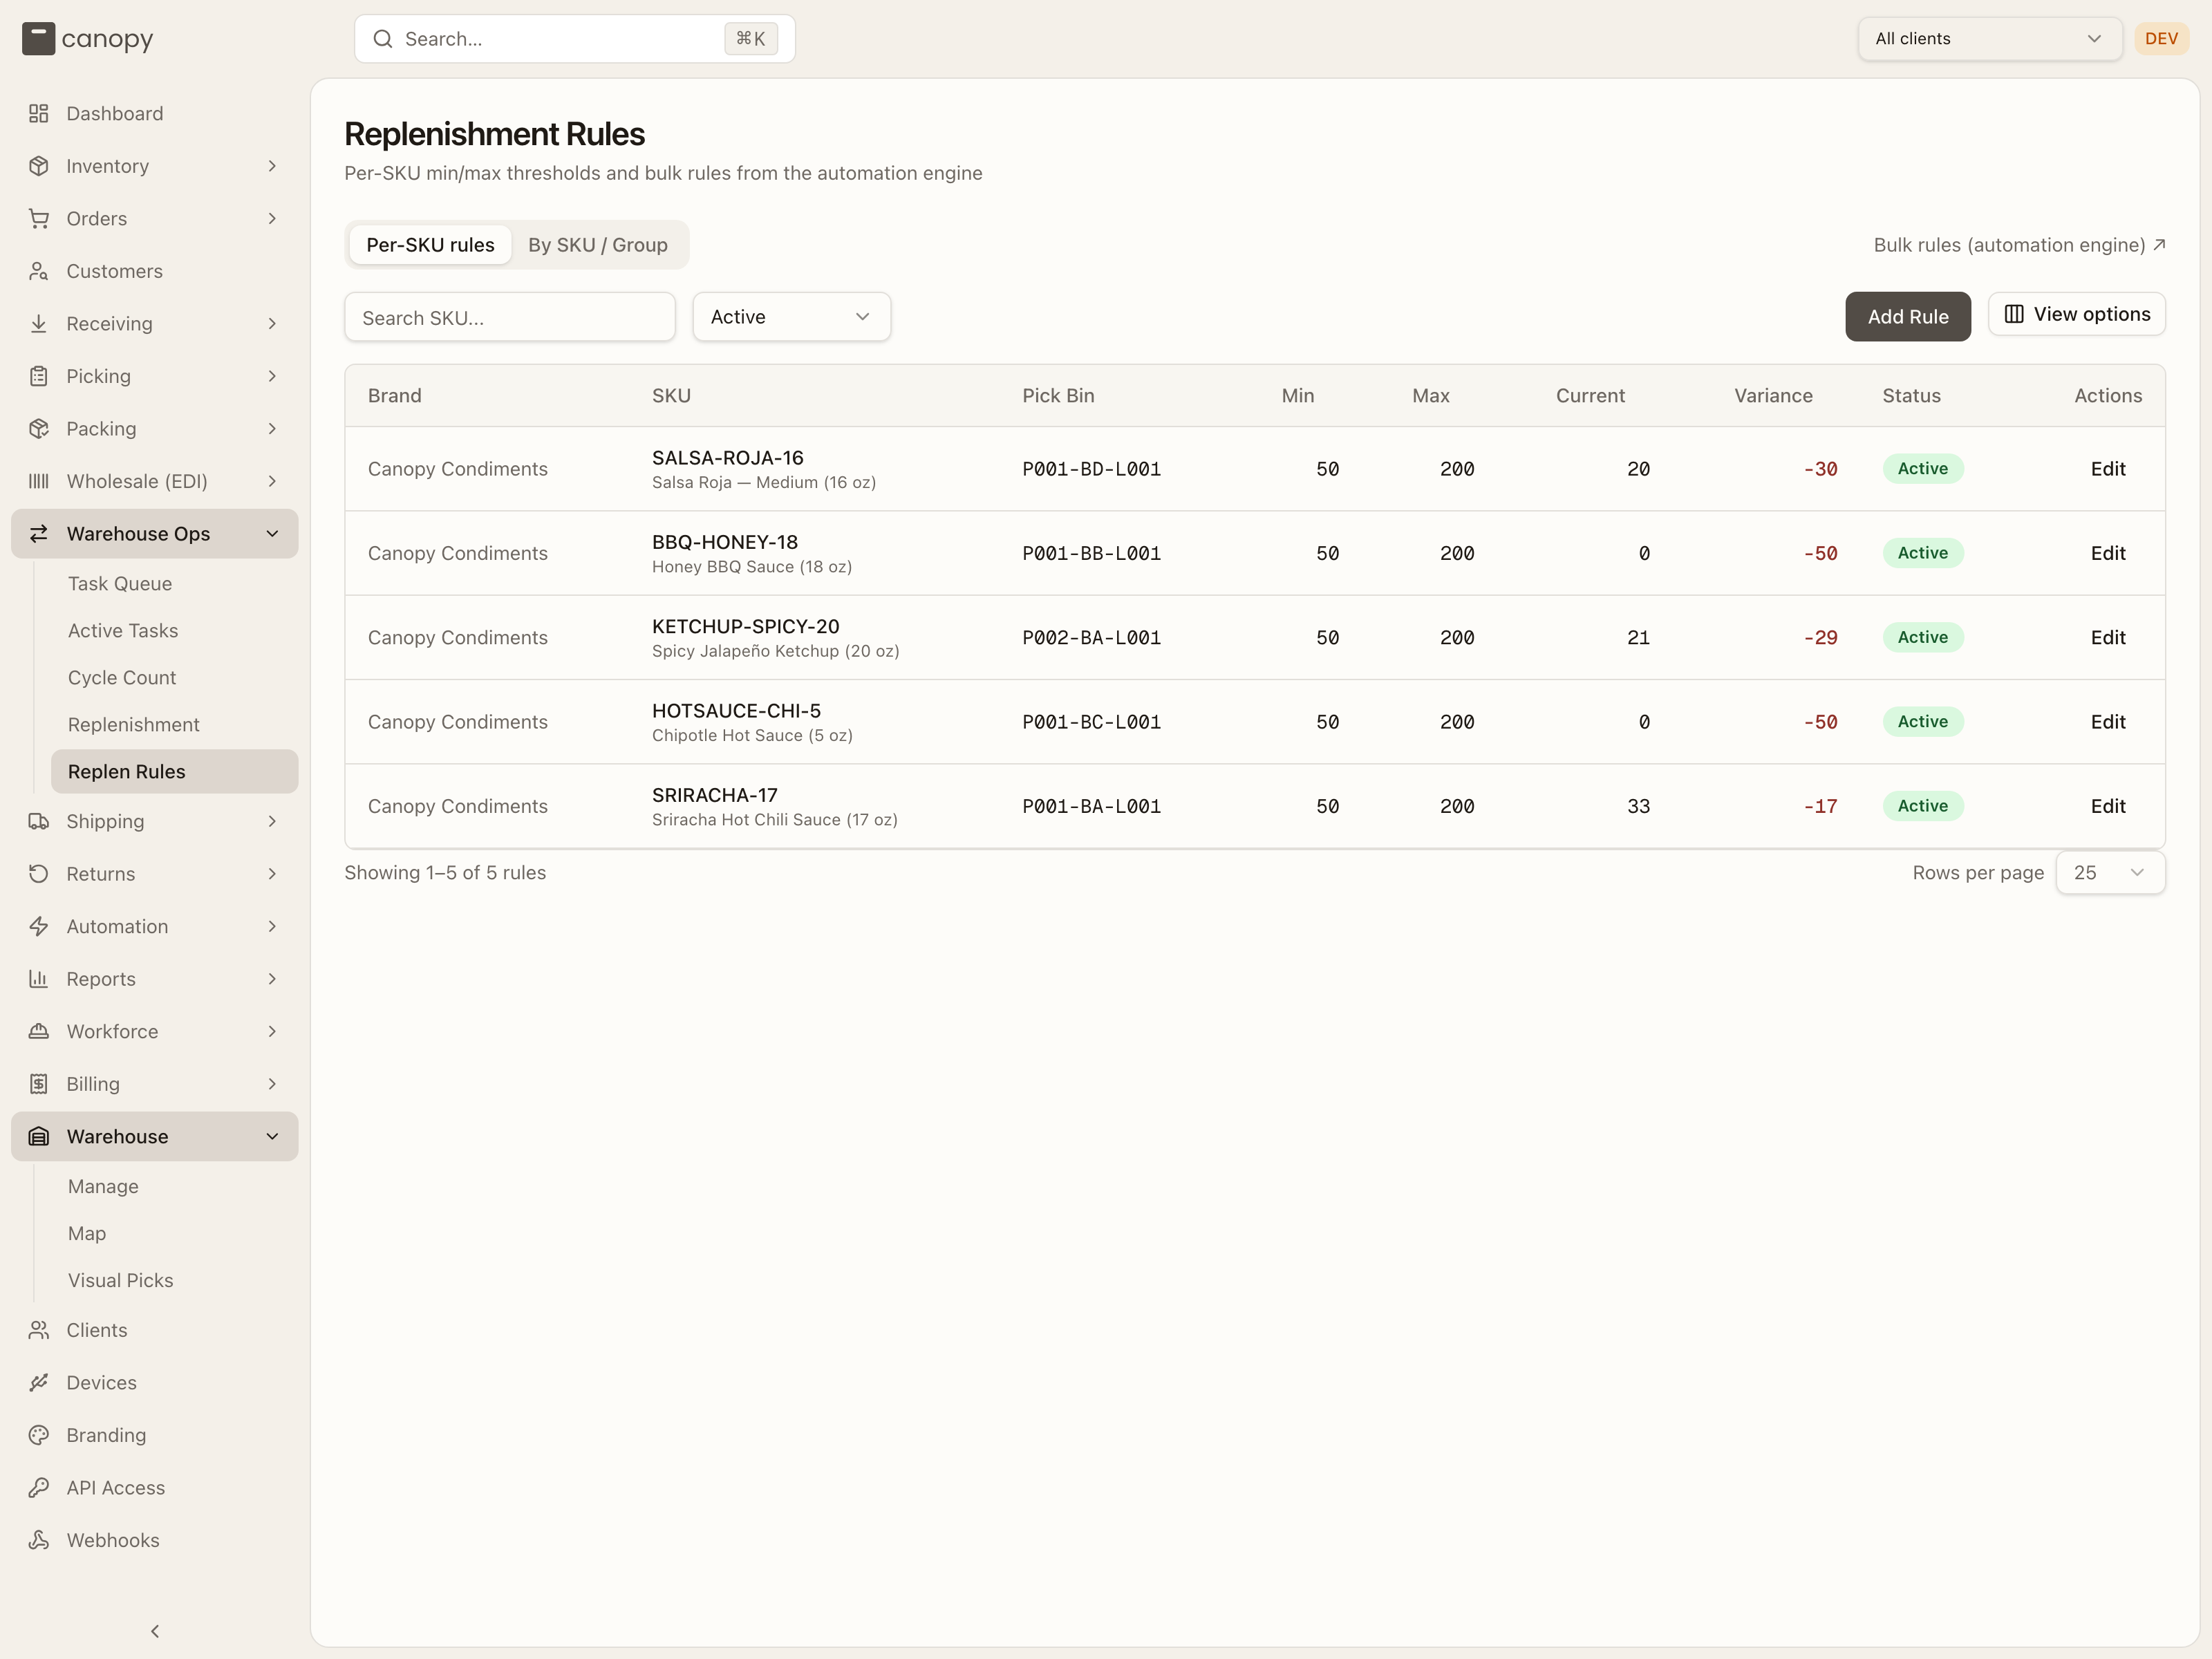
Replen Rules → /warehouse-ops/replenishment/rules. The min/max thresholds
that drive replenishment. When a pick face's stock falls below a rule's minimum,
the system can generate a replenishment task to top it back up. The page has two
tabs, and a link out to the automation engine for bulk rules.
Per-SKU rules
The default tab. A table of individual SKU rules: brand, SKU, pick bin, Min, Max, Current stock, and Variance (shown red when stock is below the target, green when above). Search by SKU and filter by Active / Inactive / All; the table has View options and paginates. Click a rule's status badge to toggle it on or off, or Edit to change its thresholds. A Tag conflict badge beside the pick bin means the bin's storage tags don't accept the SKU — the rule saves, but every task it raises fails at execution until you tag the bin, adjust the SKU's tags, or point the rule at a compliant bin.
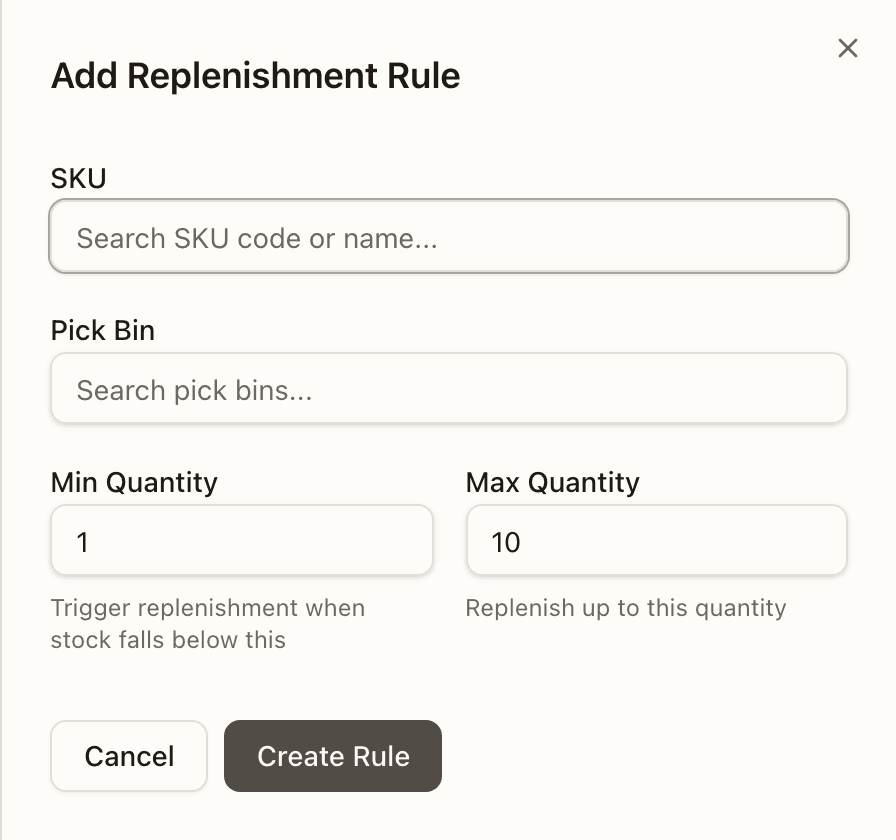
Add Rule (or Edit) opens a panel where you choose the SKU and its pick bin — if nothing pins a warehouse yet, a warehouse picker appears above the bin search first — then set the Min Quantity (replenishment triggers when stock falls below this) and Max Quantity (replenish up to this). Max has to be greater than Min.
By SKU / Group
The same rules seen from the SKU's side, grouped by size category. Each SKU lists the per-SKU rules that apply to it (green cards showing min / max / current / variance) alongside any bulk rules from the automation engine (blue cards showing their When / Then conditions). Search by SKU, tick Hide SKUs without rules to focus, and the header totals how many SKUs, per-SKU rules, and bulk rules are in play. Bulk rules themselves are authored in Automation.
Put-Back
Put-back is the reverse of picking: returning units that were already picked back into stock. It happens whenever picked work gets undone — and it's easy to miss because there's no sidebar link for it.
A put-back task is created when you:
- cancel a picked order (its totes are flagged),
- cancel a pick list,
- clear a flagged tote and choose "Put Back",
- abandon a short pick ("Abandon & re-queue"),
- pack a tote whose order was fulfilled externally, or
- recall a lot — with one twist: recalled units go to a quarantine bin, not back to sellable stock.
Two places handle the work. The guided Active Tasks flow walks
a put-back task type just like a putaway (Pick Up from the staging bin → Drop
Off at the original bin). And a dedicated Put-Back Tasks page
(/fulfillment/put-back, reached by URL or mid-flow — not the sidebar) lists them
as a table: SKU, Qty, Staging Bin, Original Bin, Order, Tote, and Status,
with a Pending / Completed filter and a Complete confirm action that moves
the units from the staging bin back to their original location.
How to work a task from the queue
Start the task. Press Start on it in the Task Queue (putaway, put-back) or the Replenishment worklist, or tap it in the list on Active Tasks. If the page asks which warehouse you're in, pick it first.
Pick up. Walk to the Go to bin, scan it to verify if you like, and scan the items (or press + / type the count) until the count matches what you've taken. Press Items Picked Up.
Drop off. Confirm the suggested Bring to bin by scanning or tapping it, choose one from Other pickable locations with this item, or — for putaway and put-back — pick a destination in the combobox. Press Confirm Drop Off. If you can't drop off yet, Drop off later keeps the count and the task open.
Done. Task Complete confirms the move; Back to Task Queue returns you to the list.