

Returns
Create and process RMAs end to end — receive, inspect, disposition, and refund — plus the reason codes customers pick from.
Returns is reverse logistics across all clients: each RMA from creation through receiving, inspection, and disposition to the refund that follows — plus the reason codes customers choose from. A brand watches this happen; you run it.
Operator vs. client view
A client tracks their RMAs and sees the results. You do the hands-on work they can't: create an RMA, receive and inspect each unit on the RMA itself, complete it, issue the refund, and manage the reason codes. Every one of those writes is refused server-side for a client account, whether or not a button is on screen.
The RMA list
Returns → All RMAs lists every return authorization and where it is. It works in the All clients view, so you see RMAs across every brand you serve.
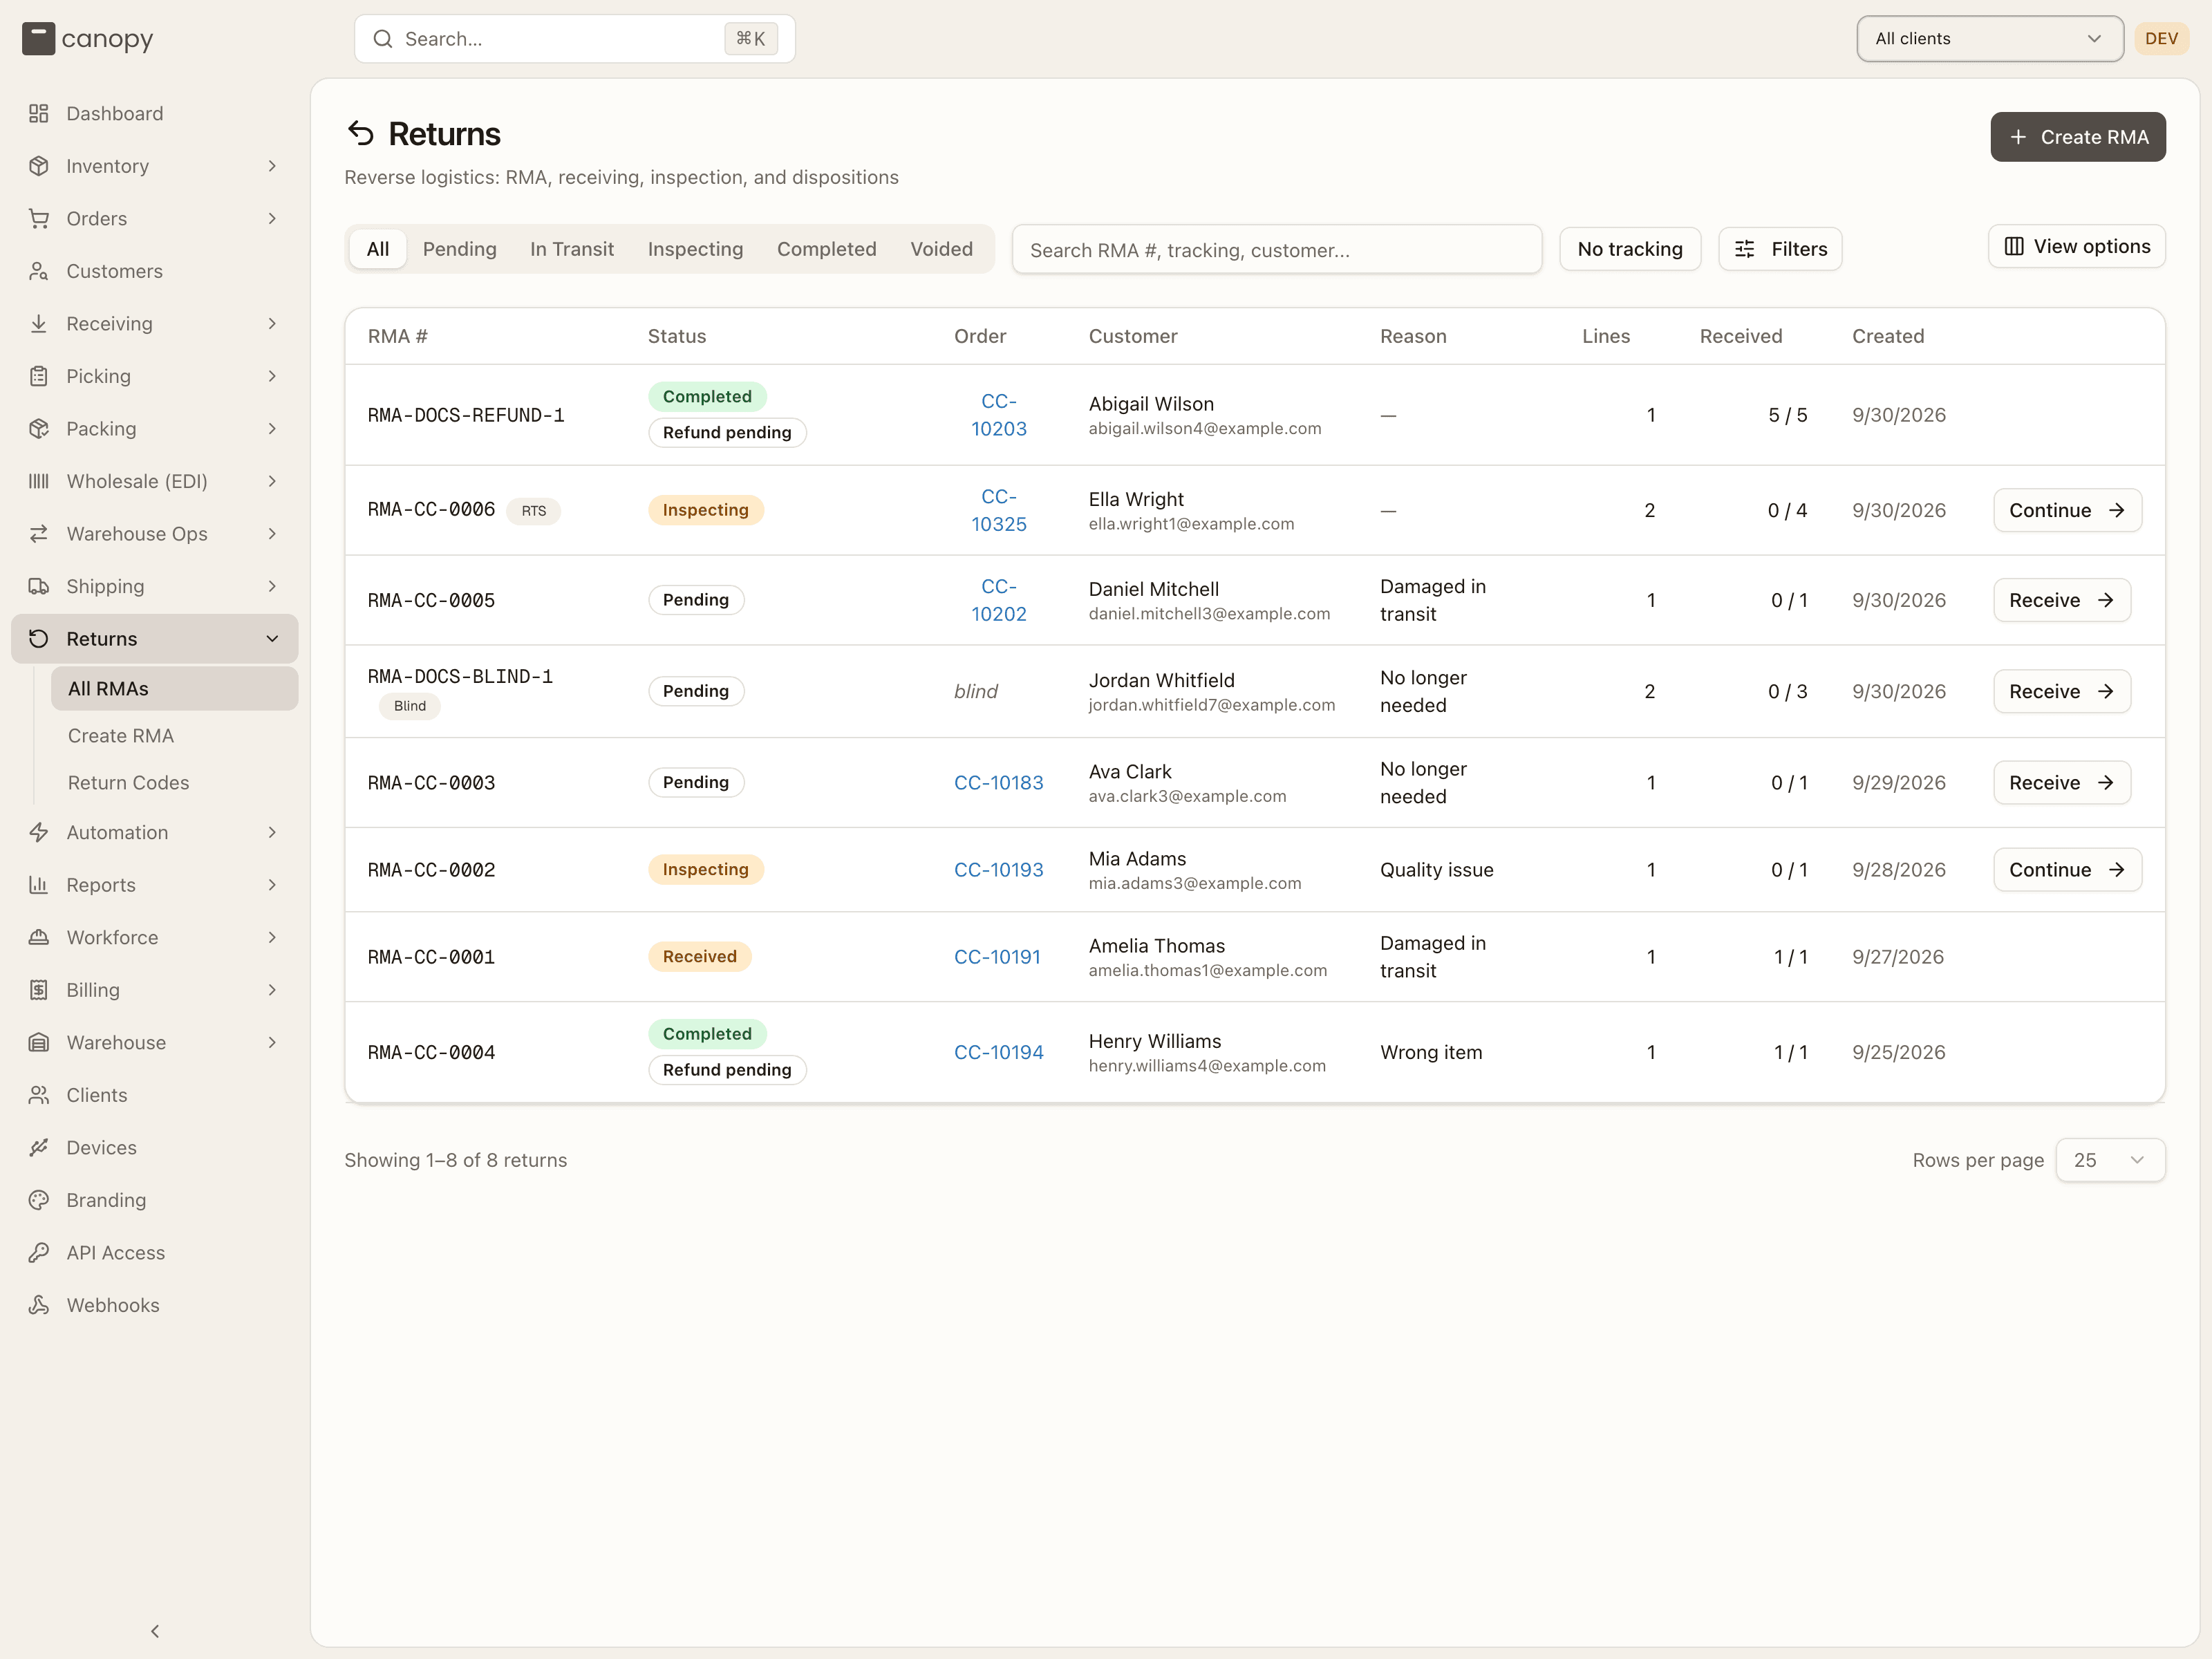
Each row shows RMA #, Status, the linked Order (a link into the
order sheet — or blind when the RMA has no source order), Customer (name
and email), Reason (the RMA's default reason code), Lines, Received
(units received / units expected, e.g. 0 / 1) and Created. Every column
sorts. Clicking a row opens the RMA; the trailing column carries Receive on a
Pending or In Transit RMA and Continue on an Inspecting one — both simply
open the RMA, because receiving happens on the RMA itself (there is no separate
receiving screen).
Next to the RMA number you may see small badges: Shopify (the return came from a connected store), RTS (an undeliverable outbound parcel that came back — see Returned-to-sender returns), Blind (a return with no source order in Canopy — see Blind returns), and Resent as-is (an RTS return completed with nothing received).
Narrowing the list:
- Tabs — All, Pending, In Transit, Inspecting, Completed, Voided. There is no Received tab; a Received RMA appears under All.
- Search — matches RMA number, tracking number, customer name or email.
- No tracking — toggles to RMAs with no tracking number logged: the pile of "the customer said they would ship it" with nothing to chase the parcel by.
- Filters → Return type — Customer return, Returned to sender or Blind return; the choice shows as a Type chip above the table.
- View options — show or hide columns.
Tables page at 25 rows by default; Rows per page offers 25, 50, 100 or 250. With nothing to show, the list reads No returns found — Returns will appear here once customers initiate RMAs.
RMA statuses
| Status | Meaning |
|---|---|
| Pending | Created; awaiting the customer's parcel. |
| In Transit | The carrier has scanned the return parcel. |
| Received | The carrier reports the return parcel delivered to you. |
| Inspecting | Receiving has started — units are being booked in. |
| Completed | Done: units dispositioned, refund ready to resolve. |
| Voided | Voided by an operator. (Stored as CANCELLED; the app says Voided.) |
How an RMA moves: when Canopy bought the return label, the carrier's tracking events advance it for you — a pickup scan moves Pending → In Transit, a delivery moves Pending / In Transit → Received — and never past that, so a late carrier scan can't undo work you've started. The first receipt you confirm moves a Pending RMA to Inspecting; Complete Return moves it to Completed; Void RMA to Voided.
A Completed RMA carries a second chip for the refund side: Refund pending (not yet issued, or ready to issue), Refund unconfirmed (an issue attempt ended without a definite answer from the channel), Refunded, or Refund failed — never on a blind return, which refunds nothing.
Creating an RMA
Most RMAs arrive on their own when a customer requests a return in a connected store (see Returns from a connected store). You raise one by hand from Returns → Create RMA (operator-only — the link is hidden from client users and the server refuses the create), from the Create RMA button on a shipped, delivered, partially shipped or externally fulfilled order's sheet (which pre-fills the client and order), or from the Shipments list's Create RTS return row action for a parcel that bounced.
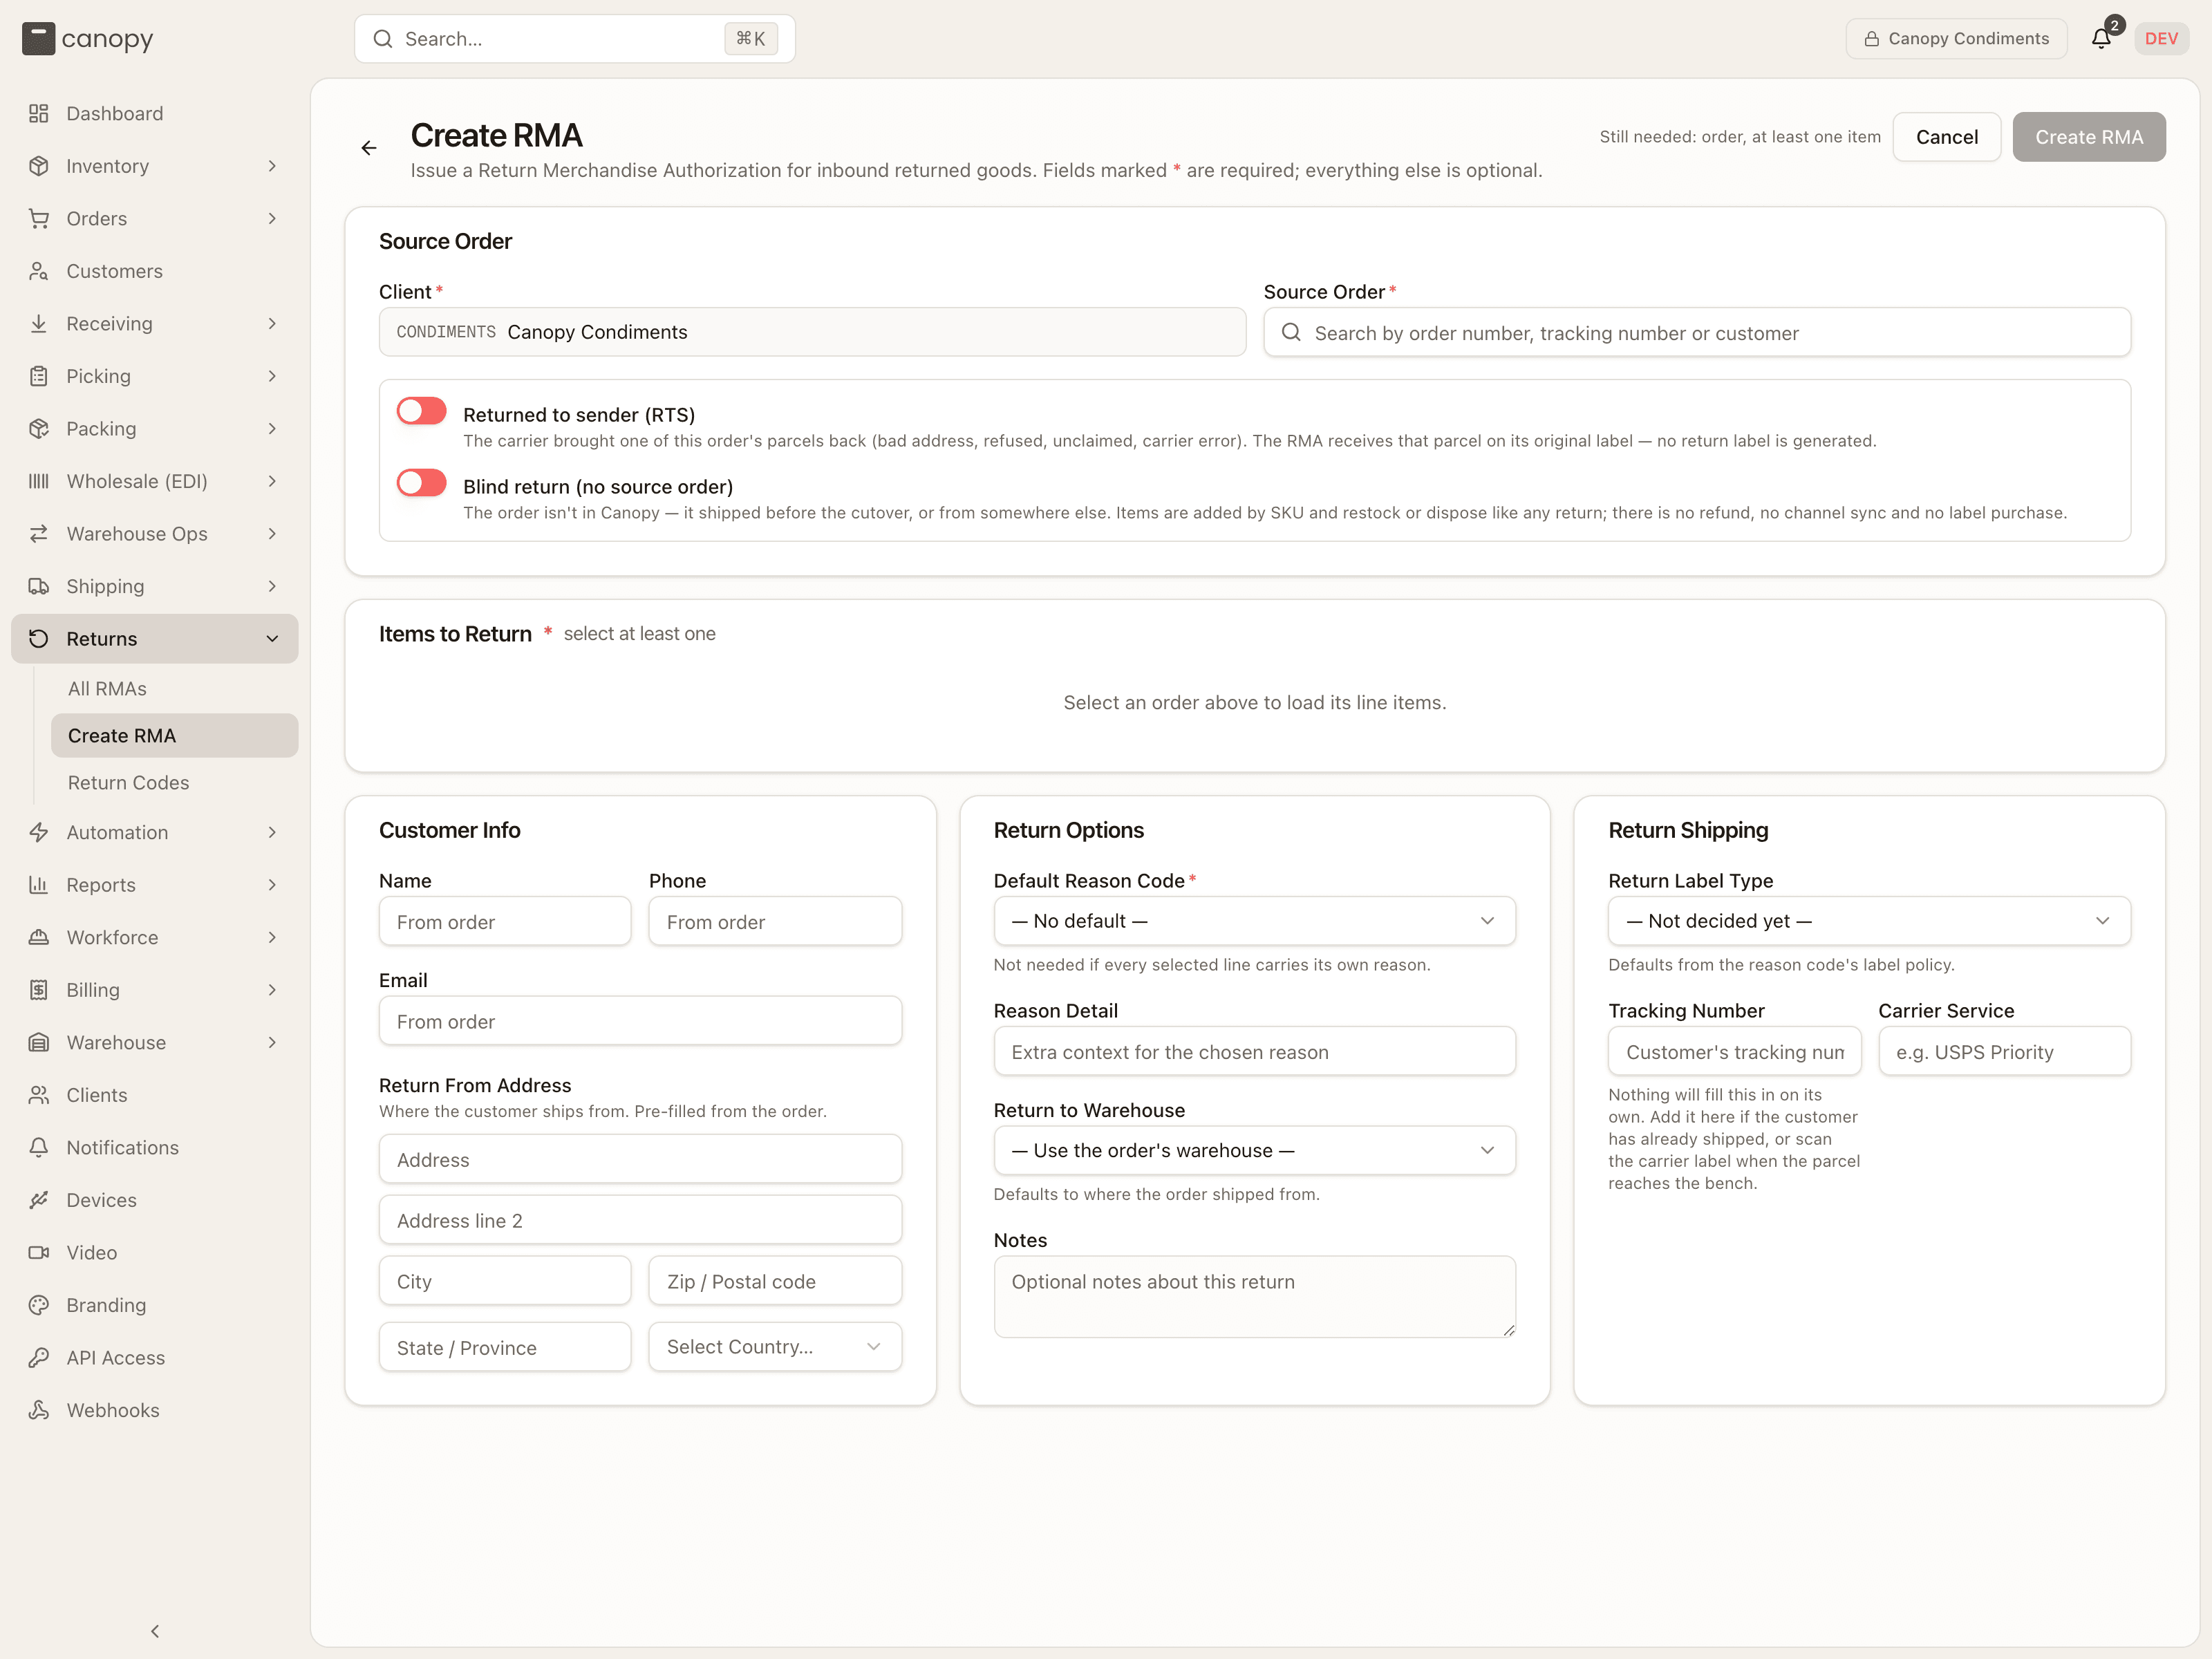
The header tells you what is still missing (Still needed: order, at least one item) and Create RMA stays disabled until the form has a client, an order (or Blind return switched on and a warehouse chosen), at least one ticked item, a reason on every ticked line (or a default reason), a valid return country, and — for an RTS return — the parcel that came back. Saving lands you on the new RMA, in Pending.
Source Order
Pick the Client (the picker pins every request on this form to that client), then search for the Source Order by order number, tracking number or customer (three characters or more; a space you type is treated as the hyphen it was meant to be). The selected order shows as number · customer · status with a Change button. Every RMA needs an order — except a blind return, for an order Canopy never had.
Two switches sit beneath it. Returned to sender (RTS) turns the form into an RTS return — covered below. Blind return (no source order) drops the order altogether — covered after it. They are exclusive.
Items to Return
Choosing an order loads its lines, all unticked. Tick a line (or click anywhere on its row) to include it.
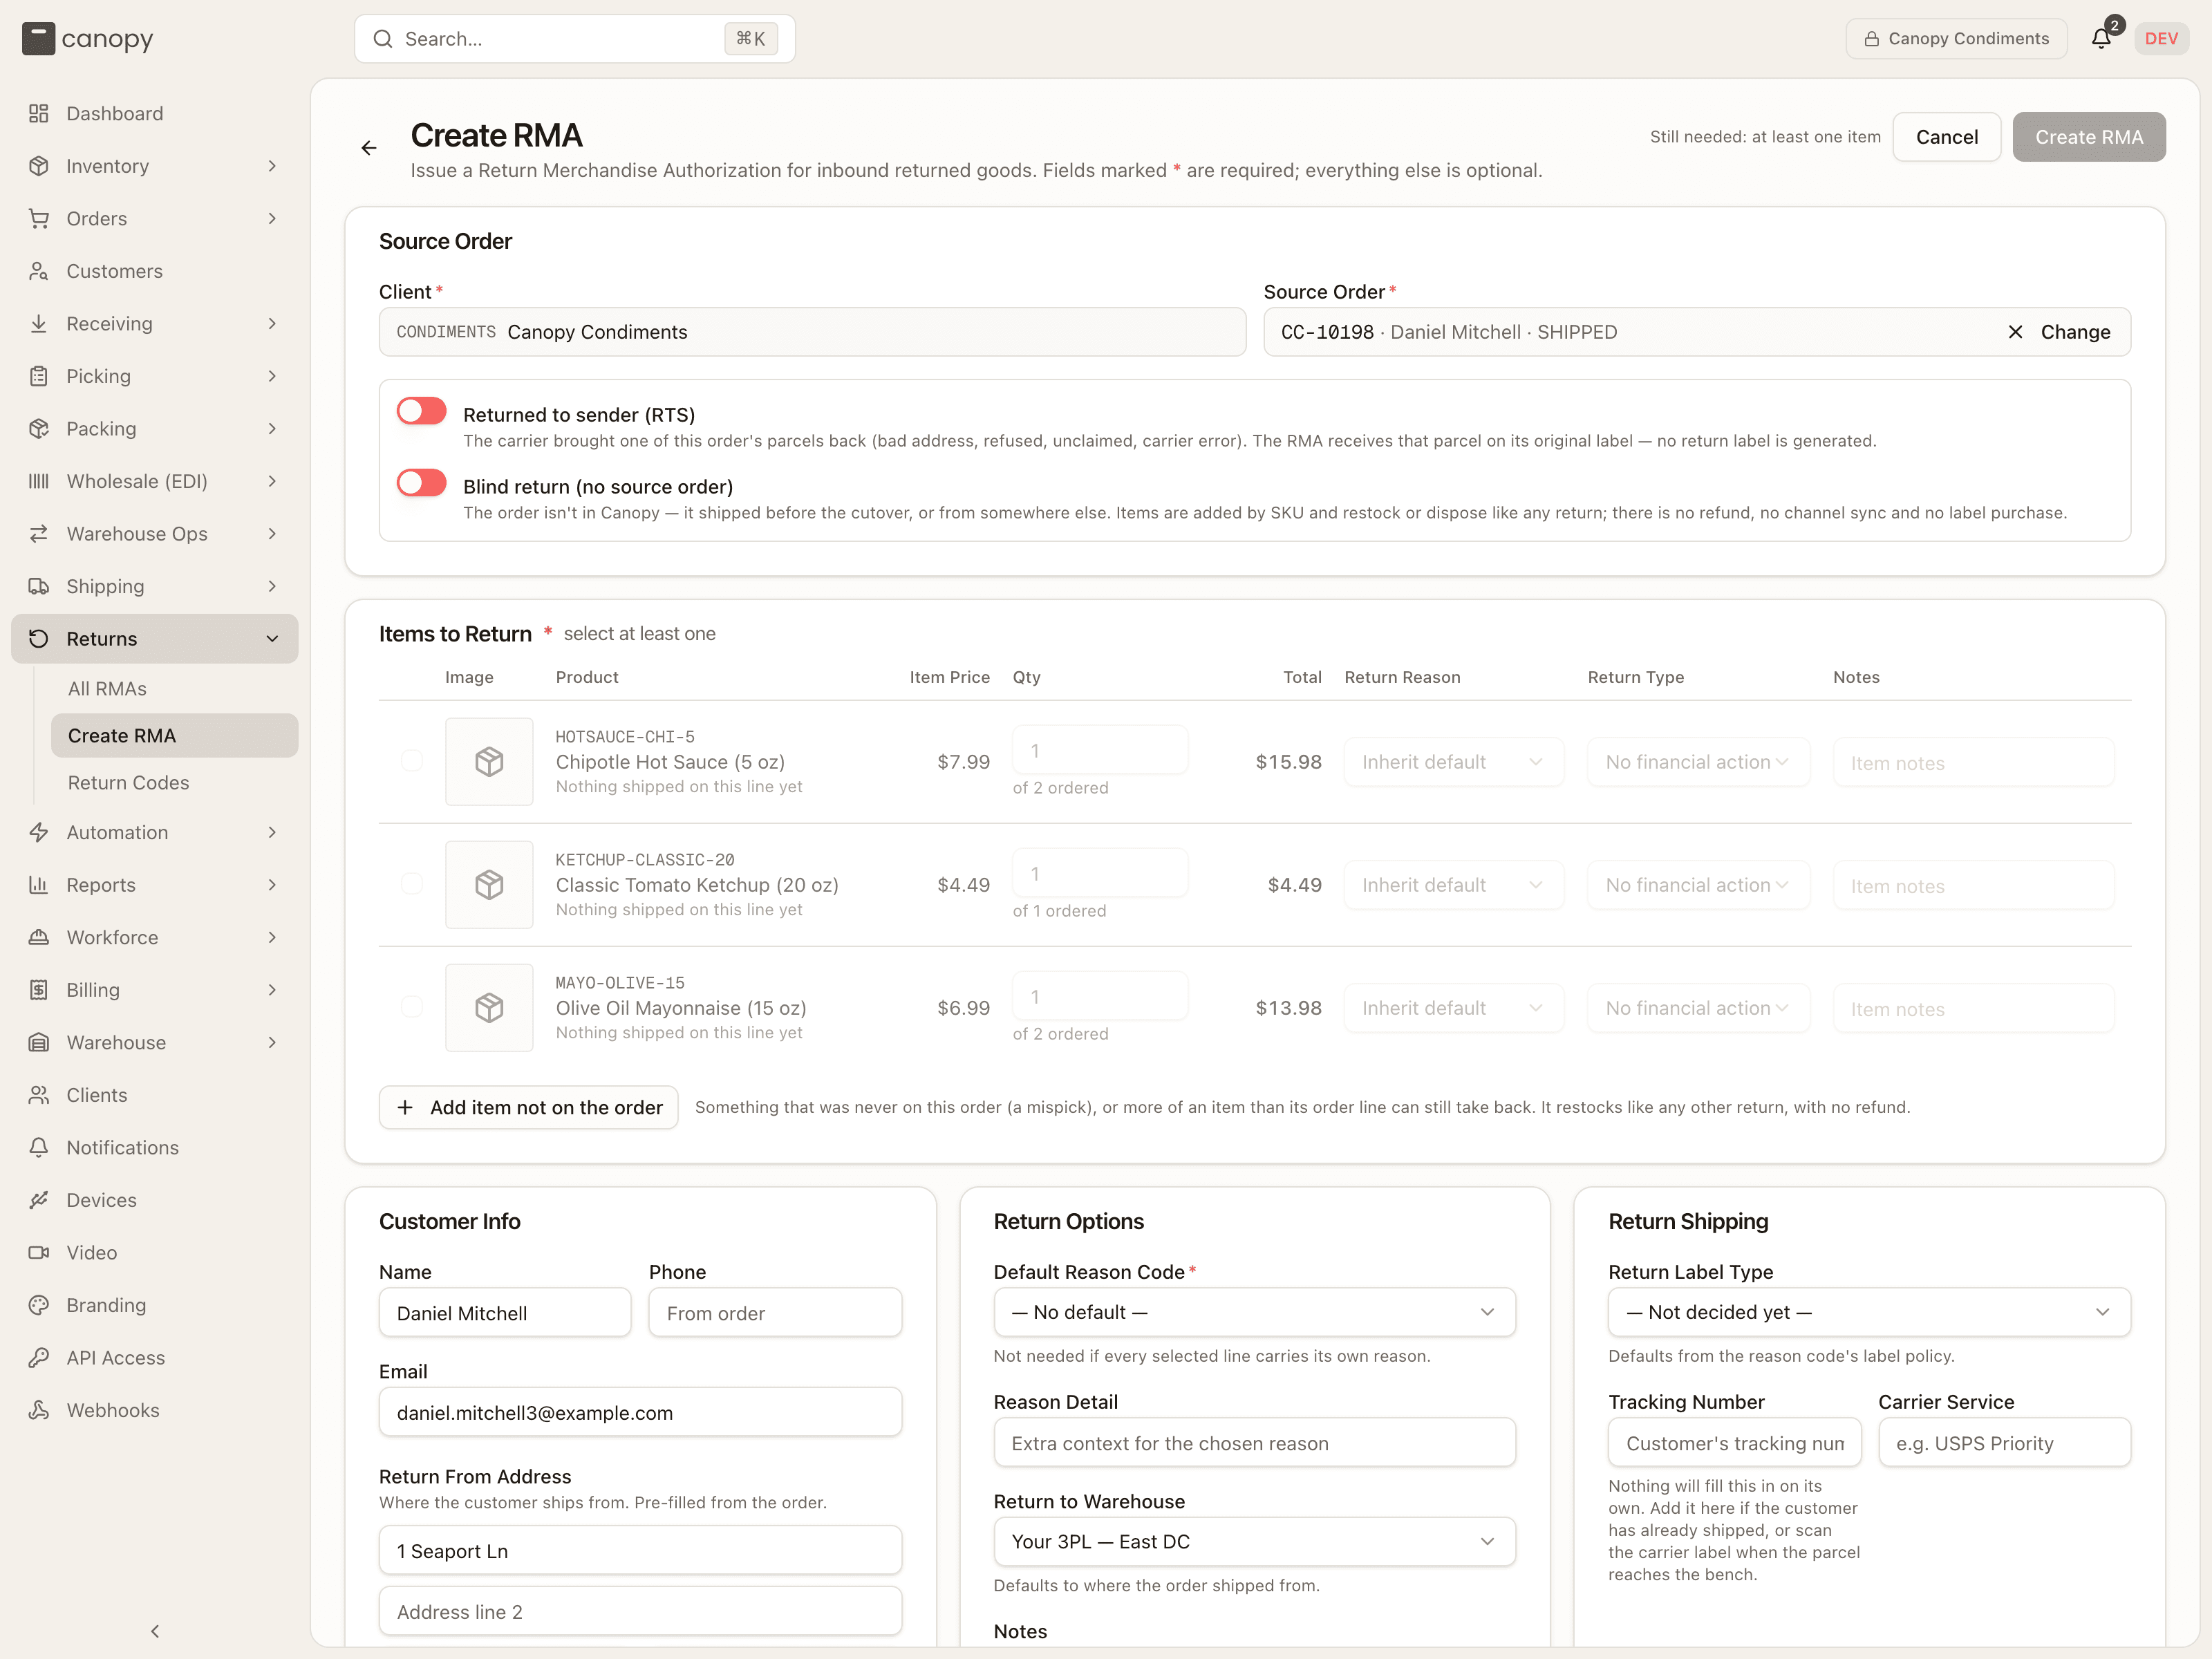
| Column | What you set |
|---|---|
| Image / Product | The SKU, name, and any lots it shipped from. Under it, a hint when units are already spoken for: 2 of 3 already returned on another RMA, All 3 already returned on another RMA (row disabled), or Nothing shipped on this line yet. |
| Item Price / Total | The unit price and the refund value of the quantity you've entered. The card header totals the ticked lines. |
| Qty | Capped at what is still returnable — of 3 ordered, or 1 of 3 left once a sibling RMA has claimed some. |
| Return Reason | Inherit default (the RMA's Default Reason Code) or a specific code for this line. |
| Return Type | Refund, Store Credit, Exchange, Replacement, Warranty, or No financial action. |
| Notes | Free text for the line. |
What is returnable on a line is what the customer bought, bounded by what ever went out to them — a parcel counts once its pack or batch completed, so a box still on the bench is not returnable yet — plus any units another location shipped. Every open RMA on the order claims what it expects; a completed one counts what it received, and a voided one nothing.
An order split across two of your warehouses is still one order to a return. The RMA can be raised on any of the orders the split made, and a line's room is read over all of them: the units bought, once, bounded by what every one of those orders shipped, less what every RMA on any of them claims. The hints and the Qty cap above count those claims too. Which order you pick only decides which order the RMA is linked to and where Return to Warehouse starts.
Add item not on the order appends a row for a product the customer received but never ordered (a mispick they're sending back), or for more of an item than its order line can still take back — the helper under the button says so. You pick the SKU — an order SKU whose line still has room is excluded, since it returns through that line — and its return type is locked to No financial action: it restocks like any other return, with no refund. Non-physical SKUs are refused. An RTS return takes one too — the parcel's ledger is what the packer confirmed, not a complete manifest, so a mispicked SKU can be in the box — but a SKU the box carried goes on its line whatever other RMAs claim (SKU "X" was in this parcel — book it on its order line…).
An order carrying lines merged in from another order lists only its own: a note names the source orders (Items merged into this order from CC-… aren't listed — raise their return on that order.), and the server refuses a customer return of a merged-in line. An RTS return of the merged box keeps them — each wearing from CC-… — with the return type locked to No financial action (Merged in from CC-… — this box's RMA never refunds it), and the server refuses a refund on one however it is asked: "This line was merged in from another order (CC-…) — it is never refunded on this box's RMA. Refund the customer in the sales channel instead; a return against that order would receive these units a second time".
Customer Info
Name, Phone and Email pre-fill from the order. Return From Address — where the parcel ships from — pre-fills from the order's ship-to and only becomes required when Canopy is buying the label.
Return Options
- Default Reason Code — the reason for the RMA. It's marked required, but the form accepts a reason on every ticked line instead. Each option shows its label policy, e.g. Damaged in transit (PAID BY STORE). If the client has a code named No Longer Wants, it is preselected.
- Reason Detail — extra context for the chosen reason.
- Return to Warehouse — defaults to the warehouse the order shipped from. For a return-to-sender, that is the warehouse the returning parcel left from, even if the order has moved since. With nothing else to go on, it is the order's warehouse, then the client's default warehouse, whichever is still active. A Stallion return label into a US warehouse needs a v5 account with region switching enabled by Stallion (see Connect Stallion).
- Notes — free text on the RMA.
Return Shipping
Return Label Type is the decision for this return; it defaults from the Default Reason Code's label policy and you can override it:
| Label type | What it means |
|---|---|
| Label paid by store | Canopy buys the label, the brand is billed. Default for a Return Paid By Store code. |
| Label paid by customer | Canopy buys the label, the cost comes off the refund. Default for a Flat Rate Shipping code. |
| Self return | The customer arranges shipping; enter their tracking. Default for a Return Paid By Customer code. |
| Return to sender | An undeliverable parcel coming back on its original label. |
Only the two paid types result in Canopy buying postage, and only they show Estimate Label Cost: enter Wt (oz) and optional dimensions and click Get Rates to see carrier options with price and delivery days. It is an estimate — nothing is purchased here; the label is bought later from the RMA (see Return labels). For any other type, enter the customer's Tracking Number if you have it — the Carrier Service fills itself when the number's format identifies the carrier — or leave it blank and scan the carrier label when the parcel reaches the bench. The form tells you when nothing will fill the number in on its own.
Returns from a connected store
A return from a Shopify store arrives as an RMA with a Shopify badge, checked line by line against the fulfillment that shipped each unit. Units another location shipped — the order's fulfillment that sent them is at a location that isn't mapped to one of your warehouses on the channel, such as the merchant's own or another 3PL's — follow the channel's Receive returns for items other locations shipped setting, in the Returns box on its Orders tab. It is on by default, and those units import like any other. Switched off, they are left for that location to receive:
- the RMA holds only the units you shipped (a unit you re-sent on a goodwill reship counts as yours), and its RMA created entry names the rest;
- a return with nothing of yours creates no RMA, and stays that way even if the setting is switched back on later;
- the order's Timeline records Channel return not imported — Return of 2 × ABC-1 shipped from GoBolt LAX2 not imported — that location receives it.
An RMA that holds part of a store return speaks only for its own lines. Completing or voiding it never closes or cancels the return in the store — the other location's part is still open there — and its timeline says so (Not closed in the channel / Not cancelled in the channel). A refund the store issues for only the other location's items is not taken as this RMA's refund. An RMA you raise yourself can still take any unit, whoever shipped it.
On an order split across two of your warehouses, the store's return opens on the first of its orders, the one that keeps the channel's order number, and the RMA can take units whichever of those warehouses shipped them.
Returned-to-sender (RTS) returns
An RTS return receives an outbound parcel the carrier brought back — bad address, refused, unclaimed, carrier error — on its original label. Flip Returned to sender (RTS) on the create form (or arrive with it on from the Shipments list's Create RTS return), and the form changes:
- the header reads Create RTS return;
- you confirm the Outbound parcel that came back — picked for you when the order has one candidate, chosen from a list when it shipped several (each parcel gets its own RTS return). The list offers only parcels the carrier took custody of; a label with no carrier scan is refused (This label was never used (no carrier scans) — void or relabel it instead of creating an RTS return);
- an order that was merged into another owns no parcel. It shares the master's tracking number, so a scan lists both — the merged one reads · merged into CC-… beside its number — and picking it lands on "This order has no parcel of its own — it was merged into CC-… and its goods ship in CC-…'s box. Raise the RTS return on CC-…" with a Use CC-… button that switches the form to the master;
- the lines are prefilled with everything that parcel carried, all ticked, with return type No financial action — untick anything that didn't come back. It is the box you are holding, so units a later reship re-sent from it are offered too; they count against the order line only as far as the box still accounts for them;
- Return Shipping reads Comes back on the original label: the label type is fixed to Return to sender, and no return label is generated or billed;
- an item not on the order can be added for a SKU the parcel never carried (a mispick in the box); a SKU it did carry has to go on its line.
A box that was relabelled while in the carrier's hands is one box under two labels, and the RMA lands on the label that speaks for it. While a relabel is mid-way the RTS return is refused (A relabel of this parcel's box is in progress — its current label is voided and the replacement is still owed. Finish the relabel first, then create the RTS return), as it is while a reship is open on the parcel (This parcel is mid-reship — finish or resolve the open reship before creating an RTS return for it).
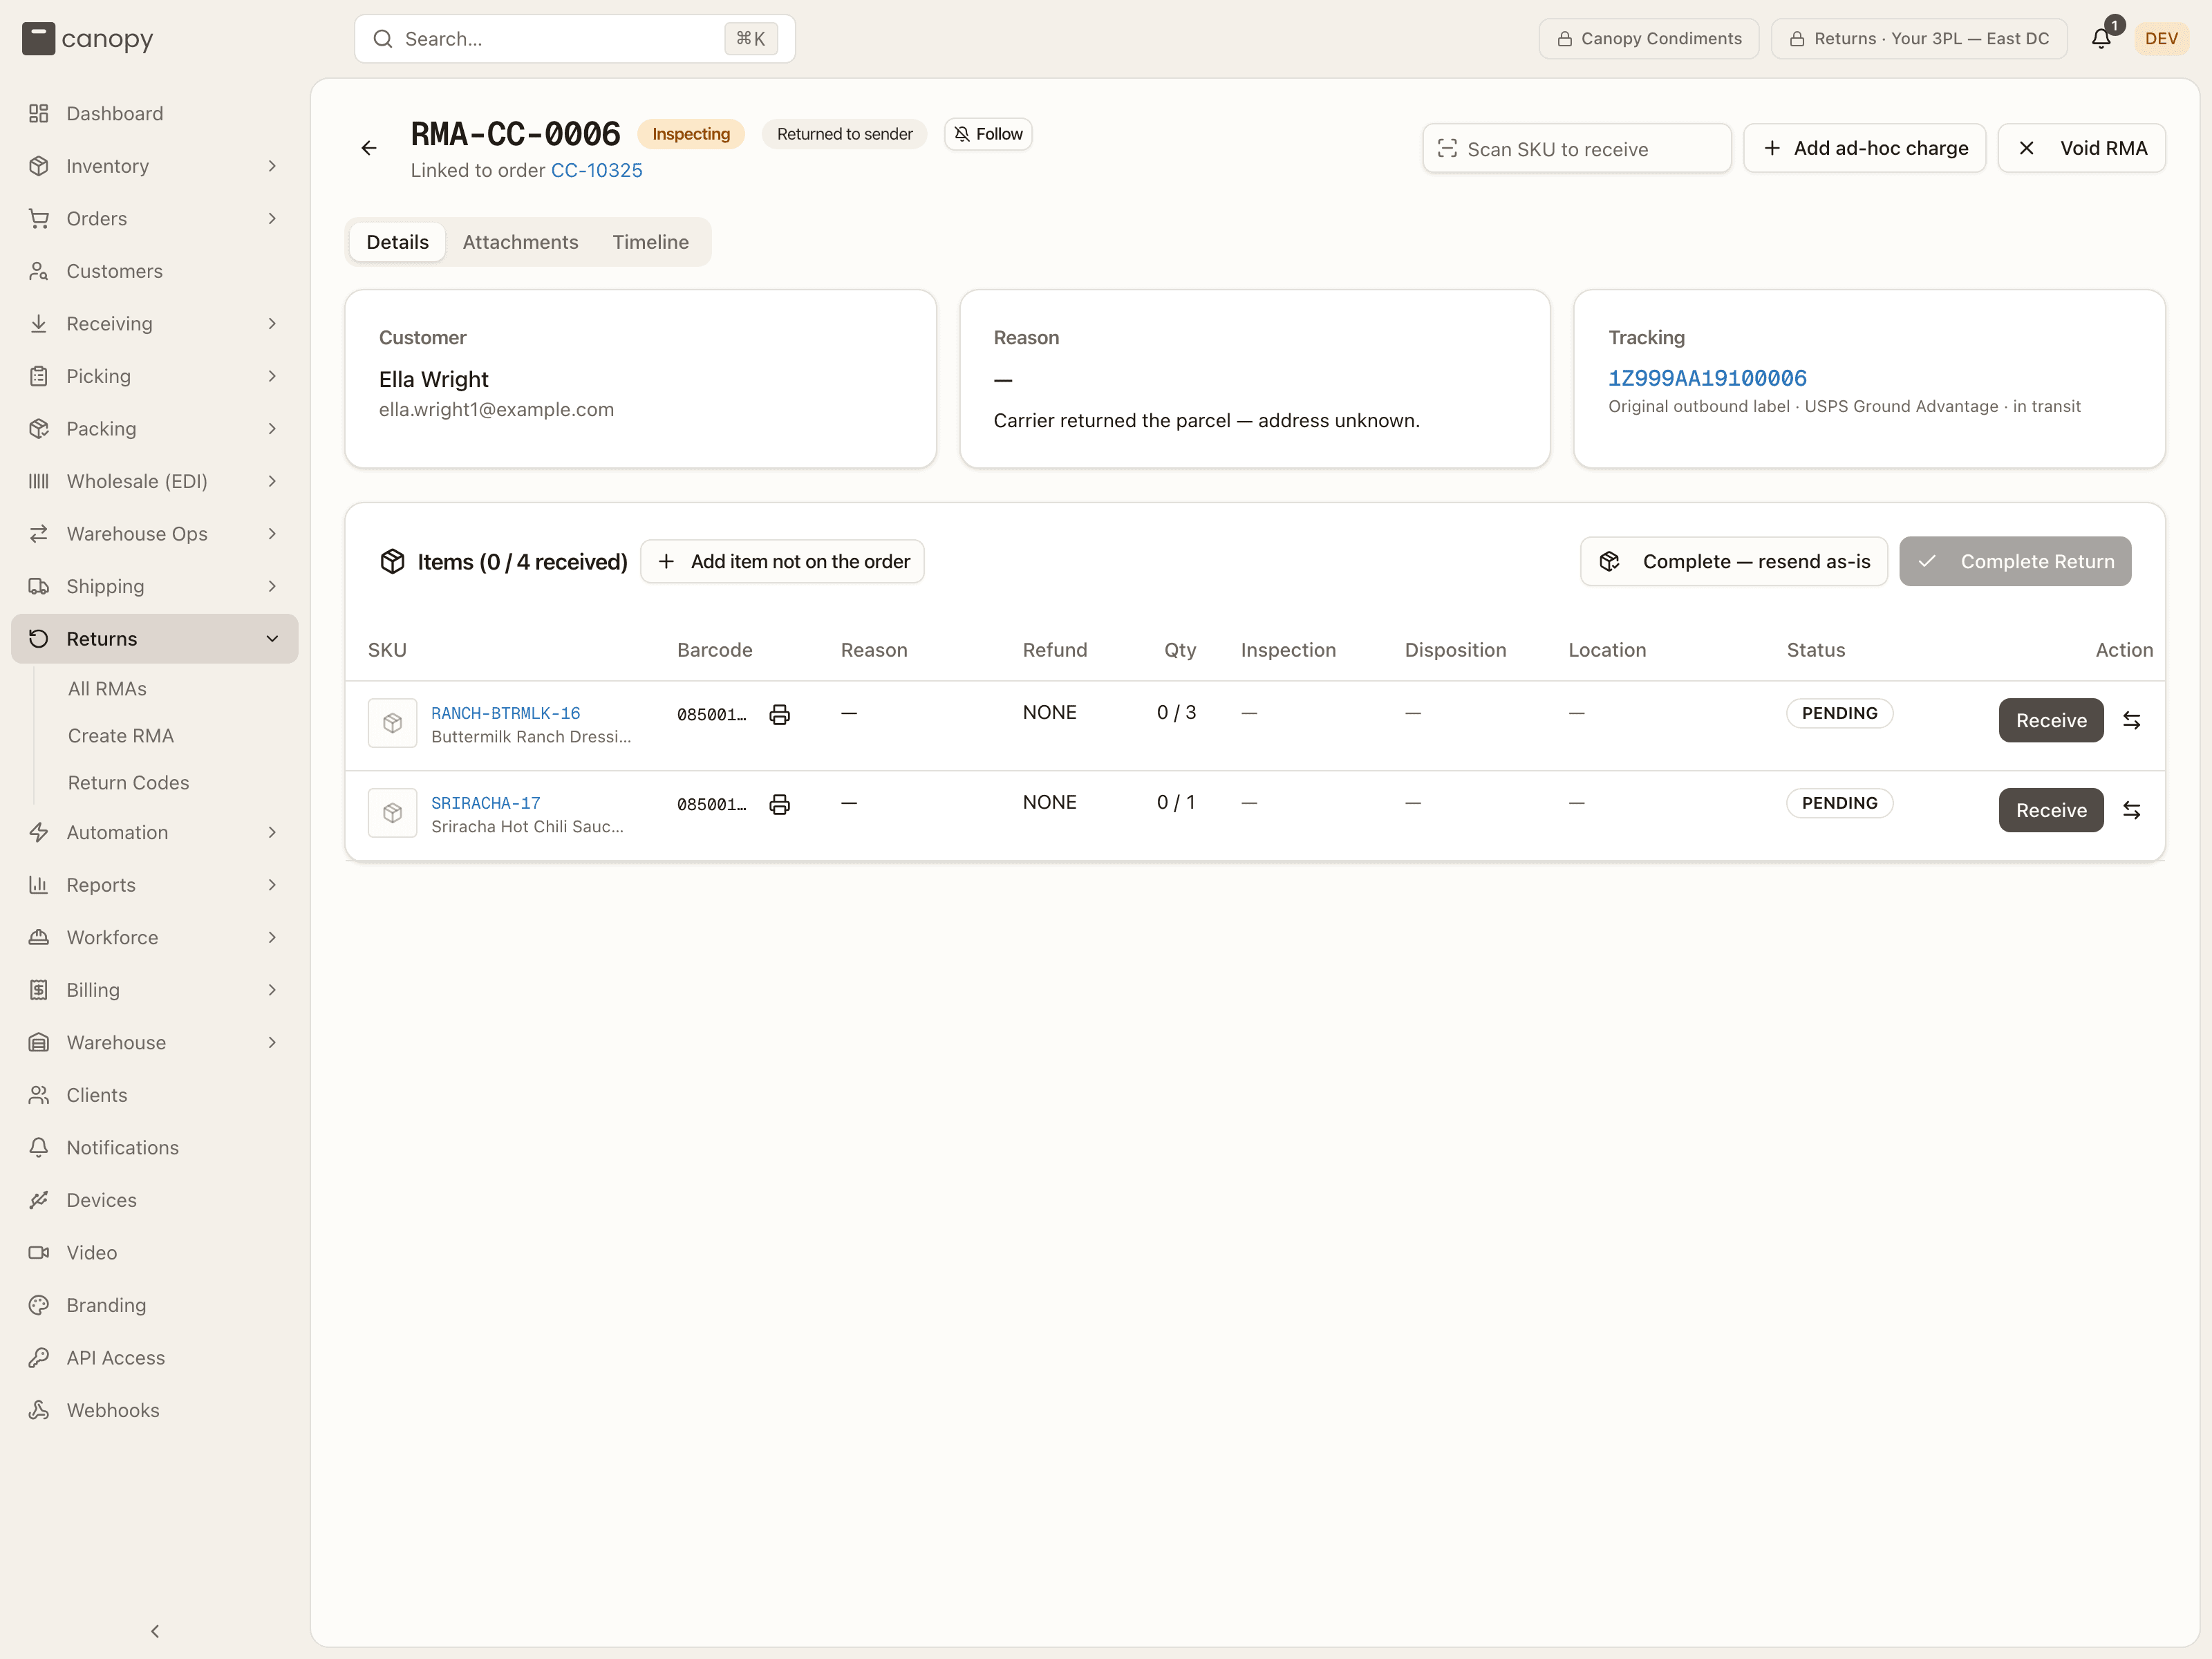
The RMA then shows a Returned to sender badge in its header and an RTS badge in the list, and its Tracking card watches the original outbound label. Starting to receive marks that outbound shipment as returned.
If you open the box and the contents are intact, you can settle the RMA without receiving anything: Complete — resend as-is appears on an Inspecting RTS return with zero receipts — and only when the relabel it licenses could run right now. The server asks the reship engine; when it would refuse (a wholesale order, a Delivered or Partially shipped order, a multi-package label, a box a reship already re-sent units from: Cannot resend as-is: a reship already re-sent 2 unit(s) from this parcel in another box…), the button is hidden and completion is refused, because a settled-as-is box that can't be relabelled would sit in the building with nothing on hand. The confirm spells it out — nothing is received and no stock moves; the RMA is marked Completed with a Resent as-is badge; the box still has to go back out via the order's reship (Package came back → intact), which buys a fresh label for the same parcel. If anything needs to come out of the box, receive those items instead and complete normally.
Blind returns (no source order)
A blind return is an RMA for an order Canopy never had — most often one that shipped before the brand moved to Canopy, or from somewhere else entirely. It is a system of record only: who sent what back, how it travelled, and what happened to each unit at the bench. Flip Blind return (no source order) on the create form and the form changes:
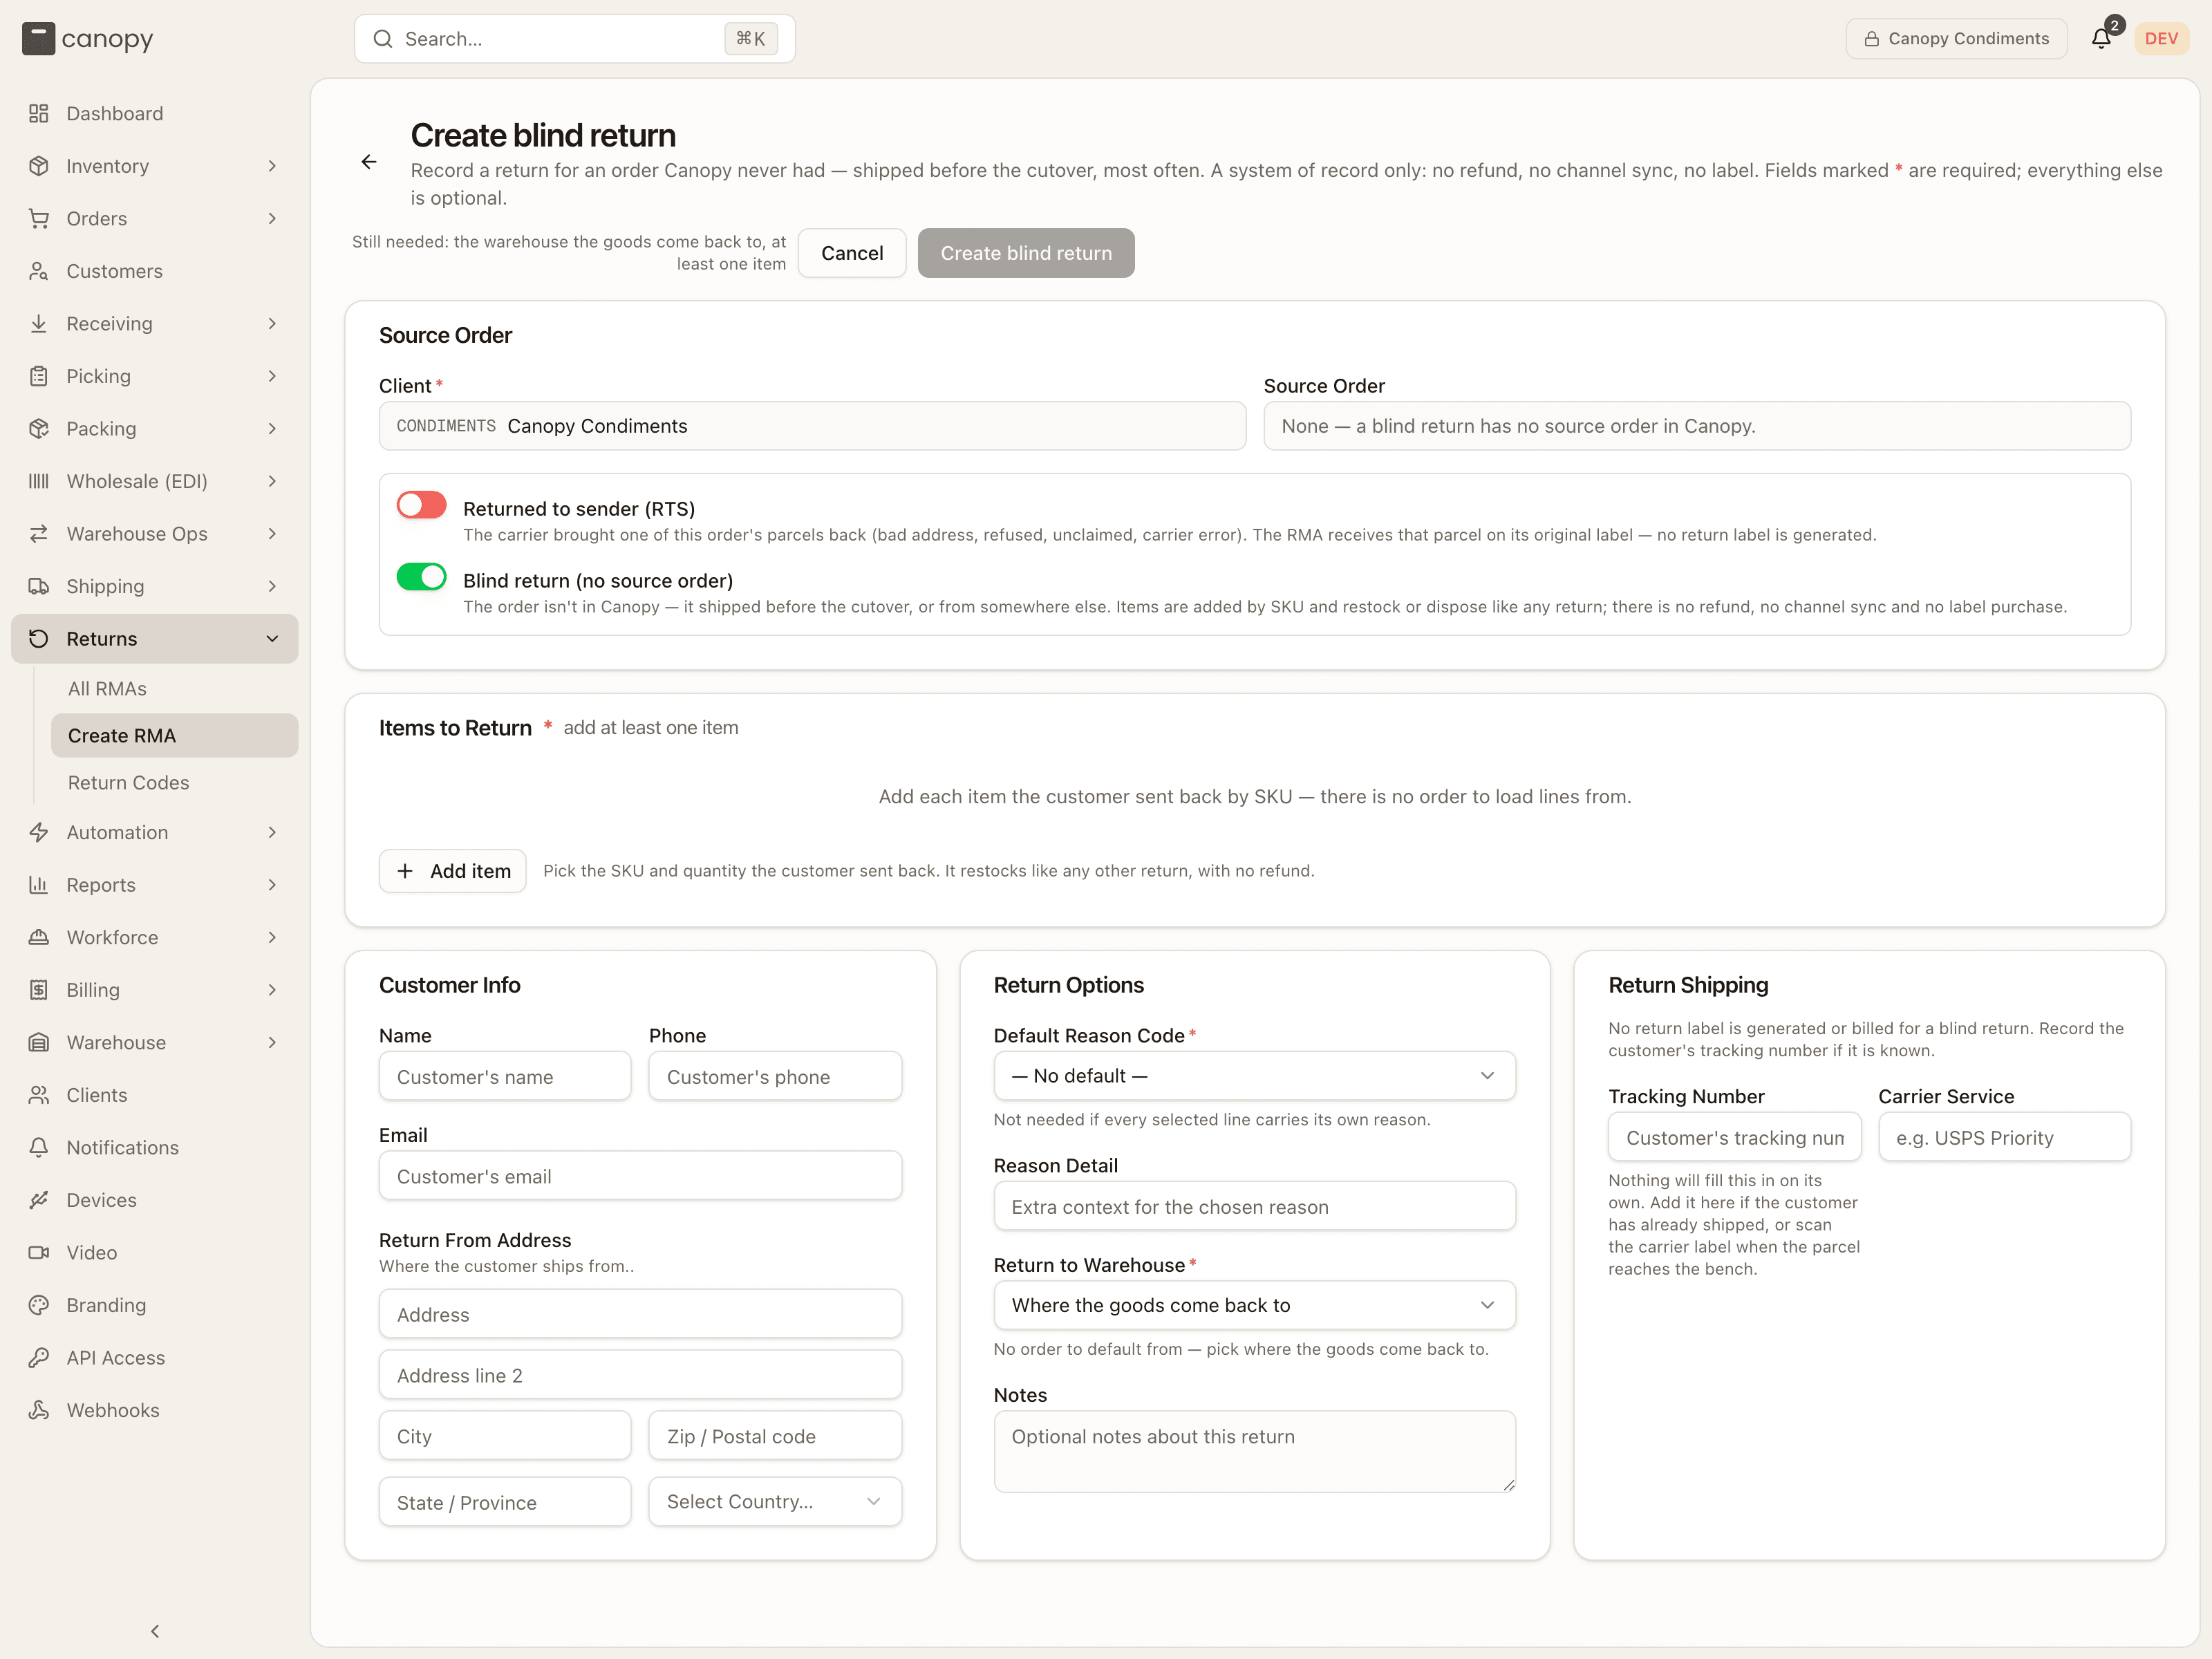
- the header reads Create blind return, and Source Order reads None — a blind return has no source order in Canopy;
- Return to Warehouse becomes required — there is no order to default it from;
- Items to Return starts empty: Add item adds a row, and you pick the SKU and quantity the customer sent back. Every line is an item not on the order — no price, no cap, return type No financial action;
- Return Shipping has no label type and no rate quote: no return label is ever generated or billed. Record the customer's tracking number if you know it, or scan it when the parcel reaches the bench.
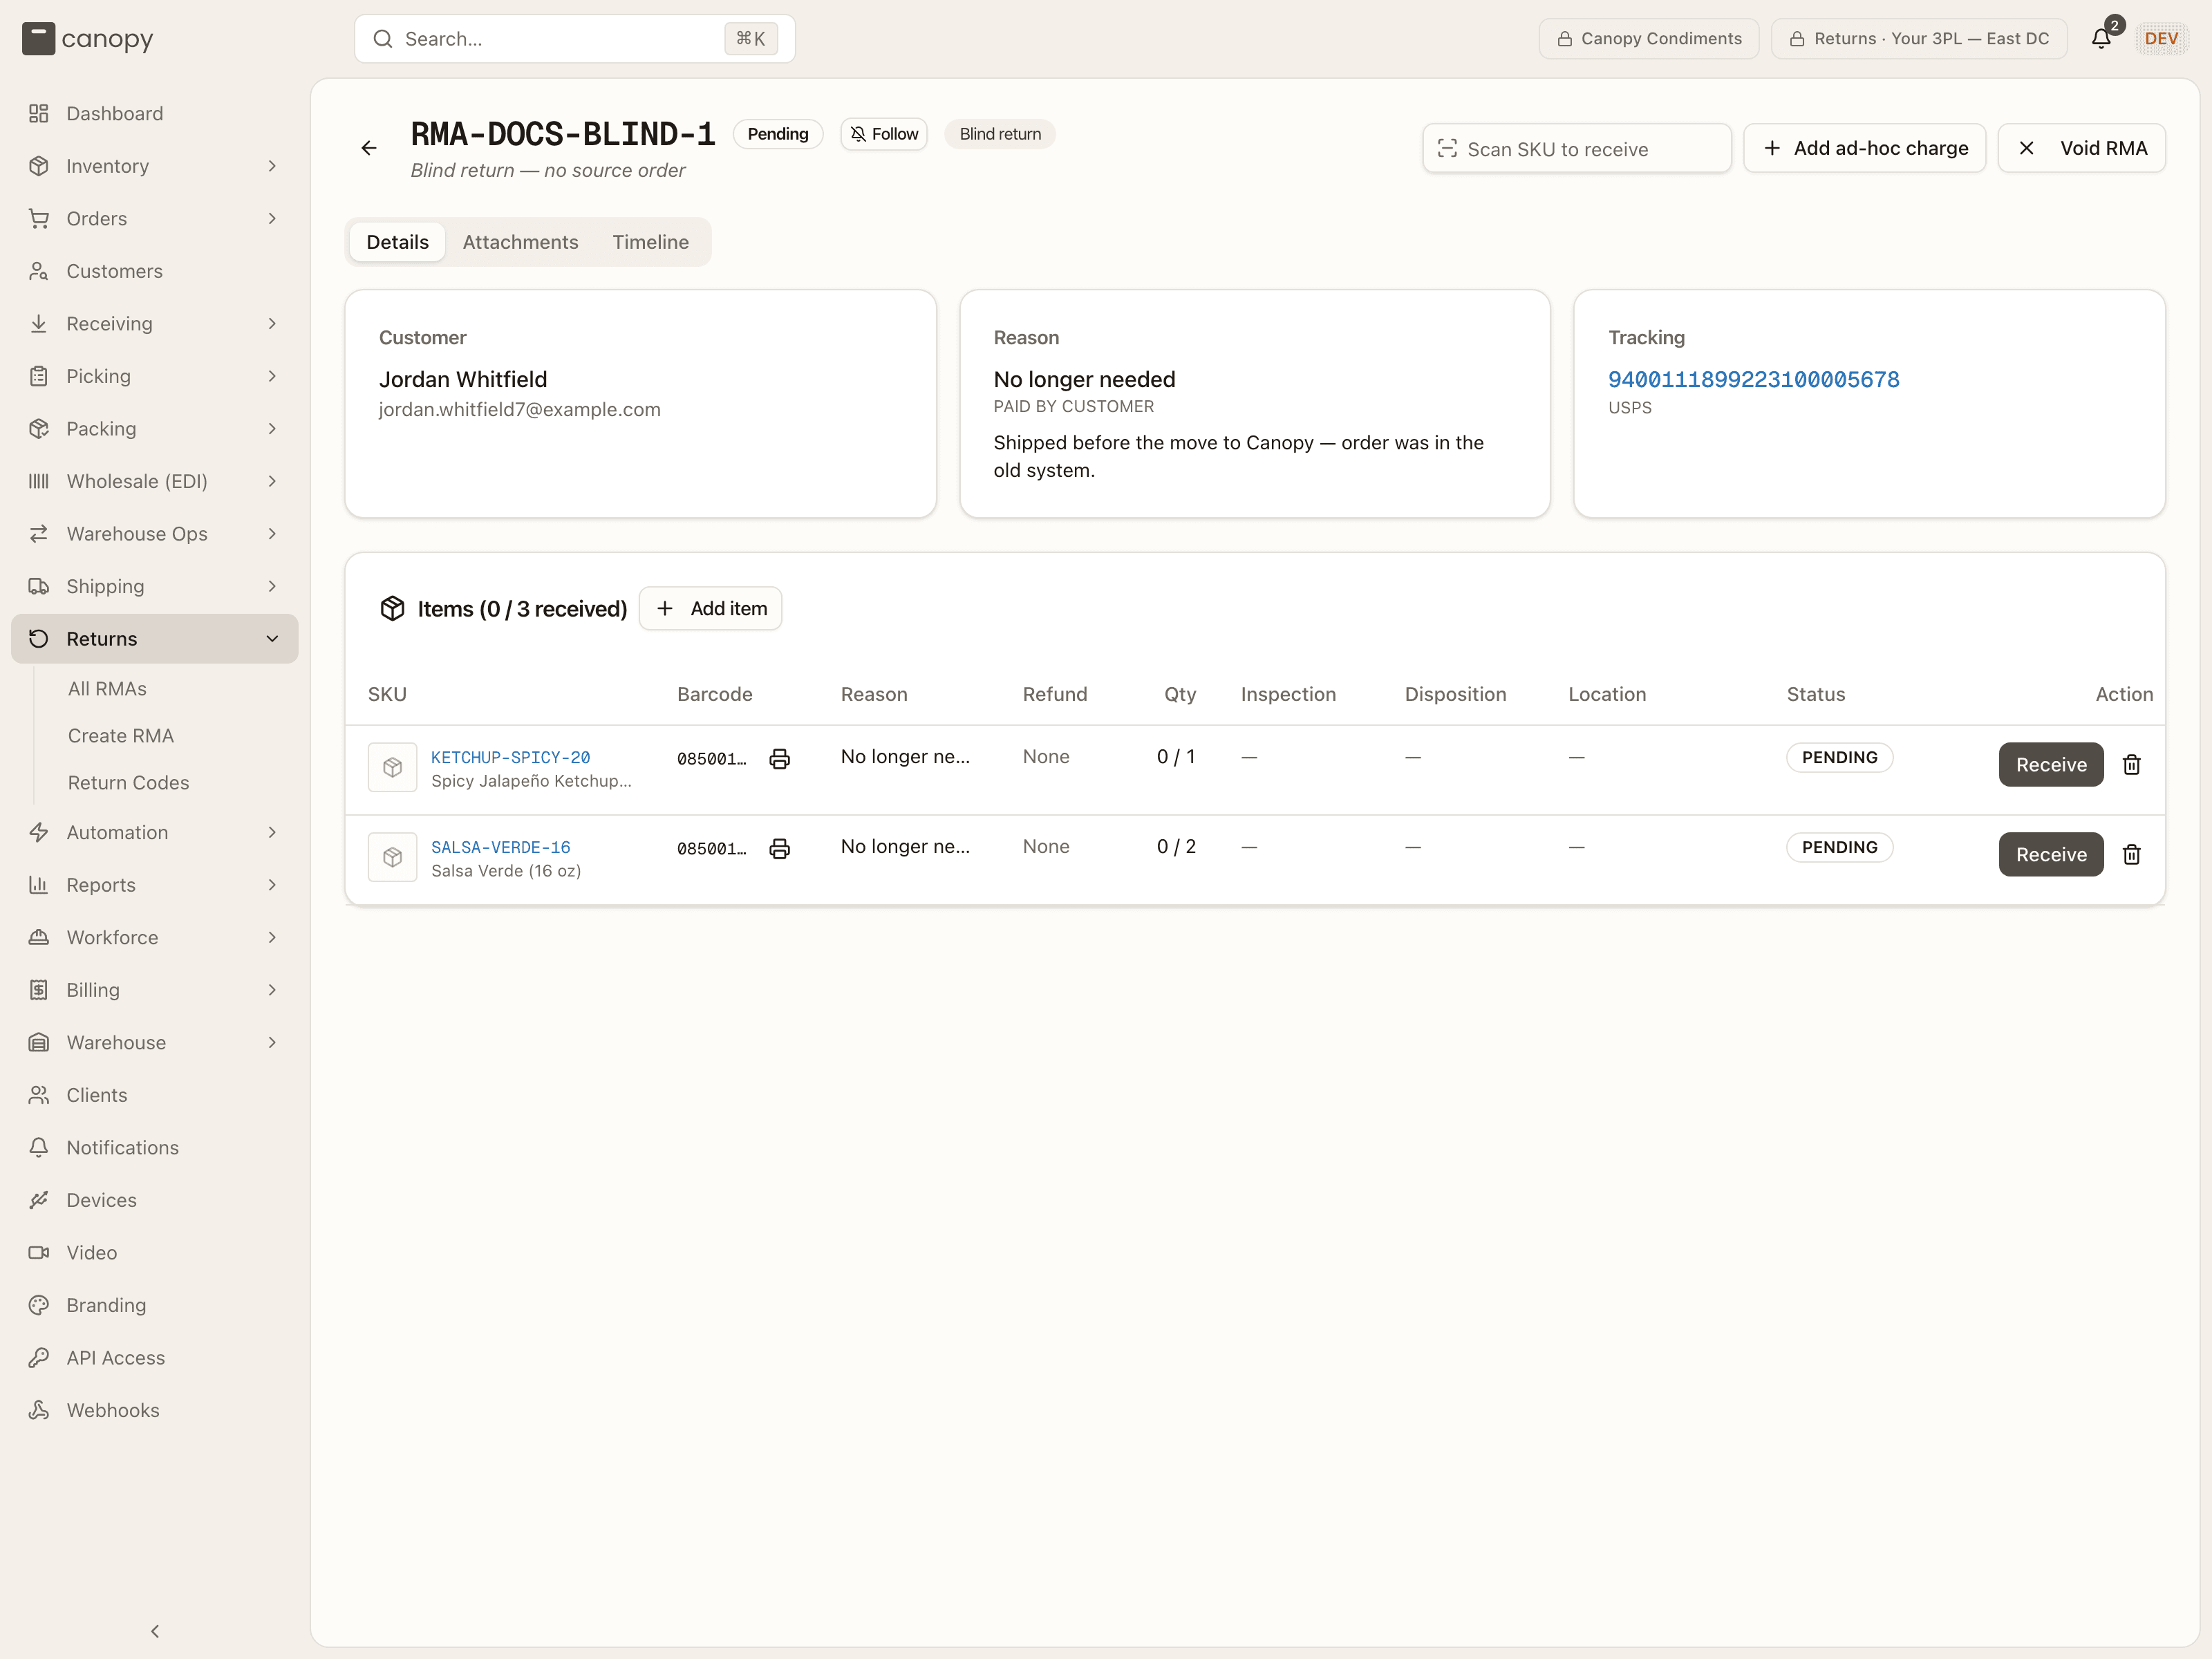
The RMA then shows a Blind return badge in its header, Blind return — no source order under the RMA number, and a Blind badge in the list, where Filters → Return type → Blind return narrows to them. On the RMA page the header button reads Add item, the rows carry no Not on order badge (the header badge says it once), and a scan that matches nothing reads X is not on this return. If the customer sent it back, add it as an item. Receiving, inspection and dispositions work exactly as on any RMA, and the units restock, quarantine or are written off the same way. What a blind return never does: issue a refund (there is no order to refund against, so the refund card doesn't appear, and the list shows no refund chip), sync to a store, or buy a return label (A blind return has no source order — Canopy never buys postage for it. Record the customer's tracking number on the RMA instead.). Return processing fees bill as usual, and a rate card rule can price or exclude blind returns through its Return type condition.
Processing a return
Open a Pending RMA — the list row or its Receive button — and receiving happens right there on the Details tab. There is no separate scan session: the first receipt you confirm moves the RMA from Pending to Inspecting on its own. Follow in the header tells you about everything that happens to this RMA from then on; see Notifications.
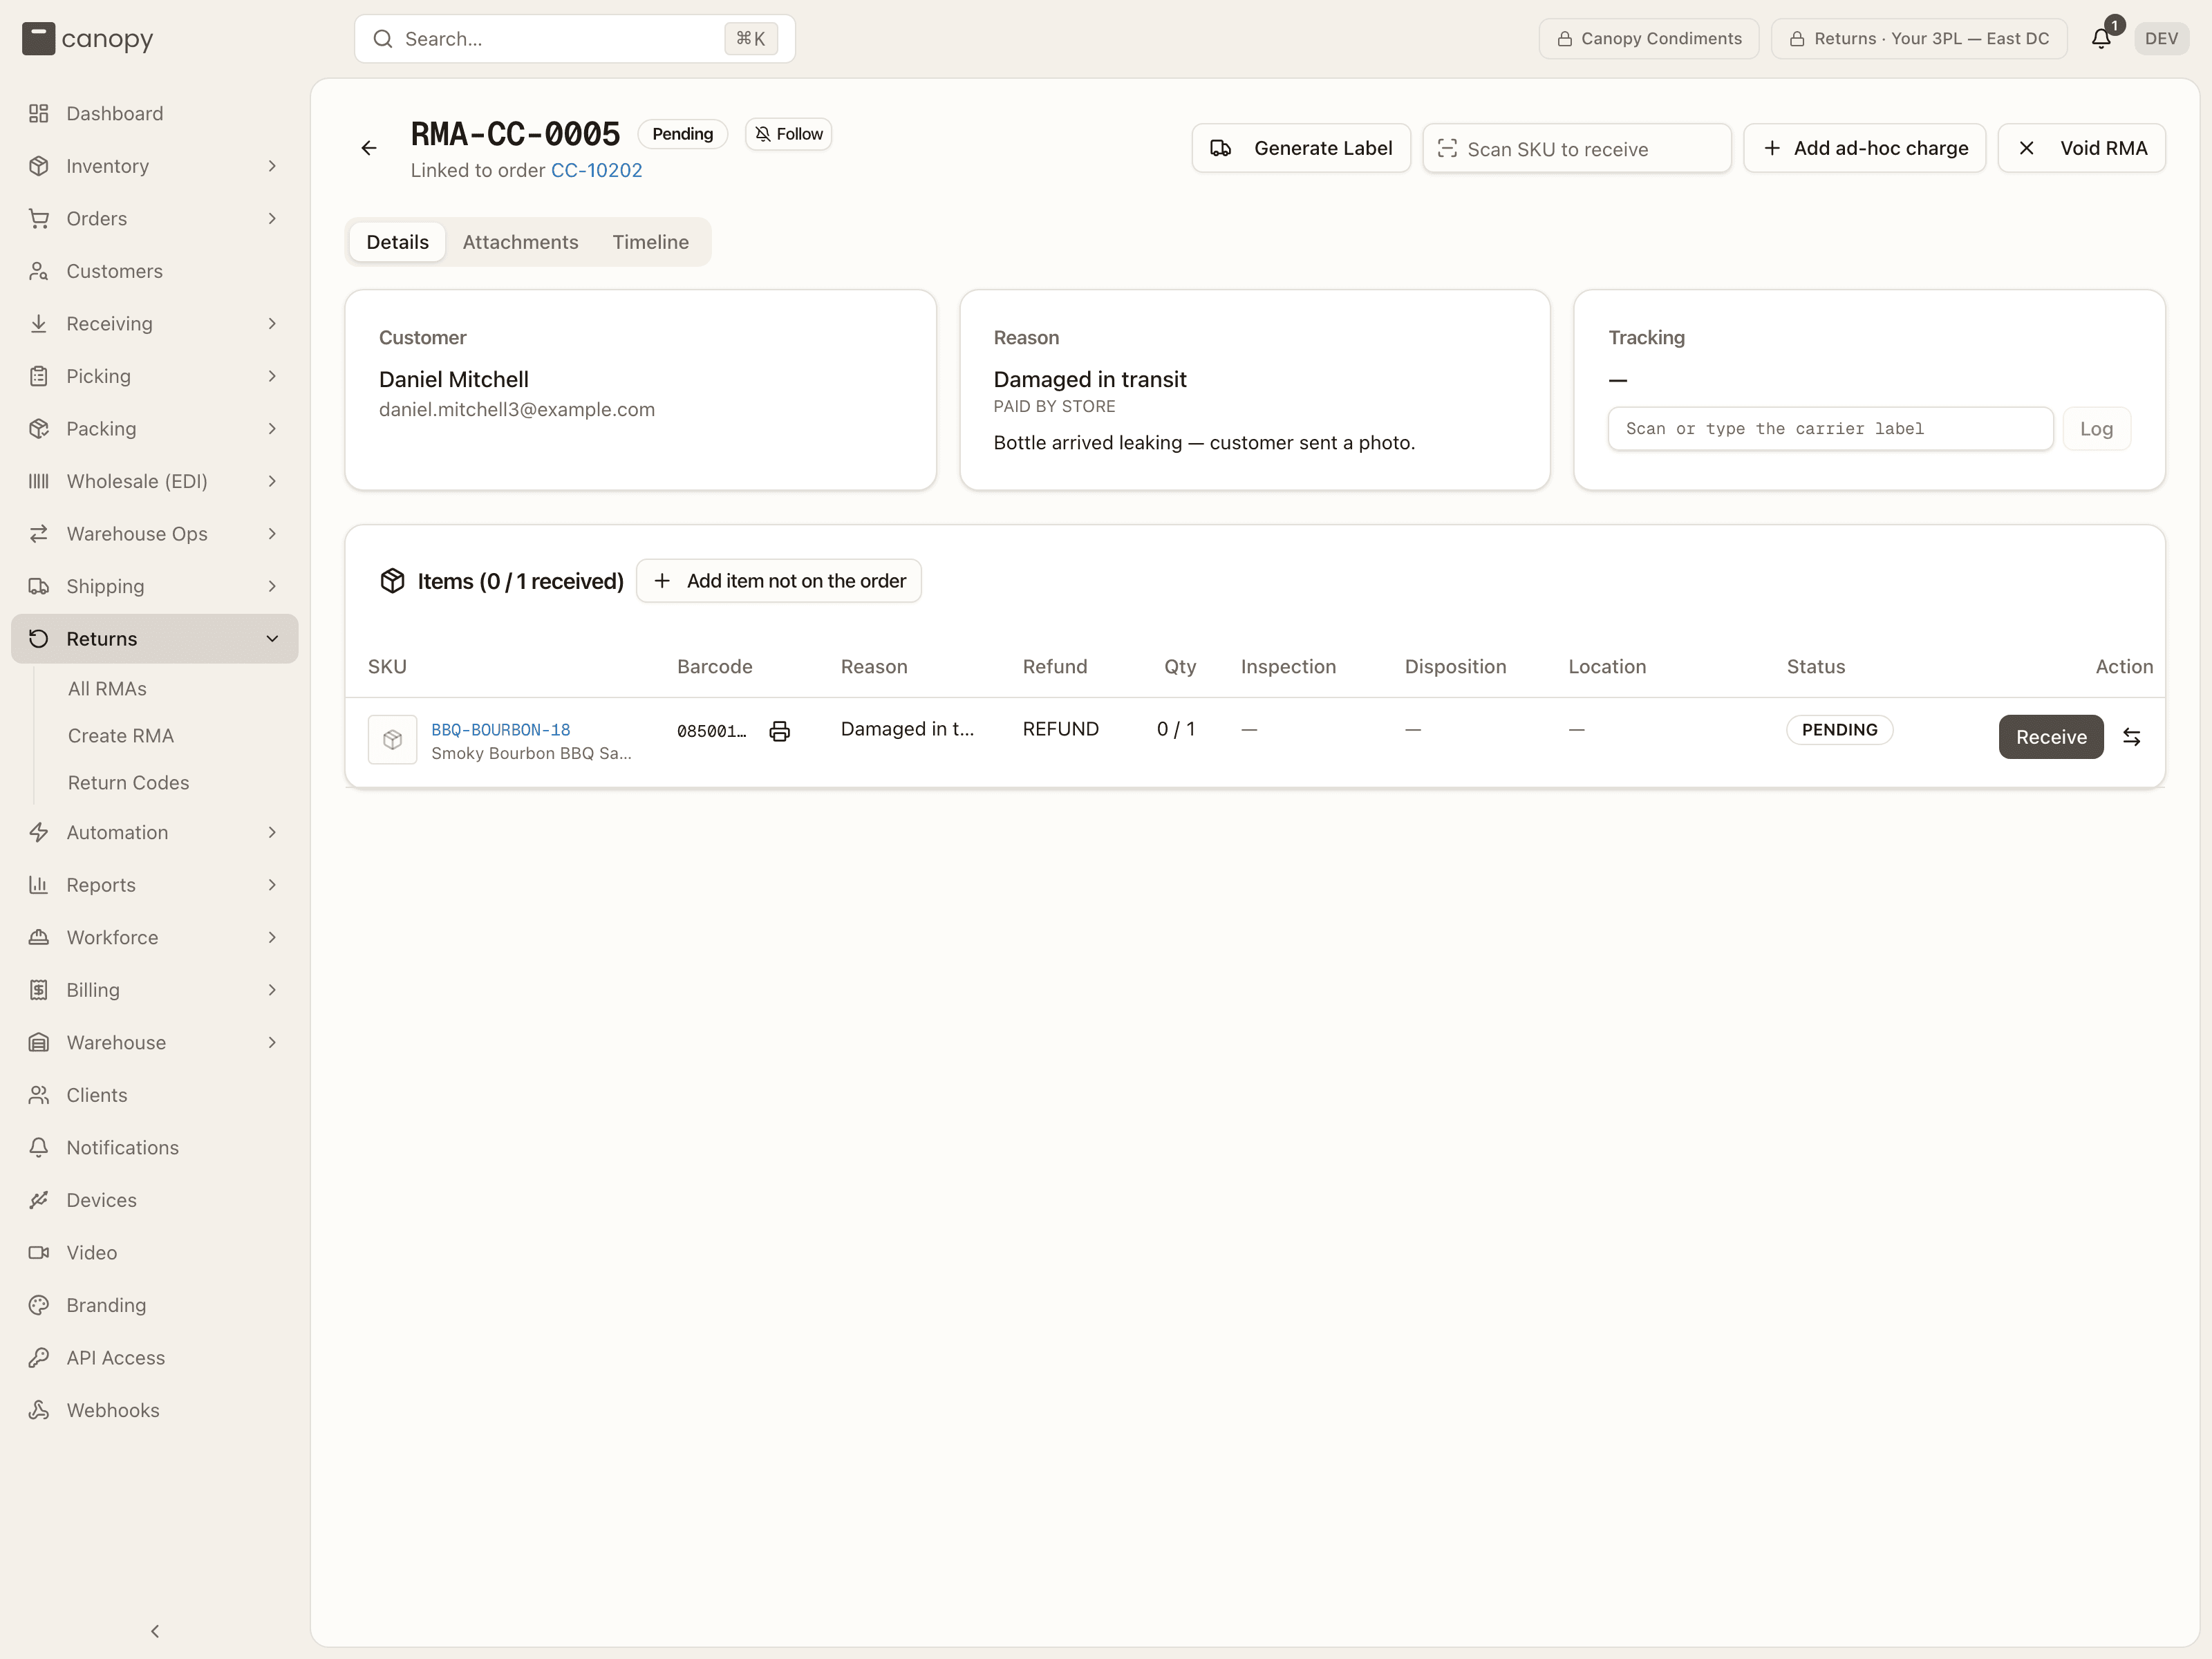
Three ways to open a line's receiver: scan or type the SKU barcode into Scan SKU to receive in the header (it opens the matching line that still has outstanding units; a fully received SKU gets already fully received on this RMA), click the line's Receive button, or click the row itself. A line offers Receive while it still has outstanding units and the RMA is Pending, Received or Inspecting; a Non-physical line is auto-received at creation.
A scan that matches no line is looked up before anything is said: No SKU matches, a SKU that shipped on this order but is not on this RMA (use Change item on a line, or create a new RMA), a SKU that is on this order, but this RMA can't take it through its order line (its line's room is held by another RMA, or this RTS parcel never carried it), or a SKU that is not on this order — in the last two cases the banner offers Add as item not on the order and opens that panel pre-filled. The code of a SKU since merged into another scans as the SKU it was merged into.
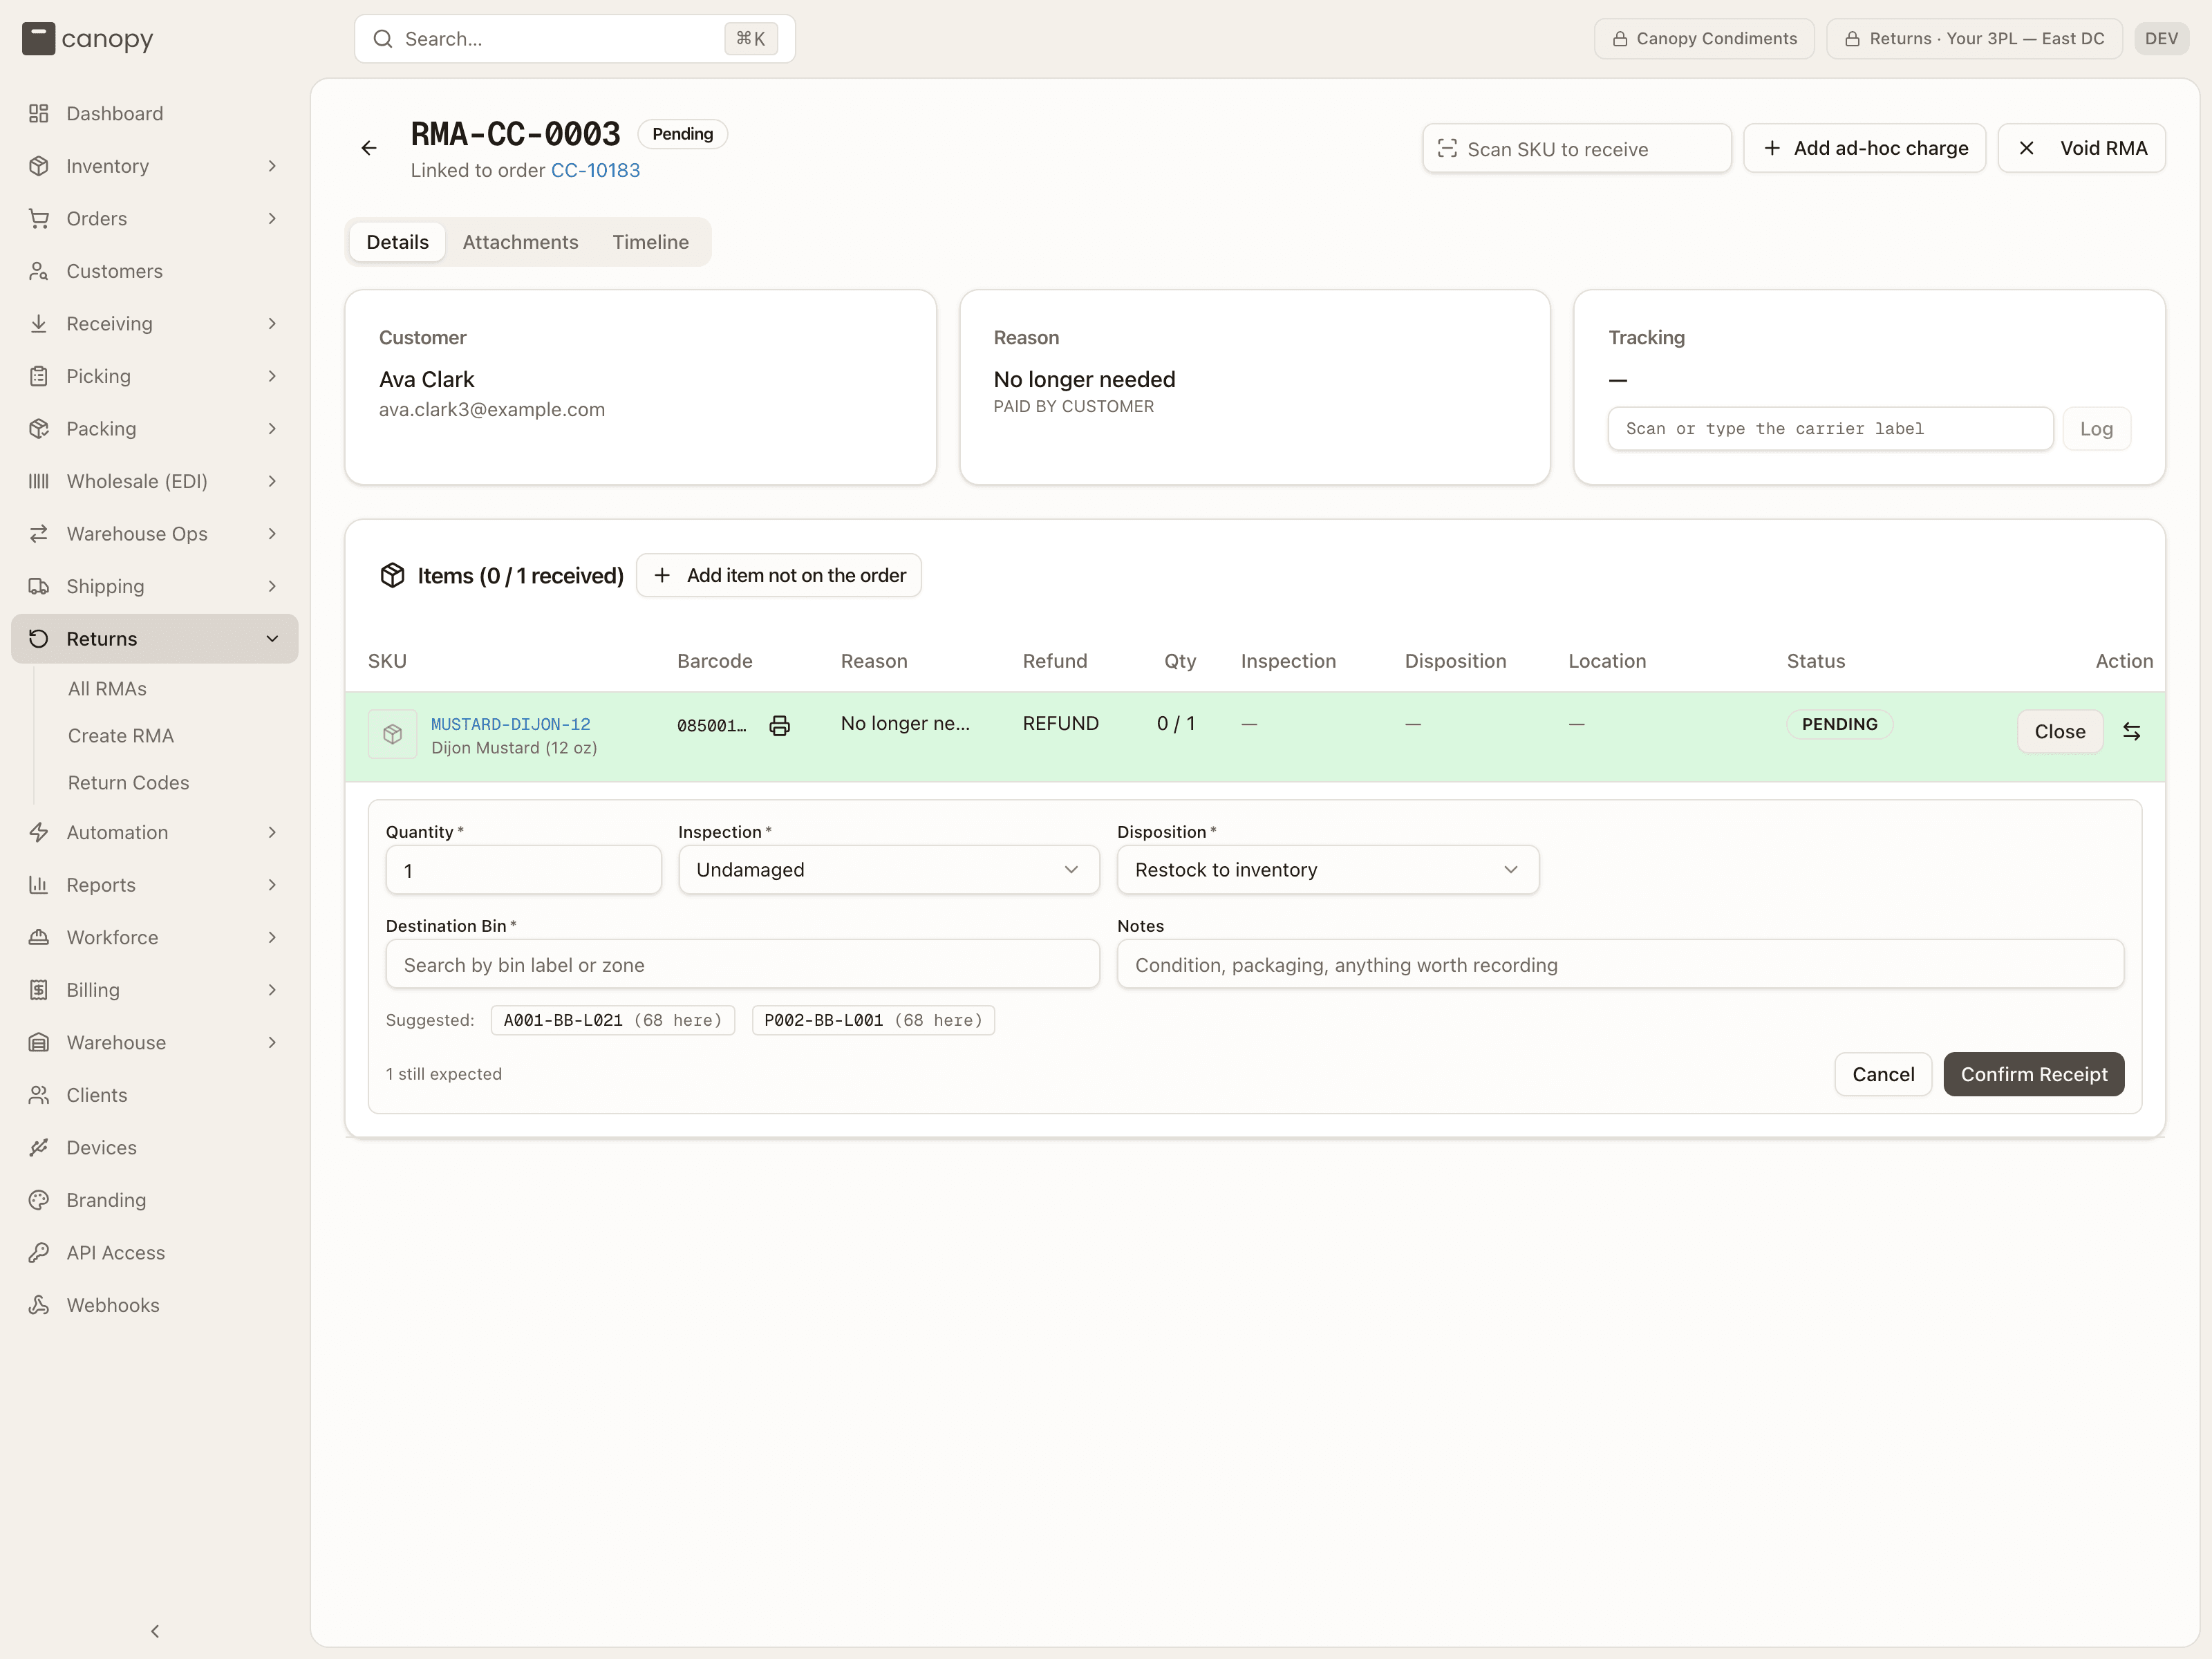
Quantity defaults to what is still outstanding on the line (the footer says 1 still expected).
Inspection — Undamaged, Opened (still resellable), Defective, or Wrong item. Changing it re-suggests the disposition: undamaged and opened → Restock, defective → Dispose, wrong item → Quarantine.
Disposition — Restock to inventory, Quarantine for review, Dispose / write off, or Return to vendor, limited to what the inspection result allows (table below).
Lot — shown when the SKU is lot-tracked or has active lots. Restocking a lot-tracked SKU requires one; the lot that shipped on the order is pre-selected when there was exactly one, and shipped lots are marked · shipped in the list. Quarantine is the escape hatch when the lot can't be read off the unit.
Destination Bin — hidden for Dispose (nothing is written to inventory). For Restock the picker lists only pickable, sellable bins that satisfy the SKU's storage tags, with one-tap Suggested chips: the bin this line was picked from, bins holding the SKU now (3 here · LOT-…), or a bin that last held it. With no history the picker starts with free bins near this brand's stock. Quarantine and Return to vendor swap the chips for the warehouse's Inspection (quarantine-zone) bins. A bin can hold only one lot of a SKU — picking a chip adopts its lot, and a conflicting hand-picked bin is refused.
Notes, then Confirm Receipt. The footer names the bin you picked (· into …). Coded failures come back as advice — lot required, one lot per bin, or a storage-placement refusal.
| Inspection result | Allowed dispositions |
|---|---|
| Undamaged | Restock, Quarantine |
| Opened (still resellable) | Restock, Quarantine, Dispose |
| Defective | Quarantine, Dispose, Return to vendor |
| Wrong item | Quarantine, Return to vendor |
Once a line has receipts, they stack in its Inspection, Disposition and
Location cells (raw all-caps: WRONG ITEM, RETURN TO VENDOR; location as
bin label plus lot), and the Action cell grows a pencil and trash per
receipt while the RMA is Inspecting: Edit this receipt reopens the form on
its values (the footer reads Replaces the existing receipt, the button Save
Receipt), Remove this receipt un-receives it. The Status cell shows who
confirmed the last receipt and when — or Auto-received.
Other corrections on the Items card:
- Change item (the ⇄ icon, on a line with nothing received yet) swaps the line to another item on the same order — the customer sent back something else. Pick from SKU — name (1 of 2 returnable); the change is recorded on the timeline.
- Add item not on the order (in the card header) works exactly as on the create form — SKU, Qty, Reason (Inherit default or a code) — and a trash icon removes such a line while nothing is received on it. Available while the RMA is Pending, In Transit, Received or Inspecting, on an RTS return too: a mispicked SKU can be in the box, though a SKU the parcel carried has to go on its line.
Complete Return sits in the Items card header once the RMA is Inspecting. It stays disabled — Receive at least one item before completing — until a receipt exists, then pulses so the next step is unmissable. Completing finalizes the line statuses, restocked units are already sellable from the moment they were received, and the Refund card appears.
A raw all-caps line status shows in the Status column:
| Line status | Meaning |
|---|---|
PENDING | Nothing received against the line yet. |
PARTIAL | Some but not all expected units received. |
COMPLETE | All expected units received. |
OVER | More received than expected. |
SHORT | Finished with fewer than expected. |
Following an RMA
Every RMA has its own page with Details, Attachments (with a count badge), and Timeline tabs. Opening one pins the topbar to the RMA's client and warehouse so you can't widen scope mid-flow.
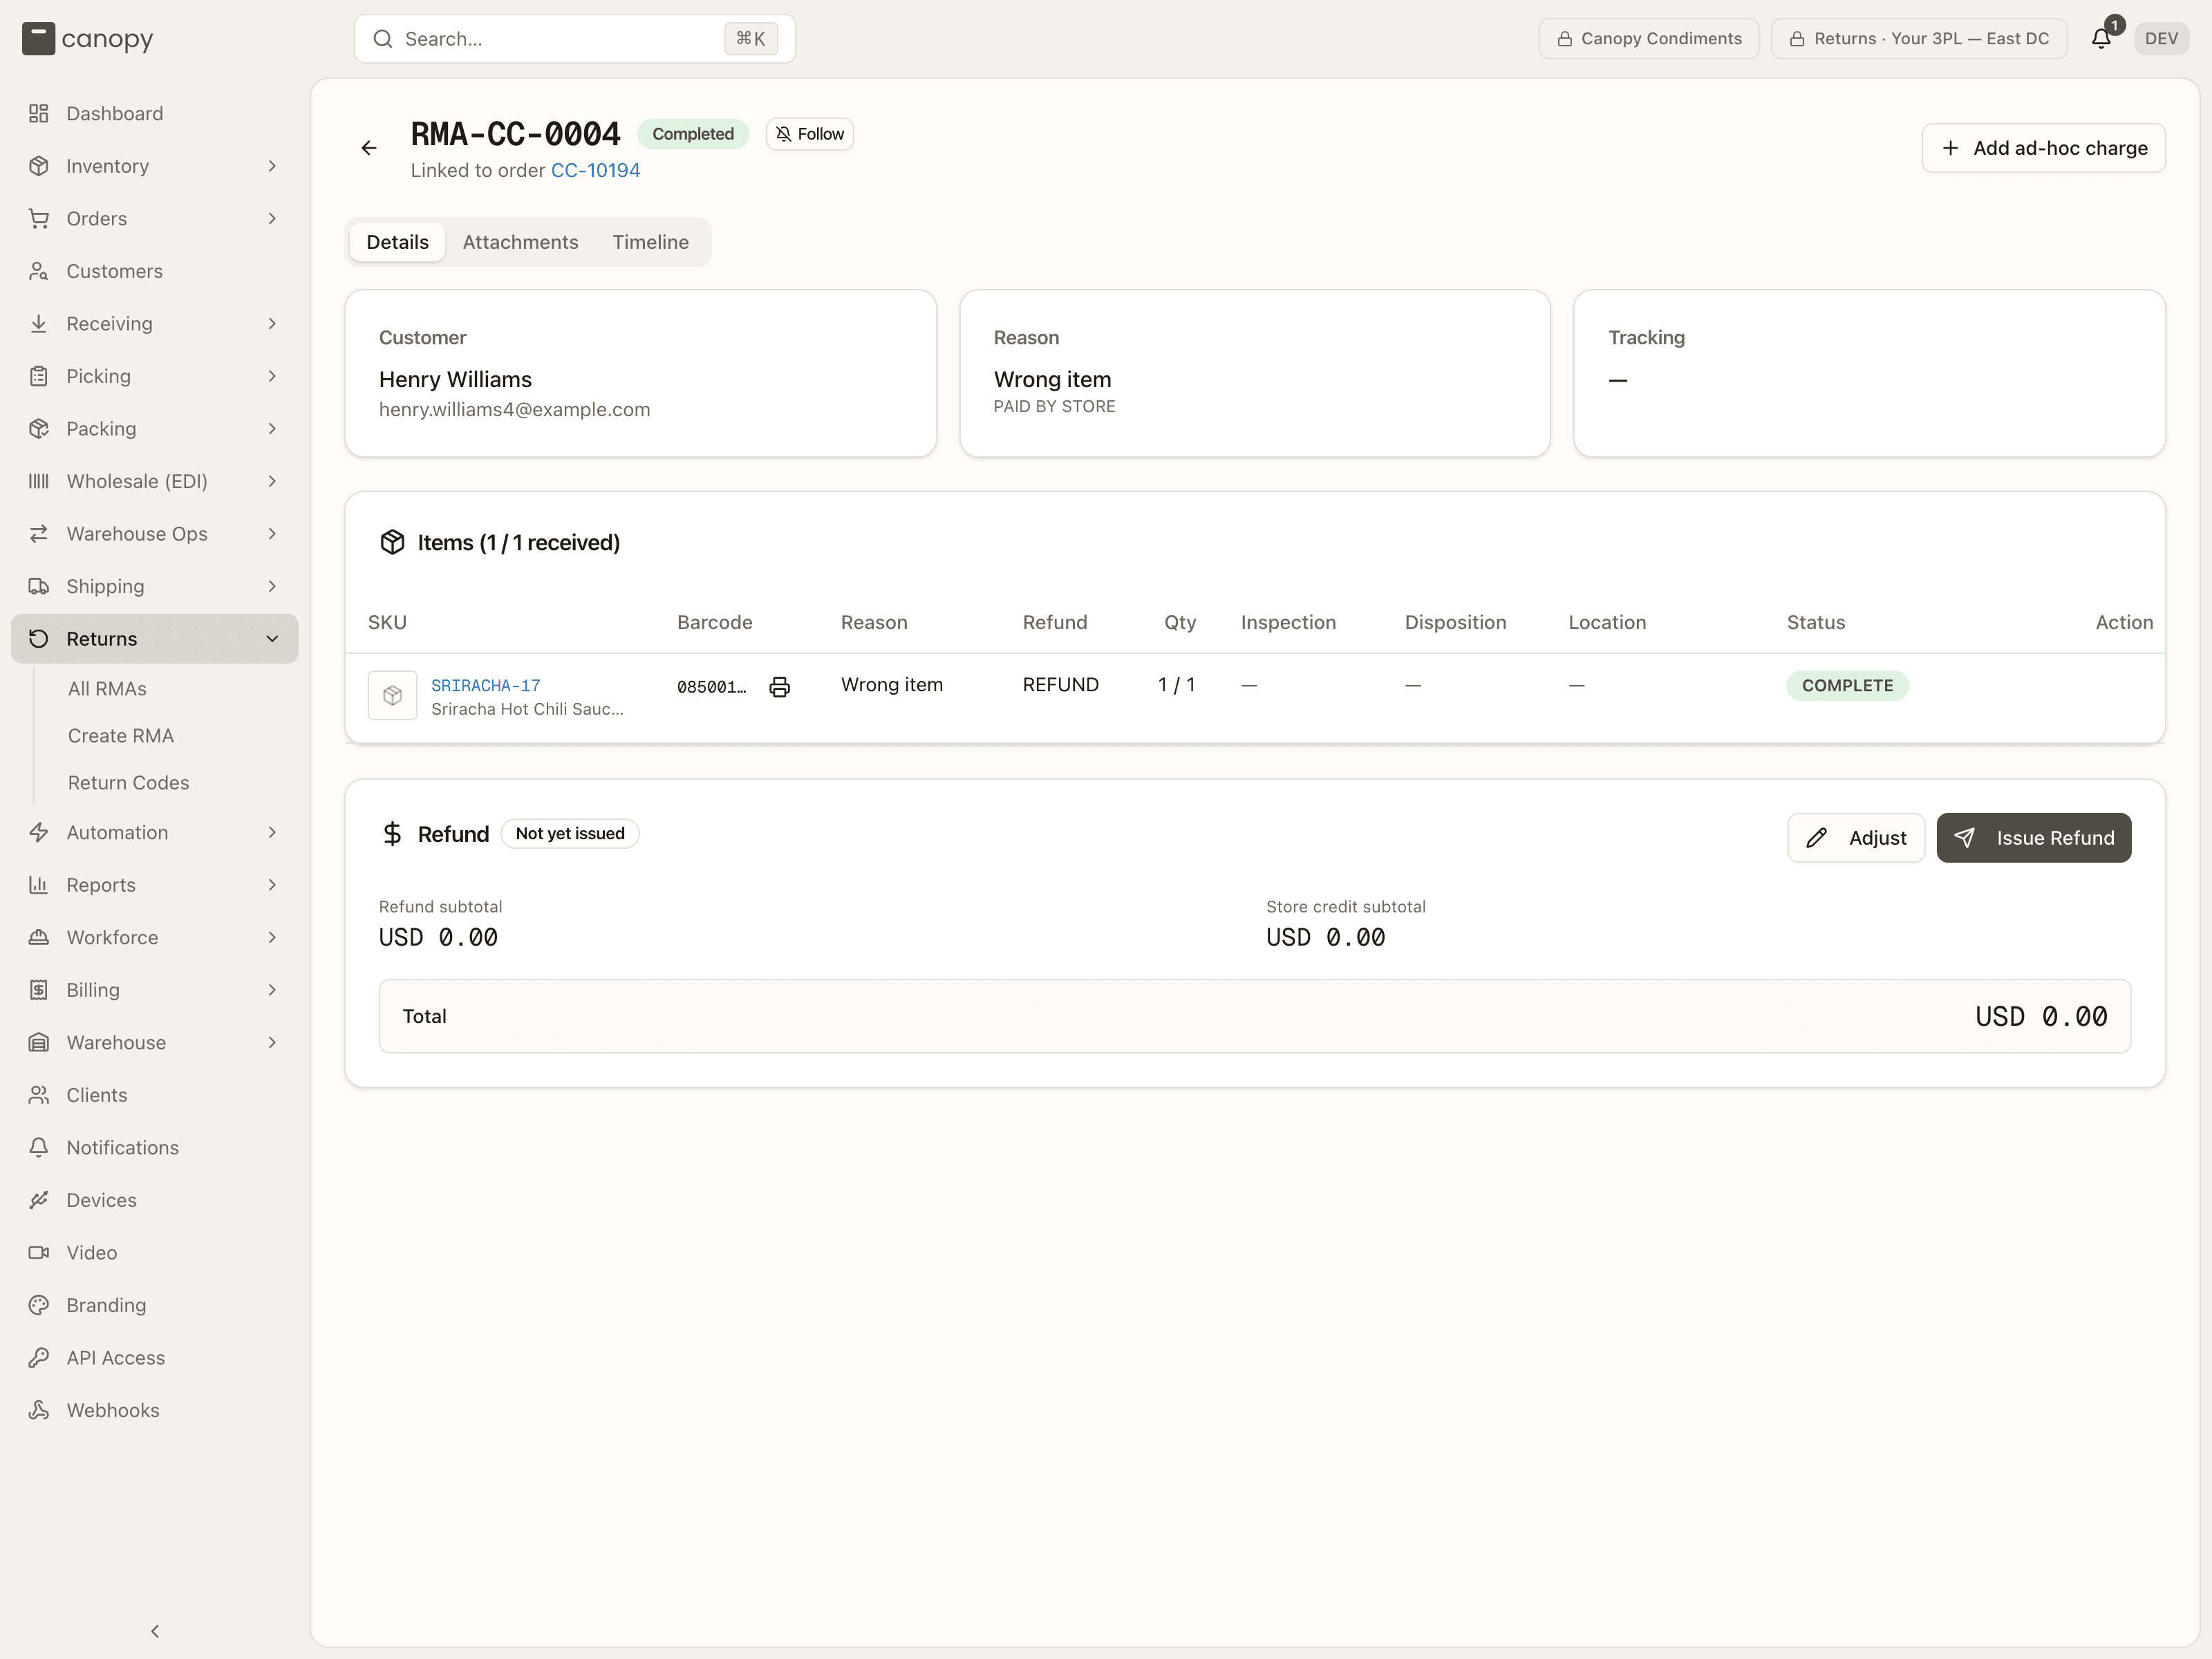
The header carries the RMA number, its status, and — as they apply — Returned to sender, Blind return, Resent as-is, Synced with Shopify, and a channel-sync badge: Sync pending or Sync failed (with a Retry sync button for you) tells you whether the return status and refund made it back to the store. Under it: Linked to order … or Blind return — no source order.
Details opens with three cards:
- Customer — name and email.
- Reason — the default reason code, its label policy in raw form
(
PAID BY STORE), and the reason detail. - Tracking — the tracking number as a carrier link and the carrier
service. On an RTS return this is the original outbound label with its
status. When Canopy bought a label, View label (S3) → and Download
label → sit under it. When there is no tracking on an RMA that is Pending,
In Transit, Received or Inspecting, you get Scan or type the carrier label
- Log — nothing fills this number in for a customer-arranged return, and the bench is usually where it first becomes knowable; the carrier is detected from the number's format.
Below them the Items table: SKU (photo, code — click it for the SKU detail modal — name, description, the lots it shipped from, and Non-physical / Not on order badges — the latter never on a blind return, where every line is one), Barcode (with a print button — falls back to
the SKU code), Reason, Refund (the line's return type in raw form,
STORE CREDIT; None on an item not on the order), Qty (received /
expected), Inspection, Disposition, Location (operators only — a
client never sees bin locations), Status, and Action.
Attachments is a drop zone plus the file list — anyone on the RMA can upload and download; a client can delete their own uploads, you can delete any. Timeline is the RMA's history with a notes composer on top (Post note, 2,000 characters; you can edit your own notes): RMA created, Status changed, Item received / Item unreceived, Line item added / removed / updated, Return label generated / voided, Refund payload overridden, Refund issued, RMA voided, note and attachment events. Each names its actor — or System for a carrier-driven status change — and shows field changes as old → new. An RMA with no history reads No activity yet.
Return labels
Generate Label appears in the header of a Pending RMA that has no label and no tracking yet, when Canopy is the one buying the postage — decided by the RMA's own label type (Label paid by store or by customer), falling back to the reason code's policy (Return Paid By Store or Flat Rate Shipping) only for RMAs created before label types existed. The dialog mints a Stallion return label and emails it to the customer:
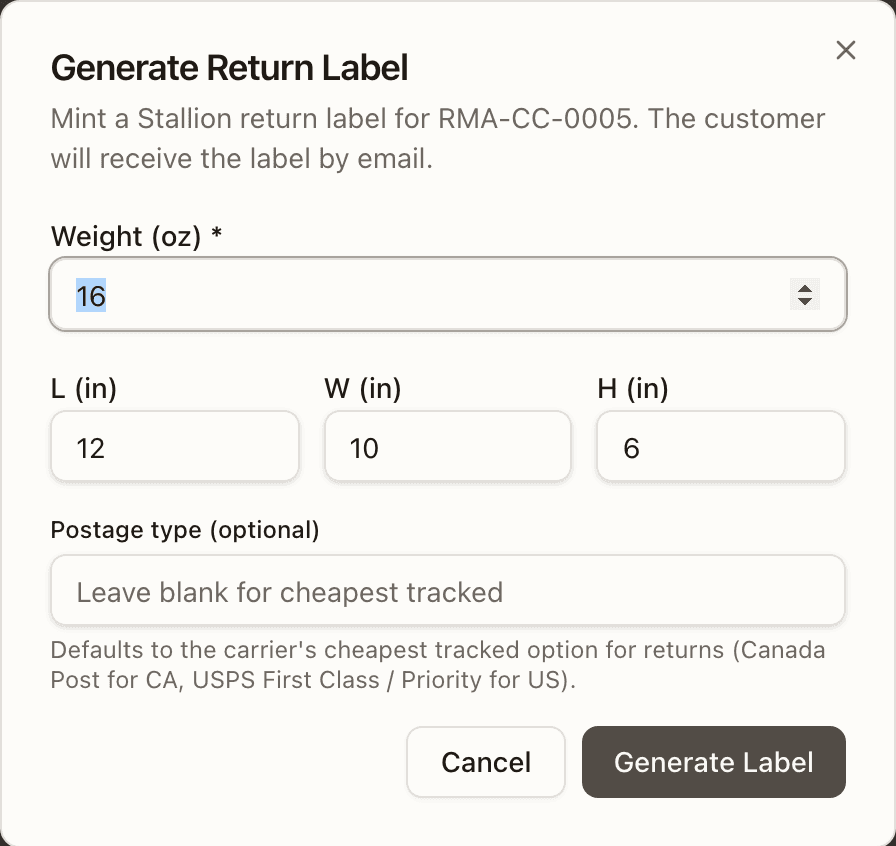
Enter Weight (oz) (required) and optional L / W / H (in); Postage type defaults to the carrier's cheapest tracked option for returns (Canada Post for CA, USPS First Class / Priority for US). The label's tracking number lands on the RMA, and carrier scans on it drive the status advance described above.
Void Label replaces Generate Label once a label exists and the RMA is still Pending: it cancels the label carrier-side and unlinks it so a new one can be minted (wrong dimensions, wrong RMA). The carrier may still refuse if the label has already been scanned — the error shows inline.
Refunds
The Refund card appears on a Completed RMA with the computed payload and its state: Not yet issued, Ready, Issued, Failed — retry available, or Unconfirmed — verify on channel. It breaks down Refund subtotal, Store credit subtotal, any Adjustments, and the Total, followed by per-type line-item tables — Refund, Store credit, Exchange, Replacement, and Warranty line items (manual review). Once issued, a footer records when and by whom (by Shopify when the store issued it).
The payload pays for at most what the customer bought — the refund ceiling. Per order line, the units bought less every unit already refunded there — by an earlier RMA on the order, or by the sales channel itself, whose refunds Canopy records as it hears of them — is what this RMA may still refund; receipts are admitted in the order they were booked, and the rest is received but not paid. The card says so with Capped at what the customer bought (SKU: 2 received, 1 refundable — the rest is more than the customer bought, or was already refunded on this order (here or in the sales channel).) and, when the channel refunded money on the order with no items attached, Already refunded in the sales channel — shown, never subtracted, since the channel caps money itself. Exchange, replacement and warranty lines move no money and are never capped. On an order split across two of your warehouses the ceiling reads every one of its orders: units refunded by an RMA on any of them, or by the channel, come off the same line.
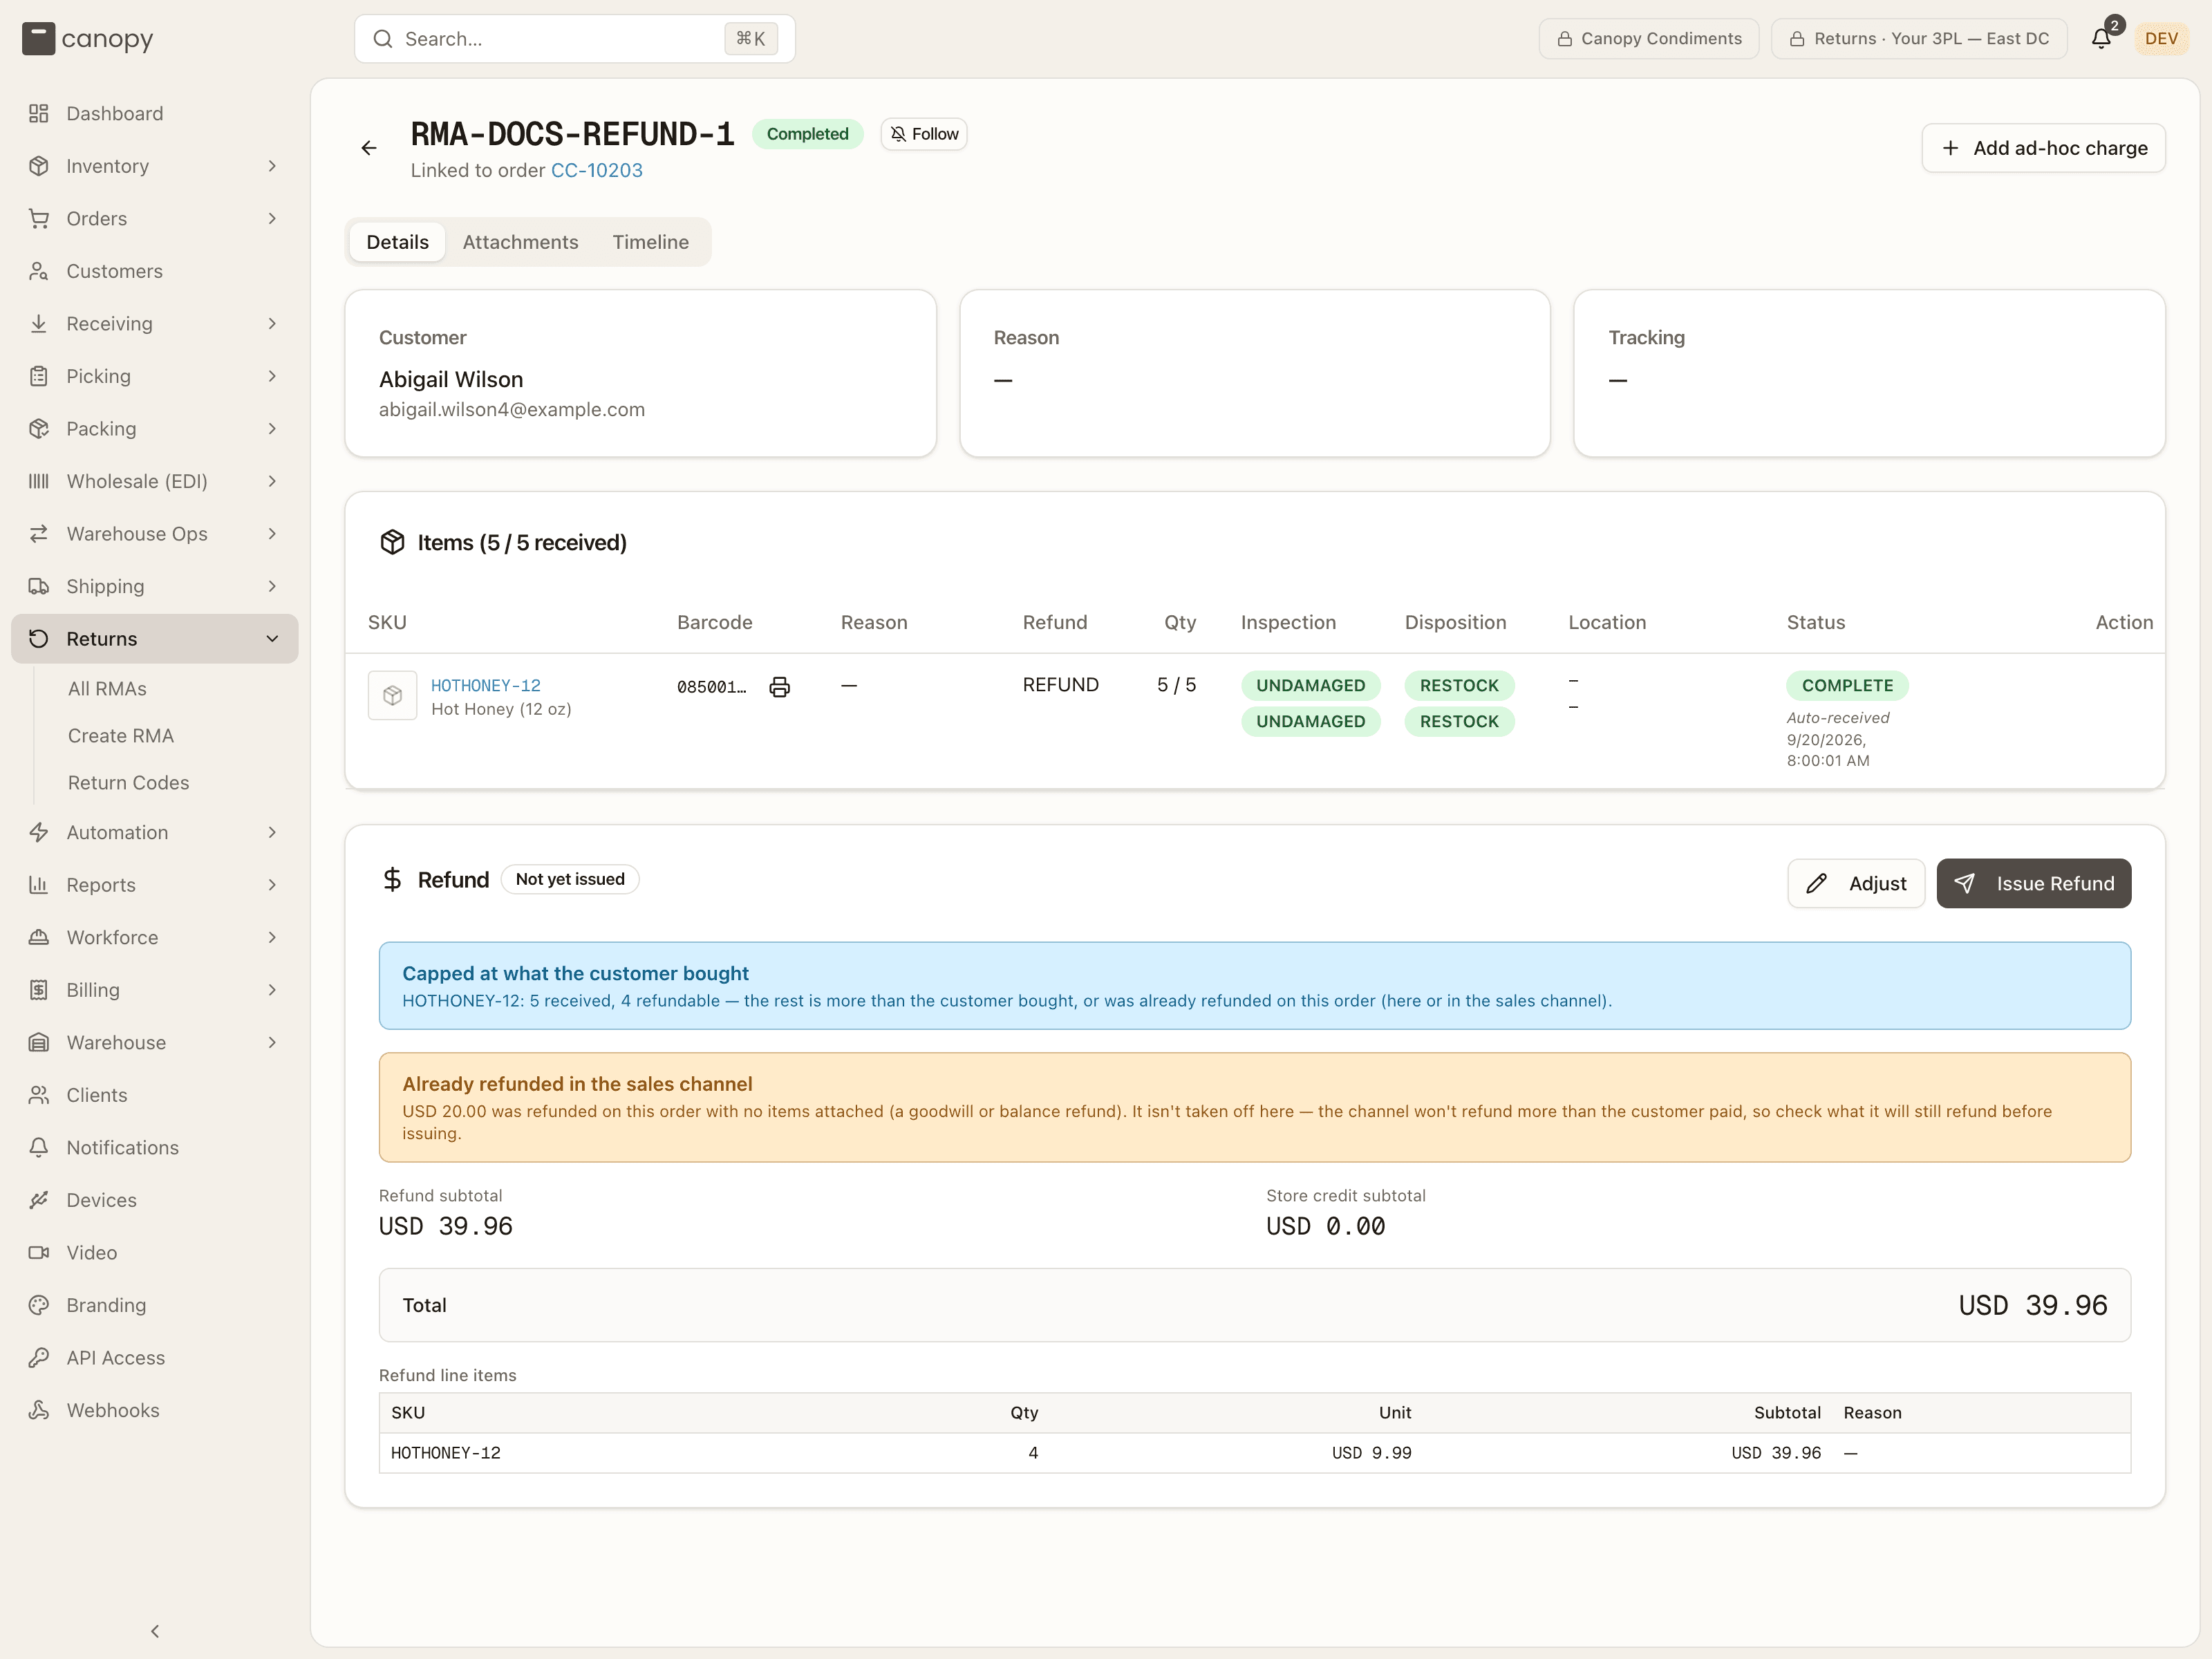
Your controls, hidden from client accounts: Issue Refund pays it out through the channel (the button becomes Retry Refund after a failure), and Adjust opens the override dialog:
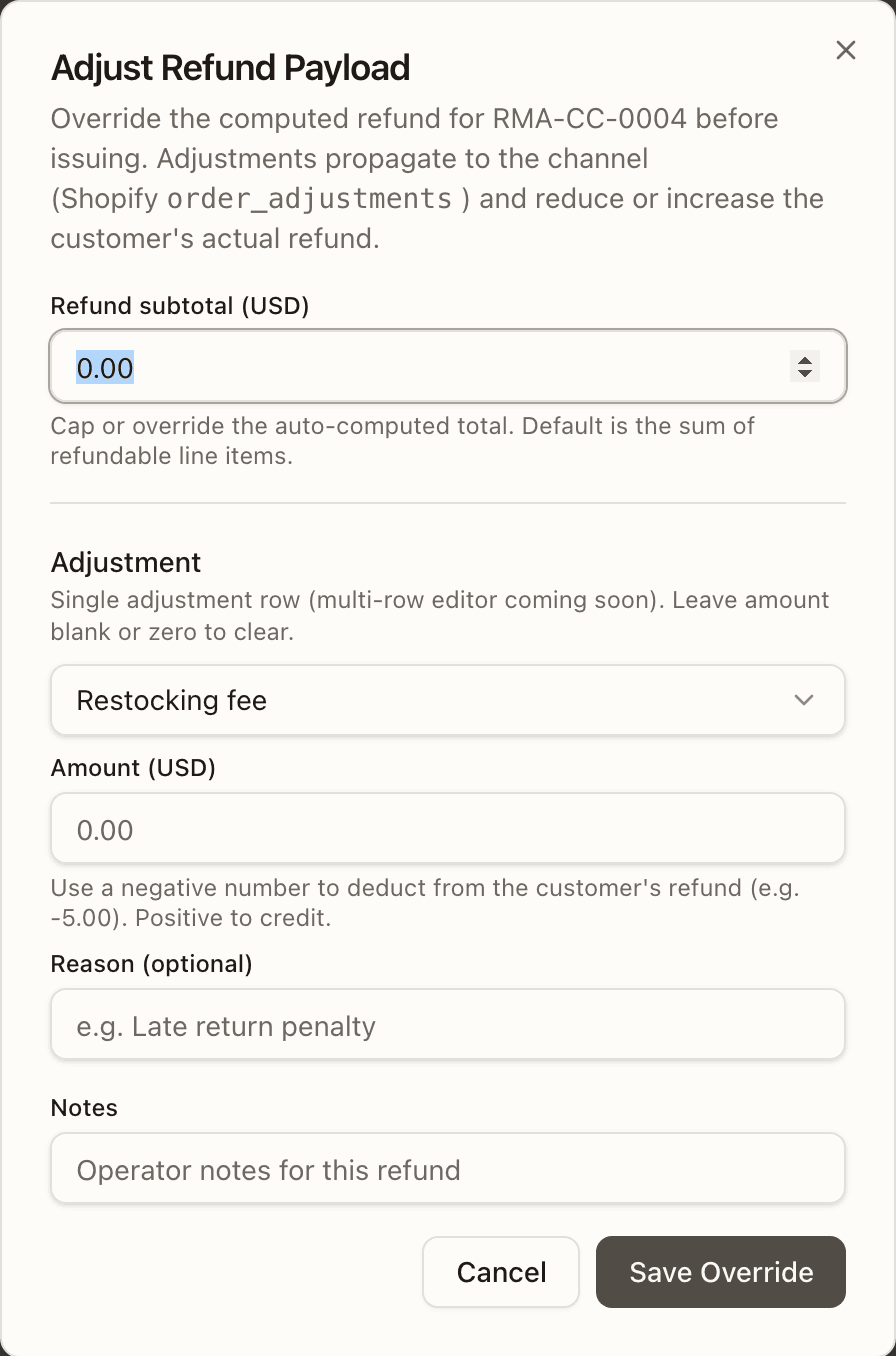
Adjust Refund Payload lets you lower the Refund subtotal (never raise it past what the items allow) and add one structured adjustment — Restocking fee, Return shipping fee, Goodwill credit, Shipping refund, or Other (reason required) — with an Amount (negative deducts from the customer's refund, positive credits; blank or zero clears a saved adjustment), an optional Reason, and Notes. Save Override stores it; adjustments propagate to the channel (Shopify order adjustments) and reduce or increase the customer's actual refund, and a lowered subtotal caps what the channel is told to move at the card's total.
Issue Refund builds the payload once more under the order's refund lock (one lock for all the orders of a split order), so two RMAs of one order issuing at once wait for each other and never pay past what was bought together.
It refuses a saved override the ceiling has overtaken (The saved refund no longer matches what is refundable on this order (a refund was recorded since, or the saved subtotal is above what the items allow) — review the refund and save it again) and a payload whose items leave nothing to move while its adjustments add money (Nothing on this return is left to refund through the channel, but the refund adds USD 5.00 in adjustments — remove them, or refund that amount in the sales channel). When every received unit was already refunded, the RMA is marked issued without a channel call, and the timeline says so.
An Unconfirmed refund is one whose issue attempt timed out or got no definite answer: an amber banner asks you to check the order on the sales channel before retrying, and Retry Refund unlocks ten minutes after the attempt. The list shows it as Refund unconfirmed.
Voiding an RMA
Void RMA is in the header of any RMA that isn't Completed or Voided. It is disabled while the RMA has receipts — Remove the receipts on each line first — because the way out is on the same page. The confirm (Void RMA-… ?) explains the effect — the RMA is marked Voided, nothing can be received against it, and its lines stop counting toward the per-line return cap, so the units become returnable on a new RMA — and takes an optional Reason that is recorded on the timeline. It cannot be undone. The check for receipts is made again under the RMA's lock as it voids (Cannot cancel — items have already been received. Unreceive each receipt first, or complete the return.), so a unit booked in a moment earlier can't be left with no return behind it.
A cancel that arrives from the store after you have received units is not applied: the RMA stays open, its timeline records Shopify cancelled return … after 2 receipt(s) — NOT applied: the received units are in stock. Complete the RMA, or unreceive them and cancel, and the order is flagged for review in the same breath.
Return reason codes
Returns → Return Codes is the per-client list of reasons a customer picks when starting a return and, crucially, who pays for the return label. Pin a client in the top bar first — until you do, the page says Select a client from the top bar to manage their return codes.
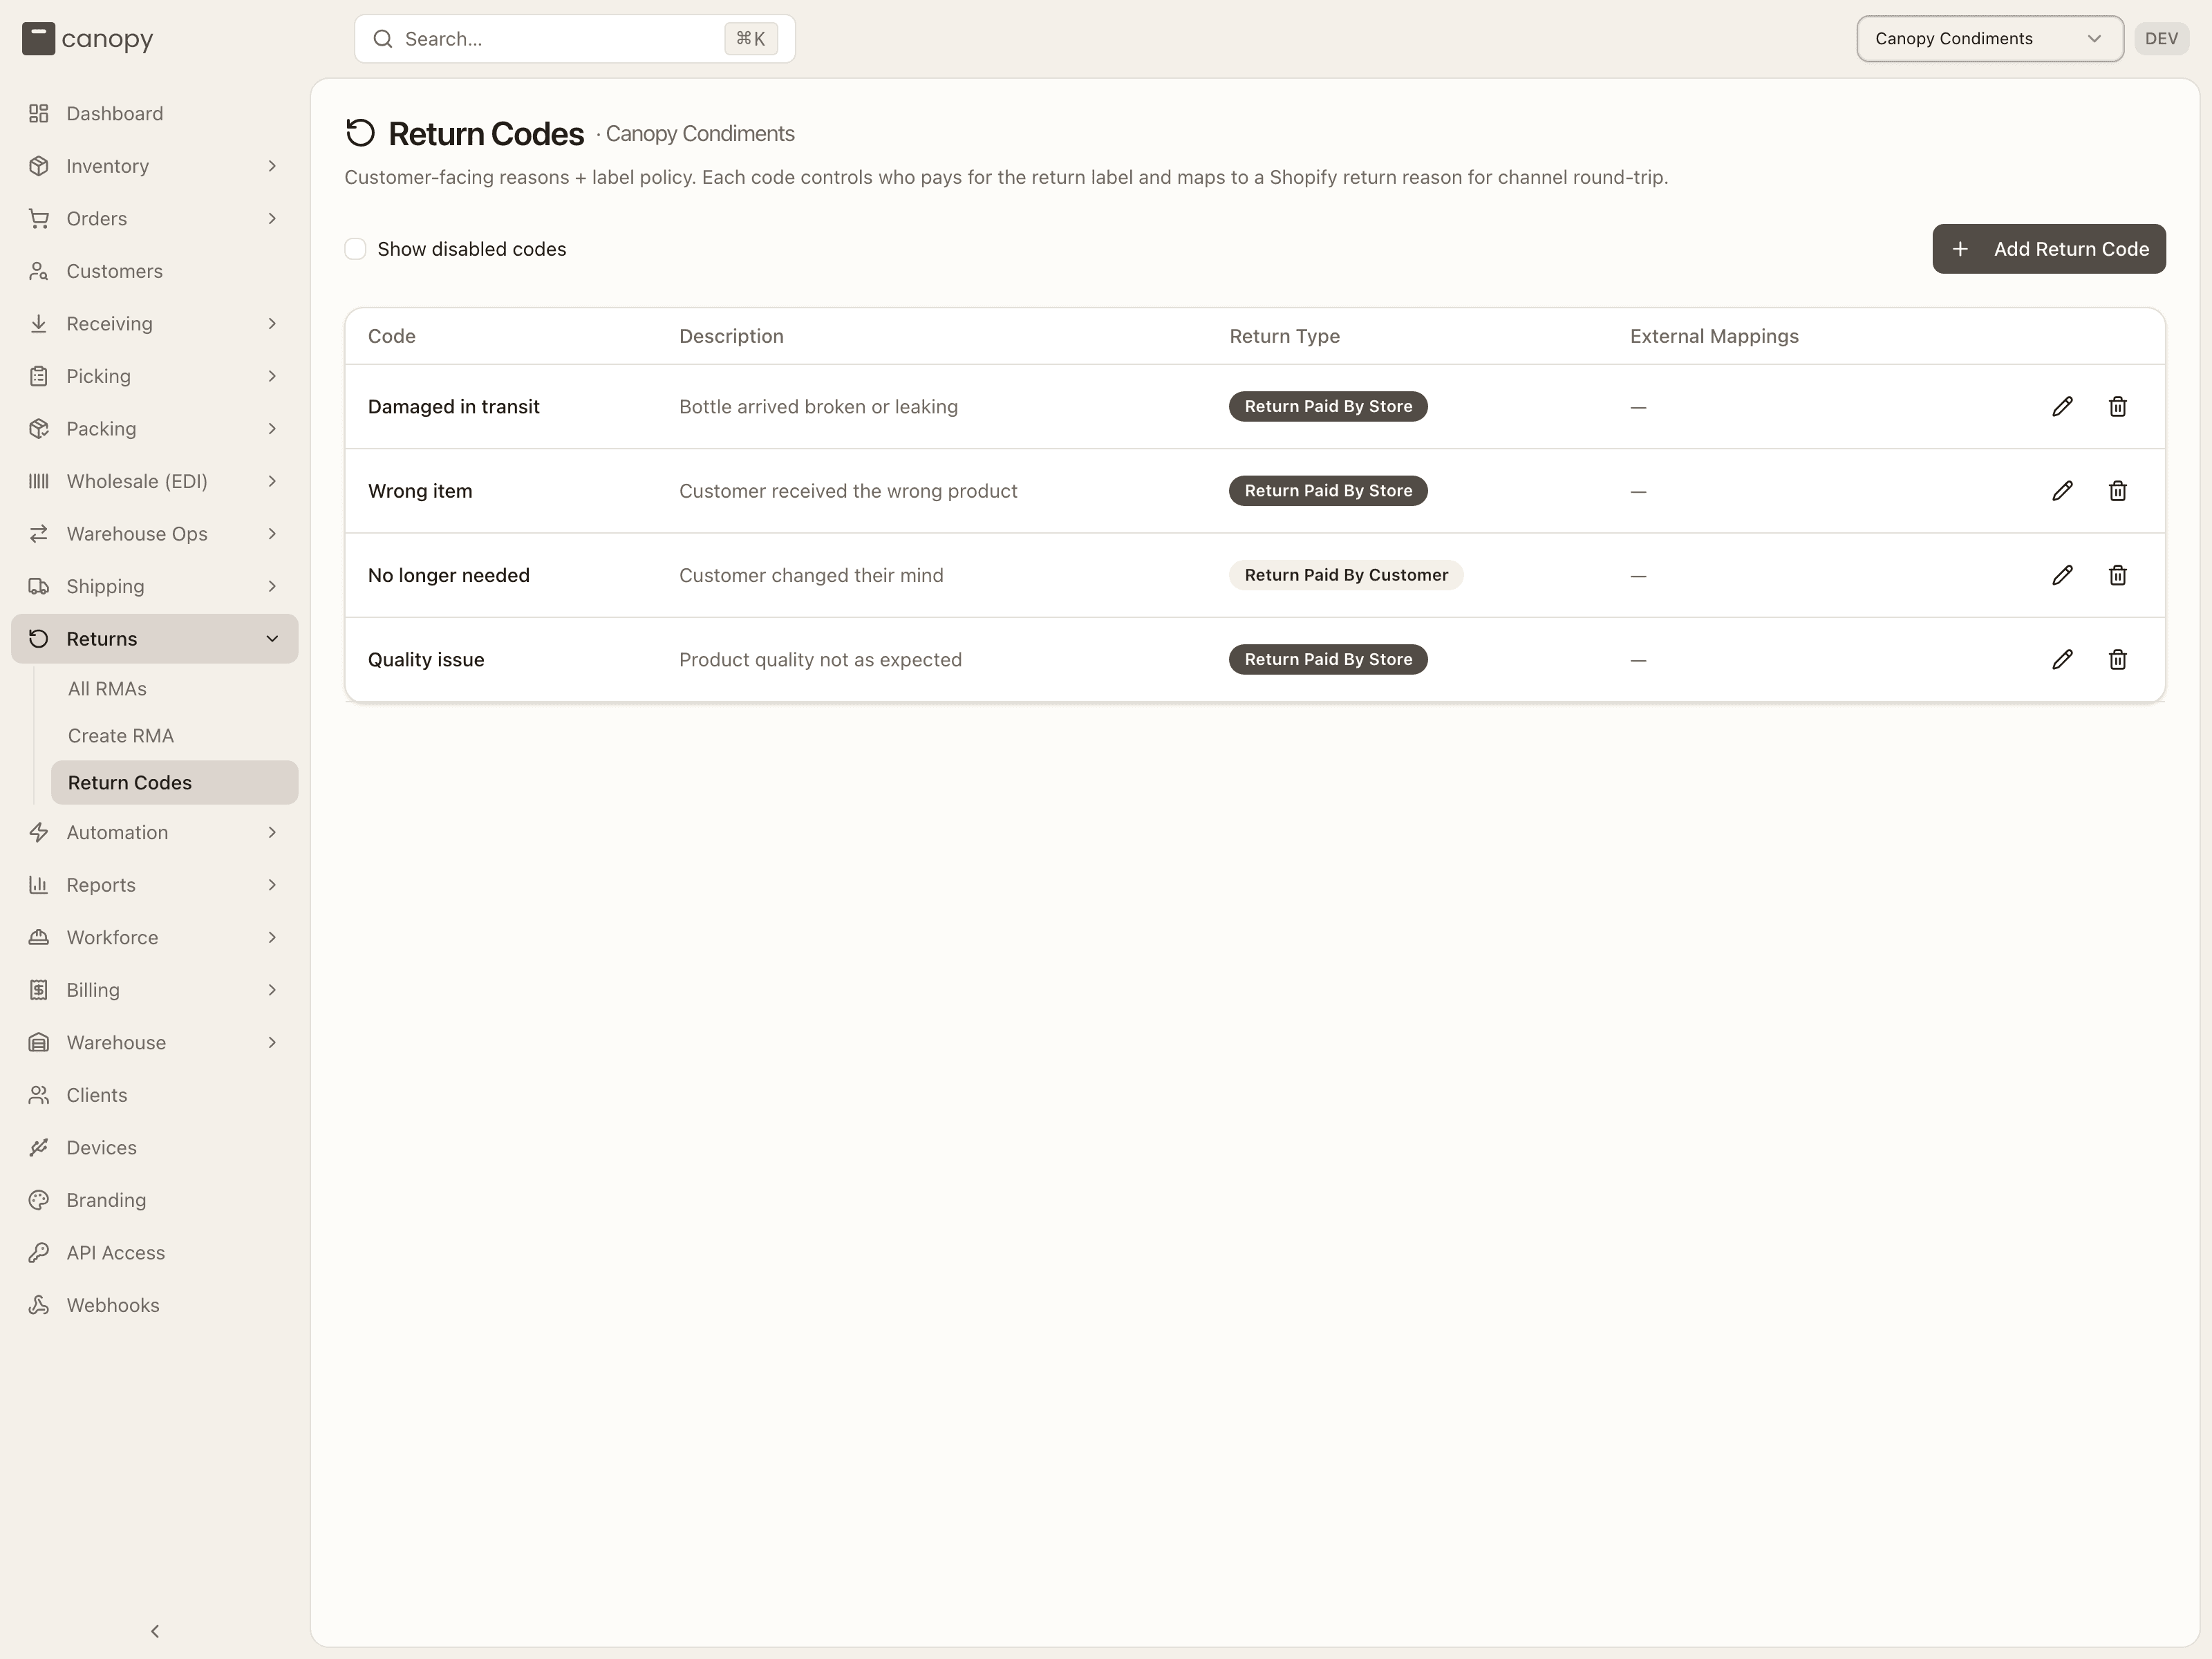
Columns are Code (with a Disabled badge on inactive codes), Description,
Return Type (the label policy, plus the fee on a flat-rate code) and
External Mappings (chips like SHOPIFY: WRONG_ITEM, or —). Show disabled
codes brings inactive codes back into the list.
| Policy | Who pays / what happens |
|---|---|
| Return Paid By Store | The merchant covers the return label. |
| Return Paid By Customer | The customer self-ships under their own label. |
| Flat Rate Shipping | The customer pays a fixed fee, deducted from the refund total. |
| Not Returnable | An RMA cannot be created with this reason. |
Your controls, hidden from client accounts: Add Return Code, the pencil to Edit, the trash to Disable (a confirm warns It will be hidden from new RMAs, but historical RMAs that reference it will keep their link — codes are never deleted), and Reactivate on a disabled code.
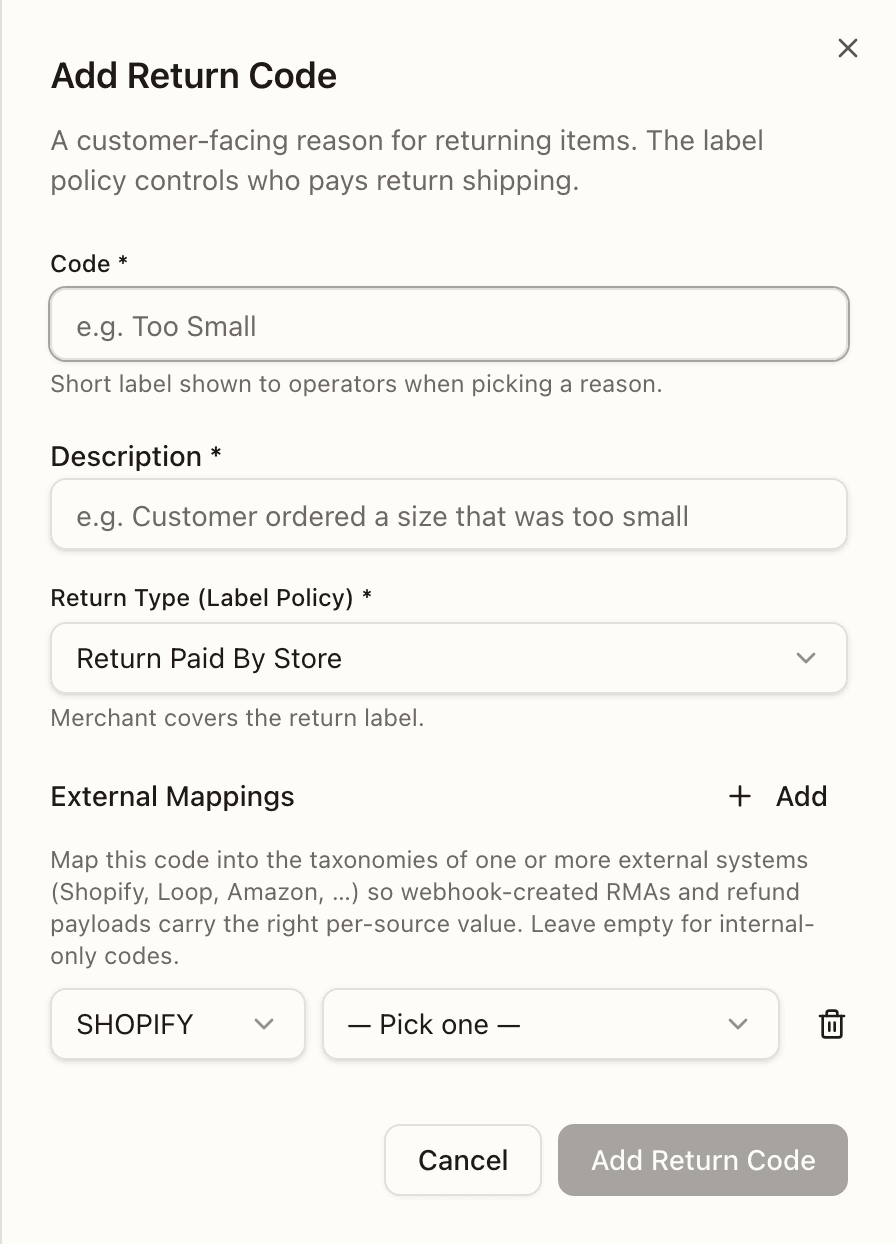
The sheet takes a Code (the short label operators pick from), a
Description, the Return Type (Label Policy), a Flat Rate Amount when
the policy is Flat Rate Shipping, and External Mappings: one row per
external system — Shopify, Amazon, Walmart, eBay, WooCommerce, Loop, Redo,
AfterShip, ReturnGO, or Other — so webhook-created RMAs and refund payloads
carry the right per-source value. A Shopify mapping picks from Shopify's own
return reasons (SIZE_TOO_SMALL, UNWANTED, DEFECTIVE, …); other sources
take a free-text code. A new code starts with one blank Shopify row you can fill
or remove. Editing a code applies to new RMAs going forward.
How to receive and complete a return
Open Returns → All RMAs and click Receive on the Pending RMA (or open the row).
If the parcel carried a tracking number nobody logged, scan it into Scan or type the carrier label on the Tracking card and click Log.
Scan the unit's barcode into Scan SKU to receive — or click the line's Receive button. The inline receiver opens under the line.
Set Quantity, the Inspection result and the Disposition; pick the Lot if asked and a Destination Bin (tap a Suggested chip), then Confirm Receipt. The RMA moves to Inspecting on the first receipt.
Repeat for each line. If the customer sent back something else from the order, use Change item before receiving that line; if they sent something that was never ordered, use Add item not on the order.
Click Complete Return in the Items card header. The RMA is Completed.
On the Refund card, Adjust the payload if a fee or credit applies, then Issue Refund. The list shows the RMA as Completed · Refunded.
Shipping
Every outbound label and its tracking, live carrier rates, the carrier accounts labels are bought on, and the channel-to-postage mapping that drives label generation.
Dashboard
Your all-clients operations overview — today's pace, per-brand progress, exceptions, inventory health, SLA, and throughput.