

Warehouse
Set up warehouses and zones, lay out the physical map, print slot labels, and visualize picker routes.
The Warehouse section is where the physical shape of your operation lives. You set up each facility and its zones, draw the rack layout on an interactive map, print the labels that go on the shelves, and see the exact route a picker walks for any pick list. Everything else on the floor, from putaway to picking, reads the bins and locations you define here.
Who can see and change this
The whole Warehouse section is staff-only — a brand account that types the URL
sees a "warehouse staff only" notice instead. Within it, nearly every change
is admin-only (TENANT_ADMIN). On the Manage page the Add Warehouse,
Edit, Add Zone, Zone prefixes and delete-zone controls only appear for admins.
On the Map, every tool is shown to every operator, but the server refuses
an operator's save: placing, moving or deleting racks, editing sections and
bins, and moving racks between zones all come back "Admin access required".
Two things any operator can do from the Map: Print labels (including
clearing the reprint highlight) and Import inventory.
The section has three pages, matching the sub-nav under Warehouse:
Warehouse Management
Create warehouses, edit their address, schedule and shifts, and organize them into zones with label prefixes.
Map
The interactive layout editor — place racks, edit bins, import stock, print slot labels, and move racks between zones.
Visual Pick Routes
Replay a pick list as a walking route on the map.
Warehouse Management
Manage → /warehouse. The landing page lists your warehouses — every one
under All warehouses, or just the pinned building when you've picked one in
the topbar warehouse switcher
(which also scopes the Map and Visual Picks). Each warehouse expands to show its
zones.
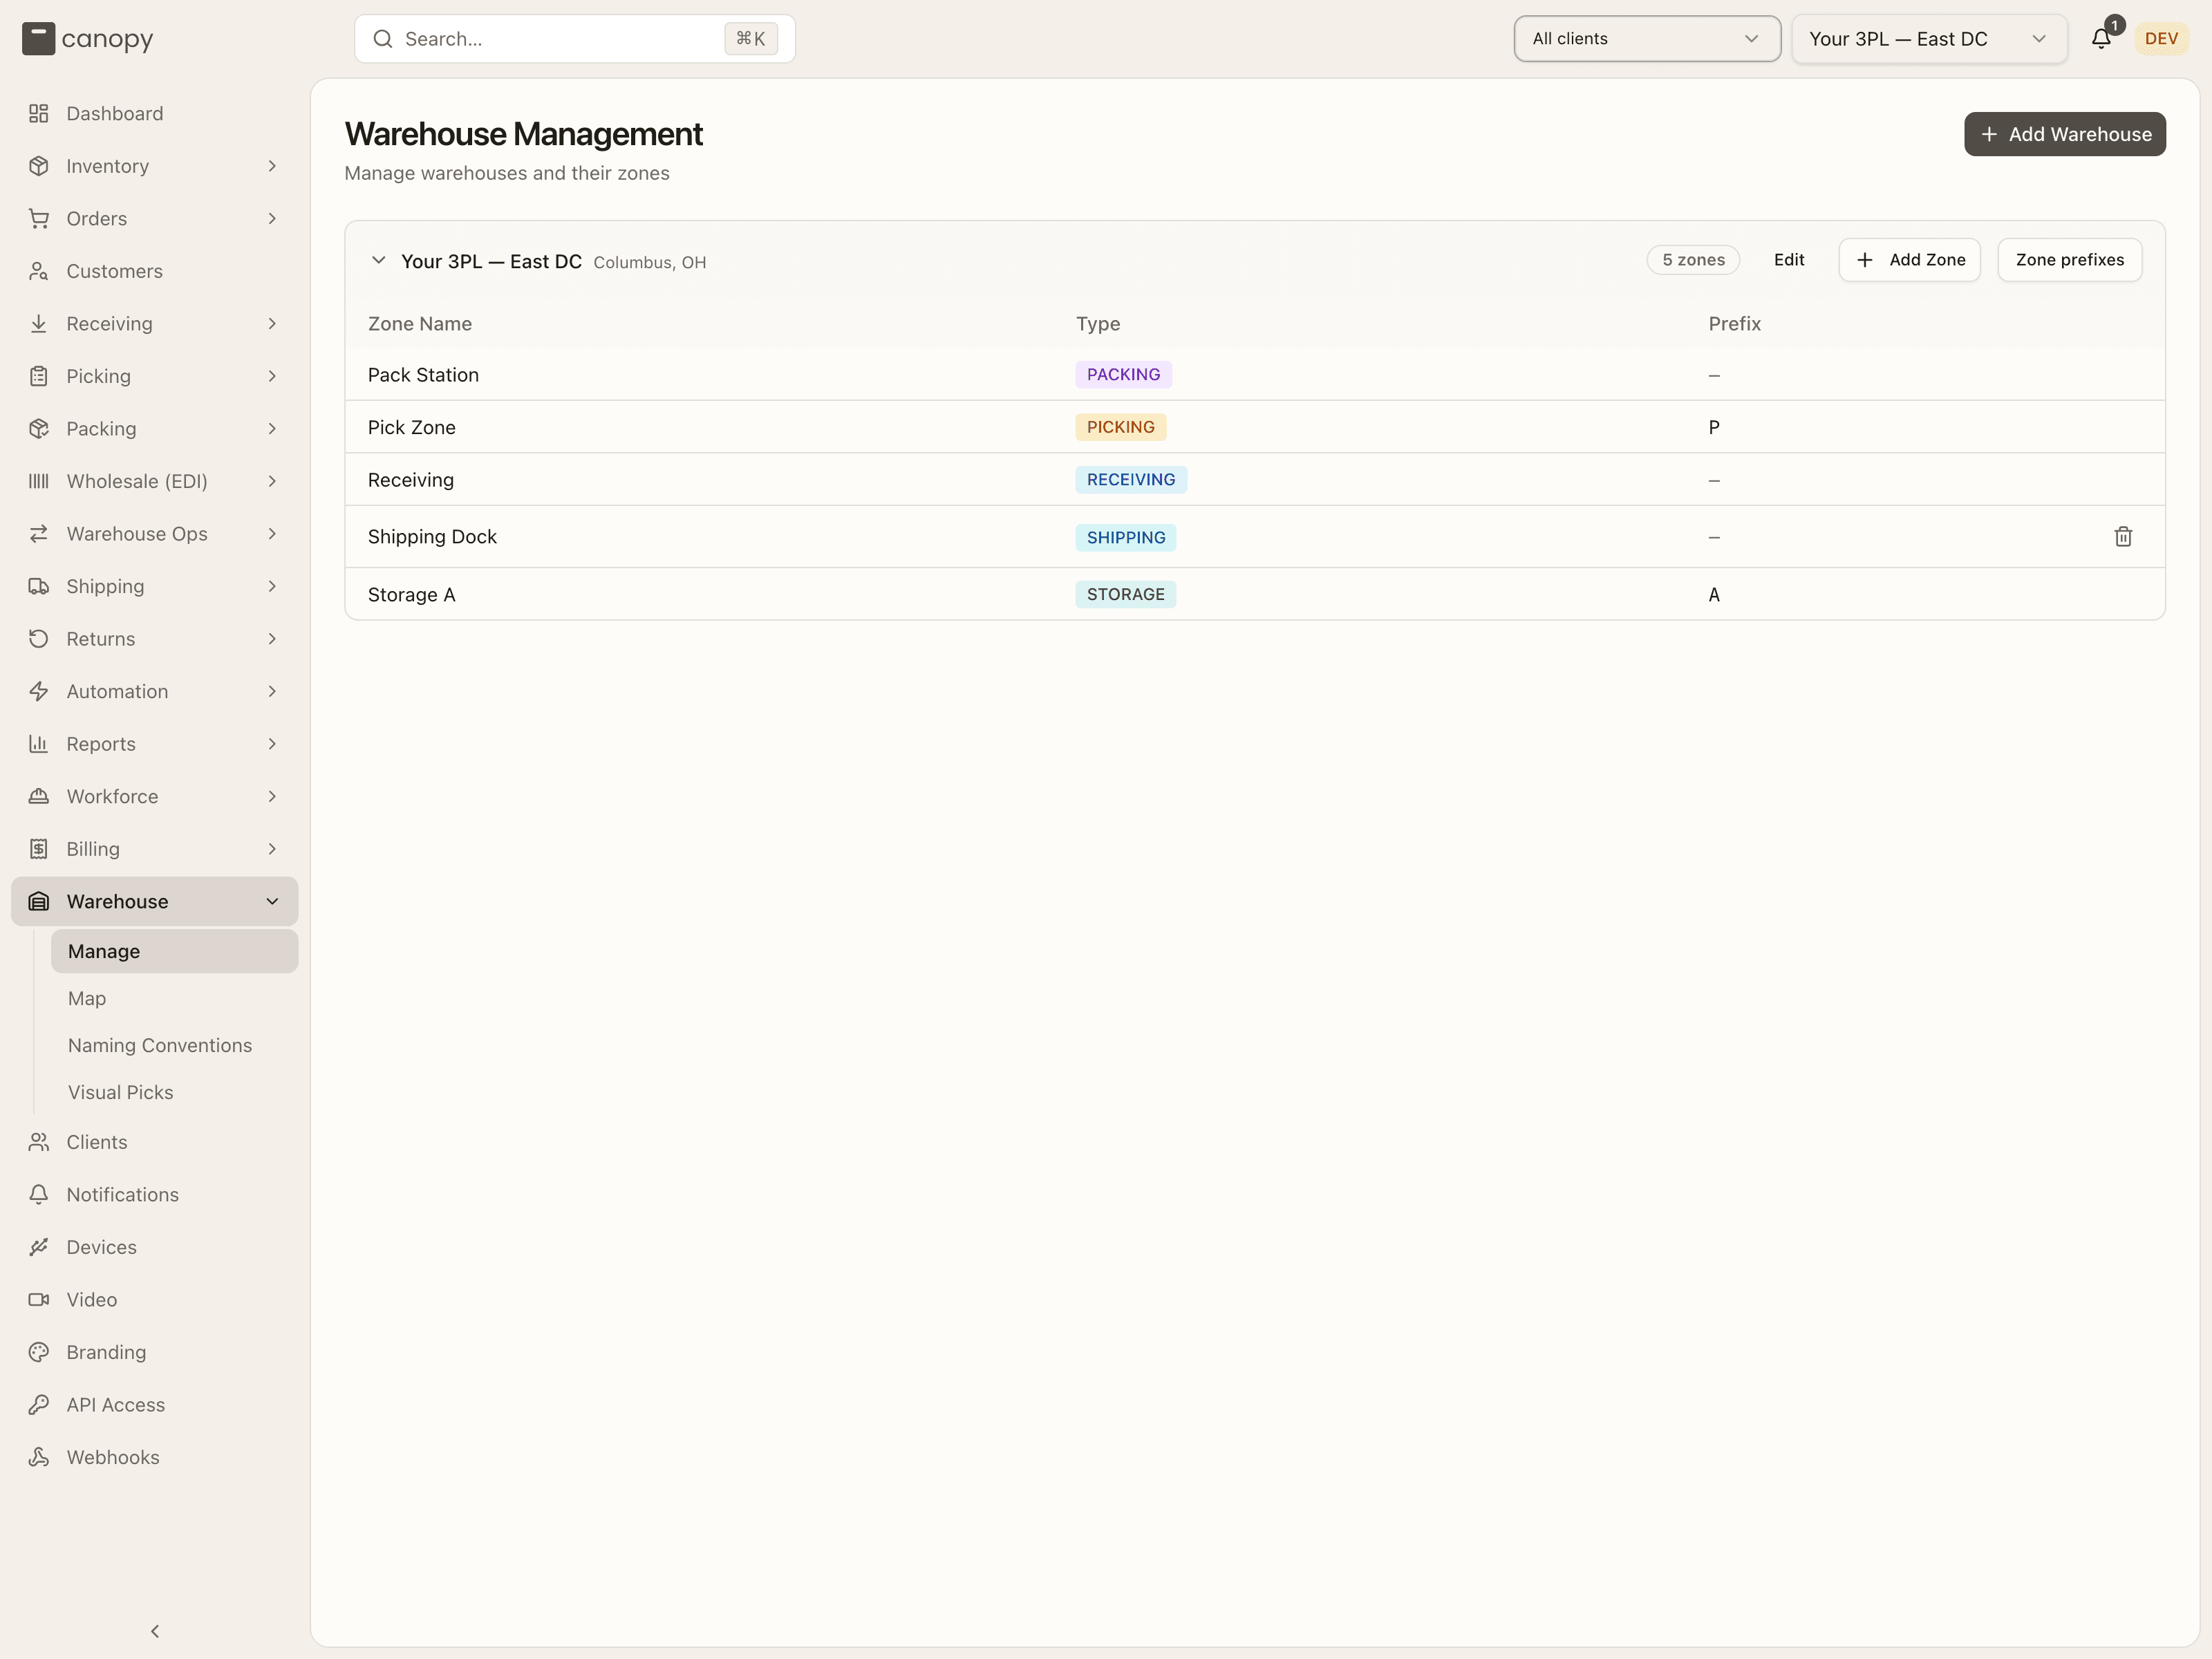
Each warehouse row shows its name, city and state, and a badge with the zone count. Admins also see Edit, Add Zone and Zone prefixes on the row. Expand it for the zones table:
| Column | What it shows |
|---|---|
| Zone Name | The zone's name. |
| Type | The zone type, rendered as the raw value in capitals (STORAGE, PICKING, …). |
| Prefix | The single letter that leads every shelf label in the zone, or — for zones without one. |
A zone that holds nothing — no bins, racks, packing stations or pick lists — gets a trash icon at the end of its row (admins only). Deleting it asks you to confirm; if the zone had a prefix, that letter is freed for reuse. A brand new warehouse with no zones yet reads "No zones yet — add zones to organize your warehouse". If no warehouses exist at all, the page shows "No warehouses configured yet".
Add a warehouse
The Add Warehouse button (top right, admins only) opens a panel for the facility's details. The name and the country are required.
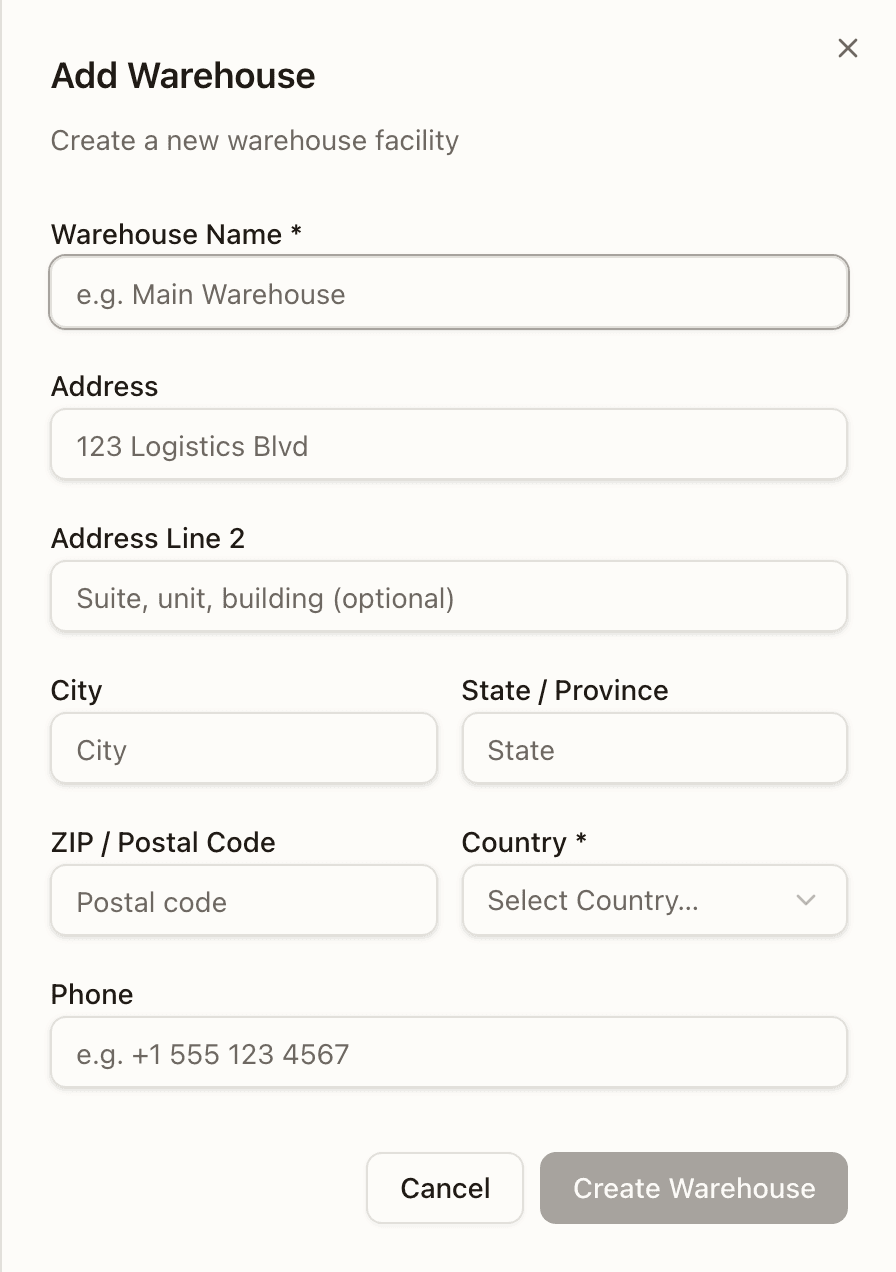
| Field | Notes |
|---|---|
| Warehouse Name | Required. |
| Address, Address Line 2 | Street address. |
| City, State / Province | |
| ZIP / Postal Code | |
| Country | Required. A searchable dropdown of countries — the carrier is told labels ship from this country. |
| Phone |
Before you add a second warehouse
With one active warehouse, anything created without naming a warehouse lands in it. A second one ends that for every client, so give each client a Default warehouse first, on its client detail panel. A new order goes there when its Ship from, a routing rule and its sales channel don't place it — and an order that nothing places is refused, "Cannot create order: no warehouse could be resolved…". Purchase orders, returns and work orders that nothing else places go to the default too. The topbar gains a warehouse switcher.
Edit a warehouse and its operating schedule
The Edit button on a warehouse row (admins only) opens the same address fields, plus an Operating schedule block that the create form doesn't have.
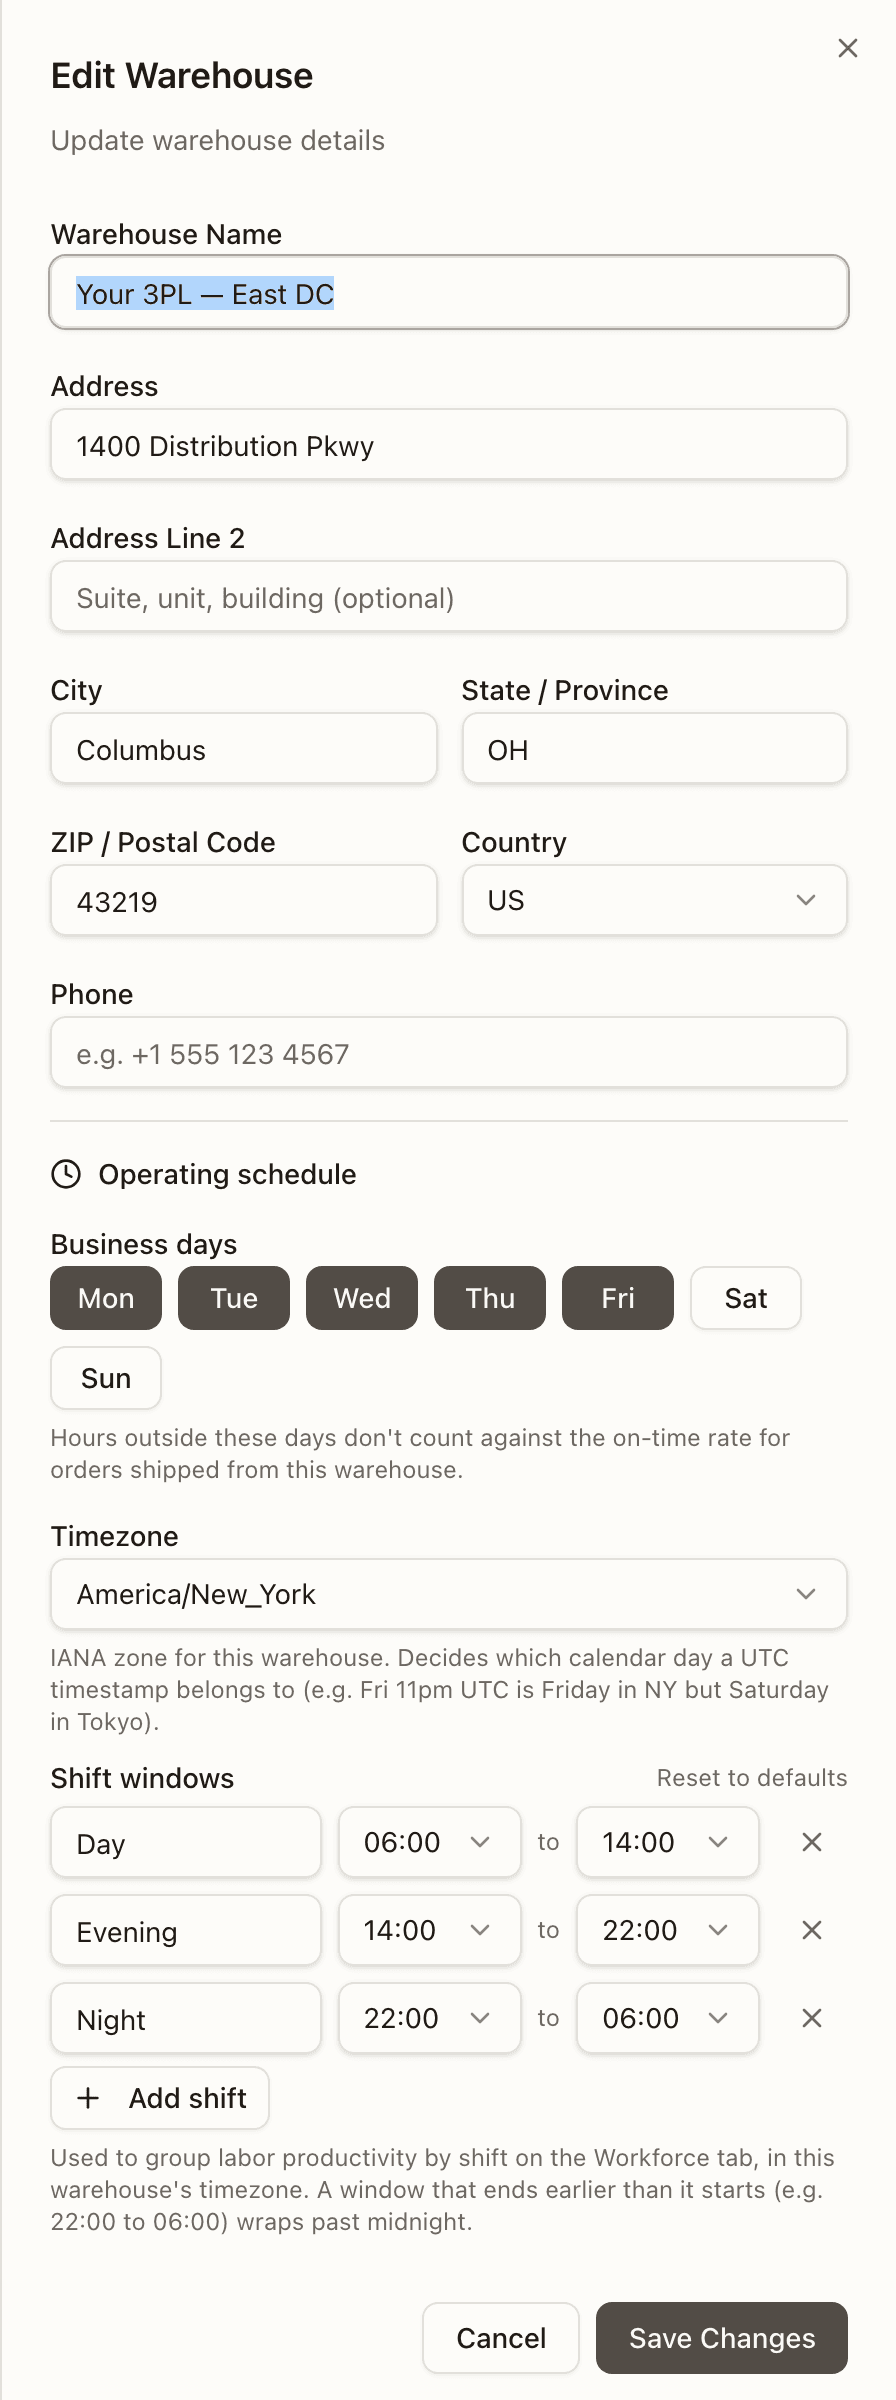
The schedule has three parts:
- Business days — toggle the days this warehouse runs (Mon through Sun). New warehouses default to Mon–Fri. Hours outside these days don't count against the on-time rate for orders shipped from this warehouse. At least one day must stay selected.
- Timezone — the IANA zone for the facility. It decides which calendar day a UTC timestamp belongs to, so a Friday 11pm UTC ship time counts as Friday in New York but Saturday in Tokyo. The dropdown lists common presets, and keeps whatever exotic zone a warehouse was already set to.
- Shift windows — the shifts that labor productivity is grouped by on the Workforce tab, in this warehouse's timezone. Each row has a name and a start and end hour; a window that ends earlier than it starts (22:00 to 06:00) wraps past midnight. Add shift appends a row, × removes one, and Reset to defaults restores the built-in Day (06:00–14:00), Evening (14:00–22:00) and Night (22:00–06:00) windows. A warehouse that has never been edited shows those defaults; they're only written when you actually change the shift section. You need at least one shift, and a shift can't start and end at the same hour.
The schedule here drives the SLA math on the dashboard. The SLA target itself (the promised turnaround) is a per-brand setting and lives on the client, not the warehouse.
Add a zone
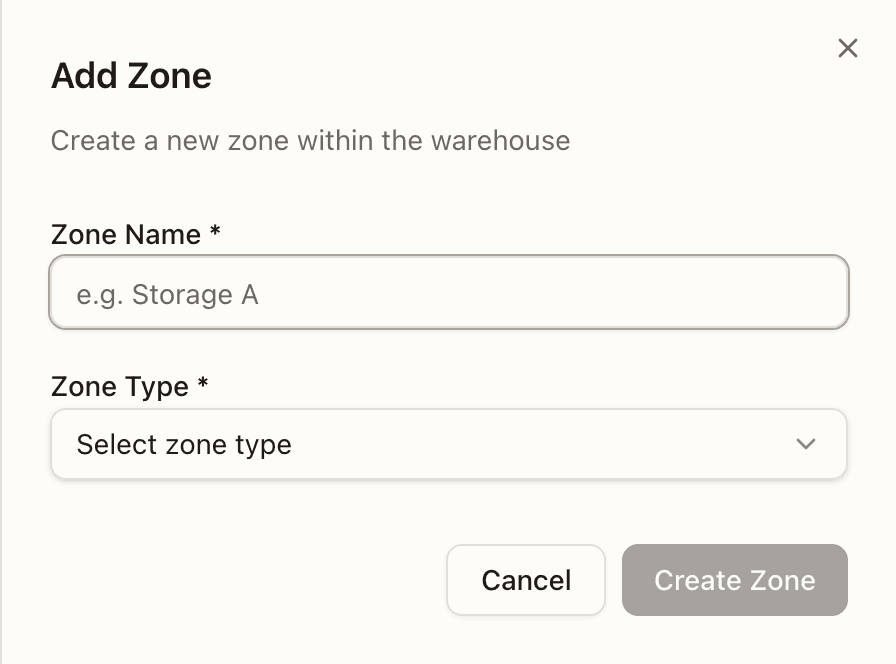
The Add Zone button on a warehouse row (admins only) creates a zone inside that warehouse. Every zone has a name and a type; picking a type reveals the fields that apply to it.
- Label prefix (Storage zones only, required) — the single letter that
leads every shelf label in the zone, so a zone with prefix
Hproduces bins likeH022-BF-L013. It is set once and can't be changed afterwards. - Storage Tags (Storage and Picking zones) — placement capabilities every bin in the zone inherits. See Storage Tags for what a tag means; other zone types never enforce placement, so the field is hidden for them.
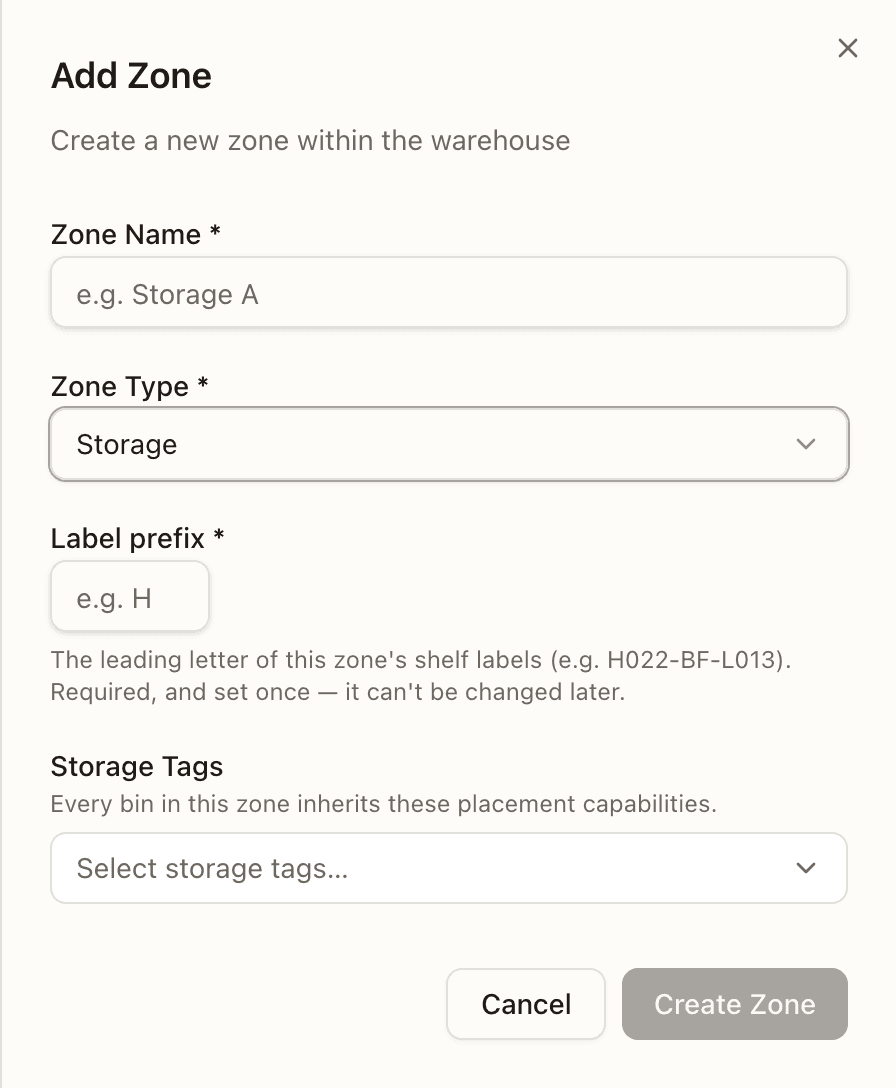
There are seven zone types. The dropdown shows friendly labels when you pick one, but the zones table renders the raw type in capitals:
| Type | Used for |
|---|---|
| RECEIVING | Inbound dock and staging. |
| STORAGE | Reserve and bulk storage — the only type racks on the map belong to. |
| PICKING | Pickable forward locations. |
| PACKING | Pack benches and stations. |
| SHIPPING | Outbound staging and dock. |
| RETURNS | Returns processing. |
| QUARANTINE | Held or damaged stock — bins here can never be pickable or sellable. |
Zone label prefixes
Zones created before prefixes existed have no letter, and their shelf labels
fall back to A. Zone prefixes on the warehouse row (admins only) opens a
sheet to give such a zone the letter its labels should use: pick a storage
zone, type one letter, and Set prefix. This rewrites the zone's existing
shelf labels to match (A020 → H020), so the toast tells you how many bins
were relabeled — they're highlighted red on the Map until you print new labels
(see Print labels). A zone that already has a prefix shows it
and can't be changed. + Create a new zone instead switches to the Add Zone
panel.
Map
Map → /warehouse/editor. An interactive, zoomable plan of the warehouse
floor. Racks are drawn to scale and coloured by zone, and the toolbar in the
top left switches between seven modes. To move around: a plain scroll or
two-finger drag pans; to zoom, hold ⌘/Ctrl and scroll or pinch on a
trackpad. The hint bar in the bottom left always tells you what the current
mode does.
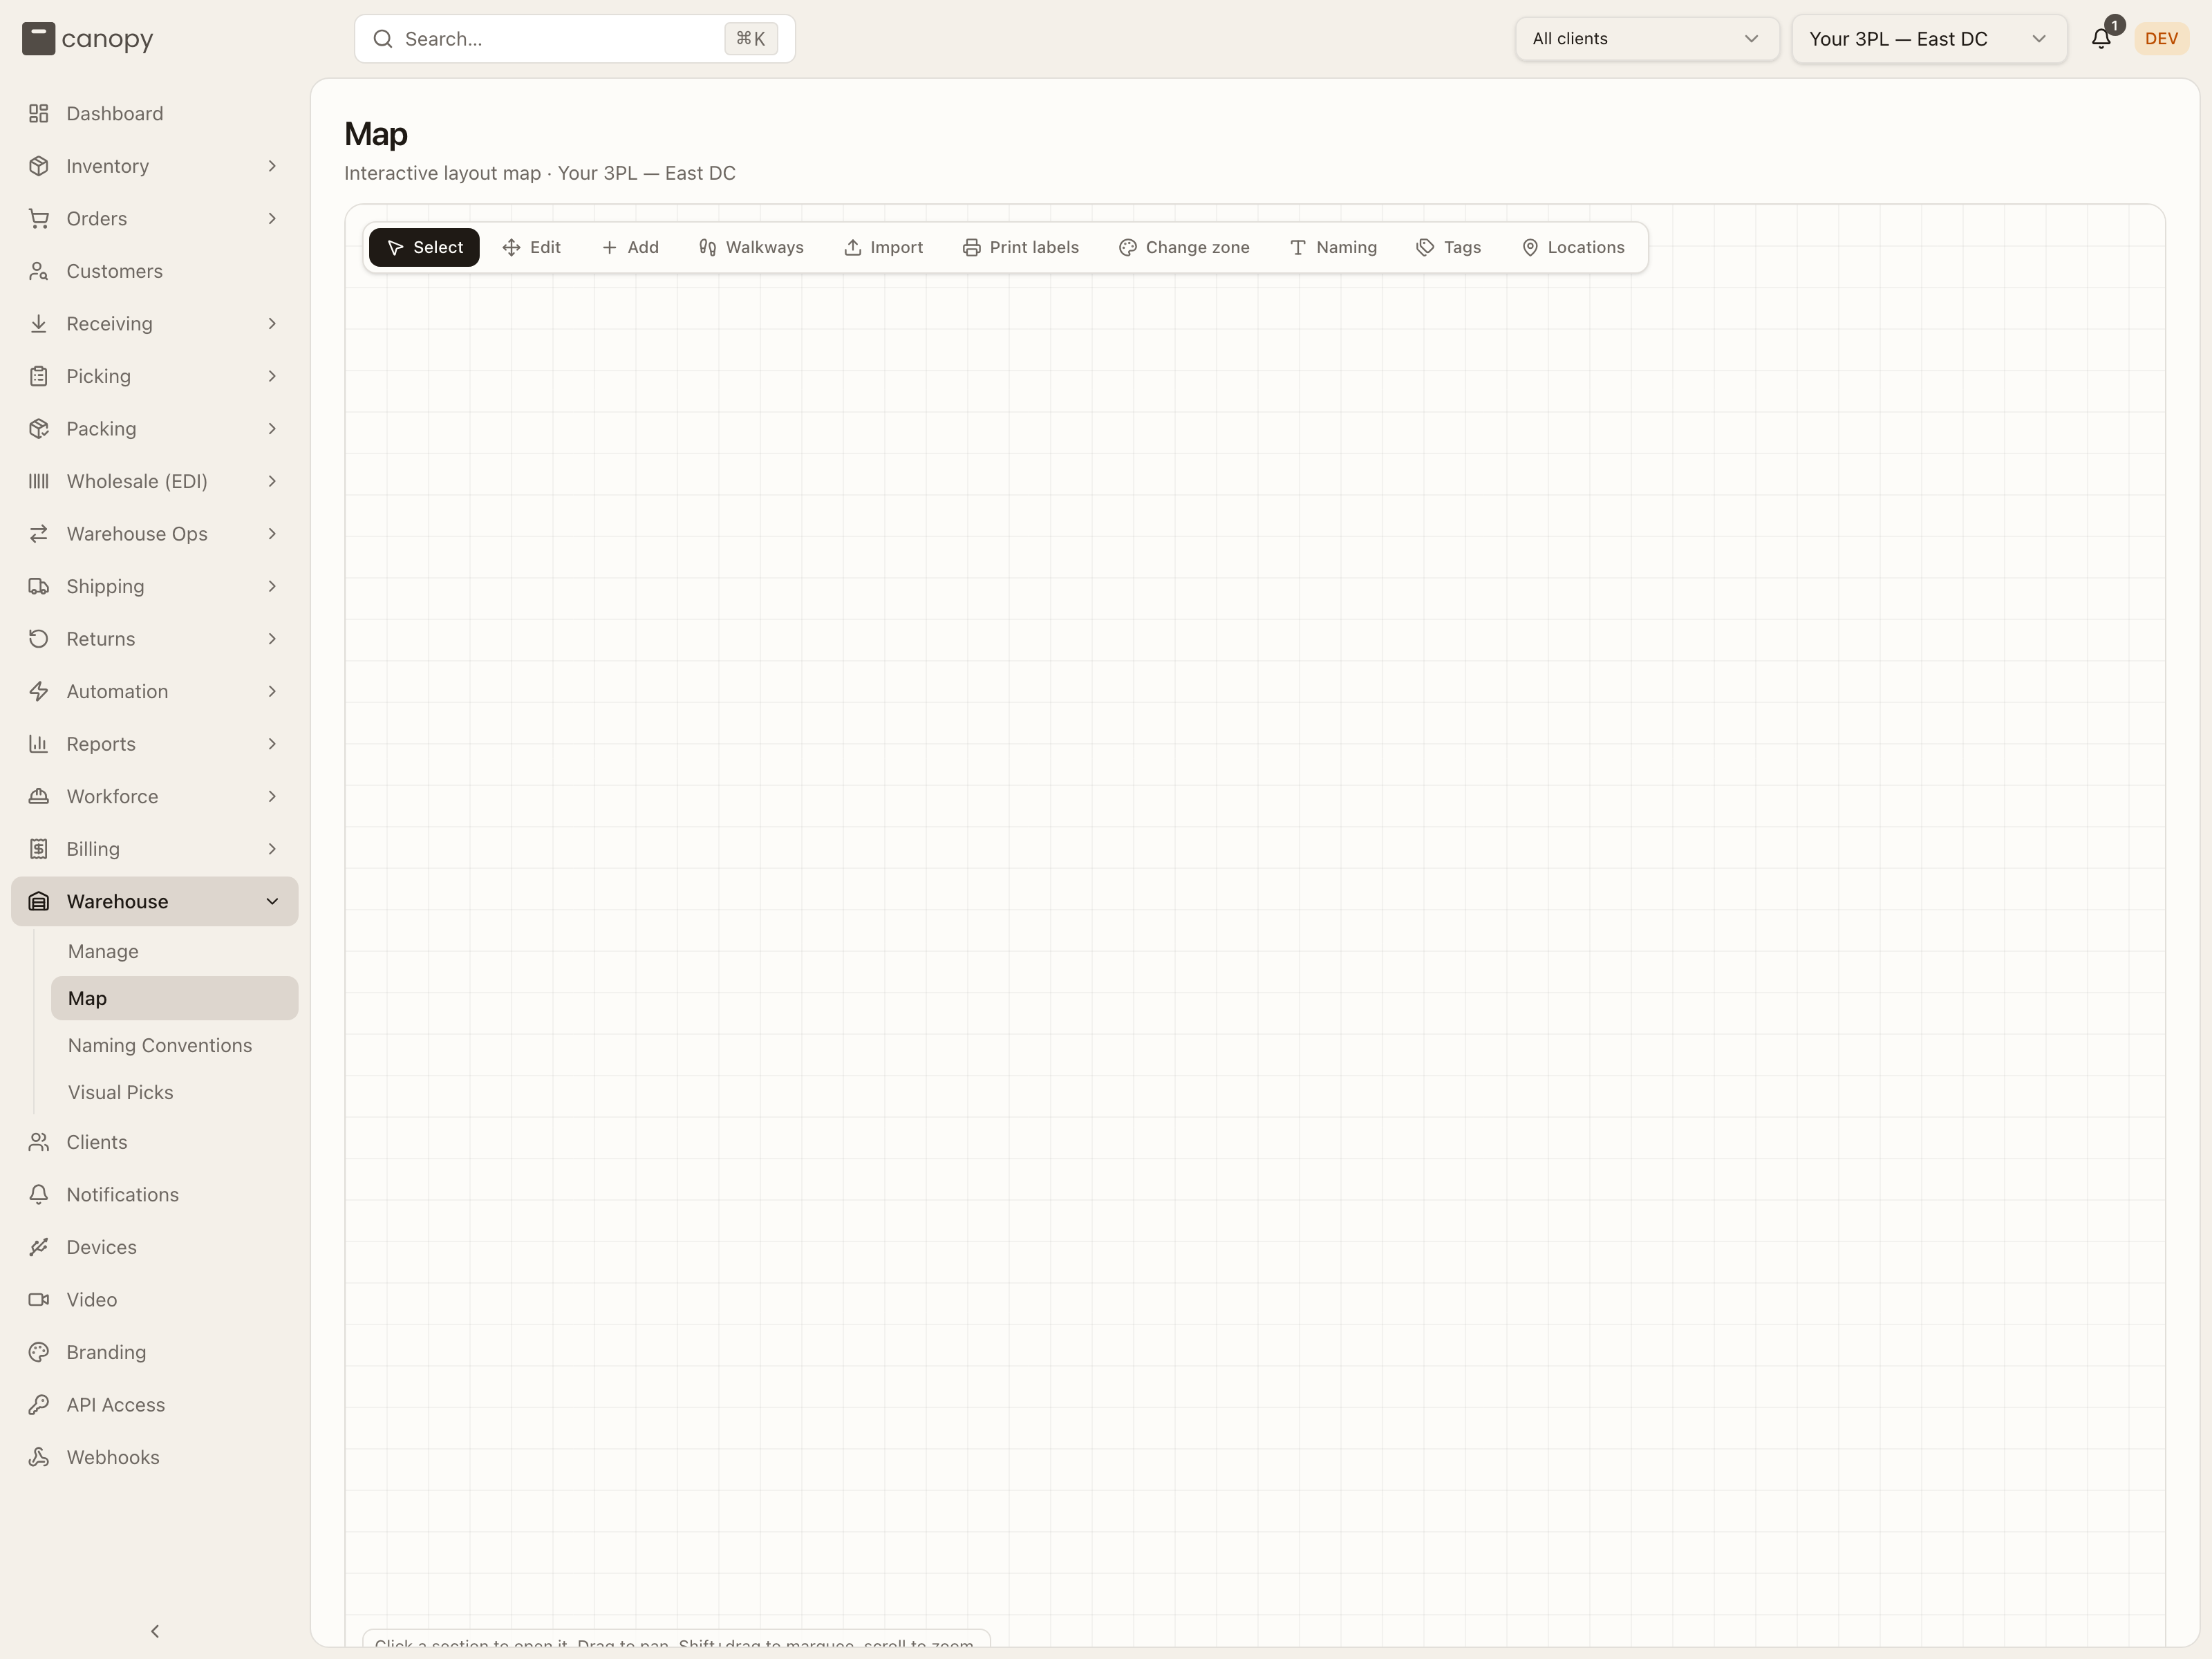
If your tenant has more than one warehouse, pick the one you want from the warehouse selector at the top of the app first. The map edits one warehouse at a time, so "All warehouses" isn't a valid choice here — you'll see a prompt to pick a specific one.
The toolbar has seven modes — Select, Edit, Add, Walkways, Import, Print labels and Change zone — plus two buttons that aren't modes: Tags (a storage-tag overlay, shown once at least one storage tag exists) and Locations (the special-location markers, below). Print labels and Change zone act on the saved layout, so both are disabled while you have unsaved edits.
Two panels sit in the top right whenever there is something to show. The Zones legend lists every zone present on the floor with the colour its sections are painted (the zone's own colour, or its type's default), plus Mixed / none for grey sections and a pulsing Reprint swatch when any shelf still needs new labels. The Tag overlay panel appears while a tag overlay is on.
Assign zone label prefixes
The first time you open the map of a warehouse whose storage zones have no label prefix yet, an Assign zone label prefixes dialog lists them and asks for a letter each (they must differ). Assign prefixes relabels those zones' shelf bins to match and flags them for reprint; Later dismisses the dialog for this visit, and it comes back until every storage zone has a prefix. A storage zone whose only bins were created outside the map — a locations CSV import's, or the stock import's Legacy Imports — has no racked labels to rewrite, so it isn't asked for one.
Select
The default mode. Click any rack section to open the Sections panel on the right, which lists every section in the warehouse and lets you drill into its bins. Hovering a rack shows its bin label as a tooltip. Hold Shift and drag to draw a marquee and select several racks at once.
The Sections panel is searchable by label, rack, or face. Expand a section to see:
- Its label, which you can edit with the pencil. Shelf labels follow the
<zone letter><aisle>-<section>format (for exampleA001-BA): the letter comes from the zone's prefix and the aisle from the rack, so only the section letters after the dash are editable. Pallet locations are labelled<rack name>-A<aisle>(for exampleR7-A020) and the whole label is editable. The server refuses a rename while work is in flight against the section and names the blockers. - Badges for the face it's on (
west/east, ornorth/southfor a rotated rack), the rack type, the bin and stocked counts, and total units. - For a shelf, a bin layout grid, one row per level (
L0,L1, …). Each cell is a bin, and a filled cell shows how many SKUs sit in it. Click a bin to see its contents — SKU image, code, name, and unit count. You can add or remove levels (up to 10), and add or remove totes per level (1–8), right from here. - For a pallet location, the pallet levels stacked top-down, each tagged
Ground · pickable, Forklift only, or Cross-aisle. → aisle
turns a level into a walkable drive-through that routing passes through
(only an empty level, and only the ground or the level directly above an
existing aisle); → storage turns it back, along with every aisle level
above it. Levels go up to 26 (
A–Z).
Edit
Edit mode lets you rearrange the floor. Drag a rack to move it — placement snaps to the grid, and the rack refuses to overlap another. Select several (Shift+click or a Shift+drag marquee) to move them as a group. Special-location markers drag here too. Three keyboard shortcuts:
- Delete or Backspace removes the selected rack. Because a rack holds every section in its column, this deletes the whole rack, so you get a confirm first. The real removal runs a server-side inventory check when you save — if any bin under the rack still holds stock, the save is blocked.
- F flips a rack's face direction (west to east), which moves the walkway to the opposite side. Only single-face racks flip.
- R rotates the selected rack(s) 90°, so the aisle runs across the map instead of down it; its faces then read north/south. Press R again to rotate back.
Add
Add mode opens the Add Rack panel and drops you into a placement flow. Move your cursor over the map to preview where the rack lands (F flips the preview's face, R rotates it), click to drop it, drag to fine-tune, then confirm with Place rack section (or Place pallet location).
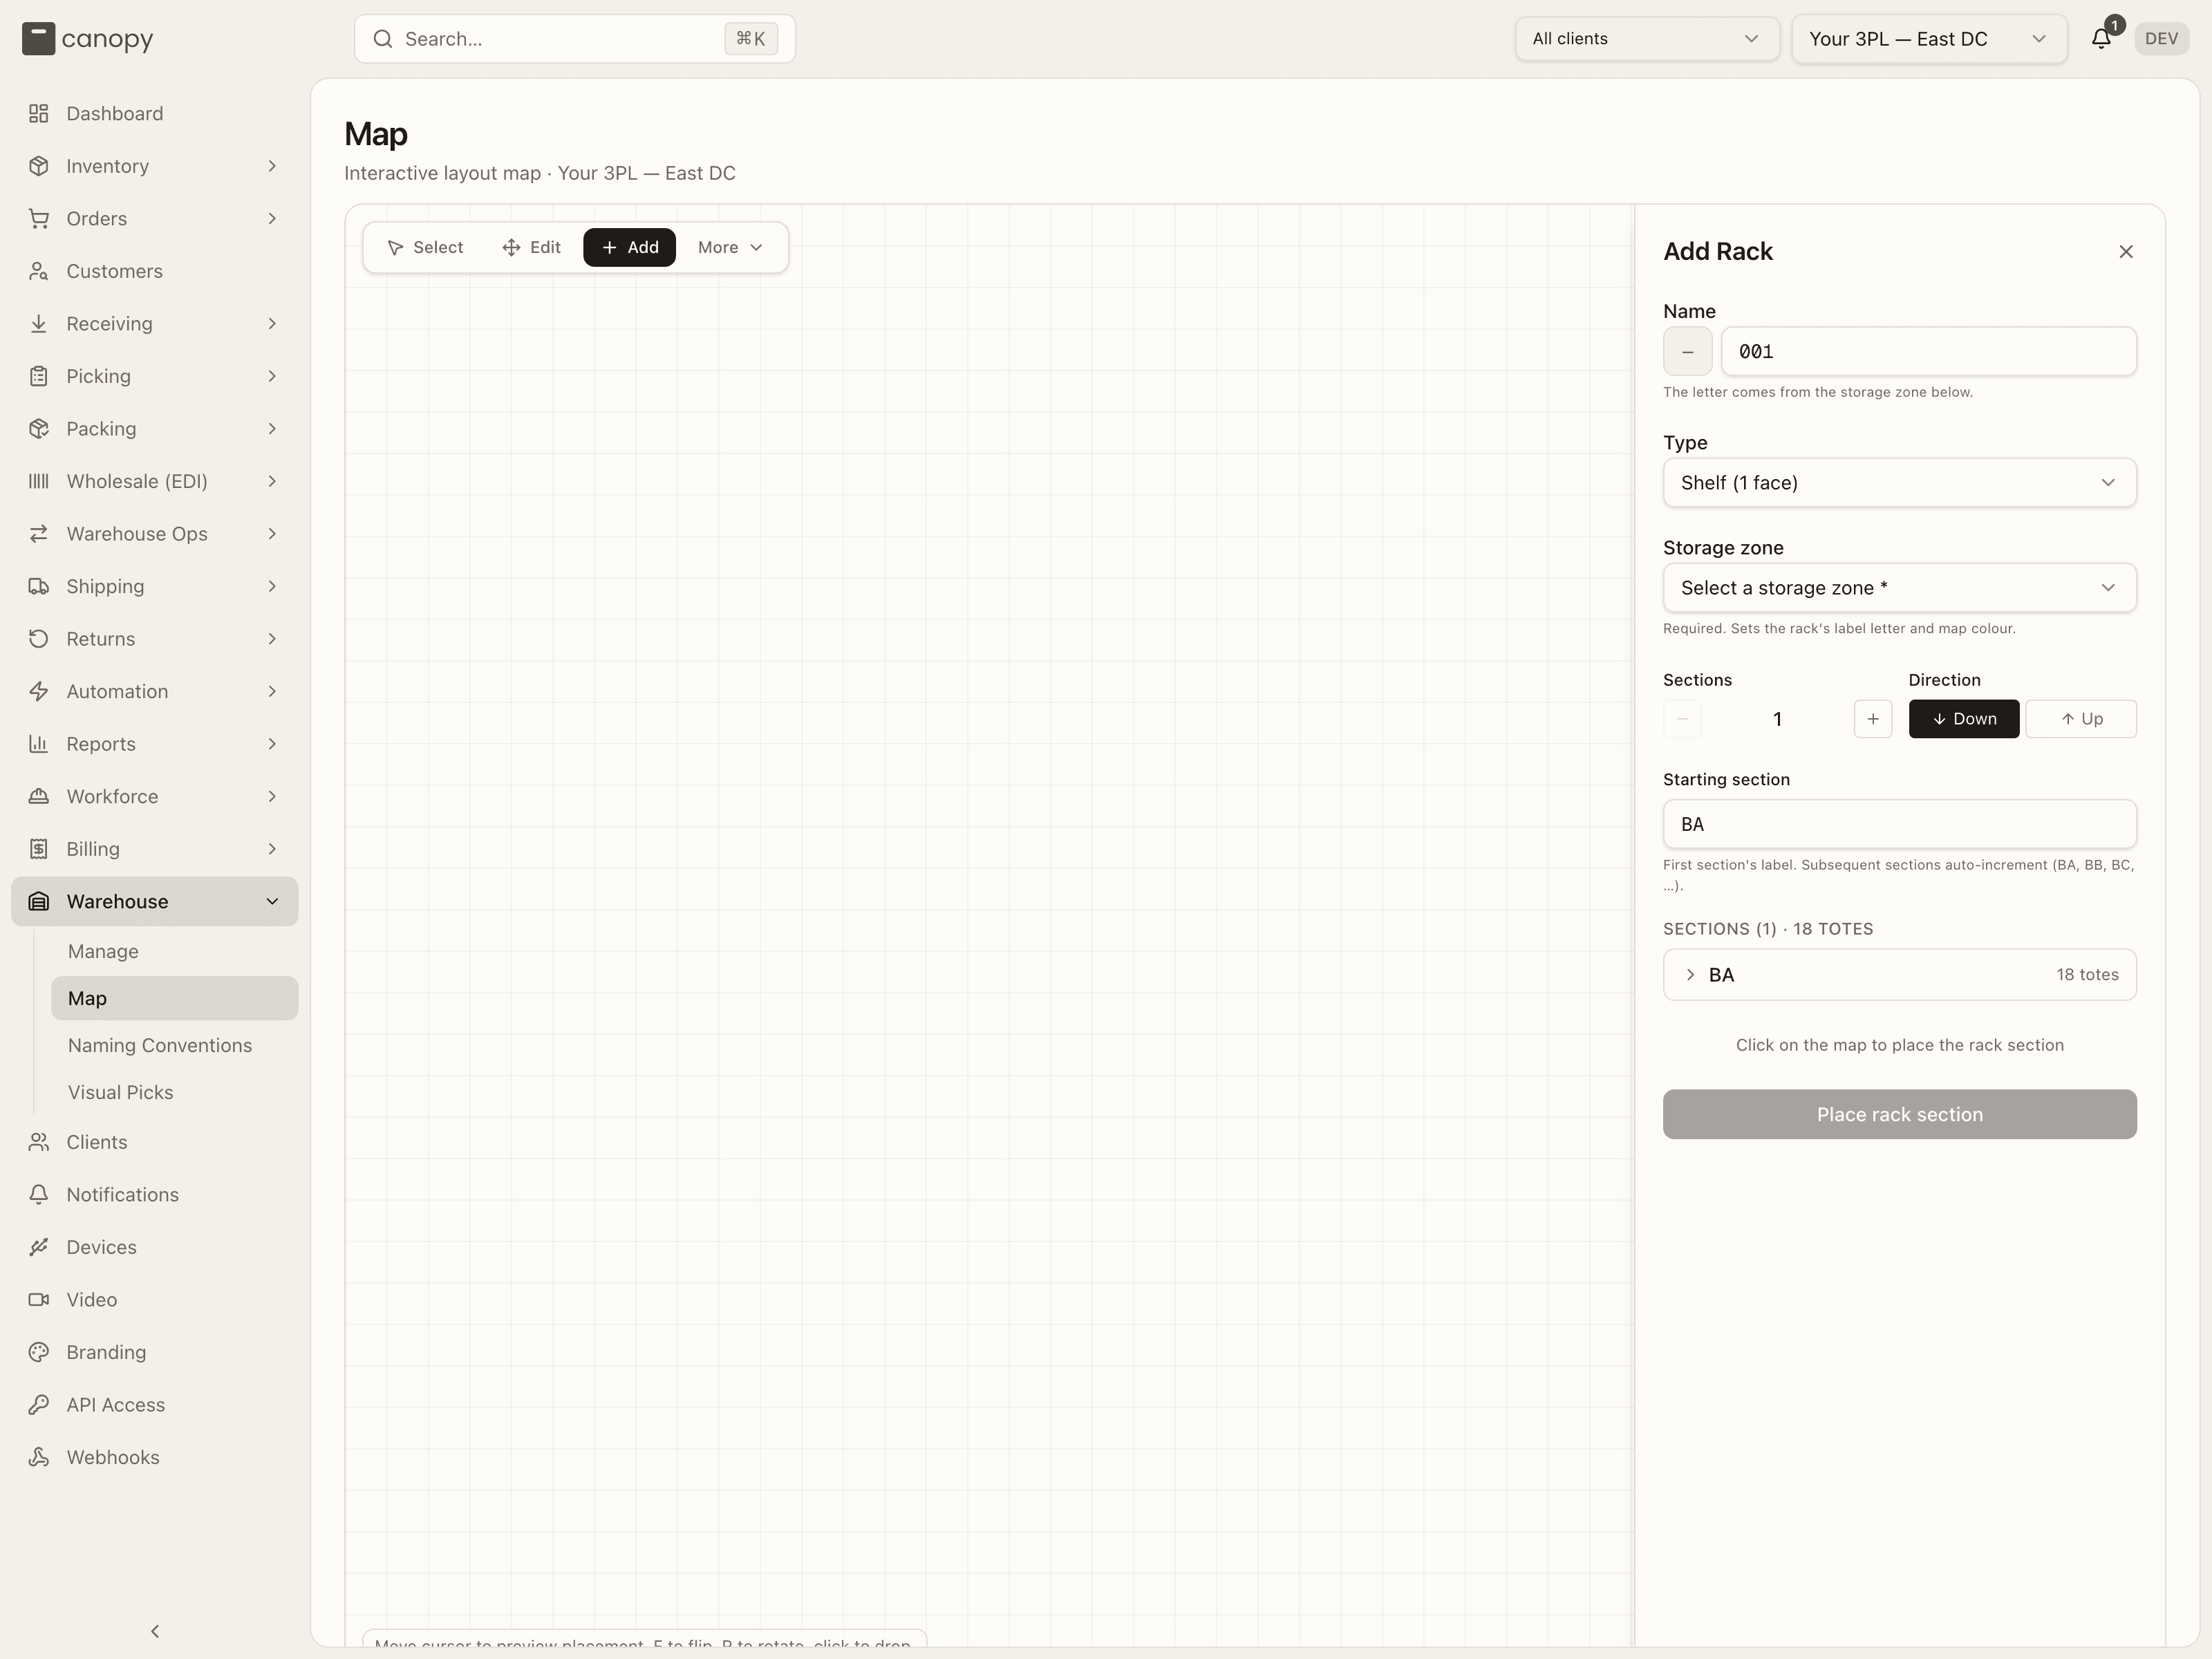
The panel controls what you're placing:
- Name — for a shelf, composed as zone letter + three aisle digits: the
letter is fixed by the storage zone below and only the digits are editable
(they default to the next aisle). A pallet location has a free-form name,
defaulting to the next
R-number. - Type — Shelf (1 face) or Pallet location. Shelf racks hold lettered sections; pallet locations are single positions stacked in levels.
- Storage zone — required; it sets the rack's label letter and map colour. Only Storage zones are offered. + New storage zone… creates one inline with a name, a required one-letter label prefix, a colour, and optional storage tags.
- Sections / Locations — how many cells the rack spans (1–60), set with the +/– stepper.
- Direction — whether cells run Down or Up from where you click.
- Starting section (shelf only) — the first section's letters, for example
BA. Later sections auto-increment (BA,BB,BC, …). - Levels (pallets high) (pallet only) — how many pallets stack in each
location, 1–26. Ground (
A) is pickable; levels above are forklift-only. The Pallet location preview lists each level's label and lets you mark levels as drive-through aisles before placing. - A per-section accordion (shelf only) where you set the bin layout — the number of levels (up to 10) and totes per level (1–8). Shelf sections default to 6 levels of 3 totes, 18 totes per section.
If the preview overlaps something, it turns amber and the panel tells you to drag it clear or flip the direction. Place stays disabled until the spot is clear and a storage zone is chosen. A placed rack is selected straight away, so R rotates it without switching modes. Nothing reaches the server until you save.
Walkways
Walkways mode overlays the aisles the system computes between your racks. It's a read-only check. A rack face whose walkway side is blocked by another rack shows in red, so you can spot an unreachable location before it causes picking problems.
Import
Import mode opens Import Inventory into the warehouse, which loads stock into the warehouse's bins from a CSV. It is built for the ItemLocations export format. It runs on the import dialog every CSV import in Canopy shares, so it works like the inventory page's Import inventory CSV: drop a file, read every row's verdict, then apply. Pin a client in the topbar first. Under All clients the dialog only says "Pin a client in the topbar before importing stock."
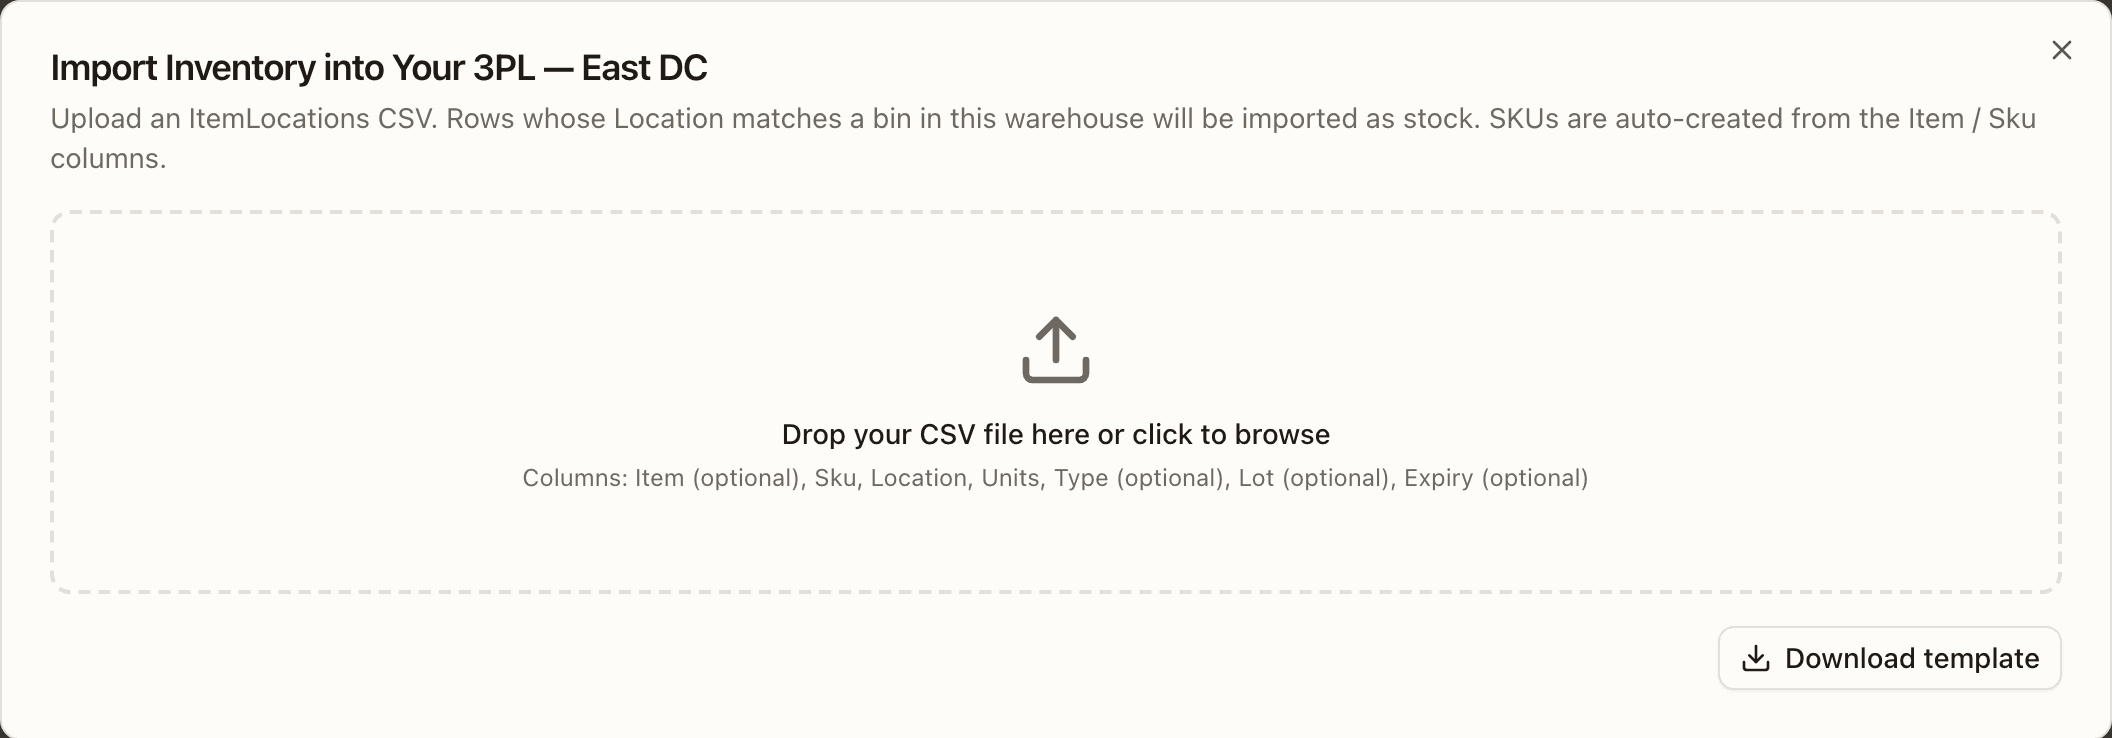
The file. The columns are Item, Sku, Location, Units and Type,
plus Lot and Expiry for lot-tracked stock. Column names are matched
without case. An extra column is ignored, and the dialog says which one. A SKU
the client does not have is created, named from Item (or from the code). A
SKU code that was merged away lands on the SKU it was merged into. Units must
be a whole number: 5.5 is refused. A row whose Type is not Bin, or whose
units are 0, is skipped. A file may hold up to 1,000 rows; split a larger
one.
Where the stock lands. Each row's Location must be a bin that already
exists in this warehouse and is active. A bin made with Add Location or
with the locations import counts, not only the racks drawn on the map. Nothing
is ever created for a location the import cannot find: that row is an error,
and the editor keeps a banner listing those labels so you can switch to Add
mode, draw them, save, and import again.
Overwrite or Append
Above the drop zone, If a bin already has stock for the same SKU asks what a row should do about it. Overwrite, the default, makes the bin hold exactly the row's units. It is safe to re-run a full snapshot. Append adds the row's units on top. A warning under the toggle says why that is risky: re-run a snapshot in Append and every bin double-counts.
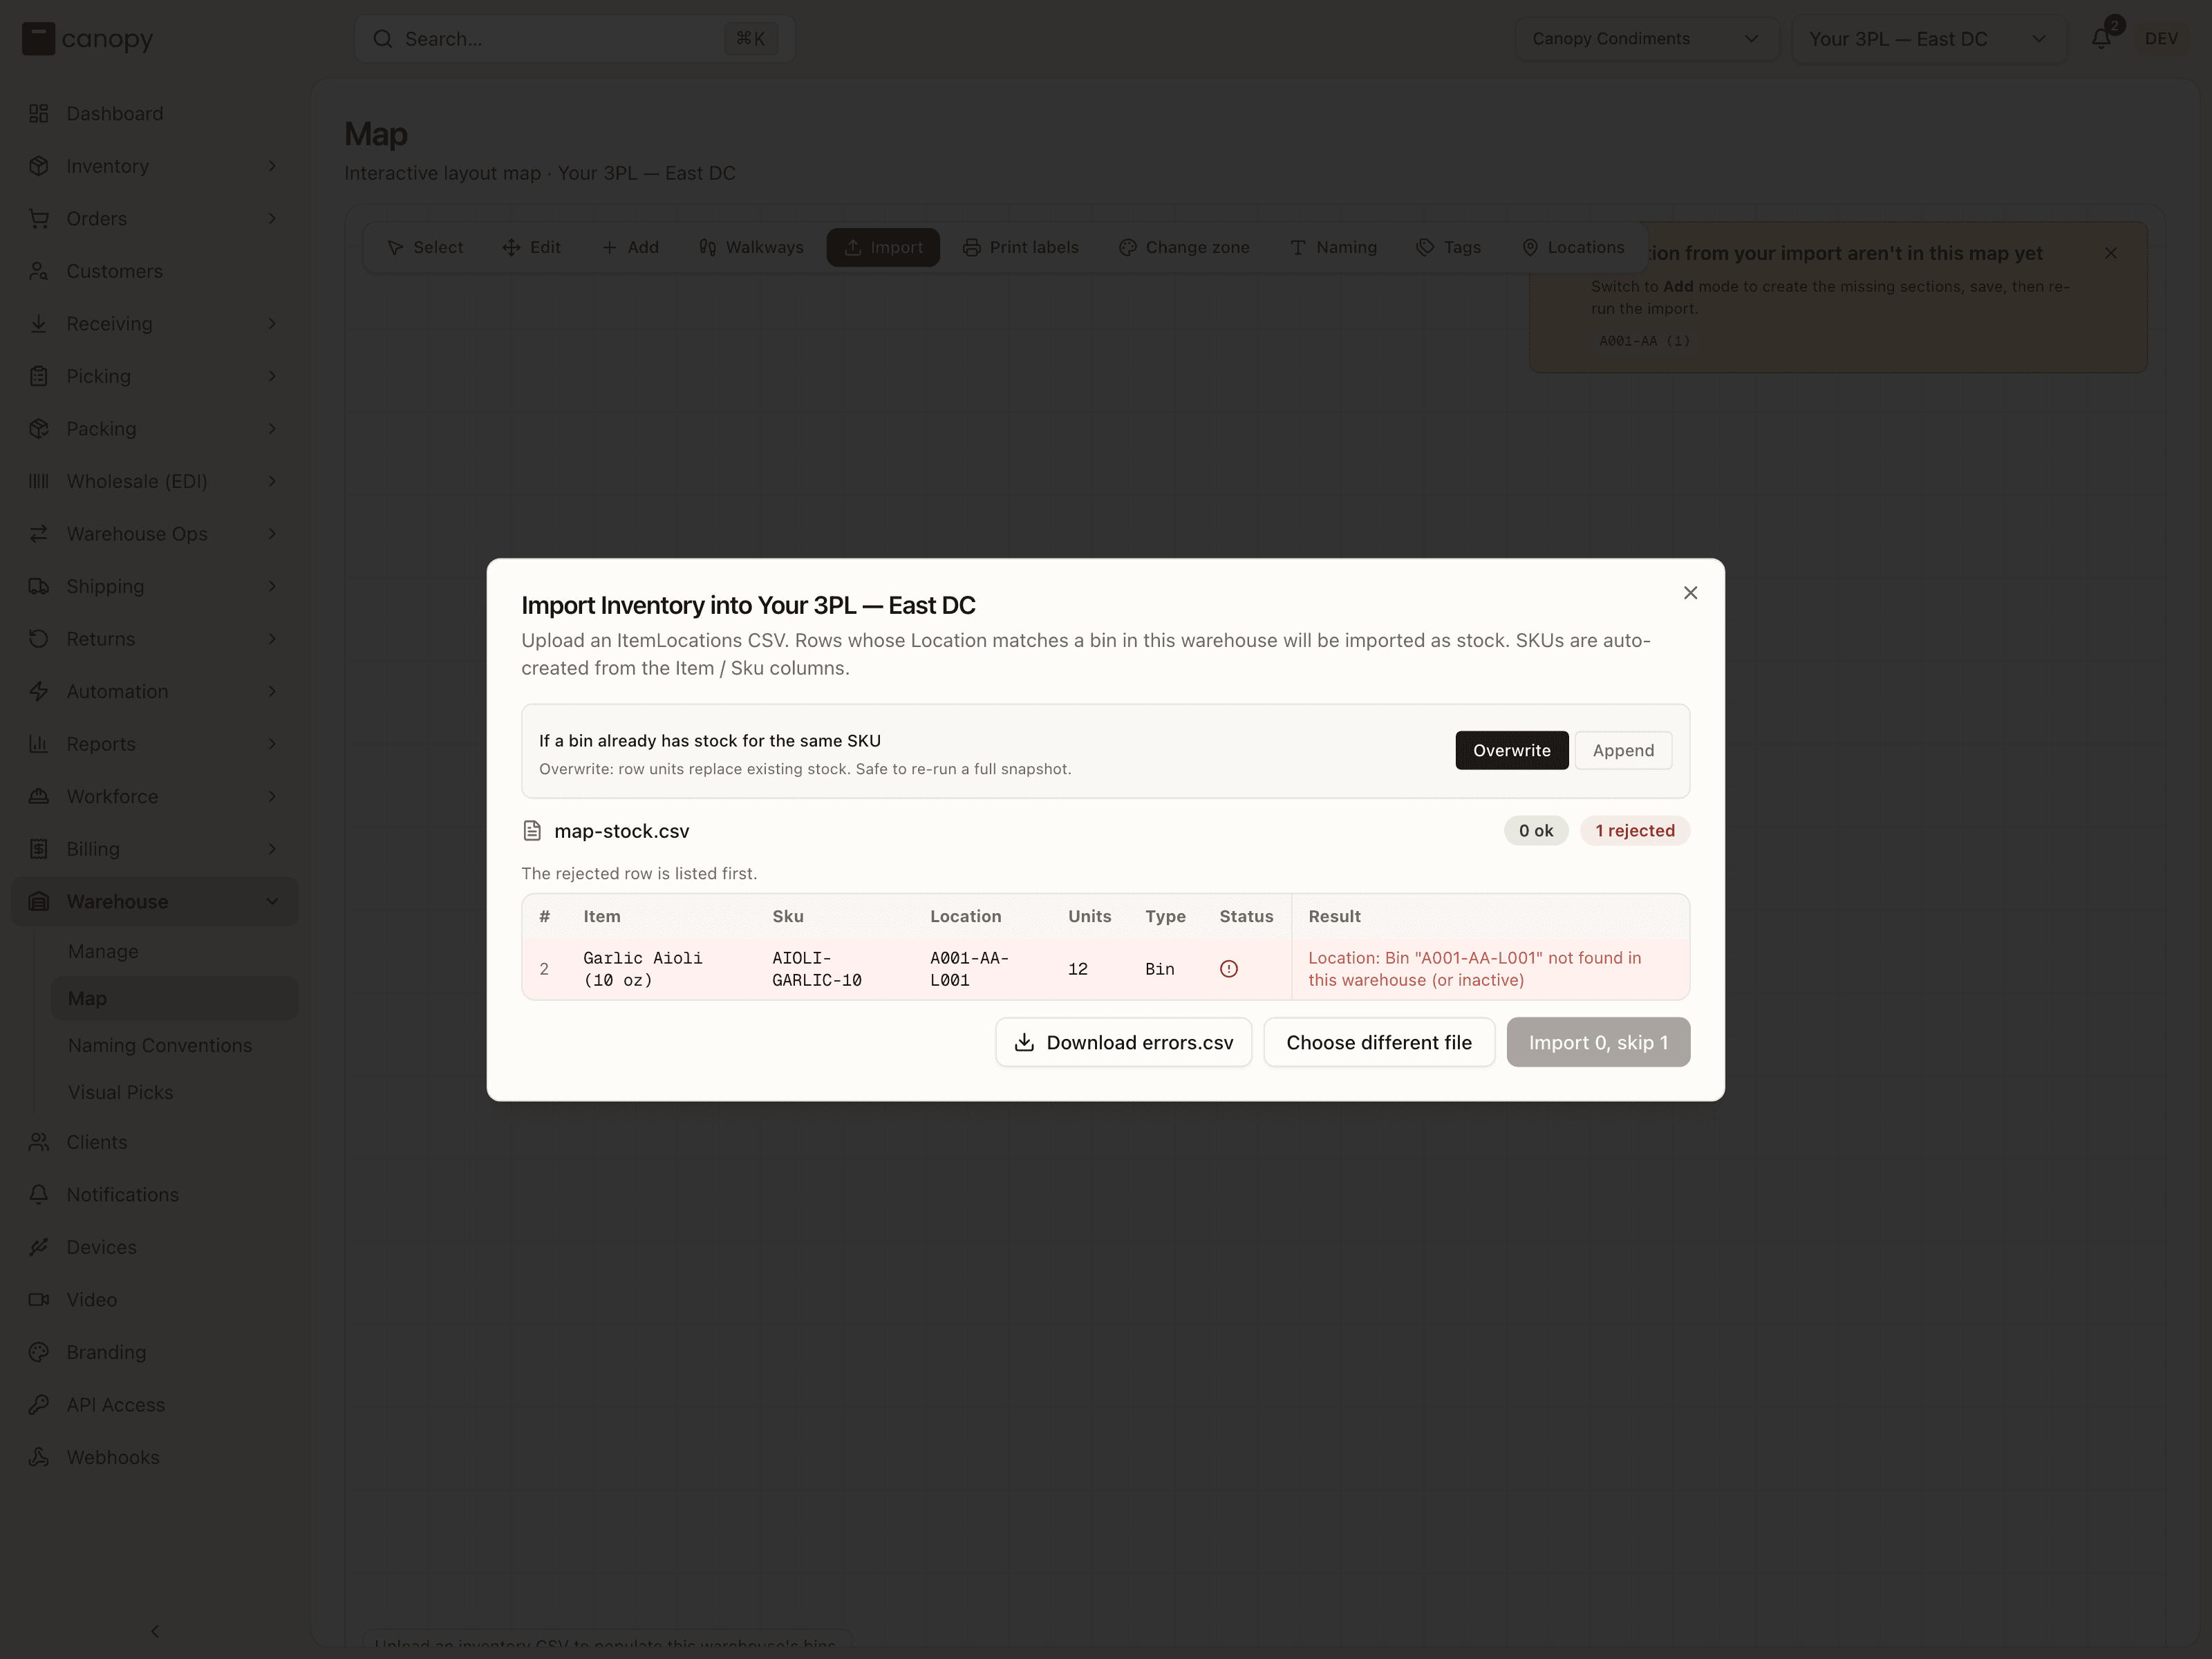
The preview and the import. Every row comes back with a verdict, as on the
inventory page's import: ok; warning, applied with a note (create SKU X,
then set X in BIN to 12, or Replaces 30 on hand when the row changes stock
already there); rejected, with the reason (a bin not found, a decimal, an
expiry not written as YYYY-MM-DD); or skipped. The rejected rows are
listed first, and Download errors.csv hands the file back with the reason
on each. This import is partial: Import N, skip M applies the rows
that passed and leaves the rest. A row that replaces stock already there, or
adds to it in Append, asks once more before anything is written: "Replace
existing stock in 2 bins?" with Replace stock, or "Add to existing stock
in 1 bin?" with Add to existing.
Each change is written to the Adjustment Log with the reason Map import, or Map import (overwrite). A row that sets a bin to the units it already holds writes nothing.
Print labels
Print labels mode gathers shelf and pallet slots and sends one label per slot to your printer. Click sections to add them to the selection (each click toggles a section in or out), or Shift+drag to box-select; clicking empty floor leaves the selection alone. The bar at the bottom counts the sections and labels selected, and offers:
- Select all N flagged — appears when any section is pulsing red because its bins were relabeled by a prefix or zone change; one click selects every one of them.
- Clear — empties the selection.
- Print N labels — builds a sheet with one page per slot (the location code, a CODE128 barcode of it, and a line naming the zone, aisle, bay and face) and opens the browser's print dialog, where you pick the printer and label size. Drive-through pallet levels hold no stock and get no label.
As soon as the print dialog closes, the red reprint highlight on those slots is cleared and a toast confirms it. The browser can't tell a printed job from a cancelled one, so the toast stays up with a Didn't print action that puts the highlight back if the labels never came out. This mode is available to every operator.
Change zone
Change zone mode moves whole racks into a different storage zone. Click a section to select its entire rack (a rack's name and every bin label under it come from the zone letter, so a single section can't move on its own), or Shift+drag to box-select; the selection accumulates until you Clear it. The panel at the bottom shows how many racks and sections are selected, which zones they're coming from, and a Move to storage zone… dropdown of the warehouse's Storage zones.
Move N racks counts only racks not already in the target. Shelf bins are
relabeled to lead with the target's letter (A022-BA-L001 → H022-BA-L001) and
flagged for reprint; pallet racks just change zone. A target zone with no
label prefix can't take shelf racks — the panel says so, and you assign it a
prefix on the Manage page first. The move is refused while work is in flight
against the racks, and the error names the blockers. Like every layout change,
it needs admin rights server-side.
Storage tag overlay
Once your tenant has storage tags, a Tags button joins the toolbar. It opens a row of tag chips plus Off; pick one to recolour the map by that tag's coverage: a face is painted solid when every bin on it carries the tag (directly or through its zone), faded when only some do, and everything else is dimmed. The Tag overlay panel in the top right names the tag and how many bins carry it. The overlay changes colours only — every mode keeps working underneath it.
Special locations
Not everything on the floor is storage. Locations in the toolbar places the three named markers a warehouse can have, one of each:
- Depot — where a pick run starts and ends. Routing reads it: the last aisle's exit end is chosen by how close it leaves the picker to the depot. A warehouse with no depot sequences from the middle of the layout instead.
- Returns Station — where returns are processed. A marker for now; put-back routes will start from it.
- Wholesale Station — where wholesale cartons and pallets get built and staged for a retailer's carrier. A marker for now; nothing routes from it.
Pick one from the menu, then click the map to drop it. Markers stay visible in every mode, and clicking one opens a panel where you can rename it or remove it from the map. The name is display copy only, so calling the depot "Packing Station" changes what the map and the picker screen say and changes nothing about routing. To move a marker, switch to Edit mode and drag it — it snaps in half-cell steps so it can sit on a walkway line or a cross-aisle rather than only on a rack cell.
Moving the depot changes how new routes are sequenced. Pick lists that already exist keep the order they were built with, so it's safe to move mid-shift. Markers save with the rest of the map, and they never block a save — a returns desk standing in front of a rack is legitimate, so an overlap is flagged as a note, not an error.
Saving your changes
Moves, rotations, additions, and deletions are staged on the canvas and committed together. As soon as you have unsaved edits, Discard and Save appear in the toolbar, and the app warns you if you try to leave the page with changes pending. Saving is an admin action; an operator's save is refused. A save can also be blocked for a few reasons, each shown in a Cannot save layout dialog:
- Bin label conflicts — a new bin's label already exists in this warehouse. Bin labels have to be unique within a warehouse. Each conflicting label is listed with its rack, aisle and section and the existing location's zone; when that location was created outside the map — imported from a CSV, say — the row says so: "created outside the map (no rack bay). Rename it, or choose a different rack name."
- Racks with active dependencies — deleting a rack whose bins still hold stock, or that has active work or rules against it. Move the stock or clear the work first.
- Layout overlaps — a rack body or face position collides with another.
Visual Pick Routes
Visual Picks → /warehouse/visual-picks. This page replays a pick list as a
walking route drawn on the warehouse map, so you can see the path a picker takes
and how the stops are ordered.
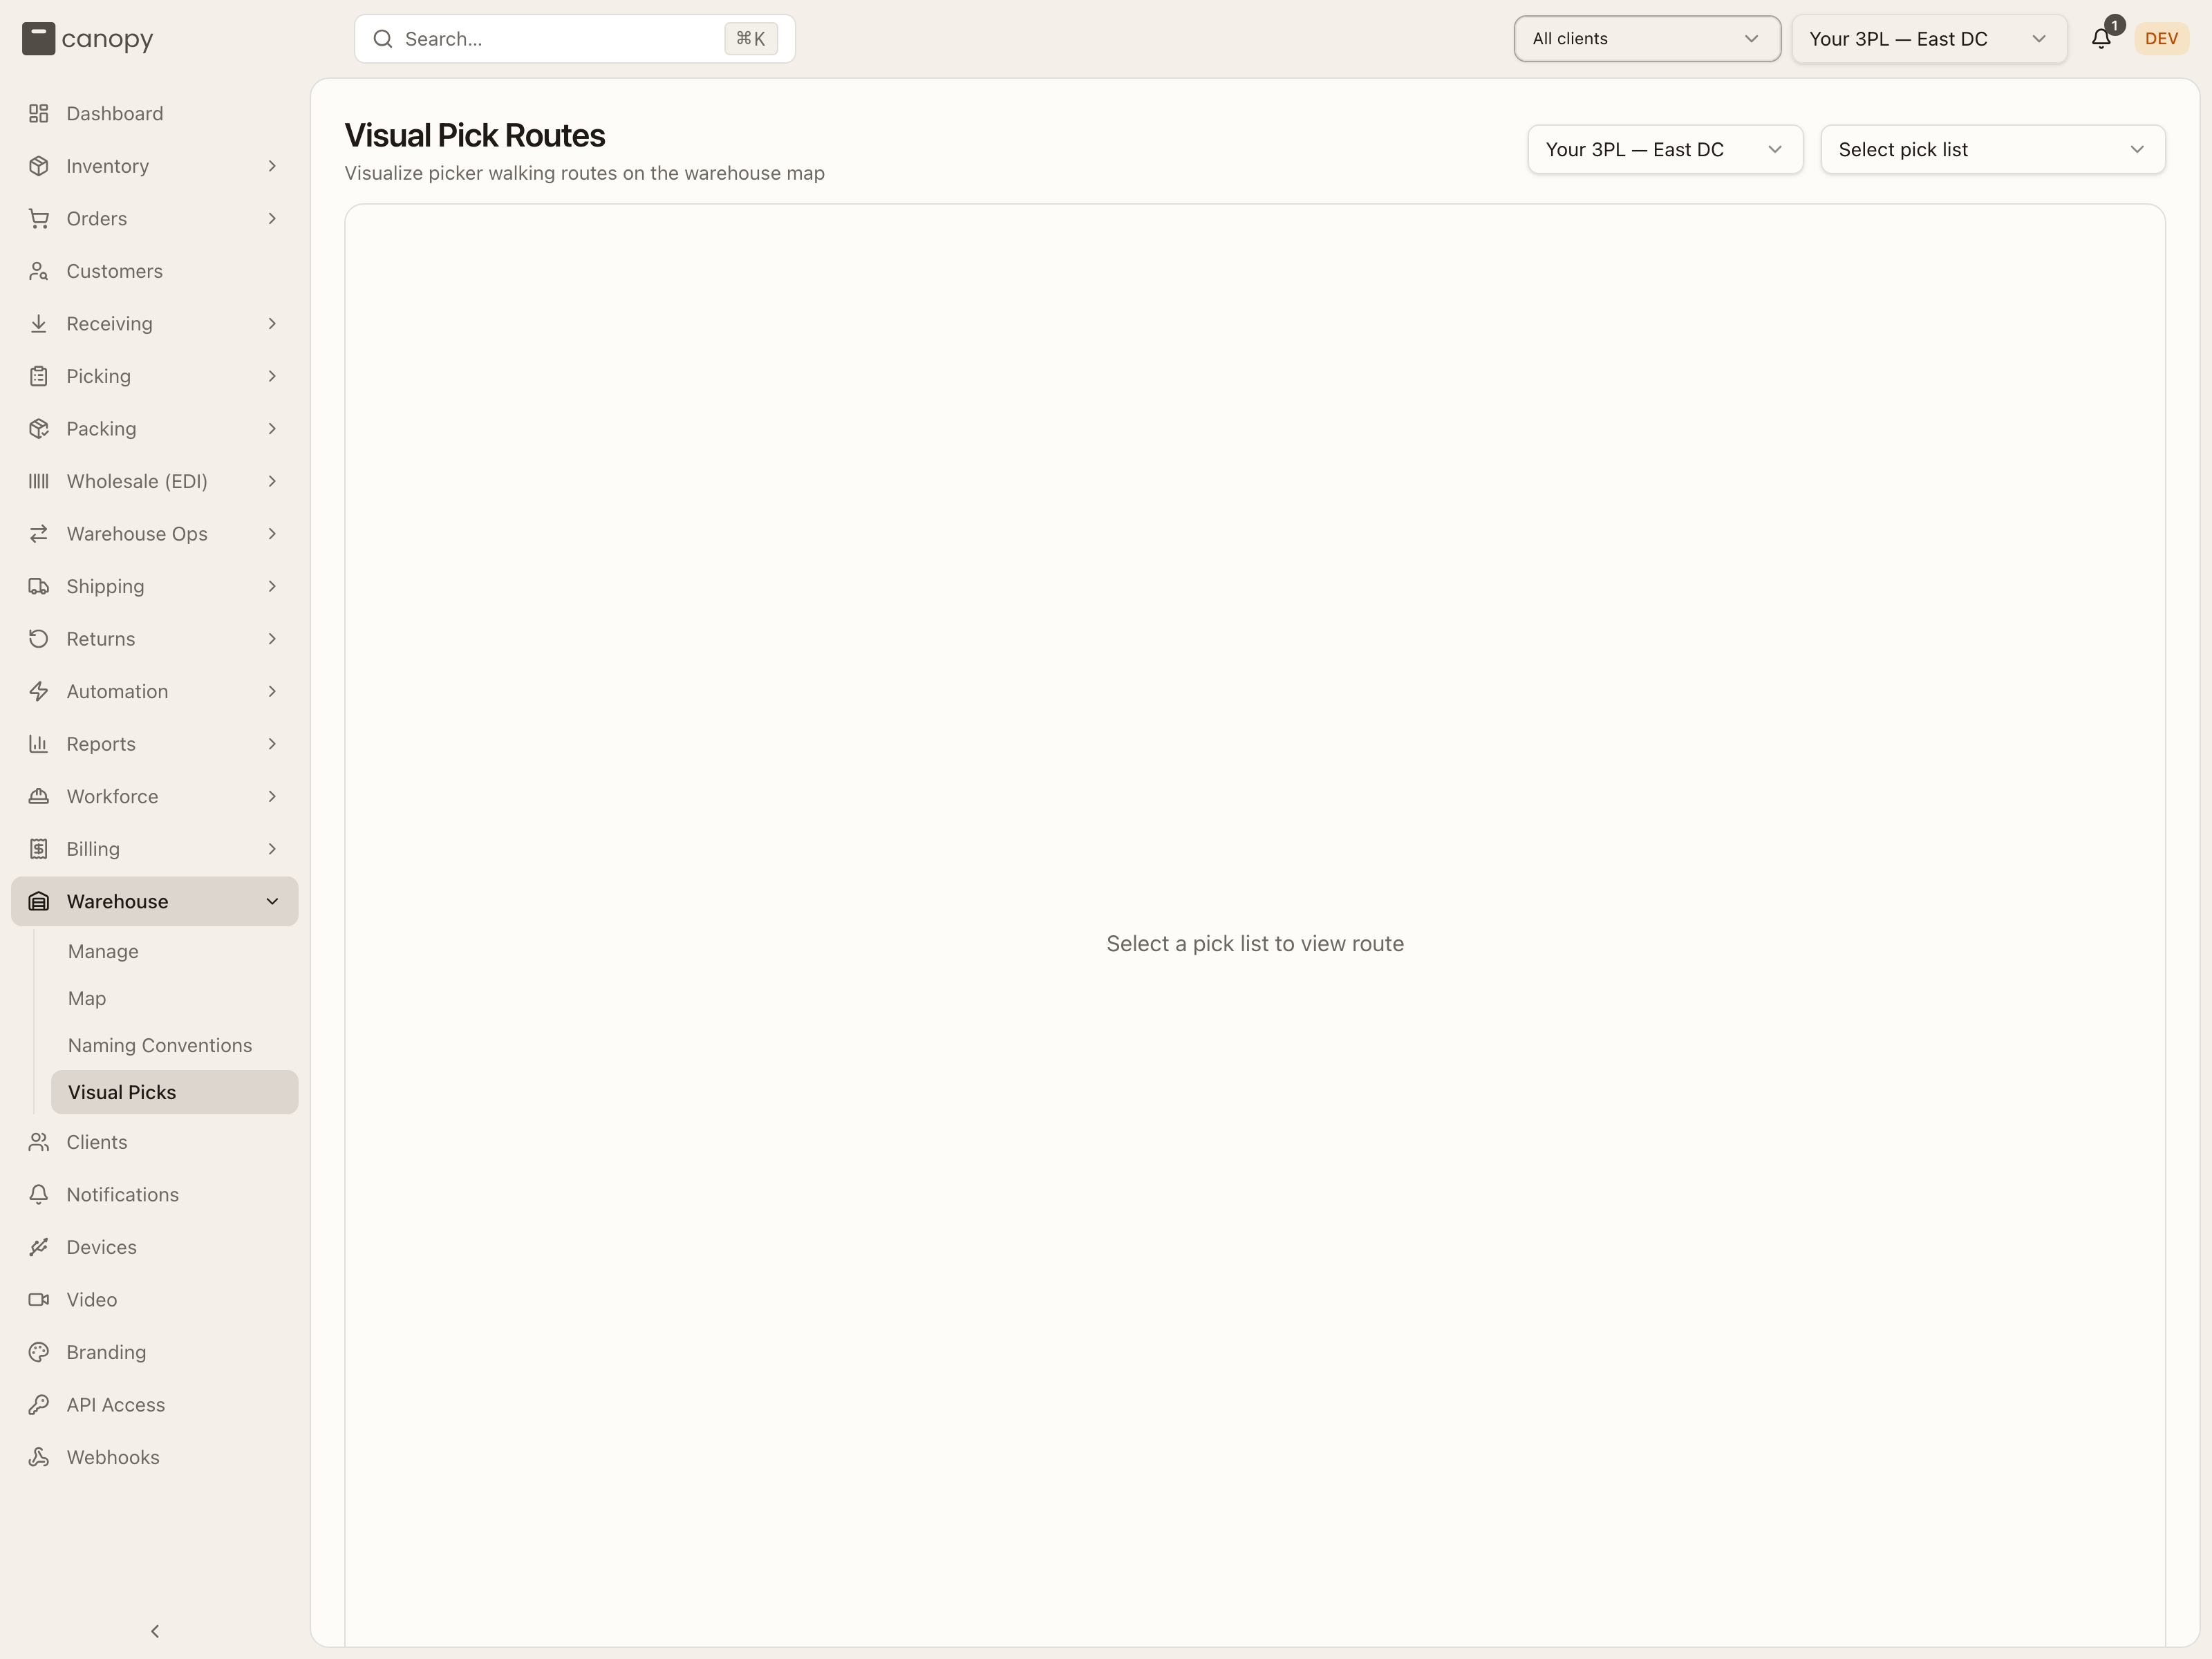
Pick the warehouse (if you run more than one) and then a pick list from the dropdown, which shows each list's short id, status, and item count. The map draws the route from the depot through every stop in order, and a sidebar lists the stops.
Each stop in the sidebar shows its number, the bay label, and how many picks happen there. Use Show all to fit the whole route in view, or the Previous and Next arrows to step through stops one at a time, zooming to each. Until you choose a pick list, the map reads "Select a pick list to view route."
How to move racks into another zone
Reassigning a rack relabels its shelves, so the flow ends at the printer.
On the Map, Save or Discard any pending layout edits — the Change zone button is disabled until the canvas matches the saved layout.
Click Change zone, then click one section of each rack you want to move (the whole rack highlights), or Shift+drag a box around them.
In the bottom panel, pick the target under Move to storage zone… and check the from → to summary. If the panel says the zone has no label prefix yet, give it one first from Manage → Zone prefixes and come back.
Click Move N racks. The toast reports how many bin labels changed; those sections now pulse red on the map.
Switch to Print labels, click Select all N flagged, then Print N labels. Once the print dialog closes the highlight clears — use Didn't print on the toast if the printer jammed.