

Packing
Pack orders at the station or on the classic stepper, manage box sizes and printers, and bulk-ship batches of identical orders.
Packing is the last stop before an order leaves the building. This section holds the two hands-on packing screens, the box catalog and packing stations that support them, and a bulk-ship mode for pushing out batches of identical orders at once. The whole Packing group is warehouse-staff only. It is hidden from a client's sidebar, and every URL under it sits behind a staff-only gate, so a brand user who types one in sees "Picking and packing are available to warehouse staff only." instead of a screen. The server matches: every packing action and the entire bulk-ship module refuse a client account.
The Packing sub-nav holds:
Pack Station
The single-screen packing flow, with scale weighing, action barcodes, and the only place you can declare a short.
Pack Order
The stepper version of the same workflow, plus a history of past packs.
Box Sizes
The box catalog that drives box pre-selection at pack time.
Packing Stations
Physical stations and the printers wired to each.
Bulk Ship
Pick, pack and label a batch of identical orders on one page.
Pack Station
Pack Station → /fulfillment/packing/station. The same job as Pack
Order — scan a tote, verify items, choose a box, buy a label —
laid out on one screen for a tablet or a scanner-driven bench instead of a
stepper. It is the flow a Packing task role can reach, and it is the only
screen that can declare a short. A Classic flow &
history button in the header jumps to Pack Order; it is hidden from a Packing
task role, whose access ends at the station.
The page itself never scrolls. Long lists scroll inside their own block, so the label and finish controls stay on screen.
Recording on camera
At a bench with a camera, the station records every pack. A pill in the header reads Recording while it does. A line above the session says when the camera is starting or missing, and a dialog opens between packs if the camera goes down. You pack exactly as before. What each state means, and how to keep packing without video, is on Pack video. A bench with no camera sees none of this.
The session at a glance
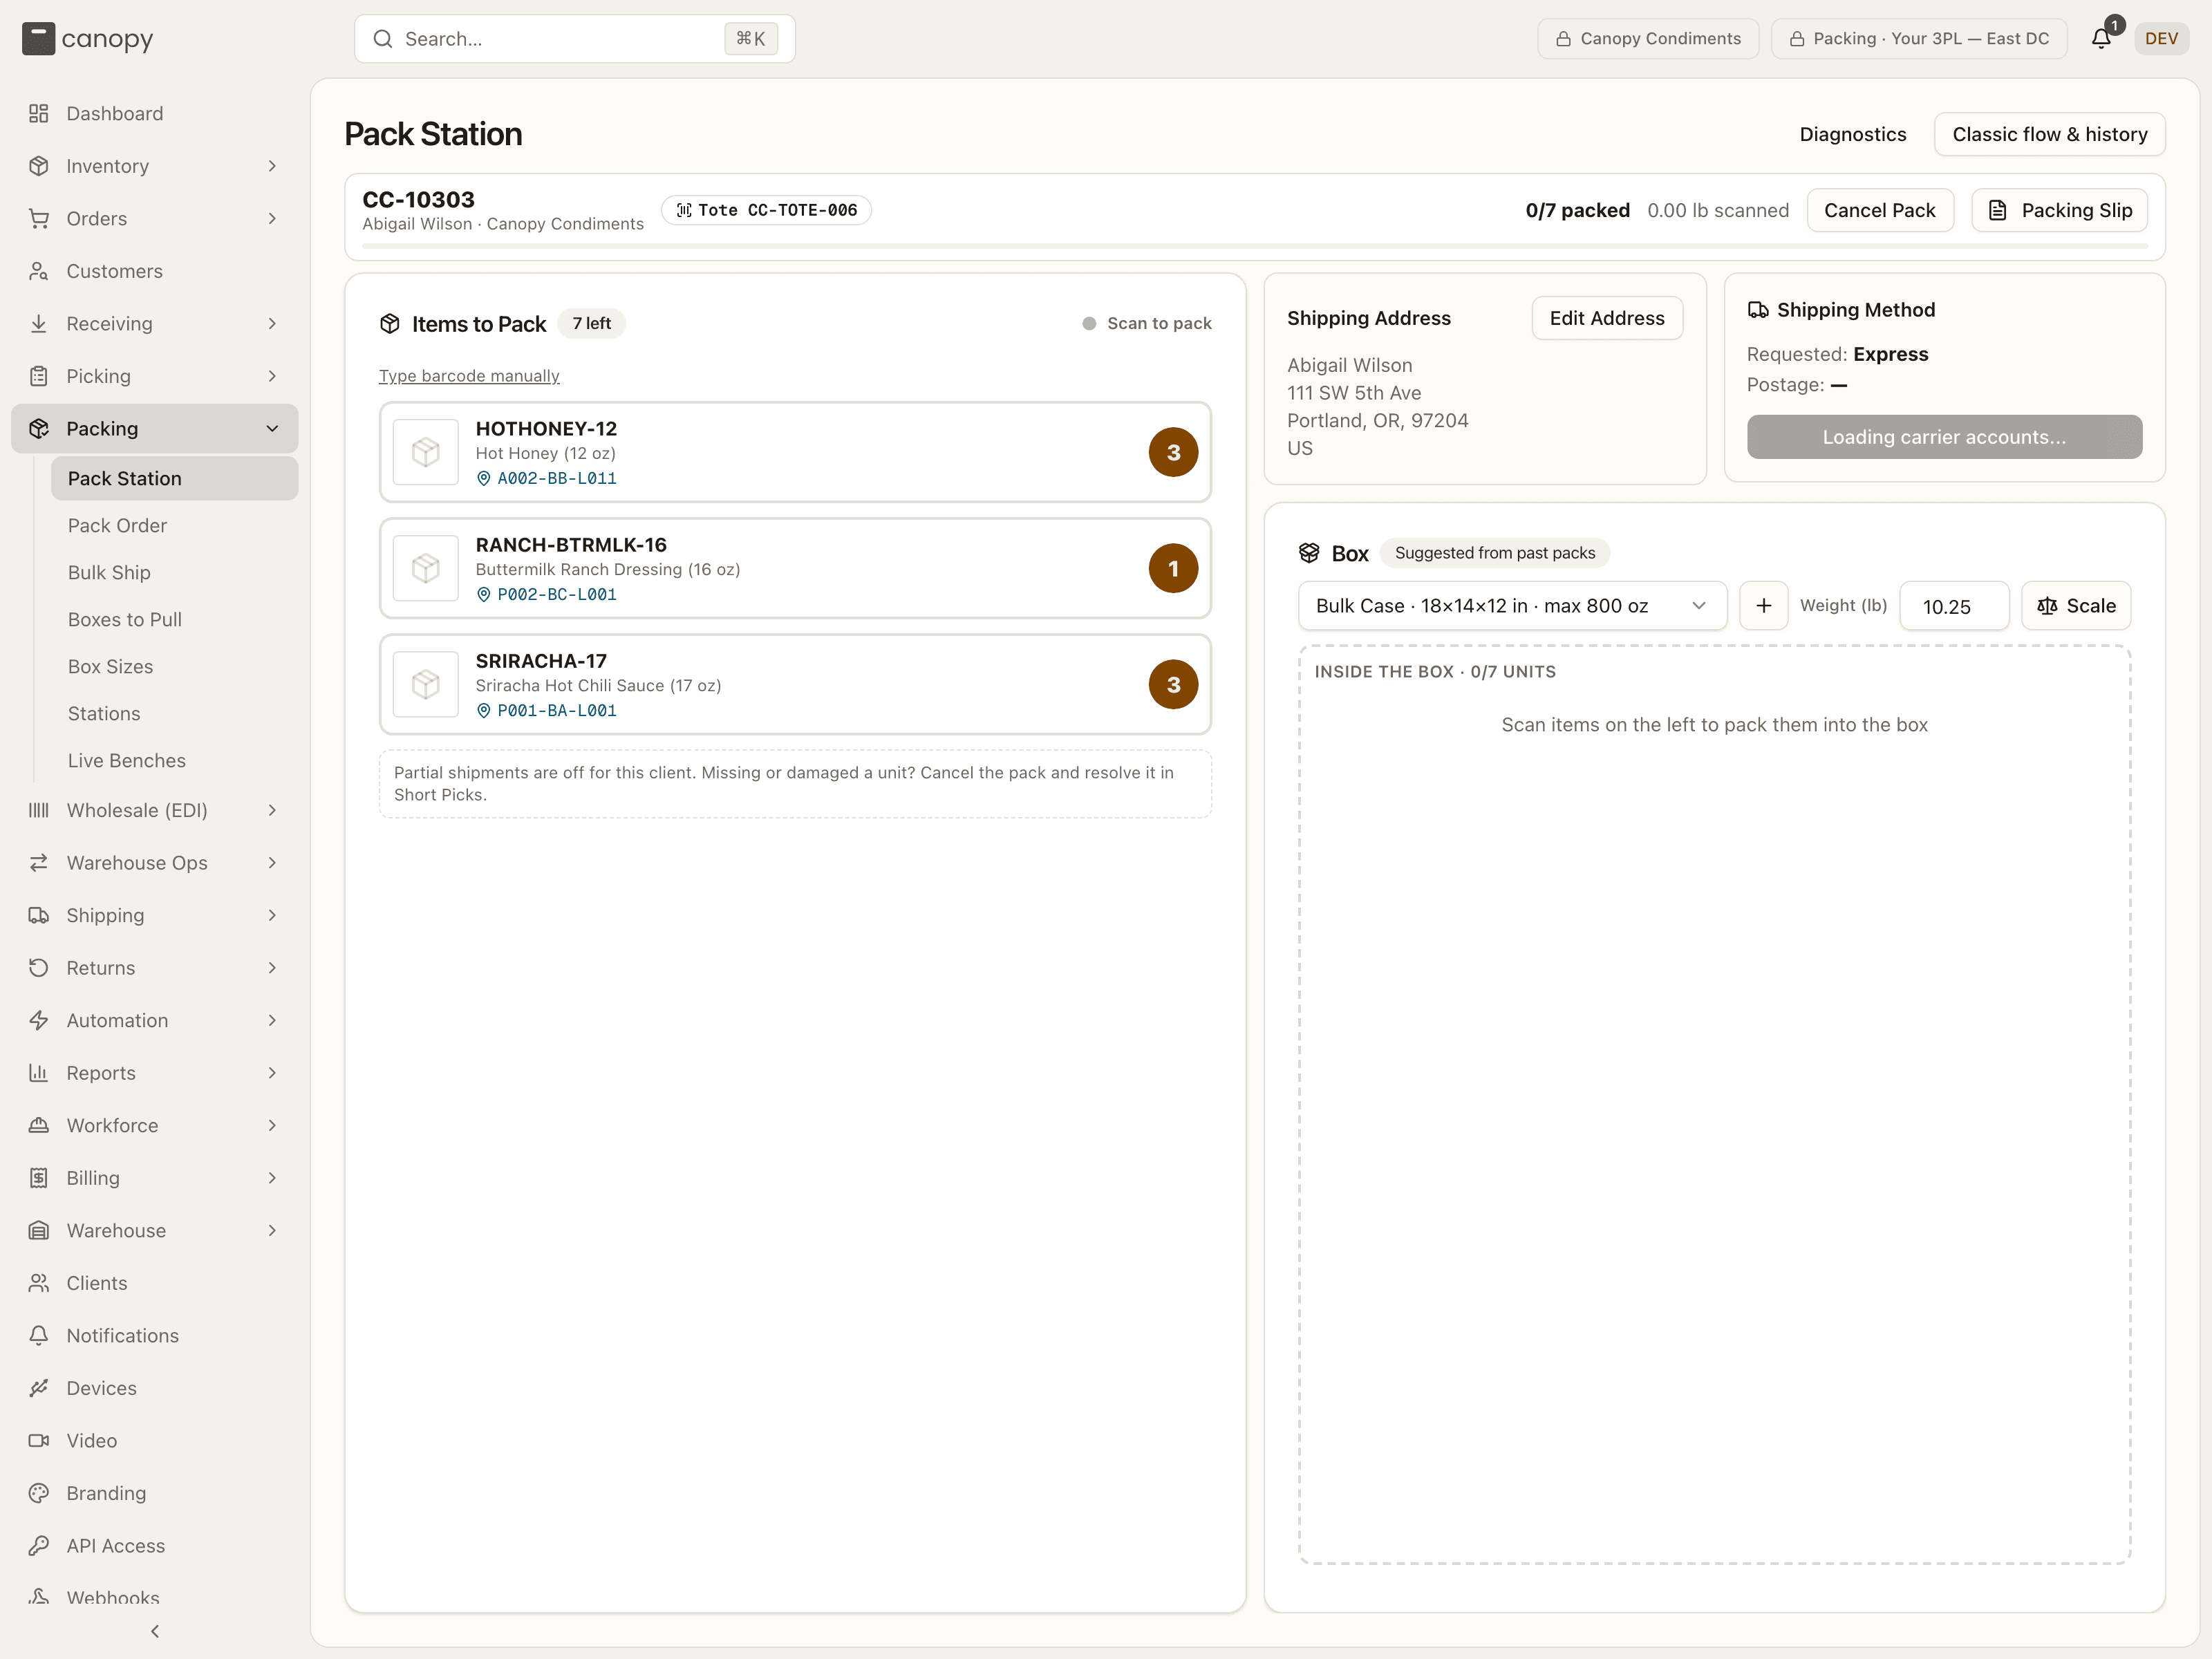
Scanning a tote (or Type manually) opens the pack record and lays the session out in three bands.
Header. The order number, customer and client, a Tote badge with the barcode, "N/M packed", the running "X lb scanned" weight (summed from the SKUs' catalog weights), Cancel Pack (until a label is bought — and again once that label has been voided: the station's poll notices within ten seconds, whether the void was made here or from the order sheet, and brings the button back with the hint This pack's label was voided — cancel the pack to take the box apart) and Packing Slip, which prints the 6×4 in packing slip on the label stock (one slip for a merged box, naming the orders combined into it and marking each line with the order it came from). On a split, the slip's still owed notes count the box as the session will ship it — every row not declared short or skipped is in the box, so a slip printed before scanning doesn't read unscanned lines as owed — and a non-physical item is never owed.
A progress bar under the header tracks verification. When the order was admitted to picking as a partial shipment, a warning line in the header reads "Ships later — 2 of 5 lines backordered: SKU ×qty": the parcel carries what was allocated, there is nothing to declare, and the owed lines ship in a later cycle.
Warning strips. Anything the packer has to read is a one-line strip that expands on tap: Note / Notes (the customer's checkout note plus any packer notes added by automation), Gift note (it goes in the box), Instructions (what the client's Packing rules ask of this box — the packing slip, inserts, handling flags; when several matching rules print a packing slip, only the topmost one's line shows, since only that slip prints), Order changed (the order was edited in the sales channel after picking; the strip lists each change, and packing as-is is allowed because the channel is only told what actually ships — "If unsure, set the tote aside and check with a lead." An order carries one such strip per open change, so two changes show two strips) and Put-back ("Do not pack: SKU × n — awaiting put-back").
Not every such change is an item change, and each strip says which it is rather than counting zero: a fulfillment hold the channel placed while the order was being worked reads "The sales channel put a fulfillment hold on this order (<reason>)" and asks for a different judgement — "The merchant asked to wait: this order's fulfillment is on hold in the sales channel." The other no-item-change reasons name themselves the same way: "The sales channel moved units between locations: …", "Refunded in the sales channel", "The sales channel cancelled a return after it was received (RMA-…)". Two notes that aren't channel changes ride the same strip. "Check the manual postage: …" means the order was moved to another warehouse (by Reprocess Rules, or by the routing rules running again) and kept a postage type or service options chosen by hand at the old one — a manual choice always wins — so check it still fits. "Not placed where routing chose: …" means a routing rule chose a warehouse for a Shopify order — as it came in, or when the rules ran again — but Shopify wouldn't move the order's fulfillment orders to match; the note says where Canopy tried to move them and gives Shopify's reason. It stays a warning in every case, never a stop. A change that holds the order puts the order on hold instead, so the tote's scan is refused before a session opens. The same strips appear on the classic Pack Order list, one panel per change, and inside a Bulk Ship batch, where a change that holds the order gets a strip of its own wording (see Orders in this session).
On the tote of a merged master — an order others were merged into — a blue Merged block heads the strips: "Merged: CC-A + CC-B — one box for N orders", each order's gift note underneath as CC-B: note (and "Gift note on CC-A (edited since the merge): …" when the master's own was changed after the merge). The order's own Gift note strip gives way to it. A change a sales channel made to one of the merged orders gets its own banner in place of Order changed — "An order merged into this one changed on its sales channel", or, when the brand's rules hold the label, the red "Label on hold — …" with "No label can be bought, and the order can't be packed out or marked shipped, until each change marked 'holds the label' is acknowledged or its order is taken out of the merge." Each block names the change and the way out: "To ship without CC-B's goods: cancel this pack (void the label first, if one was bought), unpick CC-A, then remove CC-B from the merge in Manage Orders. Or ship as packed." Ship as packed (or Acknowledge) clears it — "Change acknowledged — ship as packed".
Items to Pack on the left and the Box on the right — described next.
Items to Pack
Each outstanding line is a row: image, SKU, name, the pick location(s) it came from, and a badge with how many units are still owed. Scan a unit or tap the row to confirm one unit into the box (a tap is recorded as a manual confirm rather than a scan). Kit components sit under a dashed header naming the kit parent. Type barcode manually opens a text field for a barcode that won't scan. A secondary Short button sits beside each row — see Declaring a short; when it isn't available a dashed note gives the reason and ends "Missing or damaged a unit? Cancel the pack and resolve it in Short Picks."
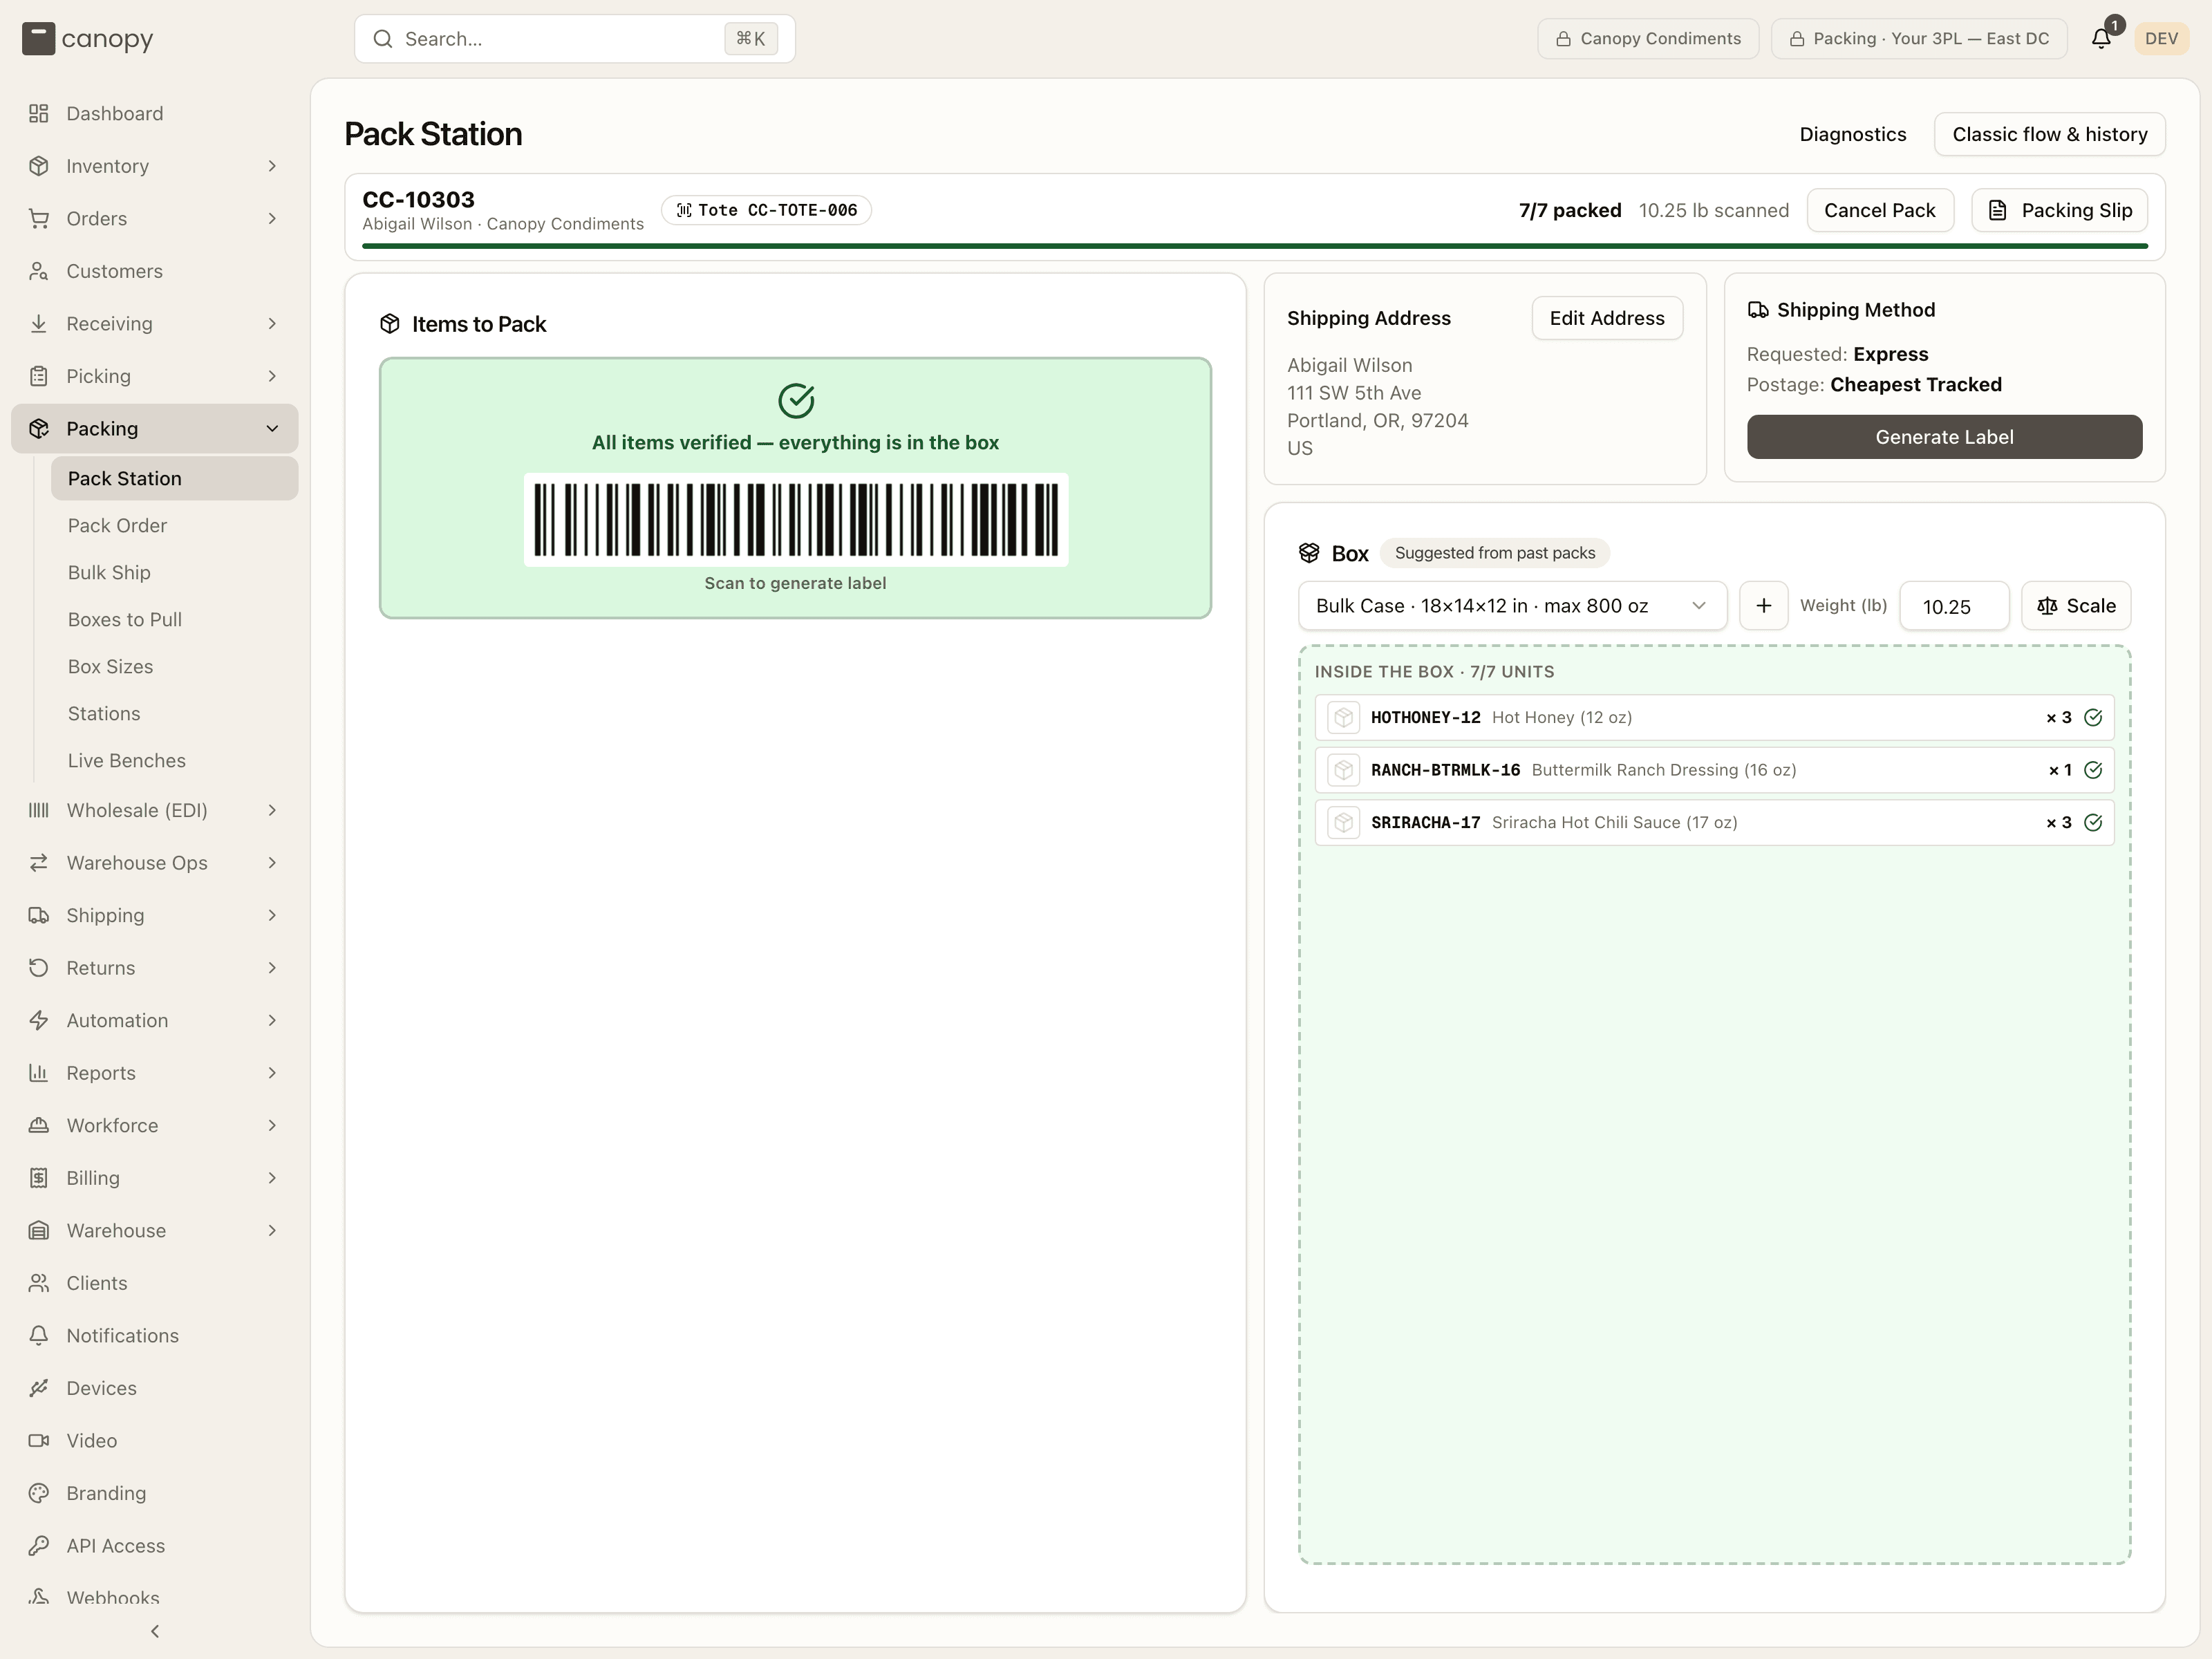
Once nothing is left the card turns green — "All items verified — everything is in the box" (or, with shorts declared, "Ready to ship X of Y units") — and, as soon as a box is selected, shows the GENERATE-LABEL action barcode captioned Scan to generate label.
Address, method and label
The right column opens with the Shipping Address — Edit Address opens an Edit Shipping Address dialog (name, address lines, city, state, ZIP, country, phone), and an order with no address reads "No shipping address on this order — add one before generating a label." Beside it, the Shipping Method card shows Requested: the channel method and Postage: the resolved postage type, with a Manual override or Automation rule badge when the postage came from one of those rather than the client's Shipping Mappings, and read-only Signature required / Insured to … badges for the order's service options.
Under the method card sits one button whose label says what is still missing: "Loading carrier accounts..." while the client's carrier accounts load (a moment at the start of a session; the button is disabled and a GENERATE-LABEL scan does nothing until they have), then "Verify N more to generate label", "Select a box first", "Nothing in the box to ship", then Generate Label (or "Generate label — partial (N units stay behind)" once a short is declared). Pressing it, or scanning GENERATE-LABEL, fetches rates and — at or under the $100 threshold — buys the label and sends it to the printer in one go ("Label sent to printer."). Over the threshold the button becomes Confirm & Generate Label, the barcode caption changes to Scan again to confirm & generate, and an Or choose a carrier & service list offers every shopped rate with a Use button. Once the label is bought it auto-prints and the button becomes Reprint Label; it stays Print Label when a stored file never reached the printer. On a carrier that hands the label over before its document is rendered (Stallion v5), the purchase toasts "Label <tracking> — the carrier is still rendering its PDF. Press Print Label to fetch it." and the button reads Fetch & Print Label (Fetching label… while it asks); too early, it says "The carrier is still rendering this label — try again in a minute.", and once the file arrives it prints. On a merged master whose label is held, Generate Label is refused outright: "Can't buy a label for CC-A: CC-B was cancelled on its sales channel. Acknowledge the change to ship as packed, or unpick CC-A and remove CC-B from the merge."
Two more things happen around that button. The order's saved postage choice is bought on the carrier account it was saved with, or on the client's default account when it names none, and it is checked against that account before any money moves: a service the account does not offer is refused, naming both ("Service "…" is not offered by carrier account "…" (…). Update the shipping method mapping or the order's carrier override before buying."), and an account that has since been deactivated, or taken away from the client, refuses too, naming the layer that chose it ("The manual postage override for this order names carrier account "…", which has been deactivated. Update the manual postage override before buying."). The rule is on the Shipping manual. A rate you pick from the Or choose a carrier & service list skips that check, since the account just quoted it. And every print of the label, Print Label, Reprint Label and Fetch & Print Label alike, is reported to the pack record, which keeps the count and the last print time; with a camera on the bench the pack's clip gets a Label printed mark (Pack video).
The box
The Box card's dropdown lists the client's active boxes as name · L×W×H in · max N oz and arrives pre-selected, with a badge saying why: Set by automation rule (a Packing rule chose it), Suggested from past packs (what this order shape shipped in before) or Default — no pack history yet. Change it freely. The + button creates a box size on the spot (name, dimensions, optional max weight in oz), and with no boxes at all the dropdown reads "No box sizes — create one". Changing the box after a label was bought voids and re-buys the label when you regenerate.
Weight (lb) is prefilled from the SKUs' catalog weights at pack start. Type over it, capture it from a scale, or press the revert arrow ("Revert to product weight (X lb)", shown whenever the field differs from that default). Any change discards a rate quote already fetched. The weight locks once a label is bought.
Inside the box lists everything verified so far ("Inside the box · N/M units"). Tap a row to unscan one unit back to Items to Pack. That works until a label is bought or is being bought, after which the contents are locked ("A label was already purchased — box contents are locked"). A declared-short row can't be unscanned either.
Weighing with a USB scale
Beside the weight field is the scale control. It appears only in a browser that can talk to USB devices (Chrome or Edge on a secure origin); elsewhere it is simply absent. Press Scale to connect a paired scale and the button becomes a readout: Ready (empty platter), Weighing… (load still settling), the settled weight in lb, or a fault such as Over capacity or Can't read scale. With auto-capture on — the default, remembered per browser — a settled weight drops straight into the field; you can also click the readout to use it. The menu beside it offers Turn off auto-capture / Turn on auto-capture, Tare (zero with the box on), Clear tare (X lb) and Disconnect scale.
Pairing happens once per workstation on the Devices page
(/settings/devices) — see Settings → Devices
for connecting a scale, taring, and copying raw-frame diagnostics when a scale
isn't recognised.
Action barcodes
Two barcodes are drawn on screen so the whole flow can be driven from the scanner: GENERATE-LABEL appears once every item is verified and a box is chosen (a second scan confirms an over-threshold cost), and COMPLETE-PACKING appears on the Label Generated card. Neither can collide with a real SKU or tote barcode.
Finishing
After the label is bought the left column becomes a Label Generated card — tracking number, postage type, Rate + Tax = Total — carrying the COMPLETE-PACKING barcode (Scan to complete packing). Under the box, when shorts were declared, a summary states what completion will do ("Ships X of Y units; N re-allocate for a later parcel", each reason listed, and whether the tote ends up flagged for put-back or released). Then Add charge (only when billing is enabled), Capture photo (attaches a photo to the order) and Complete Packing. Completing fulfils the order, releases the tote and resets the station for the next scan — unless a merged order's channel change landed after the label was bought, in which case it is refused: "Can't complete packing CC-A: … Acknowledge the change to ship as packed, or void the label, cancel the pack, unpick CC-A and remove CC-B from the merge."
Labels over $100
The $100 rate gate
A label at or under $100 buys automatically. Above that, or when no estimate could be computed, or when the last attempt failed, the flow stops and says why: "Estimated $X exceeds the $100 auto-approval threshold — confirm above to buy anyway.", "Couldn't estimate the cost — confirm above to proceed.", or "The last attempt didn't complete — see the error above. Confirm to retry, or choose a different service." Confirm, or pick a specific carrier and service from the Or choose a carrier & service list. The estimate is the price on the one account the label will be bought on: the account saved with the postage choice, or the client's default account when the choice names none. A cheaper quote for the same service from another account does not count, so an expensive saved account never buys itself past the gate on another account's price. Until the client's carrier accounts have loaded, neither flow starts a label. If they fail to load, a choice that names no account has no account to be priced on, so the flow stops on "Couldn't estimate the cost — confirm above to proceed." The same gate applies on Pack Order.
Declaring a short
Sometimes a unit isn't there. Rather than abandoning the whole pack, you can declare that line short and — when the brand allows it — ship what is in the box, letting the rest follow in a later parcel.
Each outstanding row carries a secondary Short button next to it. (Tapping the row itself still verifies one unit; the two never get confused.) Declaring covers every unit of that line still unverified — there's no quantity box. The dialog opens headed with the number, like "2 of 5 × SKU-XYZ not in the box".
No Short button?
The button is absent, with the reason stated in its place, when the order isn't eligible: "Partial shipments are off for this client." / "…for this channel." / "…for this order.", or "This is a reship repack — it ships whole or not at all." The hint names the tier so you know where the setting lives — see Administration for the client switch. It also disappears once the label is bought: the box is sealed. In any of these cases, cancel the pack and resolve the shortage in Short Picks instead.
Step 1 — pick a reason. Each one means something different to do with your hands, and the dialog spells it out when you select it:
| Reason | What it means | What you do |
|---|---|---|
| Not in the tote (lost) | The unit never reached the tote. | Nothing to set aside. The loss is recorded against the pick and the units go back to needing stock. |
| Damaged | It's here but unsellable. | Set it aside — do not pack it. It's credited into put-back staging as damaged, bound for quarantine, and shows up in the putaway queue. |
| Hold back — ship in a later parcel | The units are fine, you're just not sending them now. | Leave them in the tote. At completion they're staged for put-back to their pick bin, and the tote stays flagged until that's done. |
Step 2 — replace it, or ship what's in the box? After a lost or damaged declaration there's a real shortfall, so the dialog asks what to do about it before you commit. Replacement stock is always the better answer, so it's offered first: "Quick-pick a replacement — suspends this pack" appears when there are enough pickable units, and tells you how many. Taking it suspends the session (the tote stays with the order) and drops you into Short Picks filtered to this order, where you pick the replacement and repack whole. With no pickable stock the same button reads "Cancel this pack and resolve via Short Picks." Otherwise, "Ship what's in the box now" closes the dialog and the remainder re-allocates for a later parcel.
Hold back skips step 2 — you created no shortfall to re-source.
Two shapes where shipping partial isn't offered
A kit component. A kit ships whole or not at all, so "ship what's in the box" would dead-end when you tried to buy the label. Only the quick-pick / cancel path is offered, and Hold back is disabled with "Kit components can't be withheld — a kit ships whole or not at all."
An empty box. If declaring this line would leave nothing verified anywhere on the record, an empty parcel can't ship. Again only quick-pick / cancel, and Hold back is disabled with "Nothing would ship — cancel the pack instead." The label button then reads "Nothing in the box to ship" and stays disabled, with a note underneath — "Nothing is verified into this parcel — an empty box can't ship. Cancel the pack session and resolve the shortage via Short Picks." — and a Cancel pack session button, so you never press a live button into a refusal.
A box whose earlier label the store still counts. When a label of an earlier session of this box was voided after its push reached the store, and the store still holds that fulfillment, this box's label takes it over whole — so Hold back is refused: "This order's earlier label was sent to the store before it was voided, and the store still counts those items as shipped — this box's label takes that fulfillment over whole, so an item left out of it would read as shipped too. Ship this box complete." Lost and damaged still declare, and the label is then refused until the box is whole again: "… Cancel this pack session, quick-pick the missing units via Short Picks, and ship the box complete."
After you declare. The line moves out of Items to Pack into a Declared short group: a dashed warning card with the reason and an "N of M" count, not tappable, footed with "Cancel the pack to change this." There is no un-declare — cancelling the pack session is the door, and even that does not rewind a lost or damaged record (the write-off already happened). A mistake costs an inventory correction, not a stranded order.
Buying the label. With shorts declared, the label button reads "Generate label — partial (N units stay behind)", and completion says what will happen to the held-back units and whether the tote ends up flagged for put-back or released. The order lands in Partially Shipped and its remainder re-allocates on its own cycle.
Opening a declared session on the classic page
Pack Order has no Short button, but it renders a session someone declared at the station correctly: the short line shows as settled — a dashed warning card reading "N short · <reason>" — rather than as an outstanding item demanding units that are never coming.
When the tote should not be packed
Two situations replace the session with a single card instead of letting you pack:
- The order was fulfilled elsewhere or cancelled before you scanned. The tote scan lands on an Order Fulfilled Externally or Order Cancelled card naming the order and tote (both open a drill-down sheet without leaving the station), listing what the tote should contain, and — when a label was already bought — a Label line with View shipment, where it can be reprinted or voided. A cancelled order's card says "Give this tote to a supervisor for put-back. Don't empty it yourself." Press Acknowledge & Continue (Acknowledge & Scan Next Tote for a cancel) and route the tote to put-back.
- The order is cancelled while you are packing it. The session ends and is replaced by Order cancelled — stop packing (or Order cancelled — do not ship if a label is live, with "A label was already printed. Hand it over with the tote — it is still live at the carrier and has to be voided manually."). Acknowledge & Scan Next Tote returns you to the tote scan.
A third tote is turned away at the scan itself. An order that belongs to a live Bulk Ship batch, picked on a cart from Active Pick, is labeled and packed on the Bulk Ship bench with the rest of its batch, so the scan is refused with "This order is in Bulk Ship batch <number> — take the cart to the Bulk Ship bench, or remove the order from the batch to pack it here". The same refusal meets the classic Pack Order scan and the orders-page shortcut.
A tote whose order is on hold
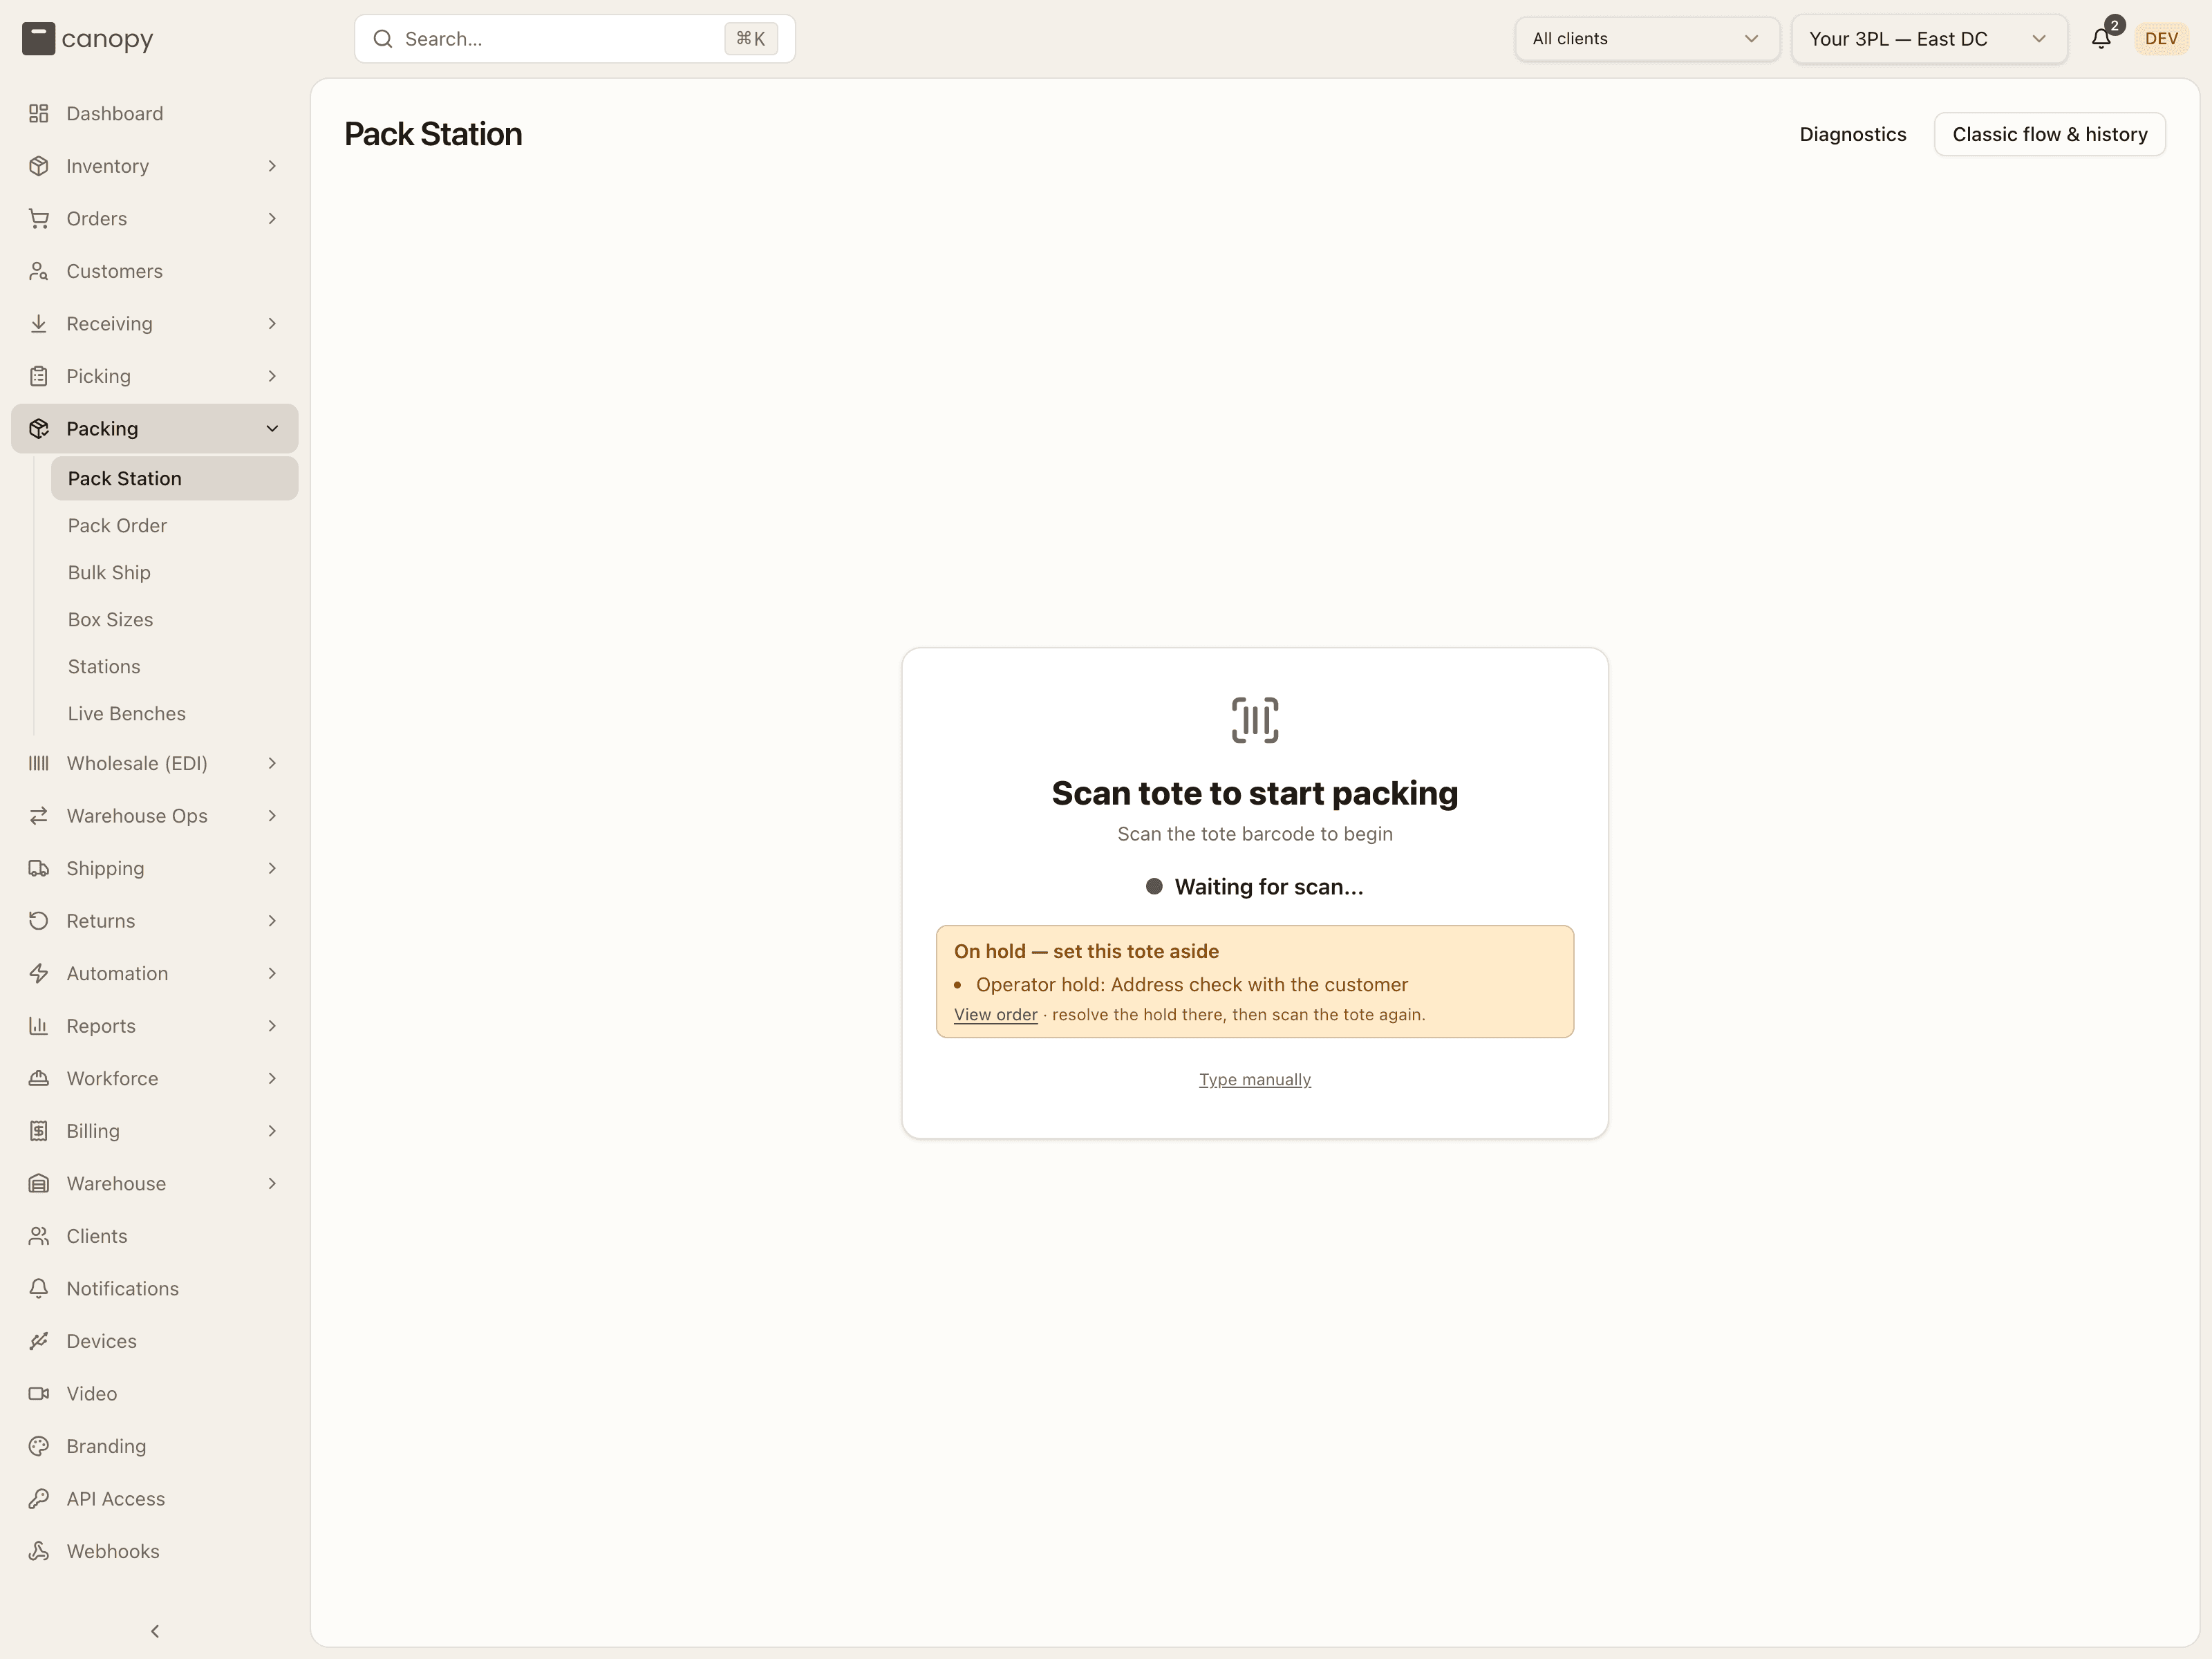
An order on hold is not packed. A hold is a stop put on the order, by a person or by the system (the sales channel, a payment check, an automation rule). The station tells you in one of two ways.
The order was on hold before you scanned. The scan is refused. A yellow card appears under "Waiting for scan...", headed On hold — set this tote aside. It lists each reason the order is held, for example Operator hold: Address check with the customer. Under the reasons, View order opens the order over the station, followed by "resolve the hold there, then scan the tote again." No pack session opens, and the order is left as it was.
The order is put on hold while you are packing it. The station checks the order every ten seconds. Once it sees the hold, the session is replaced by a card headed On hold — set the tote aside. It reads "CC-… was put on hold while you were packing it. Do not buy a label or complete the pack: set the tote aside until the hold is resolved — this card lifts on its own." Under that are the Order (a link that opens it), the Tote and each reason. The scanner goes quiet while the card is up: no scan, from the scanner or typed, reaches the pack. If the hold is resolved while the card is up, the card goes away and you carry on packing.
To move on to other work, press Set aside & scan next tote. The station goes back to the tote scan. The pack session stays open, so once the hold is resolved, scanning the tote again resumes the same session.
The server refuses the work too, in case a scan gets through. On a held order, a verify scan is refused with "Order is on hold (…) — resolve the hold before packing it". The label purchase ends "… before buying its label" and Complete Packing ends "… before completing the pack". If the hold lands while the label is being bought, the new label is voided straight away and no shipment is kept. The classic Pack Order screen has no held cards: its scan shows the same refusal as a plain error line.
Pack Order
Pack Order → /fulfillment/packing. Two tabs: Pack Order, the live
workflow, and History, a record of every pack.
The packing workflow
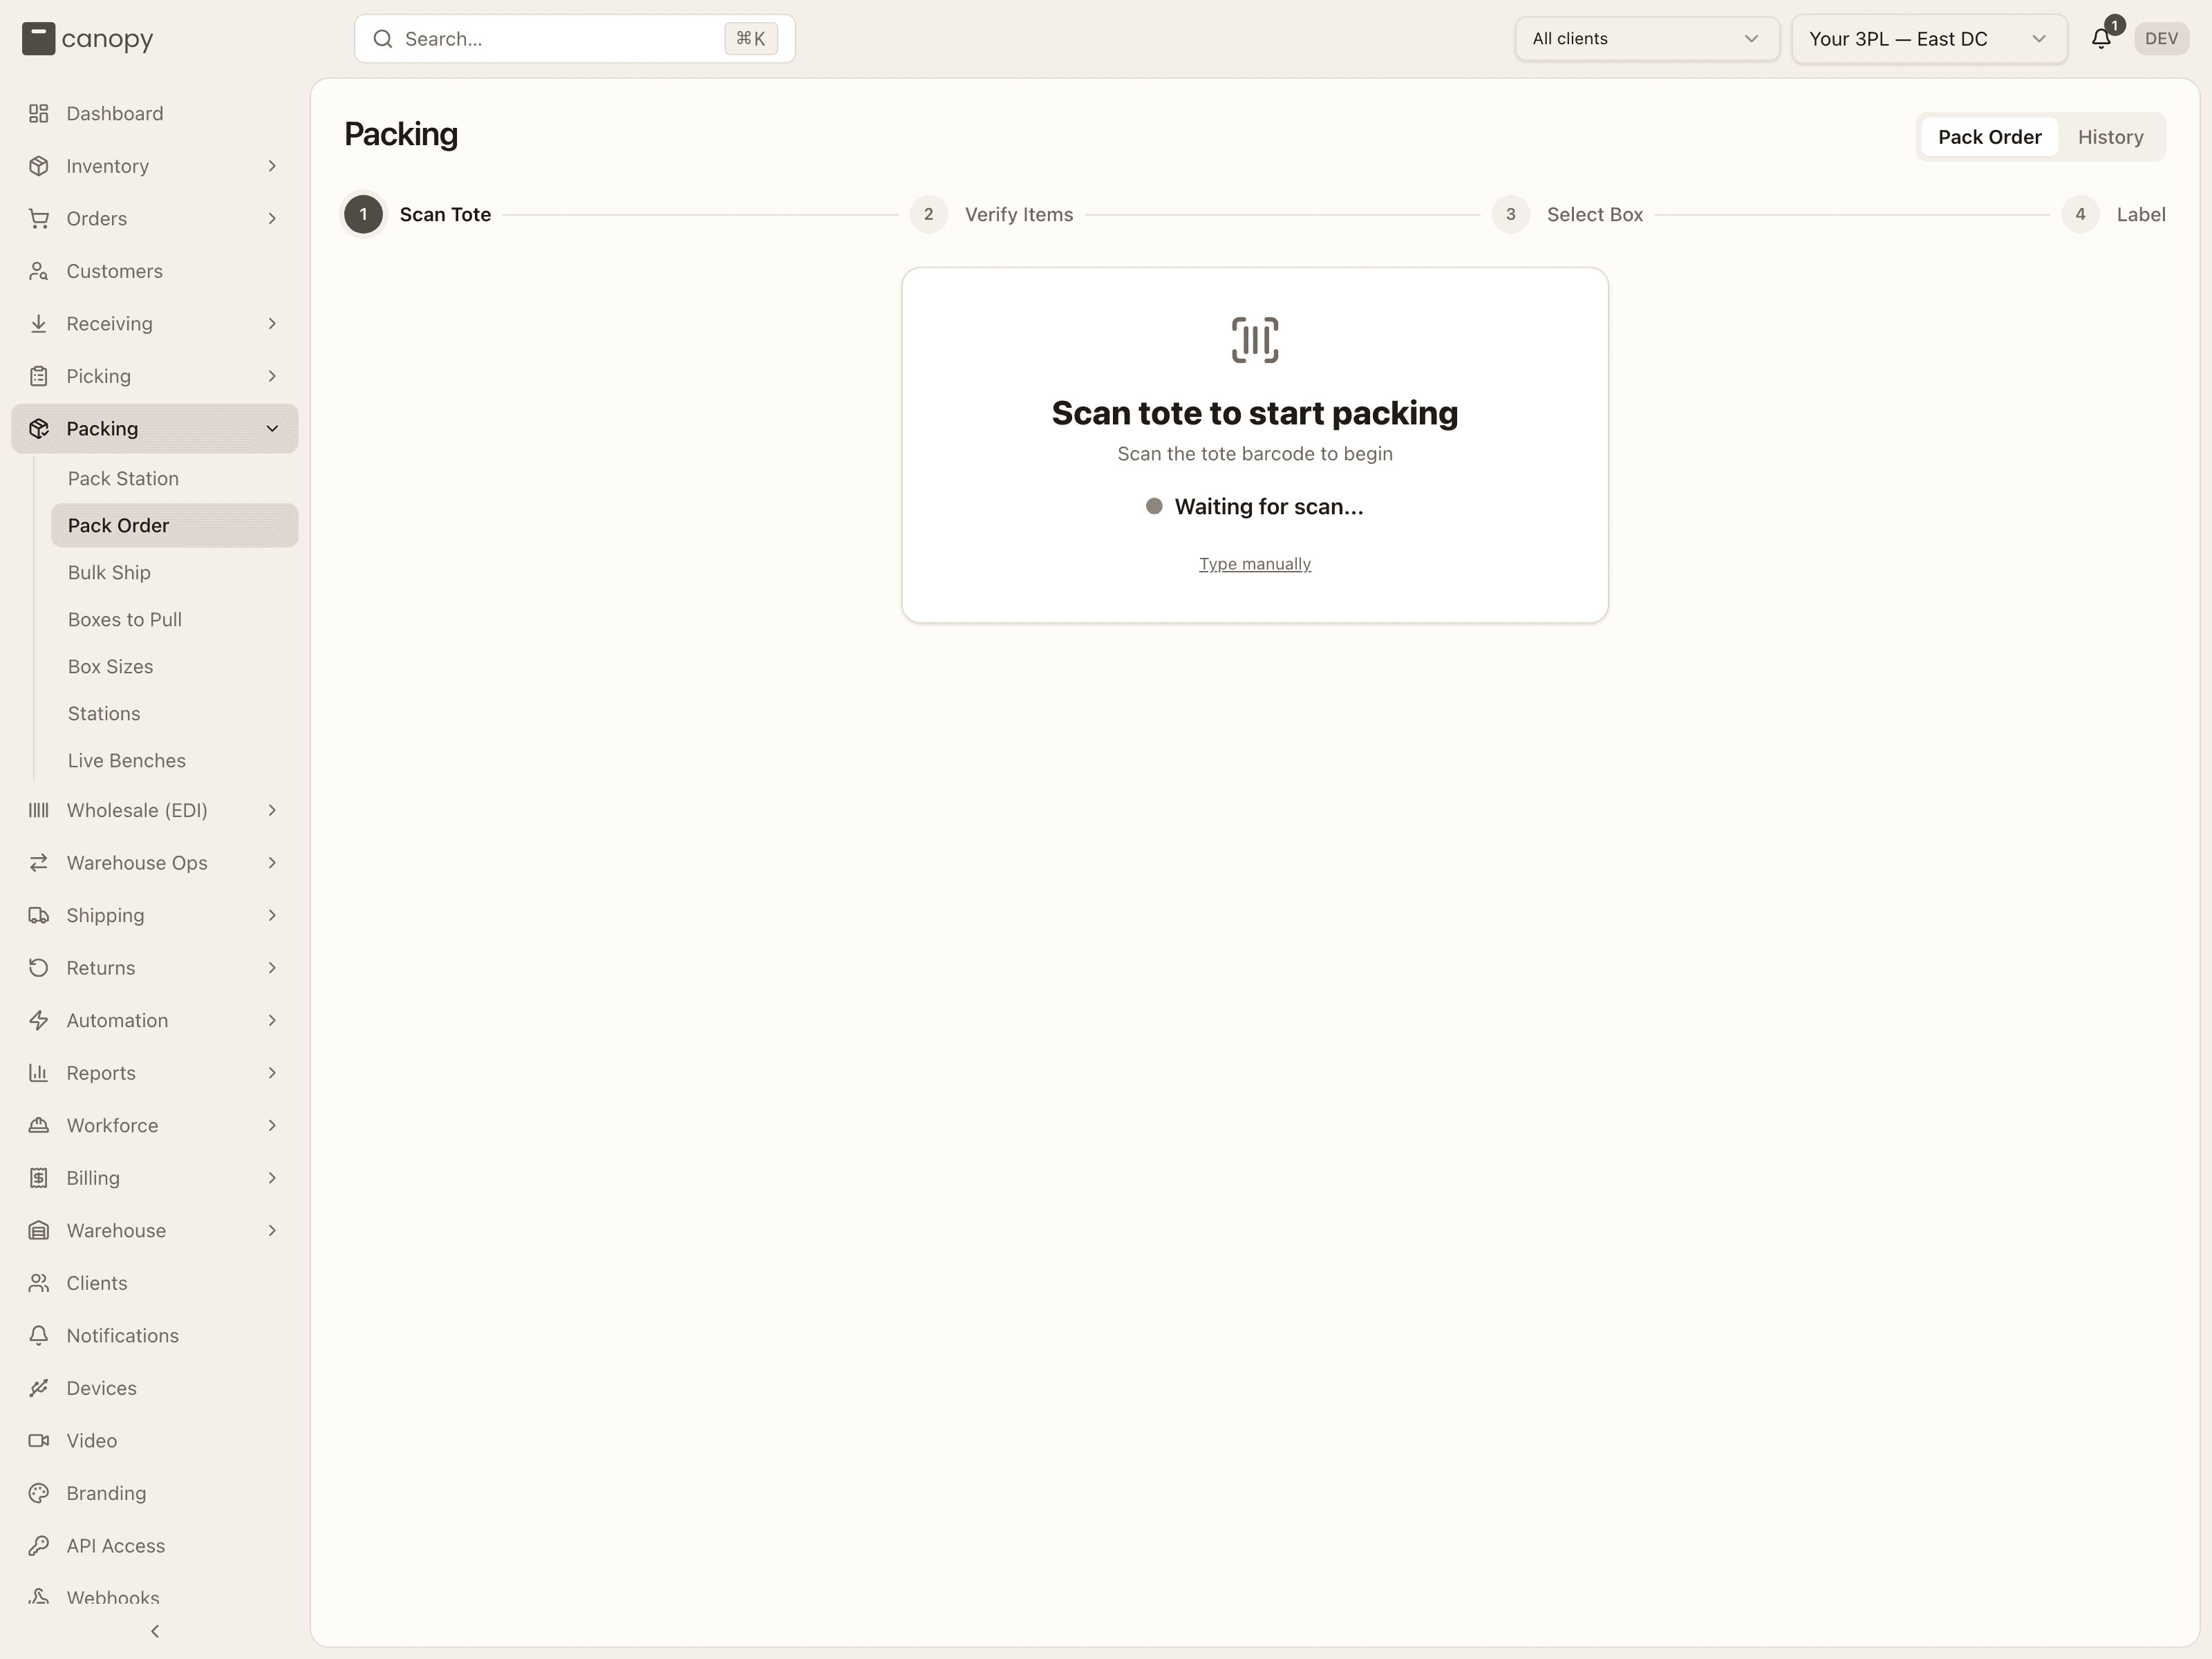
Built for a packing station with a scanner. A stepper across the top tracks where you are, and the workflow moves through four steps.
Scan Tote. Scan the tote barcode to open its pack record and pull up the items to pack. The screen waits on a scan, and Type manually takes a typed barcode. Three cards can intercept the scan instead of opening a session:
- Order Fulfilled Externally — the order was fulfilled somewhere else; the tote is flagged for put-back. Press Acknowledge & Continue and set the tote aside.
- Order Cancelled — same card, with "Give this tote to a supervisor for put-back. Don't empty it yourself."
- Lot Recall — Remove Units Before Packing — a table of what to Pull (quantity, item, lot). Set those units aside and press I've removed these units: they are staged for the quarantine put-back queue and the tote stays in use, so re-scan it to pack the rest. Back to scan (units already handled elsewhere) dismisses the card if the units were already extracted via Short Picks.
A tote of an order in a live Bulk Ship batch is refused at the scan, as on the station: "This order is in Bulk Ship batch … — take the cart to the Bulk Ship bench, or remove the order from the batch to pack it here".
Verify Items. Read the panels above the items first: a Notes for Packer sticky note (the customer's checkout note plus any packer notes, and the gift note called out separately), a Packing Instructions panel (a line and a badge for each packing slip, insert or handling flag the client's Packing automation rules ask for — Print Packing Slip, Add Insert, Add Flag; when several matching rules print a packing slip, only the topmost one's line and badge show, since only that slip prints), and the Shipping Address card with Edit Address — a bad address can be fixed here before you ever reach the label step. Two warnings can appear under them: "Order changed in sales channel — check before shipping" lists each line the merchant added, changed or removed after picking (packing as-is is allowed; if unsure, set the tote aside and check with a lead), and "Set aside — awaiting put-back, do not pack" lists units in this tote that an open put-back task owns — physically remove them.
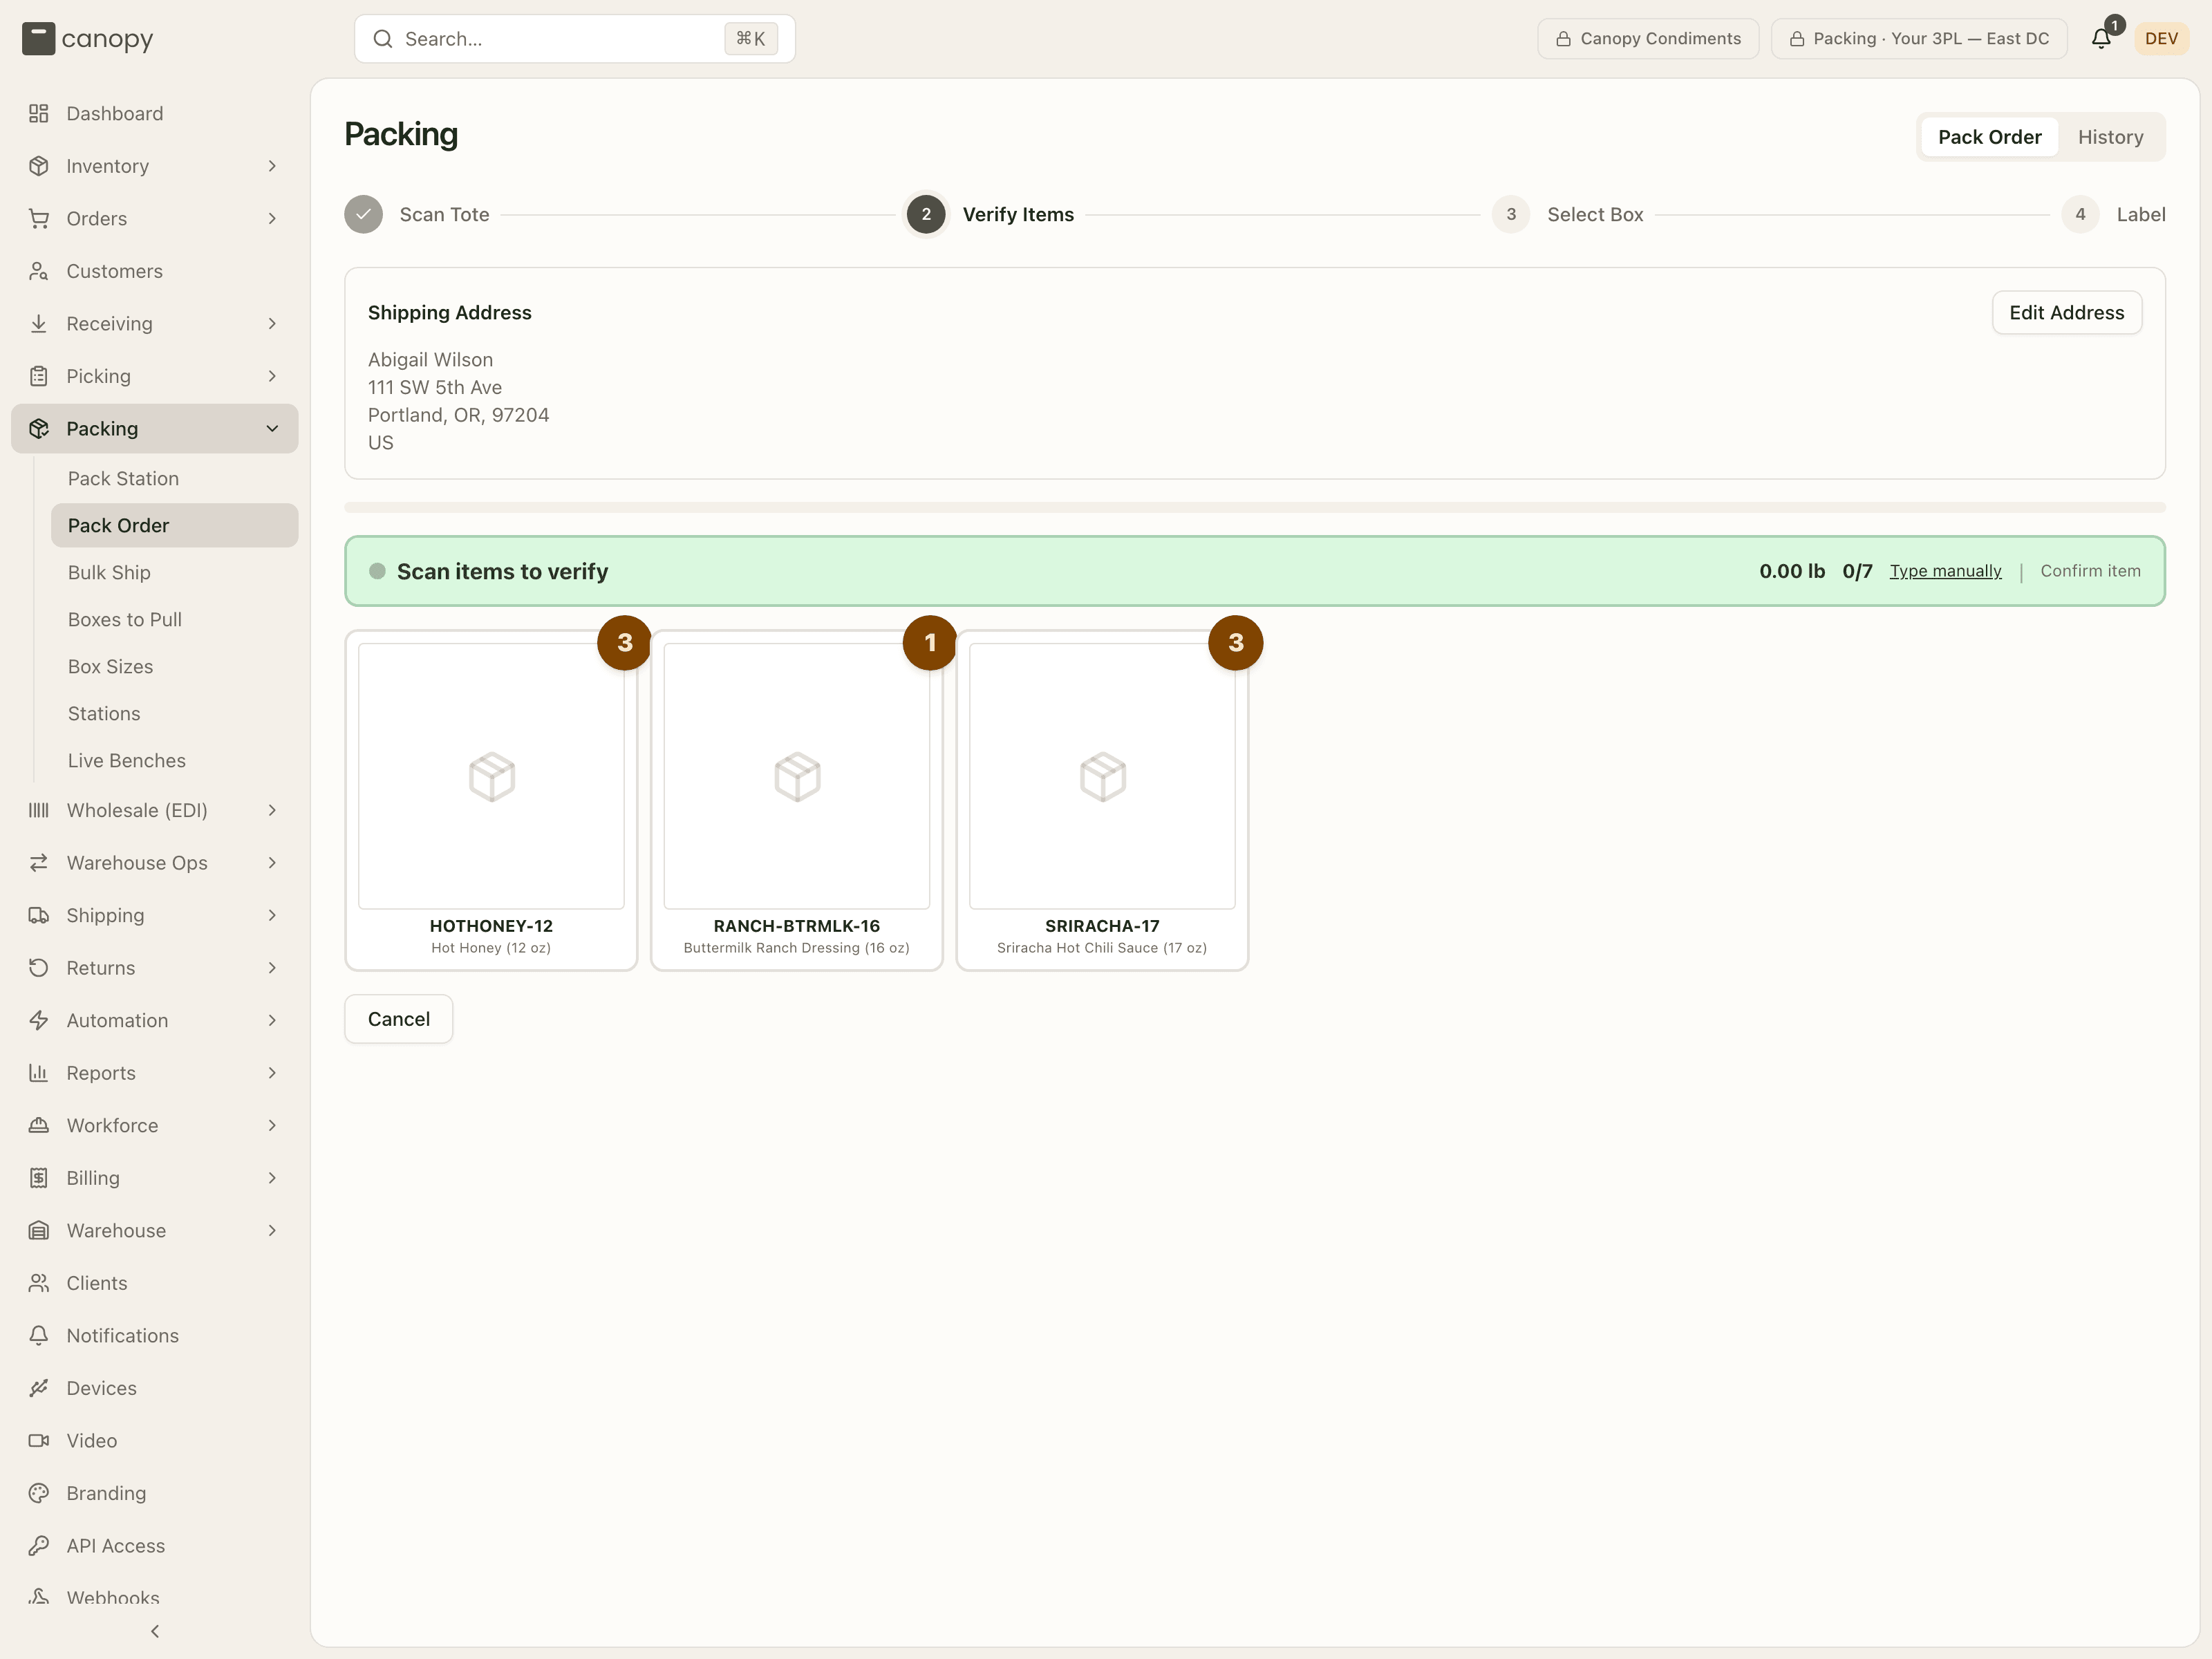
Then scan each item. The green Scan items to verify banner shows the running weight, the verified / total count, Type manually for a barcode that won't scan, and Confirm item, which verifies the next outstanding unit without a barcode. Each SKU is a card with its outstanding count; it turns green with a check when done, and a line declared short at the station shows as a dashed "N short · reason" card. Kit components group under a dashed kit-parent header. Cancel voids the whole pack (it shows as Cancelled in History) — offered until a label is bought, and again on the label step once that label has been voided, under "This pack's label was voided."
The last scan moves you to Select Box on its own. A Continue to Box Selection button only appears if you come Back to this step with nothing left to verify.
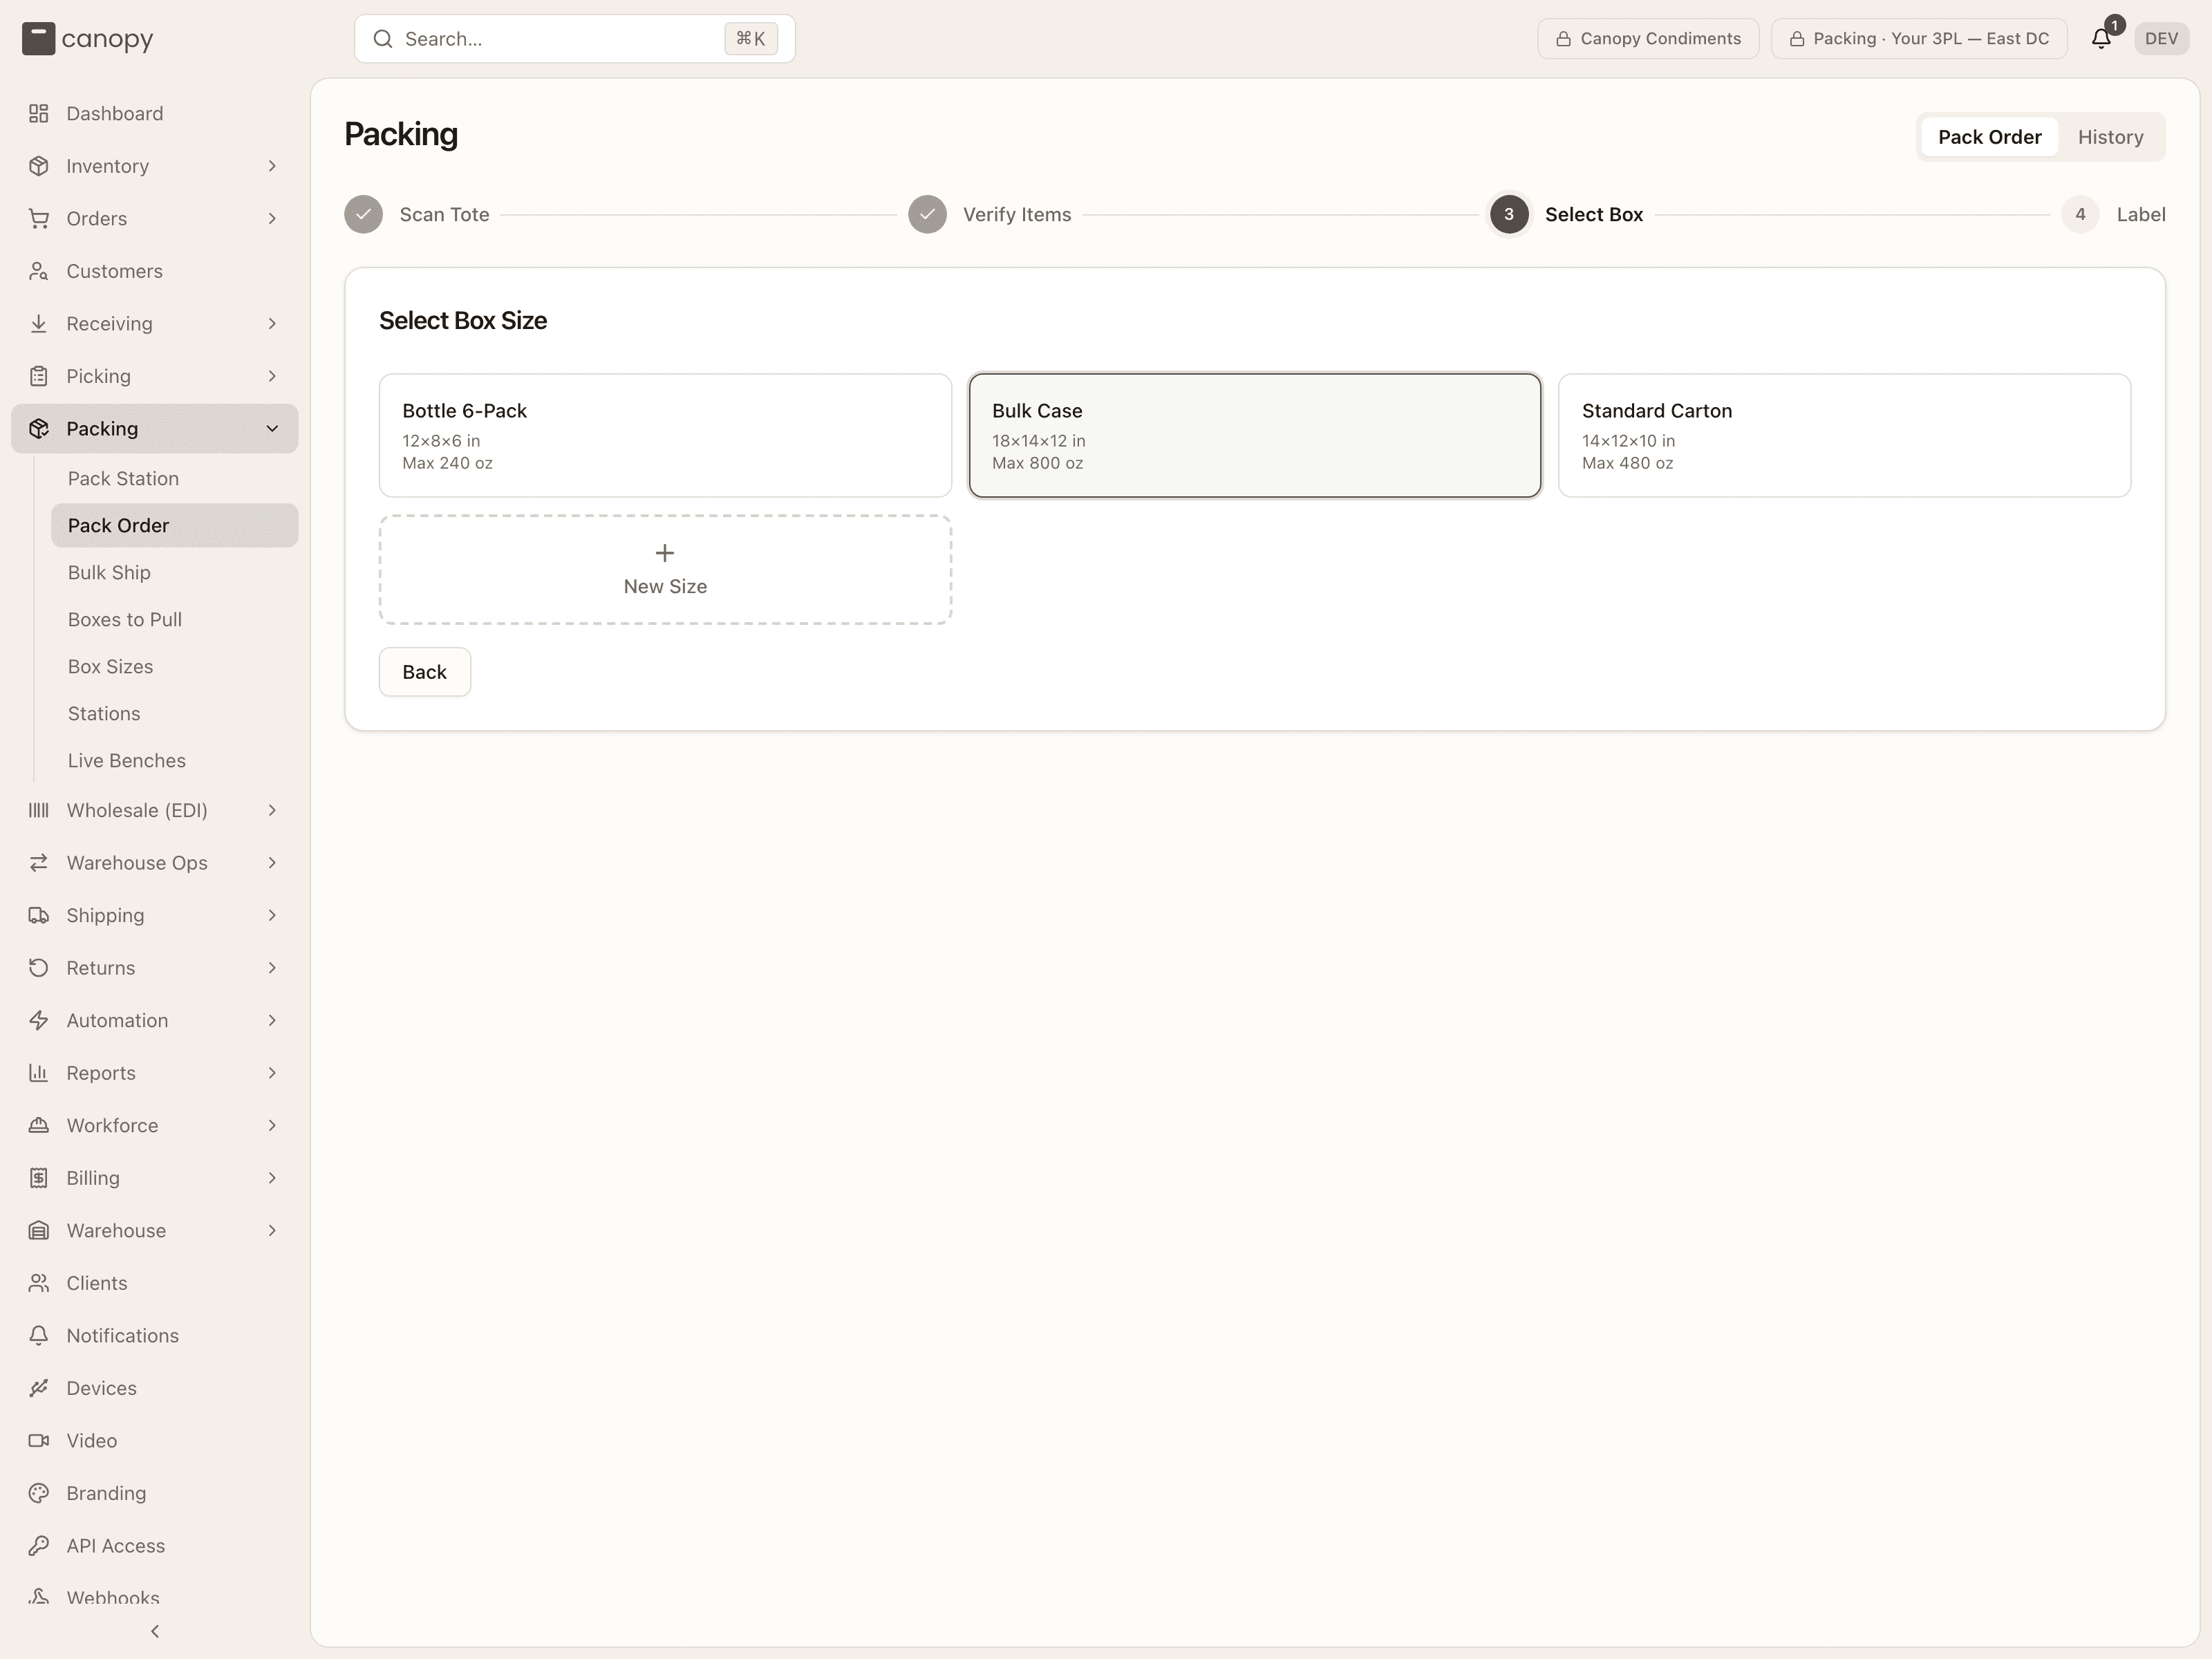
Select Box. Every active box shows its dimensions and max weight, and the one the system pre-selected is already highlighted — chosen by a Packing automation rule, by what this order shape shipped in before, or the smallest box when there is no history. A rule-chosen box also carries a Recommended badge. Tap a box to select it and move on. The dashed New Size tile opens an inline form (name, length, width, height, optional max weight in oz), and with no boxes at all the step reads "No box sizes configured for this client." with a Create Box Size button.
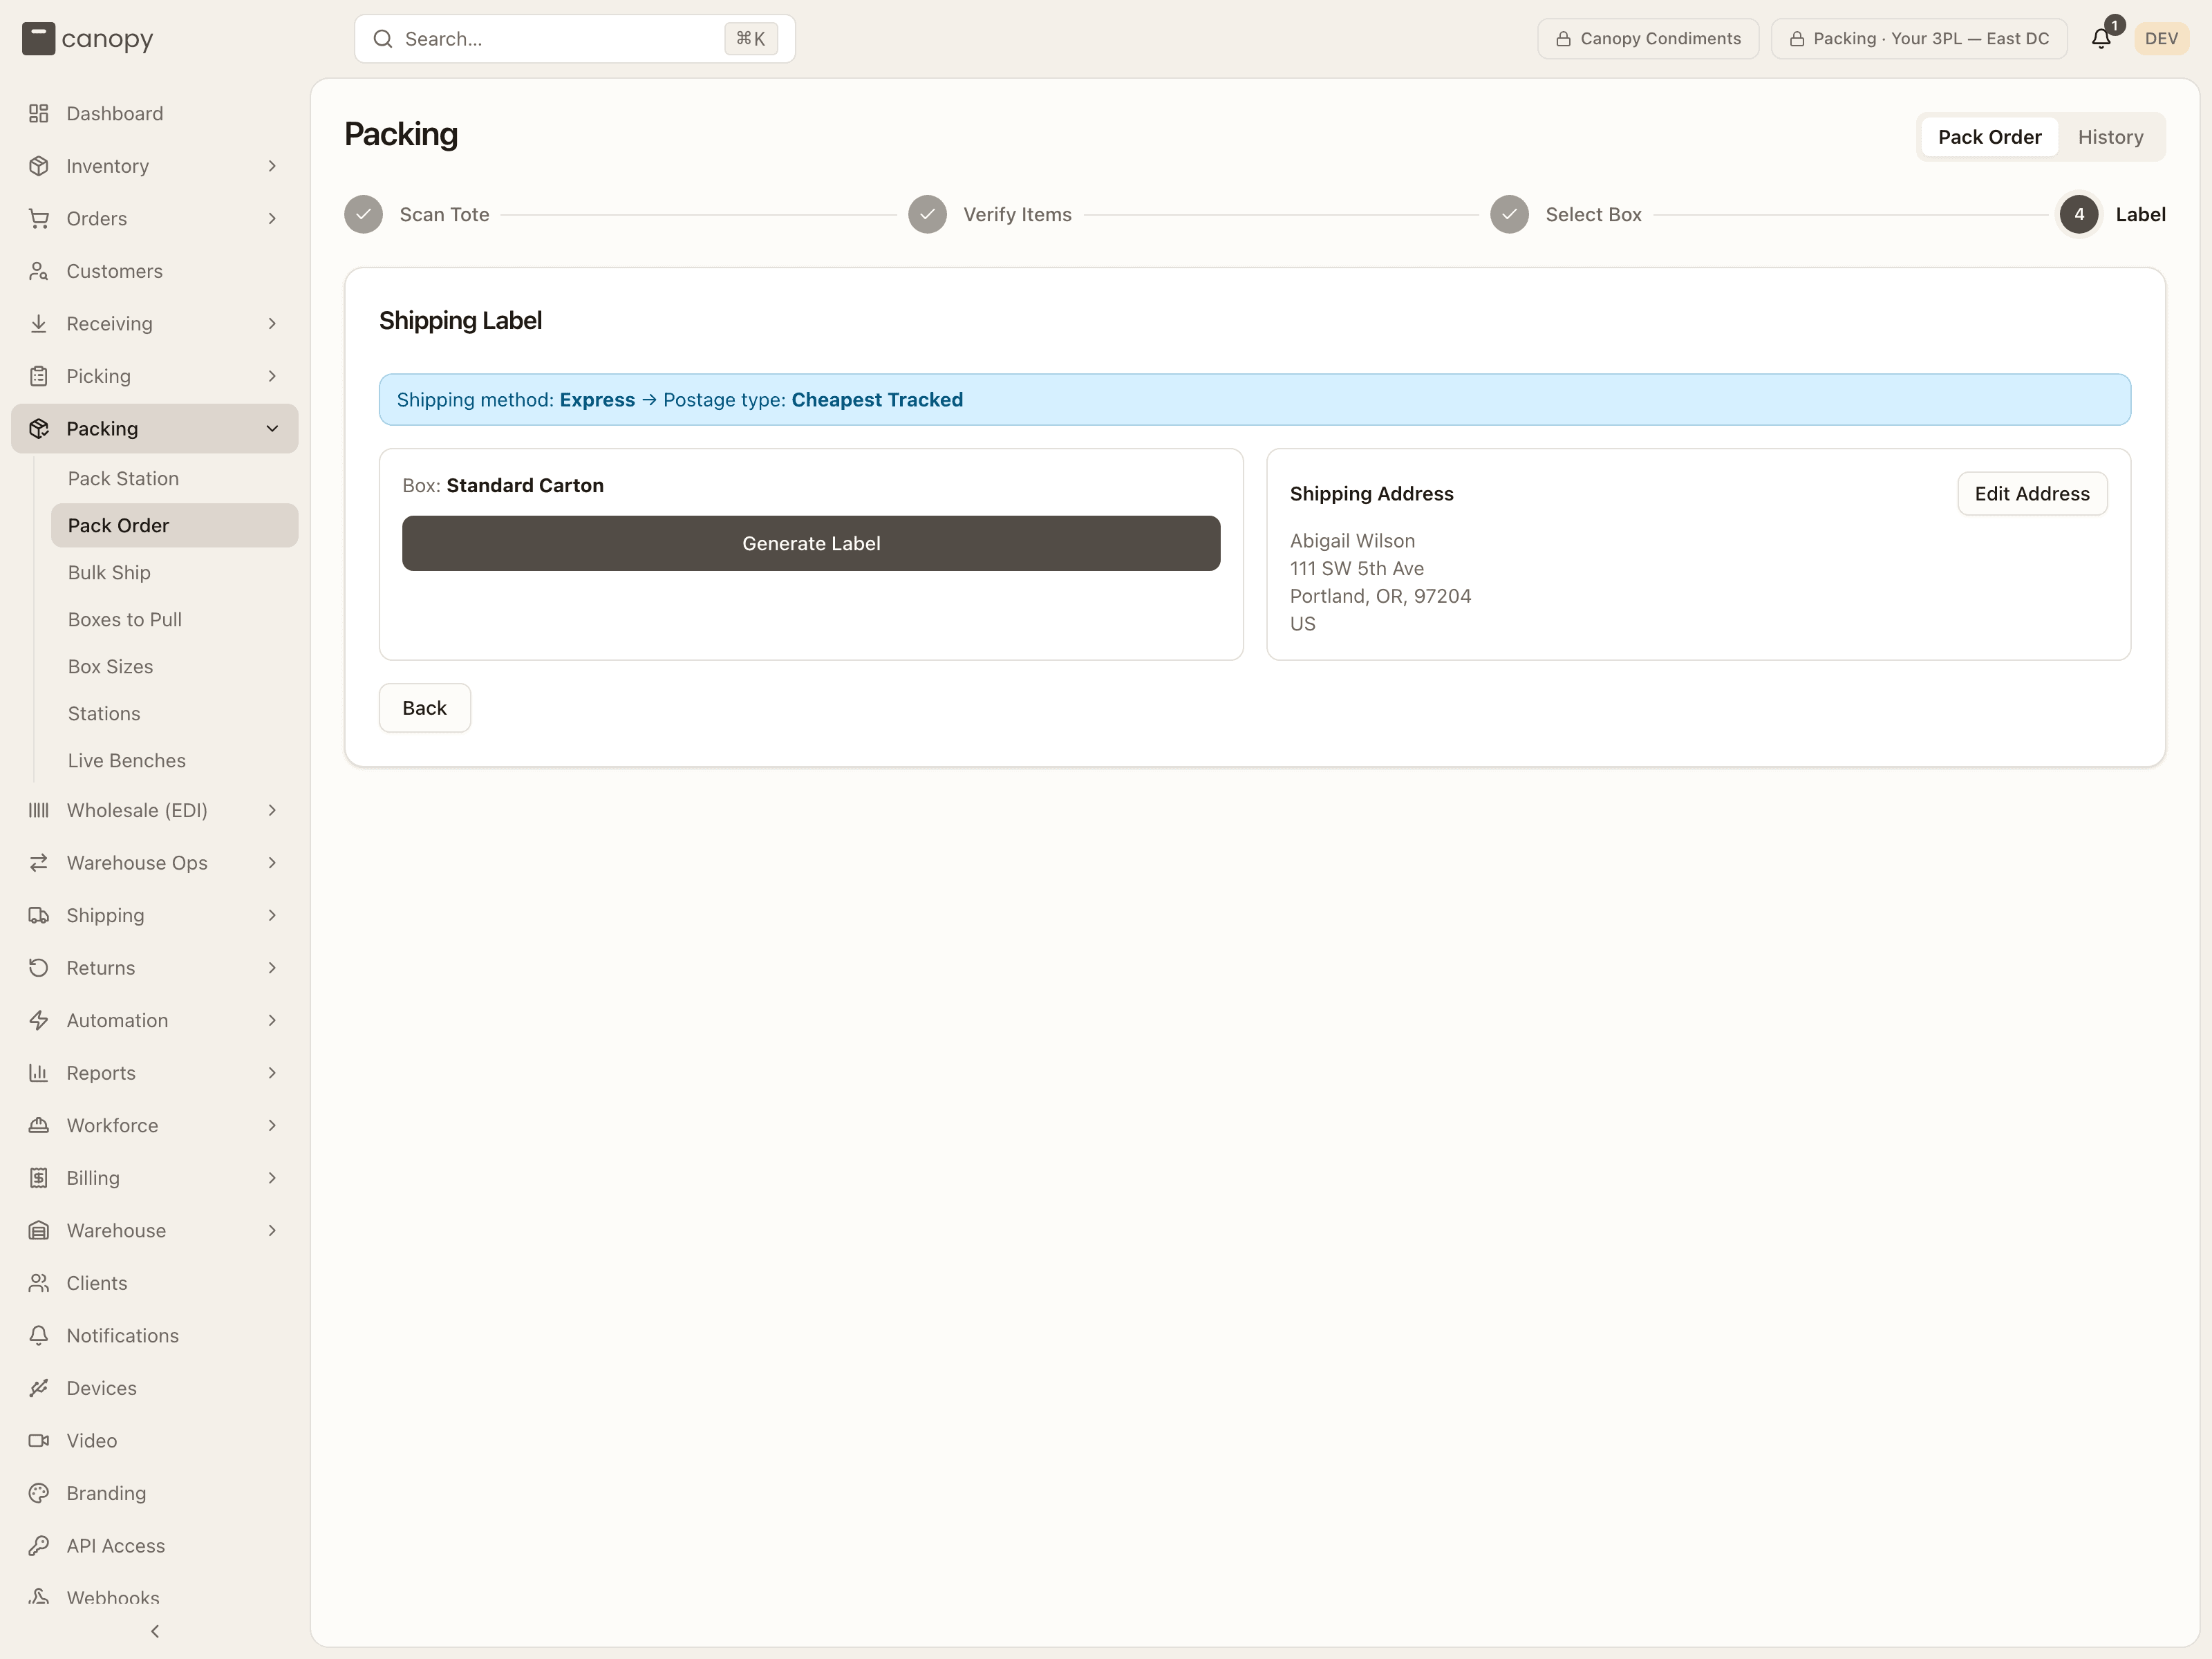
Label. The banner at the top says where the postage came from: Shipping method: X → Postage type: Y from the client's Shipping Mappings, Postage type: Y (manual override), or Postage type: Y (set by automation rule). Below it, the chosen Box, the order's Signature required / Insured to … service options when set, and the Shipping Address with Edit Address (an inline form ending in Save Address).
The step offers Generate Label once the client's carrier accounts and shipping mappings have loaded; until then there is nothing to press, since the saved choice cannot be priced without knowing which account buys it. Press Generate Label. The screen reads Fetching shipping rates... then Generating label..., and lands on Label Generated with the tracking number, postage type and Rate + Tax = Total. The label auto-prints and the button then reads Reprint Label (it stays Print Label if nothing was sent; Fetch & Print Label while the carrier is still rendering the PDF), with Download Label beside it — disabled until the file is there — plus Add charge (billing) and Capture photo. Complete Packing closes the pack; Back returns to Select Box, and choosing a different box after a label was bought voids and re-buys it.
The $100 rate gate applies here too: over the threshold the screen stops on "Estimated shipping cost: $X" with the reason, and you press Generate Label again to confirm — or pick a specific service from the Or choose a carrier & service list. The saved-postage check and the print report described under the station's Address, method and label apply here as well: the saved choice is bought, and its cost estimated, on the carrier account it was saved with (the client's default account when it names none), a postage type that account does not offer is refused before the buy, a service picked from the live list is not re-checked, and each print is counted on the pack record.
History
The History tab is a read-only log of pack records, filterable by status (All Statuses / In Progress / Completed / Cancelled), sortable by any column, and paged (the row count and Rows per page sit under the table).
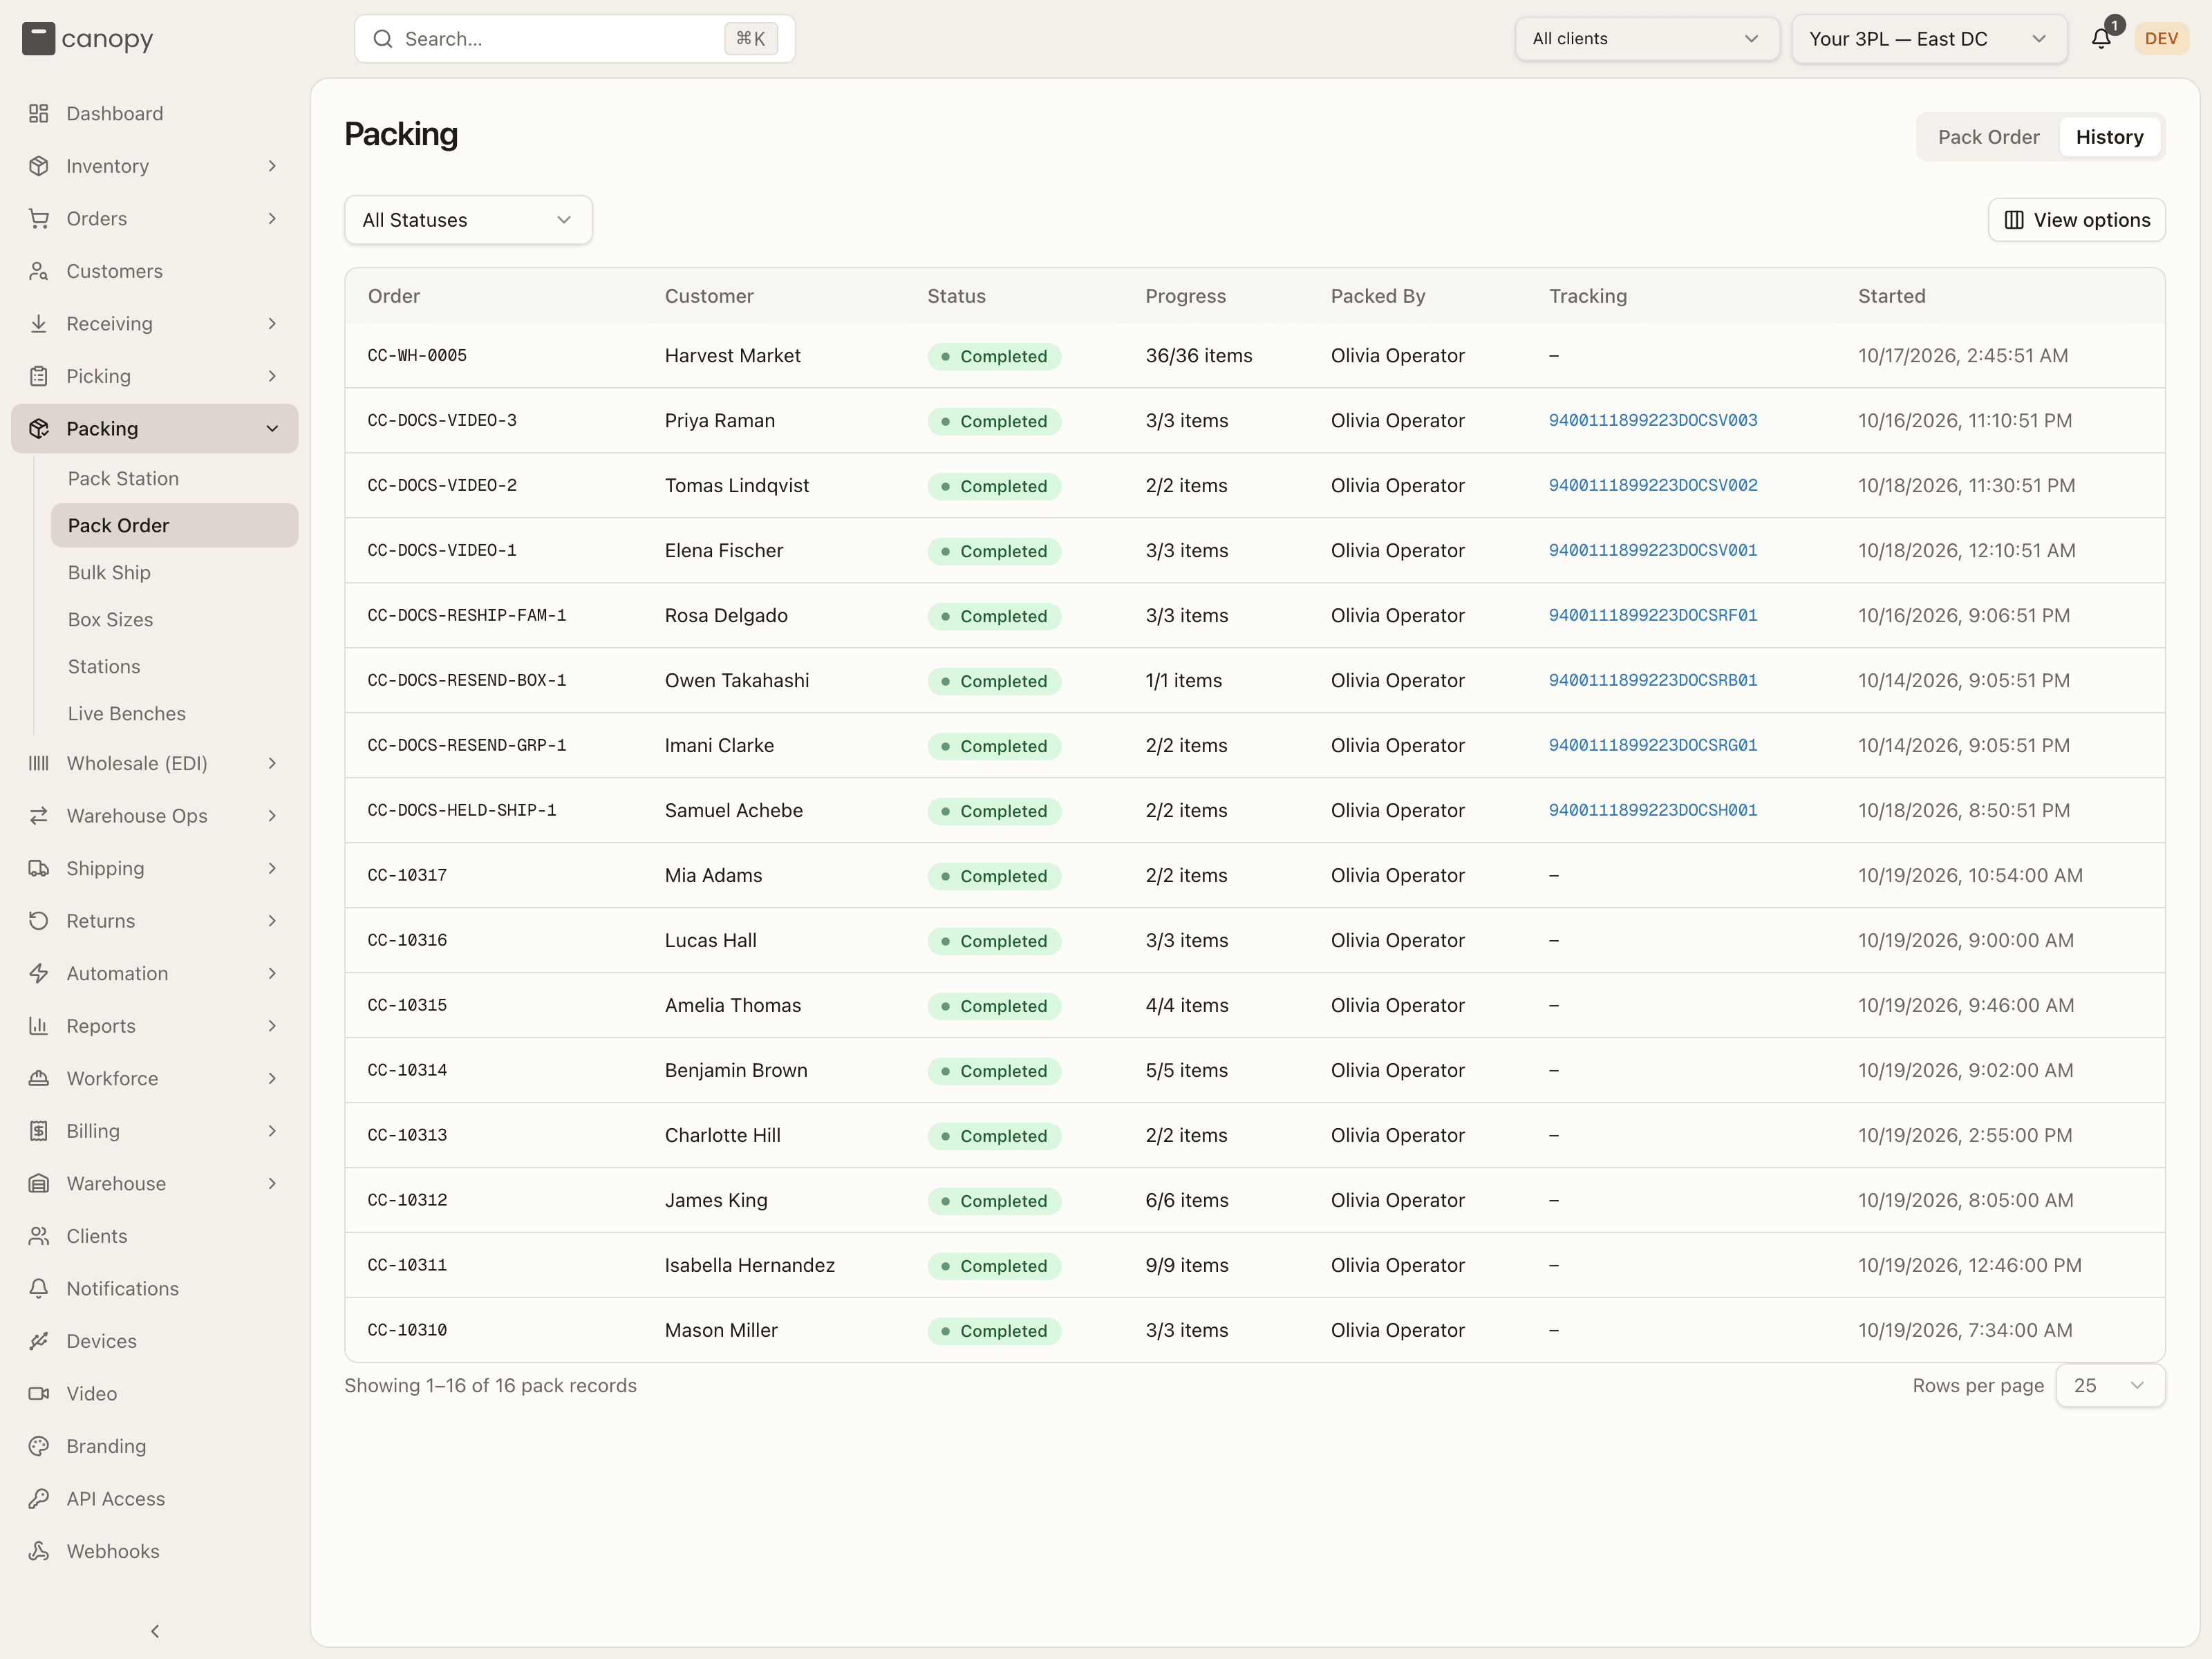
Each row shows the order, customer, status (In Progress, Completed or Cancelled), the item progress (verified / total), who packed it, the tracking number, and when it started.
Box Sizes
Box Sizes → /fulfillment/box-sizes. The catalog of boxes available for
packing, per client. This is what both pack screens read when they pre-select a
box.
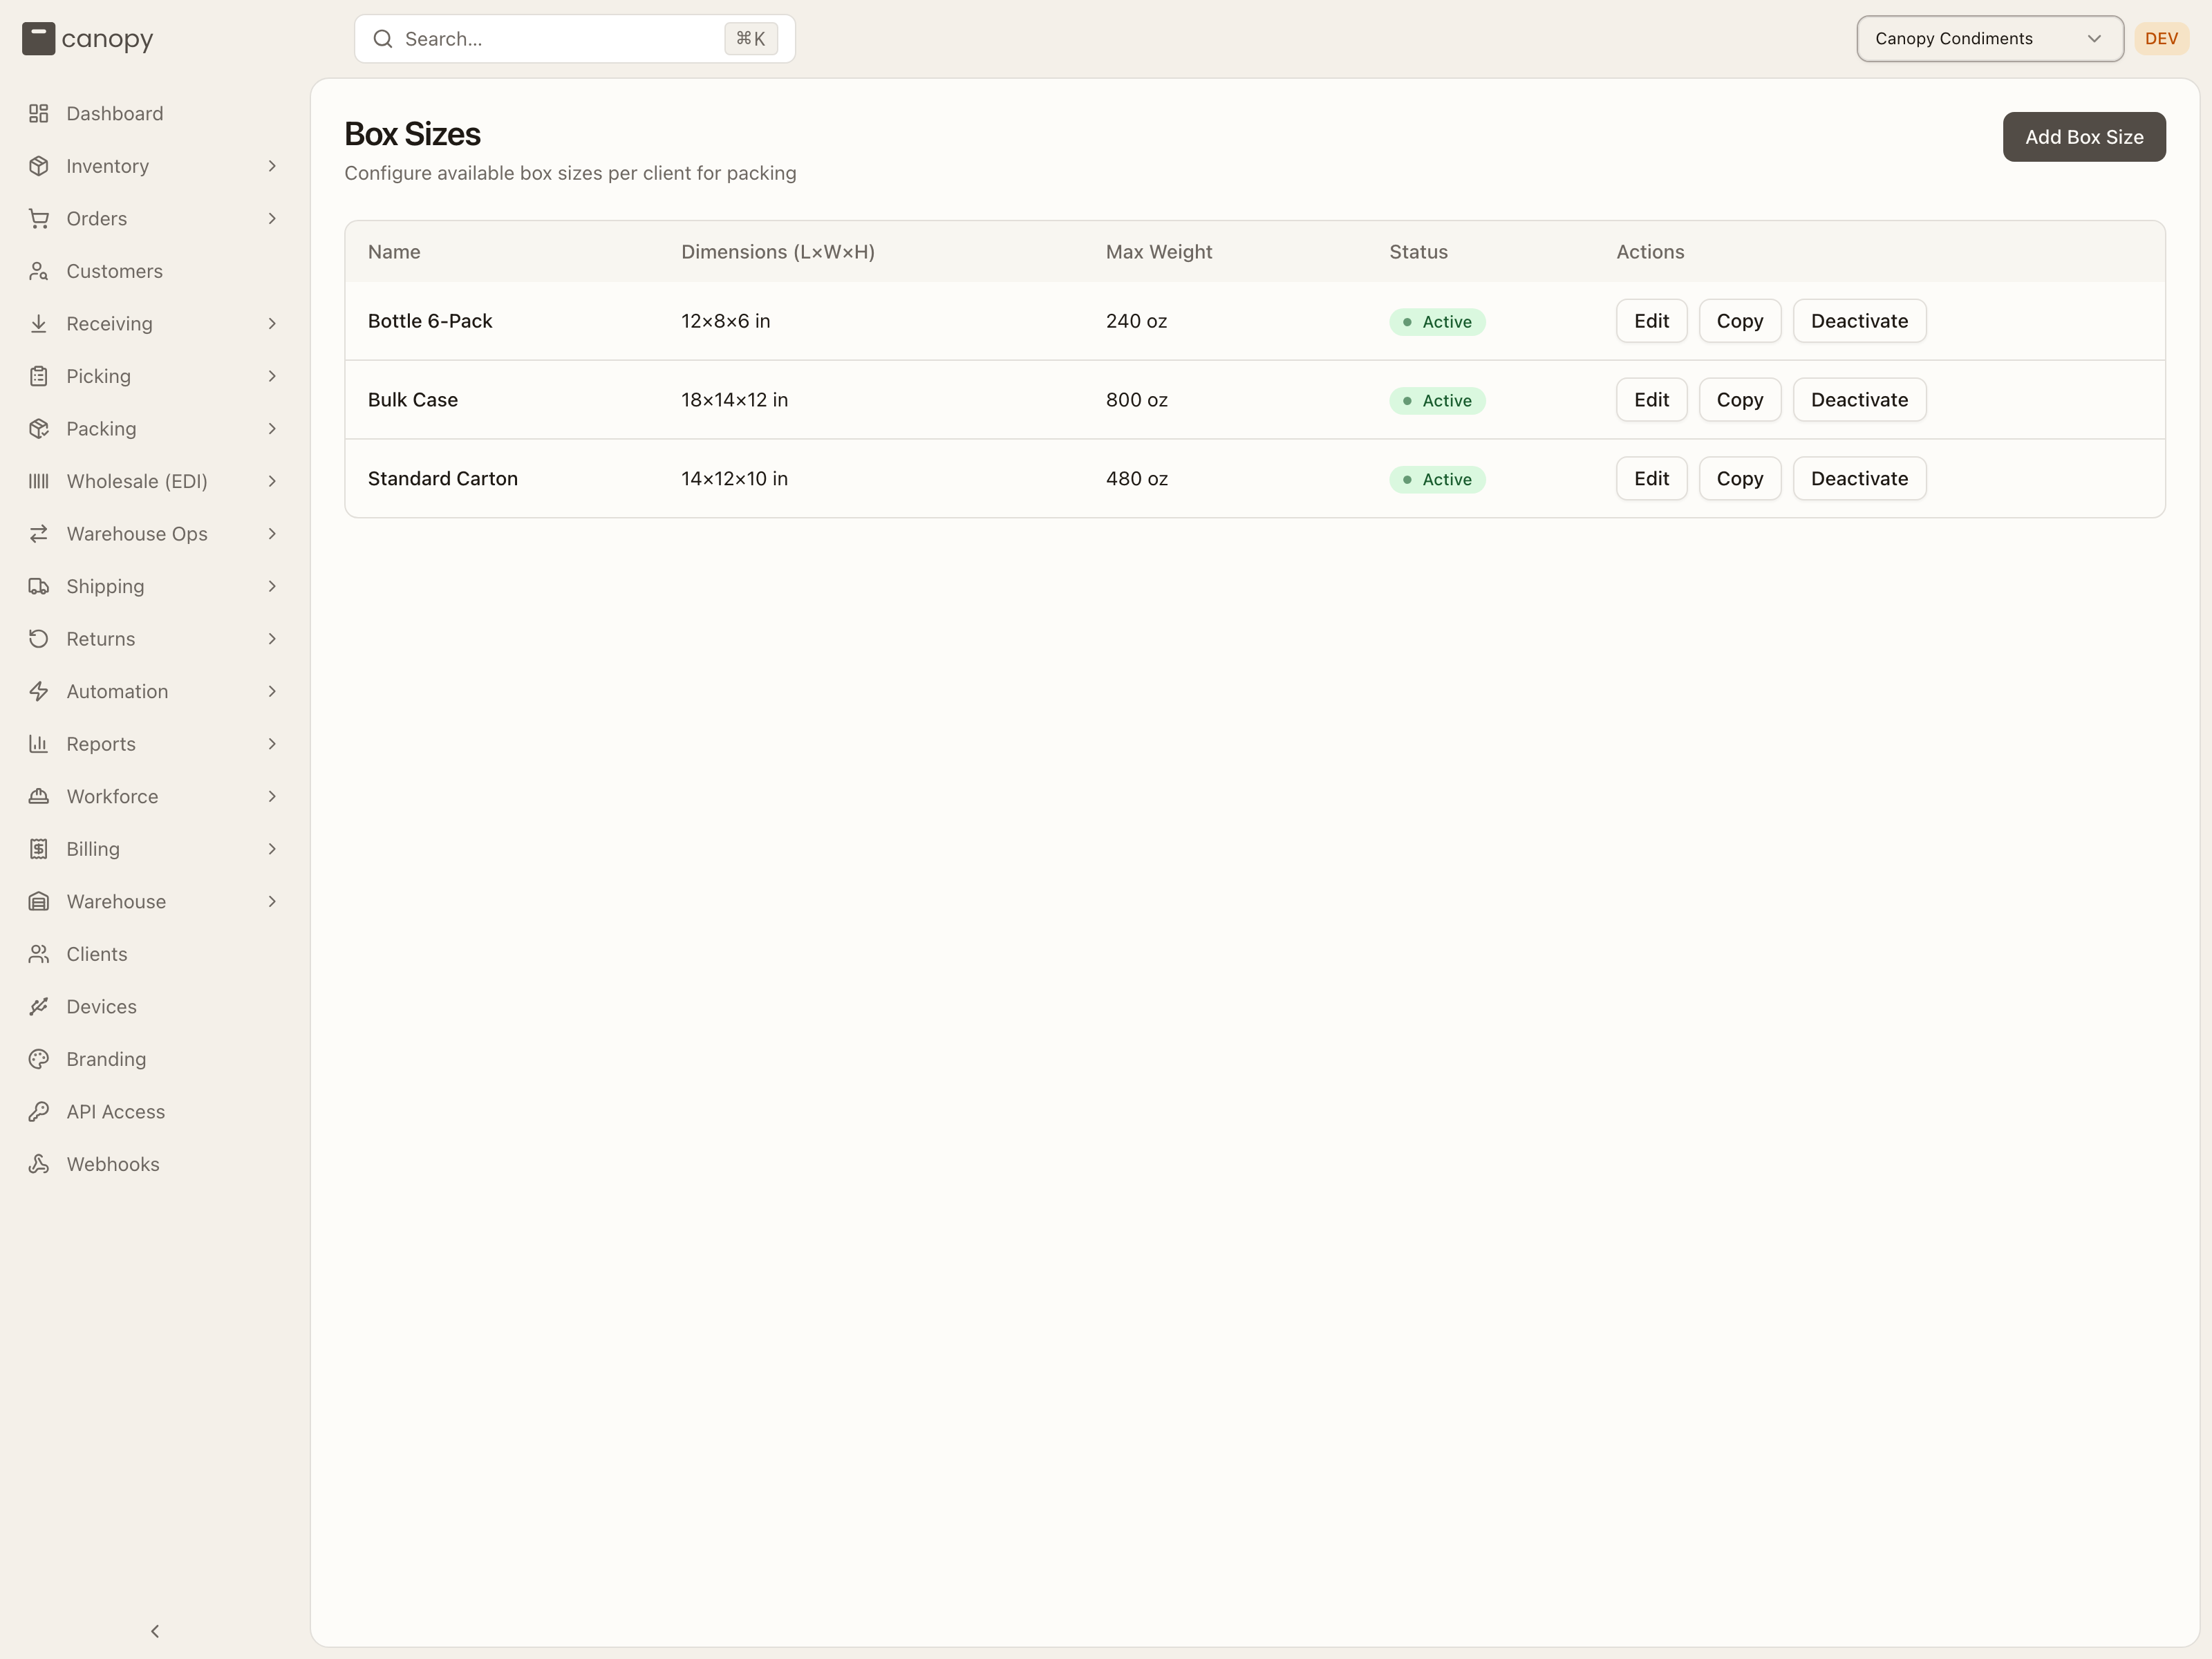
Each box has a name, its dimensions (length × width × height, in inches), an optional max weight (in oz), and an active/inactive status. Add Box Size creates one for the pinned client. Existing boxes can be edited, copied (handy for cloning to another client), or deactivated. Viewing all clients at once groups the boxes by client.
Packing Stations
Stations → /fulfillment/packing-stations. The physical stations where
orders get packed, and the printer wired to each one.
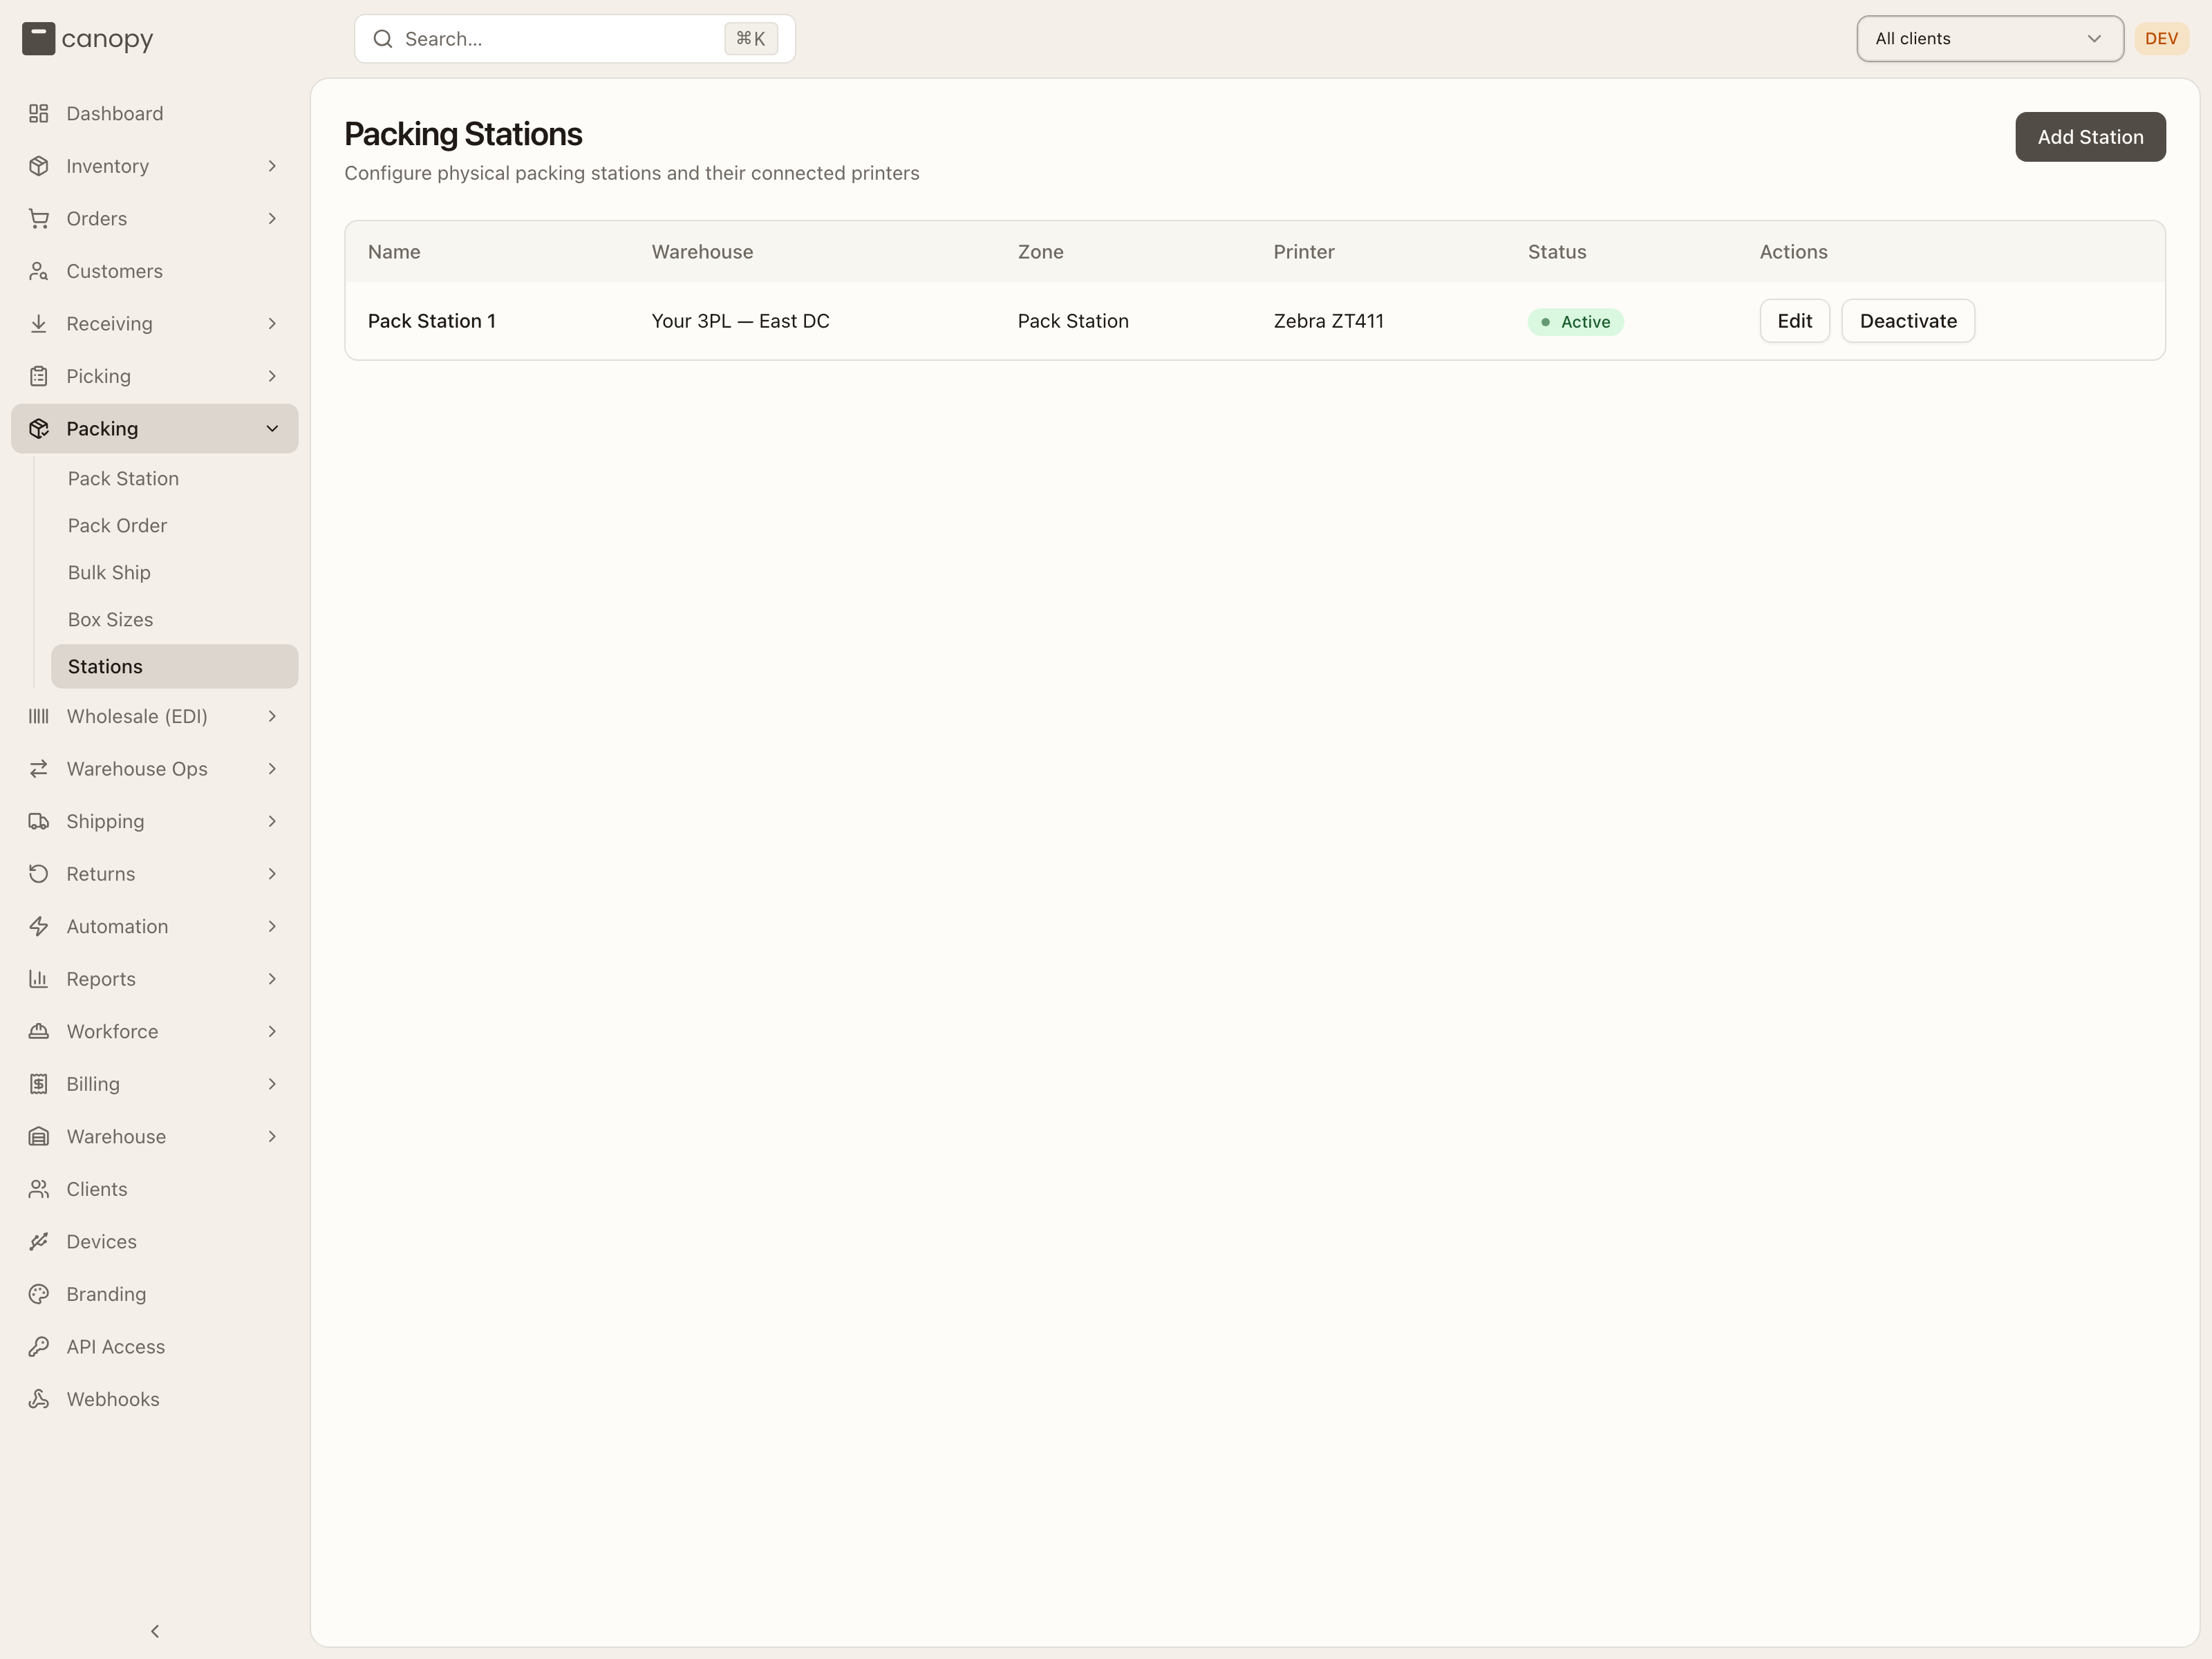
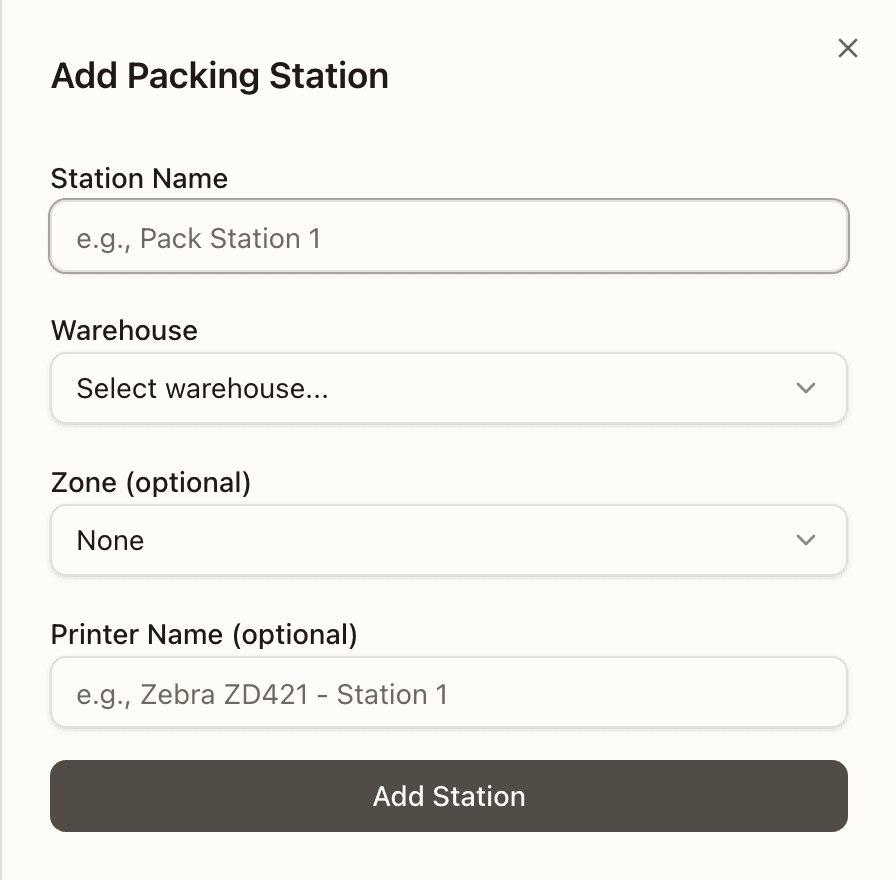
Each station lists its name, warehouse, zone, and printer (or "Not configured" if none is wired up yet), along with an active/inactive status. Add Station creates one; existing stations can be edited or deactivated.
Bulk Ship
Bulk Ship → /fulfillment/bulk-ship. A faster path when many orders are
identical. The system groups allocated orders — and Replenish orders, which
can draw on sellable overstock here where normal picking would wait for a
replenishment — that share the exact same SKU composition within one
warehouse, so you pick, pack and label them together instead of one at a
time. The same composition in two warehouses is listed as
two separate batches — a batch is always picked from a single building — and a
composition with only one order is still listed, for teams that prefer the
bulk-ship flow even for a single order. An order in a live re-send cycle — an
open reship, or a repick whose replacement label was voided before its pack
completed — is never suggested; it batches again once the reship is cancelled
or its replacement has gone out. Neither is an order already in a live batch,
whatever its status: a batch sent to the floor keeps its orders Allocated
until a cart takes them, and they are its until it completes or cancels.
A batch is picked one of two ways. On its own page, scanning each SKU's units once for the whole batch (Pick items, below), or on the floor as ordinary pick lists after Send to Picking: pickers take it a cart at a time from Active Pick → Bulk Ship, one tote per order, and the batch moves on to packing when its last order is picked. Everything after picking, the plan, the labels and the completion, is the same on both.
Two tabs: Batches, the batches suggested or under way, and History, every batch that has finished. While a session is open the header swaps the tabs for a Back to Groups link. For the job step by step, see Run a bulk ship session.
Batches
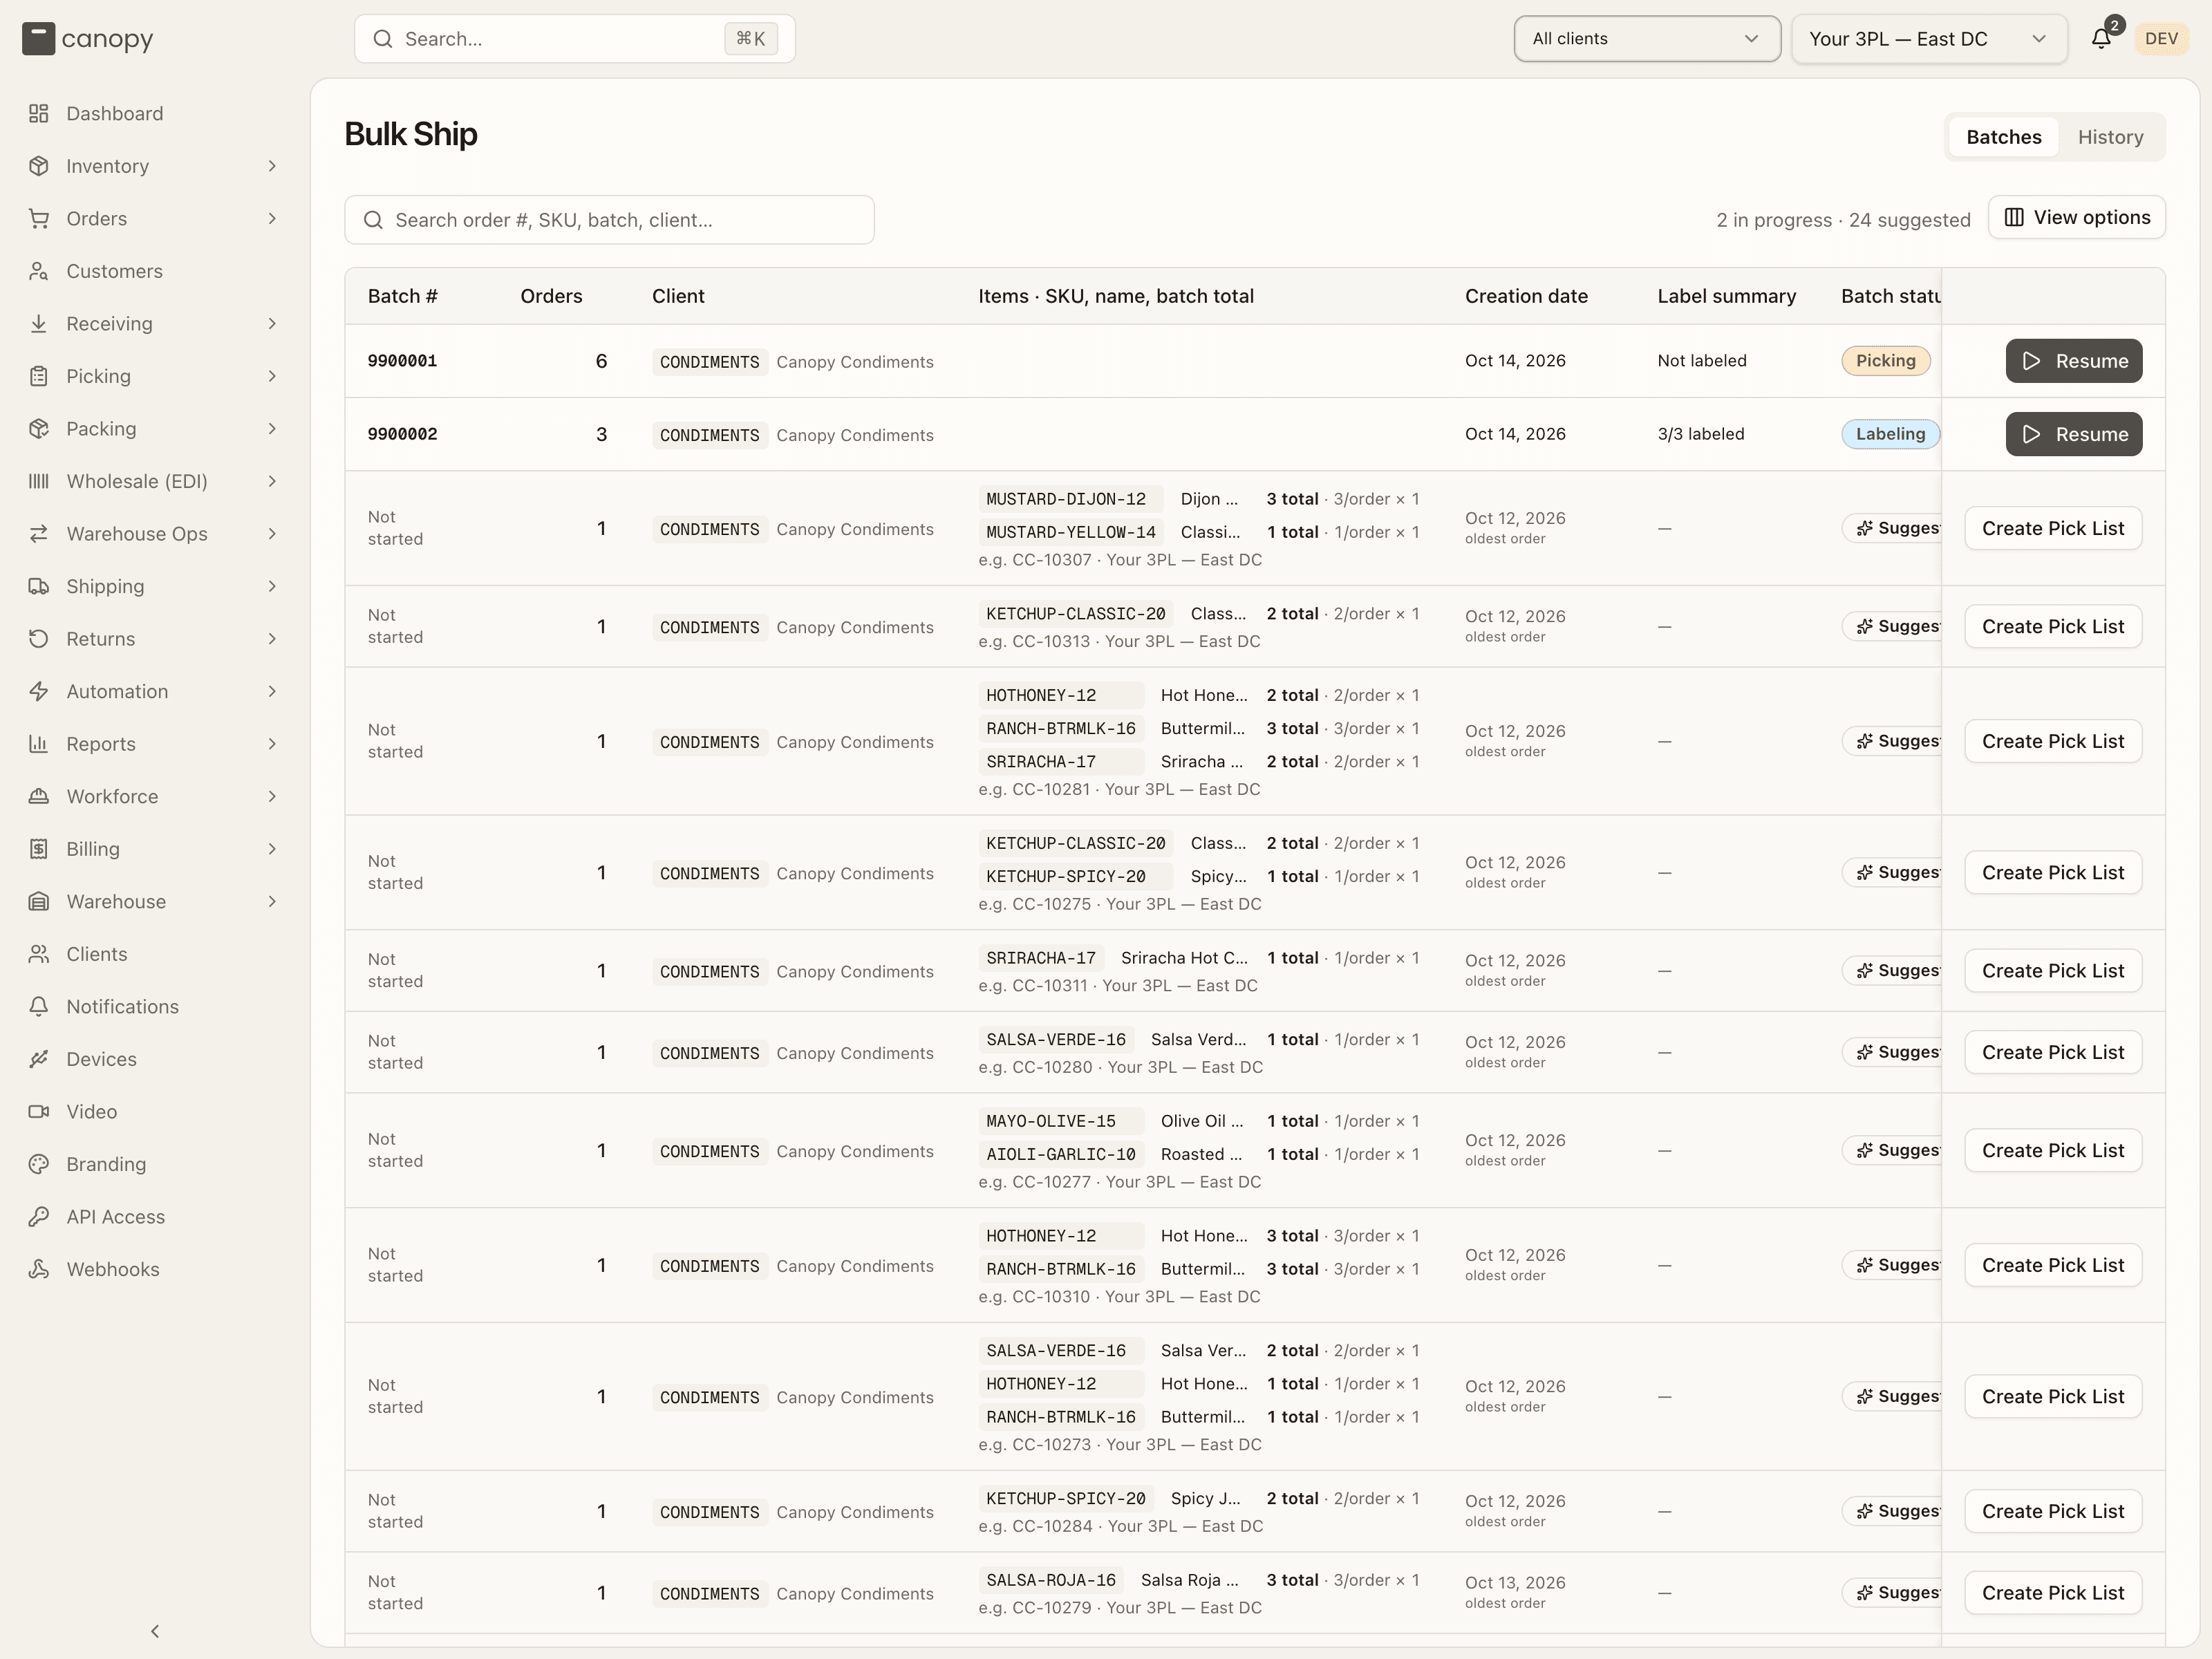
The table lists batches in progress first — that is committed work — then the
suggestions. Columns: Batch # ("Not started" for a suggestion), Orders,
Client, Items · SKU, name, batch total (one line per SKU with the
per-order count and the batch total; a Kit badge marks a composition with a
kit parent; a suggestion also names an example order and its warehouse, e.g.
CC-10197 · Your 3PL — East DC), Creation date (the session's start, or the
oldest order in a suggestion), Label summary ("Not labeled" or "N/M
labeled"), and Batch status — Picking, Packing or Labeling for
a session, Suggested for a group. A suggestion also flags its special
members: N Replenish (orders that can use sellable overstock in Bulk Ship;
normal picking would need a replenishment first) and N Partial
(backordered orders admitted as
partial shipments:
they ship this composition now and the rest stays backordered) and N Reship
(orders shipping a reship's re-send: "units these orders already shipped
once, going out again. Free unless the client asked for the re-send."). The Orders
and Creation date columns sort. The action column is pinned to the table's
right edge, so Create Pick List and Resume stay on screen on a narrow window
rather than sitting behind the table's sideways scroll. A session row ends in Resume — a
link, so a modifier or middle click opens the session in a new tab, and its
address (?session=…) survives a refresh and the browser's Back; a
suggestion in Create Pick List ("Creating..." while it runs), which
starts the batch's session, picked on its own page until you send it to the
floor, and opens it in a new tab on a modifier or middle click too. Starting a group with too little loose stock
fails with "Not enough loose stock to cover this group"; the detail under it
names the SKU and the shortfall — or, when the units sit in a bin a picker
reported short (an unresolved picking discrepancy), that bin: "N loose
unit(s) sit in … but are held back by an unresolved picking discrepancy — a
picker reported the bin short. Cycle count the bin, or resolve the
discrepancy, to release them."
The search box ("Search order #, SKU, batch, client…") matches any order in a group (not just the example shown), SKU code or name, batch number, warehouse or client. Suggestions are paged; with nothing to show the tab reads "No bulk ship batches — Allocated and Replenish orders are grouped by exact SKU composition.", and a search that matches nothing offers Clear search.
A bulk-ship session
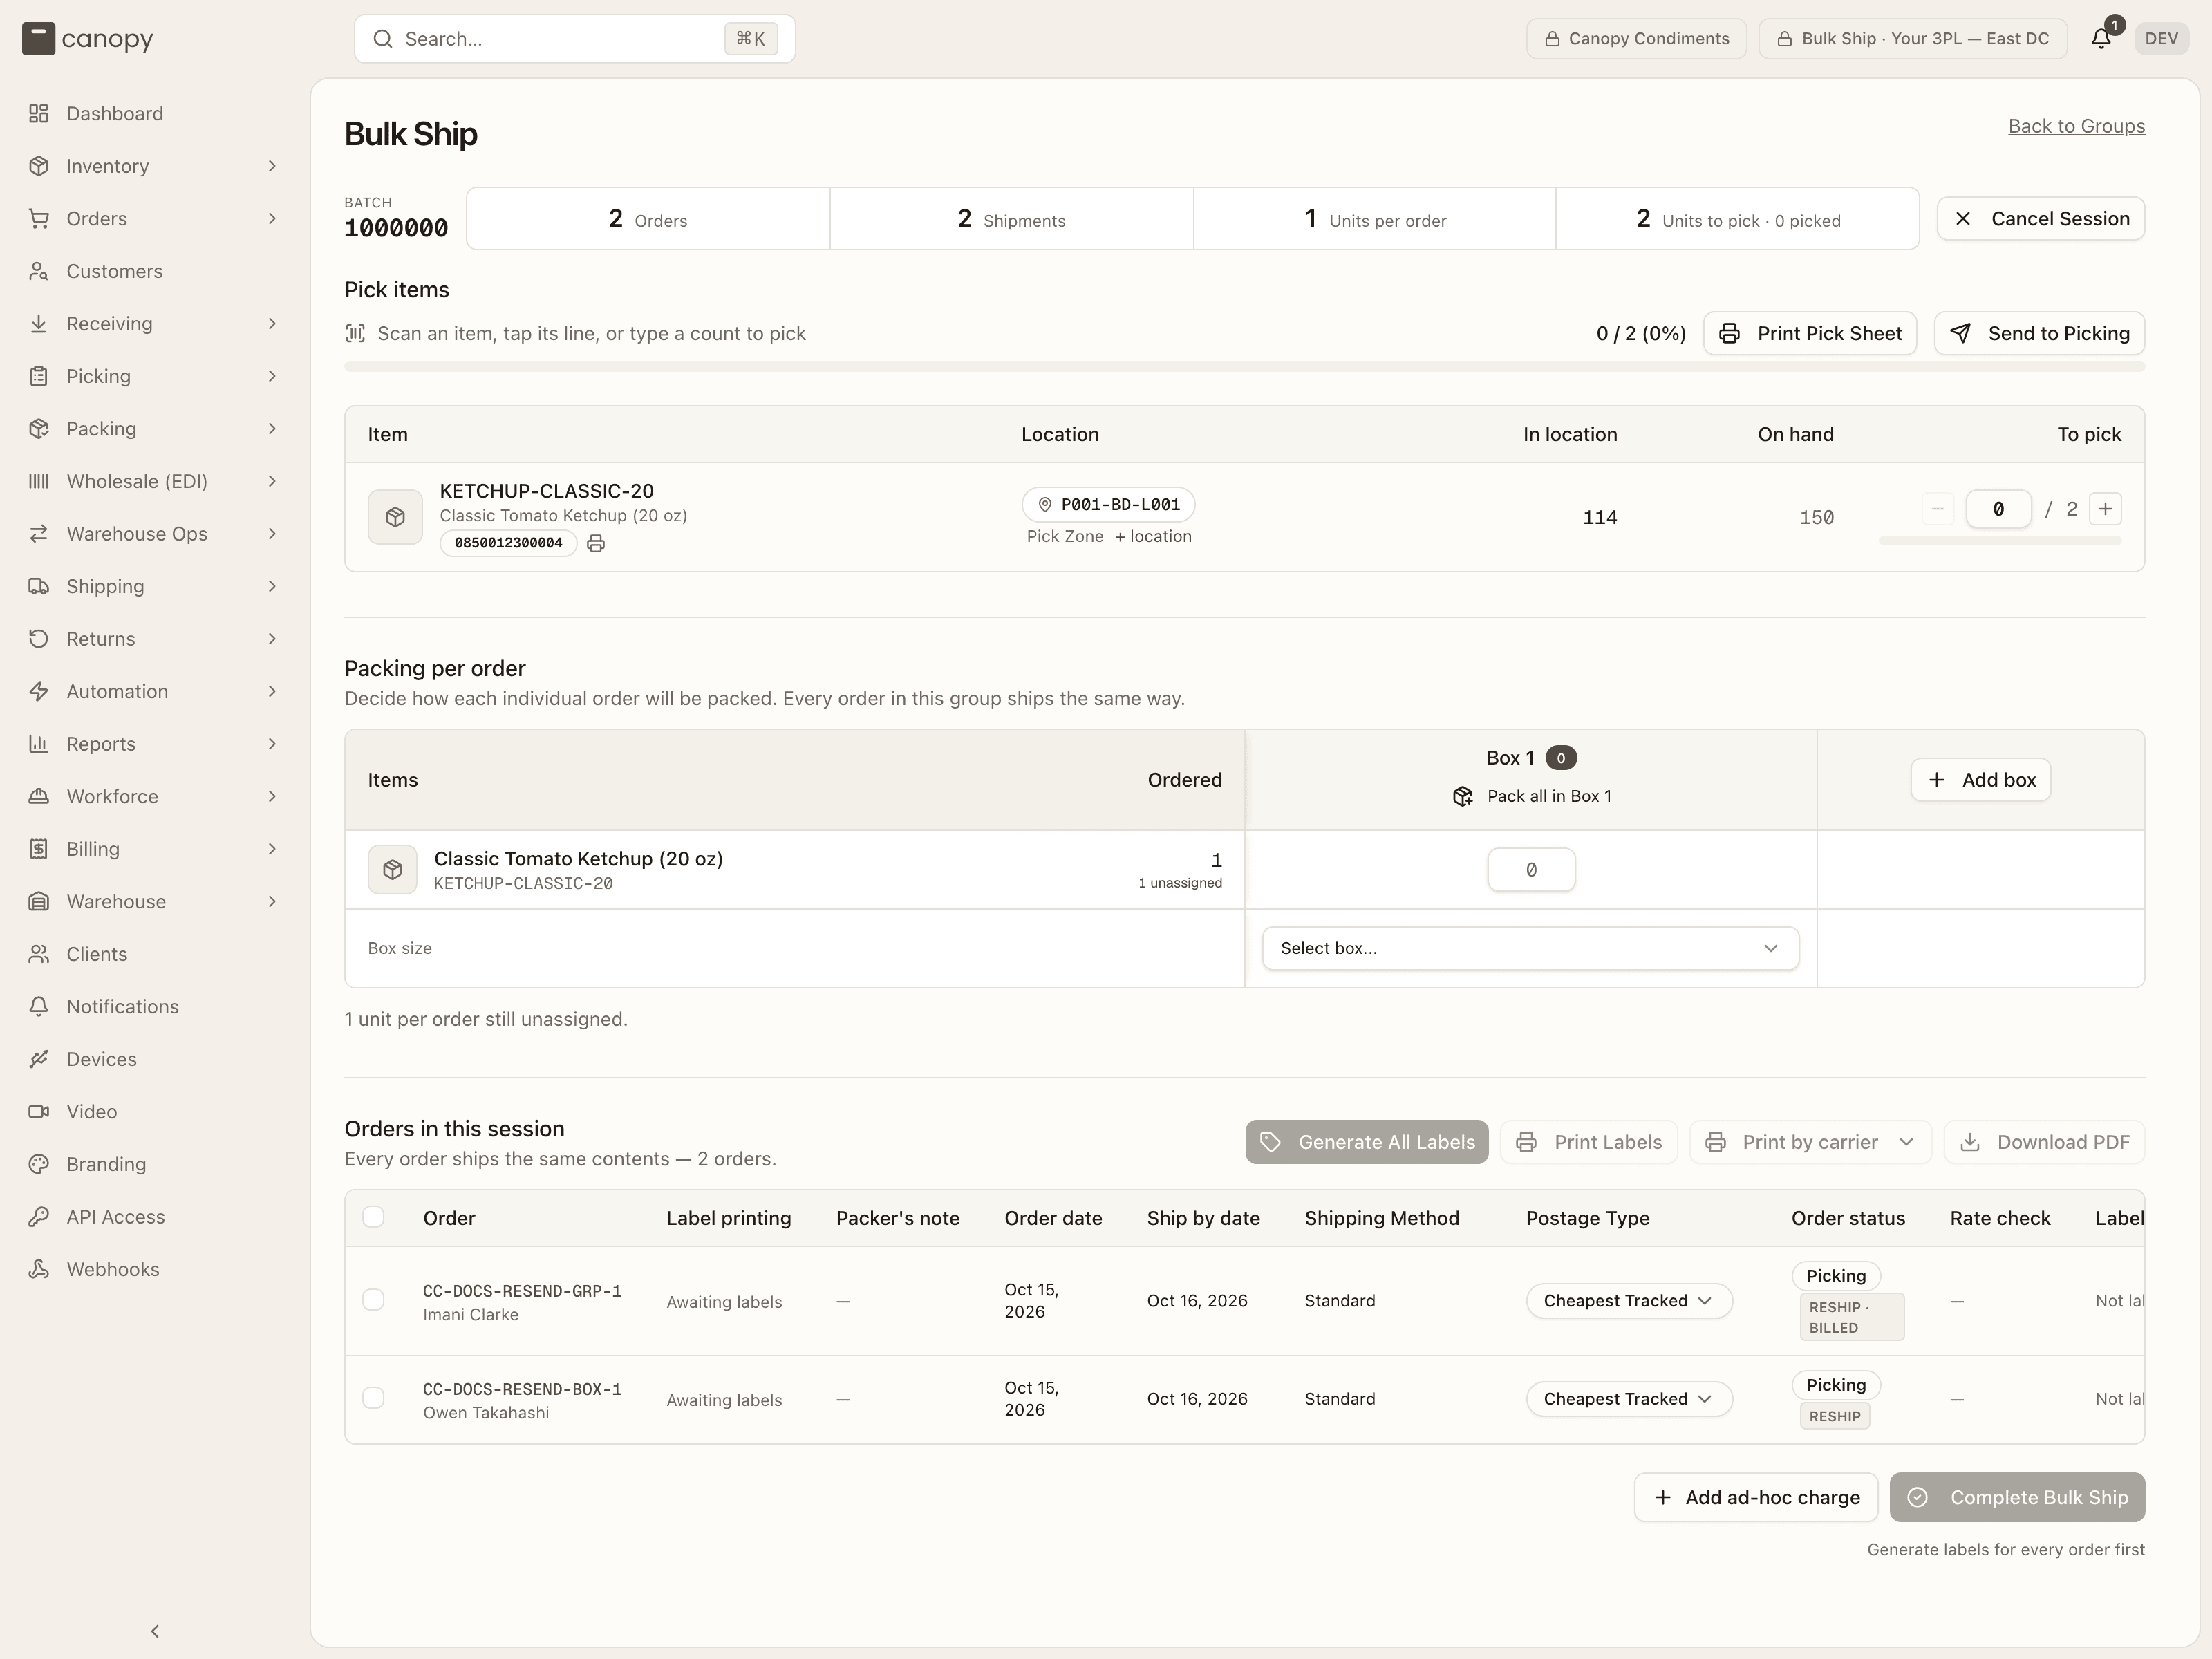
A session is one page with three sections that stay visible throughout — they lock as the batch moves past them rather than switching views. While it is open, the topbar is pinned to the batch's warehouse and client. The header carries the Batch number, a strip of counts (Orders, Shipments, Units per order, Units to pick · N picked, or Orders picked · of M once the batch has been sent to the floor) and Cancel Session, which confirms first: picked units return to their bins, the orders return to Allocated or Replenish based on picking stock, the group reappears in the list, and any labels already generated are abandoned. For a batch sent to the floor the confirmation reads instead "Orders nobody has carted go back to the suggestions. Orders already on a cart or picked keep their pick list and continue to the pack station on their own. Any labels already generated are abandoned.", and the toast "Batch cancelled — its orders are back in the suggestions, picked ones go on to packing". Either way, a cancel is refused while an order on hold in the batch carries a batch label, since a held order's label is never voided for you: "Can't cancel this batch — … is on hold (…) with its label already bought, and a held order's label is never voided on its own. Check whether its box is still here: if it is, void its label, then cancel the batch." A session runs Picking → Packing → Labeling → Completed (or Cancelled).
Pick items
"Scan an item, tap its line, or type a count to pick" — with a progress count and bar, and Print Pick Sheet for a paper copy. One row per pick line:
- Item — SKU (opens the SKU sheet), name, and its barcode with a print-barcode-label button.
- Location — the bin pill and zone. Tap the pill for Change picking location (or + location to add one for the unpicked remainder): a table of every active, sellable location holding loose (each) units of that SKU on a sellable lot, with lot, expiry, and its Location type (Pickable or Overstock). Sealed-case stock and non-sellable bins are not listed.
- Lot / Exp date — only when any line is lot-tracked.
- In location and On hand — stock context.
- To pick — a − (undo one pick), the picked count (type a number and press Enter to set it), / expected, a + (pick one), and a line progress bar. Tapping anywhere on the row also picks one unit.
A scan that isn't on the list says "Not on this pick list"; a scan past the expected count says "Already fully picked". When every line is done the heading reads "Picking complete".
Beside Print Pick Sheet, while nothing has been scanned, sits Send to Picking ("Pickers take it a cart at a time in Active Pick → Bulk Ship instead of scanning it here"). It hands the batch to the floor: the planned pick lines go, the orders return to the pool they came from (Allocated, or Backordered for an admitted partial) while staying the batch's, and the toast reads "Sent to picking — Pickers can now choose this batch in Active Pick." The button is disabled once a unit has been scanned here ("Units have already been picked here — finish the batch on this page"), and the server refuses a batch with an order on hold: "Order … is on hold — release the hold, or remove it from the batch, before sending to picking". A scan that lands from another device while you send fails it with the toast "Couldn't send to picking"; refresh and try again. From then on this section is replaced by the one described next.
Picking on the floor
Once a batch is sent to picking, the pick table gives way to a Picking section: "Pickers take this batch a cart at a time in Active Pick → Bulk Ship: one tote per order, as many as the cart holds." with a Sent to picking badge, the tally "N / M orders picked", a Pick in Active Pick button that opens Active Pick with this batch chosen, and a strip counting orders "waiting for a cart", "on carts now" and "picked". Under it, one row per cart: Cart, Picker, Orders, Progress ("N / M units"), Status (Pending, Picking, Picked or Cancelled) and View, which opens the cart on Pick Lists. The batch moves on to packing by itself when its last order is picked, and the heading then reads "Picking complete". An order that comes back to the pool after that, say one released from a hold, still gets a cart: the heading reads "N orders are waiting for a cart — pick them before generating labels, or remove them from the batch." and Pick in Active Pick stays, until a label run starts.
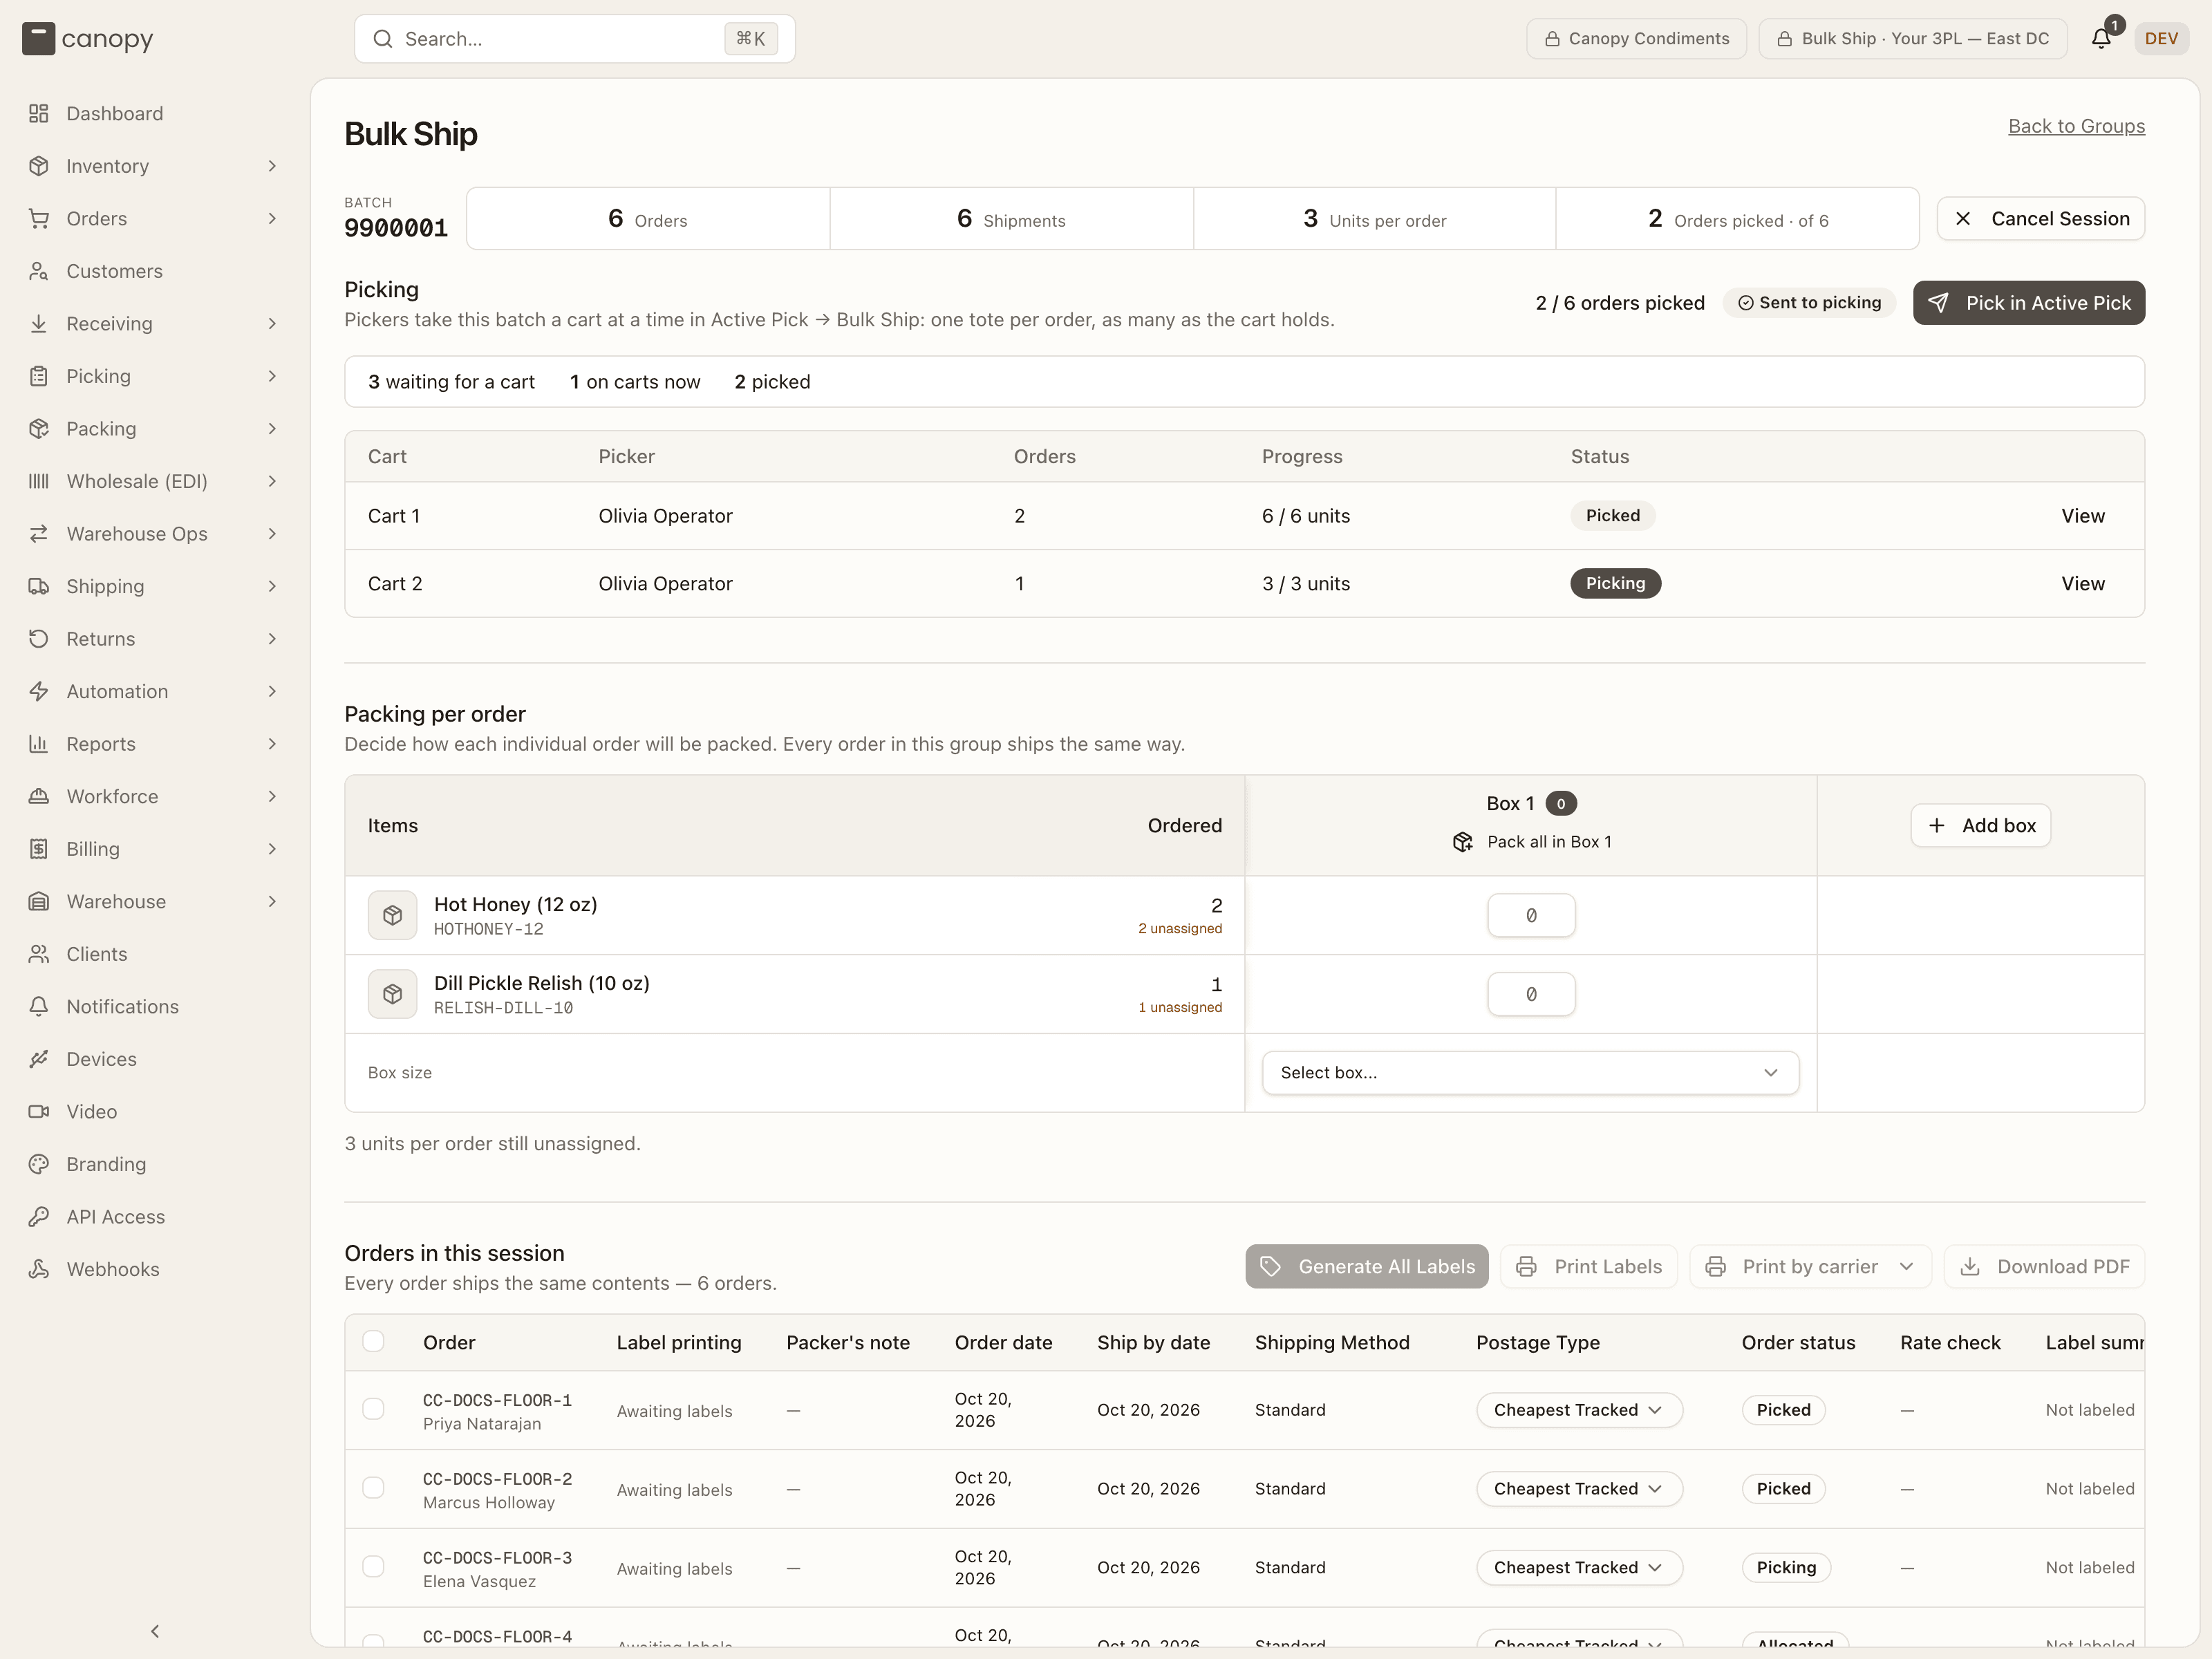
An order on hold is not picked around: a hold placed while the batch is picking lets its cart finish, but the batch never ships that order. Its labels stay out of every print job, and Complete names it with Remove from batch as the way out (below).
Packing per order
"Decide how each individual order will be packed. Every order in this group ships the same way." Because the orders are identical, one plan covers them all. The table has a row per SKU with its Ordered per-order quantity and a column per box — Box 1, Box 2, … — where you type how many of each SKU go in that box. (For a batch picked on the floor the rows come from the batch's recorded composition, at the units its orders ship now: a short pick resolved as a backorder lowers a row.)
The plan starts as one empty box: Pack all in Box 1 fills it with the whole order in one click, and on a split Pack all in Box N drops whatever is still unassigned into that box. Add box adds a column (up to 50); a box column can be removed with its ×, and the Items and Ordered columns stay put while the box columns scroll sideways. Units not yet placed show as "N unassigned". The Box size row under each column takes a catalog box or Custom, then shows its L / W / H in inches (editable for a custom box) and a Weight (lb) prefilled from the SKUs' catalog weights. The plan autosaves ("Saving packing plan…"; "Packing changes haven't saved. Retry" if it couldn't), and the status line under the table tells you when it is done: "Packing plan complete — each order ships as N boxes." Once labels exist it reads "Labels have been generated — the packing plan is locked."
Orders in this session
An order whose sales channel changed since it was picked carries the pack station's Order changed strip here too, one per open change rather than one per order, each named with its order number and with Open order beside it. A change that is only a note reads "If unsure, remove the order from the batch and check with a lead." in place of the station's set the tote aside: the batch can ship it as planned. A change that holds the order reads instead "This change holds the order: its label waits until someone decides. Remove the order from the batch, or resolve it on the order." Resolving the change on the order clears its strip when the order's sheet closes: the batch re-reads then, not only during a label run. An order admitted as a partial shipment wears the PARTIAL badge in this table, as it does on the orders list.
"Every order ships the same contents — N orders, M boxes each." The action buttons on the right: Generate All Labels (disabled until picking and the packing plan are complete — hover for the reason, e.g. "Finish picking first"; for a batch picked on the floor, "N of M orders still to pick — labels generate once every order is on a picked cart", or "CC-…, CC-… aren't picked yet — pick them on a cart (Active Pick → Bulk Ship), or remove them from the batch" for orders that came back to the pool after the batch moved on, which the server refuses the same way: "Can't generate labels — … picked yet. Pick … on a cart (Active Pick → Bulk Ship), or remove … from the batch, then generate labels."), Print Labels (a dropdown per box — Print Box 1 labels (N), Print all boxes (N) — when the plan has more than one box; every Print reads Reprint once those labels have been printed) and Download PDF, which saves the whole run as one merged file — the same document Print Labels sends, opening with the batch's full picking list and closing with the same sheet as END OF BATCH. Each order buys its label with its own postage type, on the carrier account saved beside it, or on the client's default account when the choice names none; an account that can no longer buy fails that one order with the purchase's own refusal, never the batch. Only PDF labels go into the merged document. A label the carrier returns in another format (a webhook carrier's ZPL) still counts its order as labeled; the server returns it apart, as the carrier sent it, on the first run and on a retry alike, but this screen does not print it. A merge that fails never marks a bought label as failed. A label with no tracking number shows as Generic Label. On a carrier account that supports multi-package (Stallion v5), a multi-box order's boxes go out as one shipment — one tracking number, one label document covering every box; accounts that can't, and carriers that refuse the grouped request, fall back to one label per box. A label the carrier hands over before its document is rendered counts as labeled, wears a PDF rendering tag in the Label summary, and its print button reads Fetch and print <tracking>; pressed too early it answers "Label <tracking> is bought; the carrier is still rendering its PDF — try again in a minute.", and a by-box or whole-run print fetches the pending documents on the way — but any it still cannot get are named rather than dropped: "N labels left out — their PDFs are still rendering", or "Nothing to print yet — N labels are still rendering" when the job printed nothing at all, listing each order (and its box label, on a multi-box shipment) and what to do: print them from their rows, or print again in a minute. The batch's cover sheet counts them apart as well — "Not in this stack (PDF rendering): N" — so a short stack never reads as a complete one. A large batch can outrun one request: "Still generating labels" means they keep appearing as they are bought, and the run ends on "Label run finished — N of M orders labeled", with "Generate again to retry the rest." when some failed. On a batch picked on the floor, an order still on its cart fails with "CC-… is still on its cart — finish the cart, then generate labels again (or remove it from the batch)", and one never carted, once the batch is labeling, with "CC-… isn't picked, and a batch that is labeling takes no more carts — remove it from the batch". An order put on hold while the run is buying labels is skipped, not labeled. It fails with "Order is on hold (…) — resolve the hold before buying its label", naming each reason. If the hold lands while that order's label is being bought, the new label is voided straight away and the order fails the same way. Once the hold is released, Retry failed buys its label.
While a run is live — this tab's, another tab's, or one that outlived its request — Generate All Labels stays disabled and spinning.
Whatever you print is one document. With several boxes it runs order by order — each box's cover slip (headed Box 1 of 2, listing only that box's contents, counted x N / box) then that box's label — and ends on an END OF BATCH sheet; with one box it is the batch cover sheet, every label, then the end sheet. On a multi-package shipment, a box's label is the page its carrier's adapter can cut out of the shipment's document (Stallion declares that layout); a carrier with no documented layout prints the whole label document for each box. A SKU picked from two bins or lots keeps a row per bin but is counted once: the repeat row reads counted above.
Columns: a checkbox, Order (opens the order sheet; customer under it), Label printing, Packer's note, Order date, Ship by date, Shipping Method, Postage Type, Order status, Rate check and Label summary — "N labels" (N counts boxes; a PDF rendering tag on a label whose document the carrier hasn't returned yet), each row prefixed with the box it covers — Box 1:, Box 2:, or Boxes 1–2: when one multi-package shipment covers several boxes on a single tracking number — with a print (or, once printed, reprint) button, or "Not labeled".
Label printing shows Awaiting labels, Not printed, Partially printed, or Printed. Orders with multiple boxes also show the confirmed count, such as 1 of 2 labels printed. This uses the saved print confirmations, so reloading the page preserves the status and replacement labels need a fresh confirmation. It stays visible when the carrier options are collapsed. An order on hold, cancelled, merged into another order, fulfilled outside Canopy, or whose reship was cancelled shows Not printing with the reason. A held order lists every open hold's reason, joined when there is more than one ("CC-101 is on hold (Fraud review; Awaiting payment)"); the others say what happened ("CC-101 was cancelled", "… was merged into another order", "… was fulfilled outside Canopy", "CC-101's reship was cancelled — it is back on its original parcel"). Its labels stay out of every print job and the carrier options, its print button is disabled ("…, so its label doesn't print"), and a confirmation for them is refused ("Nothing was confirmed — …, so its label doesn't print. If it printed, set it aside, then print again: the job now leaves it out."). Complete names it and points at removing it from the batch.
The Order status cell also wears a pill for an order shipping a reship's re-send: RESHIP ("A reship's re-send — no charges for its label, pick or pack."), RESHIP · BILLED ("A reship's re-send, billed as a new order (the client asked for it)."), or RESHIP CANCELLED ("Its reship was cancelled — the order is back on its original parcel. Remove it from the batch (void its label first, if there is one).").
The Postage Type cell is a popover. Before label generation it shows the selected type. After generation it shows the purchased service returned by the carrier, with the original request underneath when different. For example, USPS Ground Advantage can appear above Requested: Cheapest Tracked. Cheapest Tracked is a selection rule, not a carrier. A label without a resolved service shows Carrier not provided. The cell also shows a Manual override or Automation rule note and the order's signature / insurance lines, and opens Shipping options: a Postage type select (including No override (use automation / channel default) to clear a manual override), Signature confirmation, and Insure shipment with a declared value. The select is the same grouped list as the order sheet's Override Carrier dialog: one heading per carrier account, each listing its services, and a pick is the service and the account together. The cell's own label is the saved pair's service name, and the order's current choice stays selectable even when no account offers it any more. Save writes it to the order. An order with a live label is locked — "Void the existing label before changing these options."
Ticking rows shows a selection bar — "N selected" — with Override postage type (the same popover, applied to every selected order; its select starts empty and shows the shared choice as its placeholder, or Mixed postage types when the orders differ, and two orders on the same service but different carrier accounts count as different), Get rates (quotes the orders without buying, to surface bad addresses first; the result lands in the Rate check column as the cheapest total or the error; an order whose saved choice names a carrier account is quoted on that account alone, and a saved service that account no longer offers, or an account that can no longer buy, fails that row with the purchase's own refusal), Void labels (N) (refused while an order is waiting on its own box: "CC-… waits on its box — answer at Boxes to pull: scanned there, the label is voided and the order leaves the batch; marked gone, it ships with it"), Remove from batch (they return to Allocated or Replenish based on picking stock and the pick quantities shrink to match; orders with live labels must be voided first: "Void the selected orders' labels before removing them"; and never every order at once: "This would remove every order — cancel the session instead") and Clear. An order on hold leaves on its hold, and its release then lands it where the batch's other orders went rather than back in a batch it is no longer part of. On a batch picked on the floor, a removed order simply leaves the batch with the status its cart gave it: one never carted is Allocated again and back in the suggestions, one already picked goes on to the pack station. Removing the last order that was still unpicked can complete the batch's picking on its own.
Four banners can sit above the table:
- "N of M orders have no label" — label generation skipped them. Diagnose with rates runs the rate check on those orders; Select them ticks them. Orders that already have labels are never re-bought.
- "N orders can't be rated" — the rate check failed for them, with each order's error; Select failed ticks them.
- "N labels failed" — with each order's error and Retry failed. When some of them are merged masters held by a change to an order merged into them, the title says so — "N labels failed — M held by a change to an order merged into it" — and each held row wears LABEL ON HOLD with an Open order button; Retry failed won't buy that label until the change is acknowledged on the order.
- "Batch not completed — a merged order's label is on hold" — Complete Bulk Ship was refused: "Nothing in the batch was packed out. Open the order to see the change and acknowledge it, then complete again."
Print by carrier, beside Print Labels, opens the carrier options. They are hidden by default. The panel reads "Print each carrier separately, then confirm its labels printed successfully. Every label must be confirmed before completing the batch." Labels are grouped by delivery carrier (USPS, UPS, FedEx, Canada Post and so on, read off each label's service; a label with no service reads Carrier not provided, generic labels group as Generic labels). Each row shows the carrier, "N of M labels printed", a Printed badge once all are, PDF rendering while any document is still being rendered, and a Print <carrier> or Reprint <carrier> button. That job is one document like the others, headed "<Carrier> labels" (or "<Carrier> · Box 1" for one box of a multi-box plan), and its cover sheet names the carrier in its subtitle. Printing with nothing labeled yet toasts "No labels to print yet".
Every print, whether by carrier, by box, the whole run or one row's print button, ends in the same question: Did the labels print successfully?, naming the job and adding "Confirm only when every label in this print job has printed. If you cancelled or the printer failed, leave them unconfirmed and print again." Choose Confirm printed only if every label in that job printed; choose Not printed otherwise. A confirmation is saved with the labels (toast "Labels confirmed printed", or "Print confirmation wasn't saved" with the reason), so it survives reloading or switching workstations. Downloads do not count as printing. Voided or replaced labels cannot reuse an old confirmation ("A label changed or was voided after this print. Refresh and print its replacement."), and every box in a multi-box shipment must be confirmed.
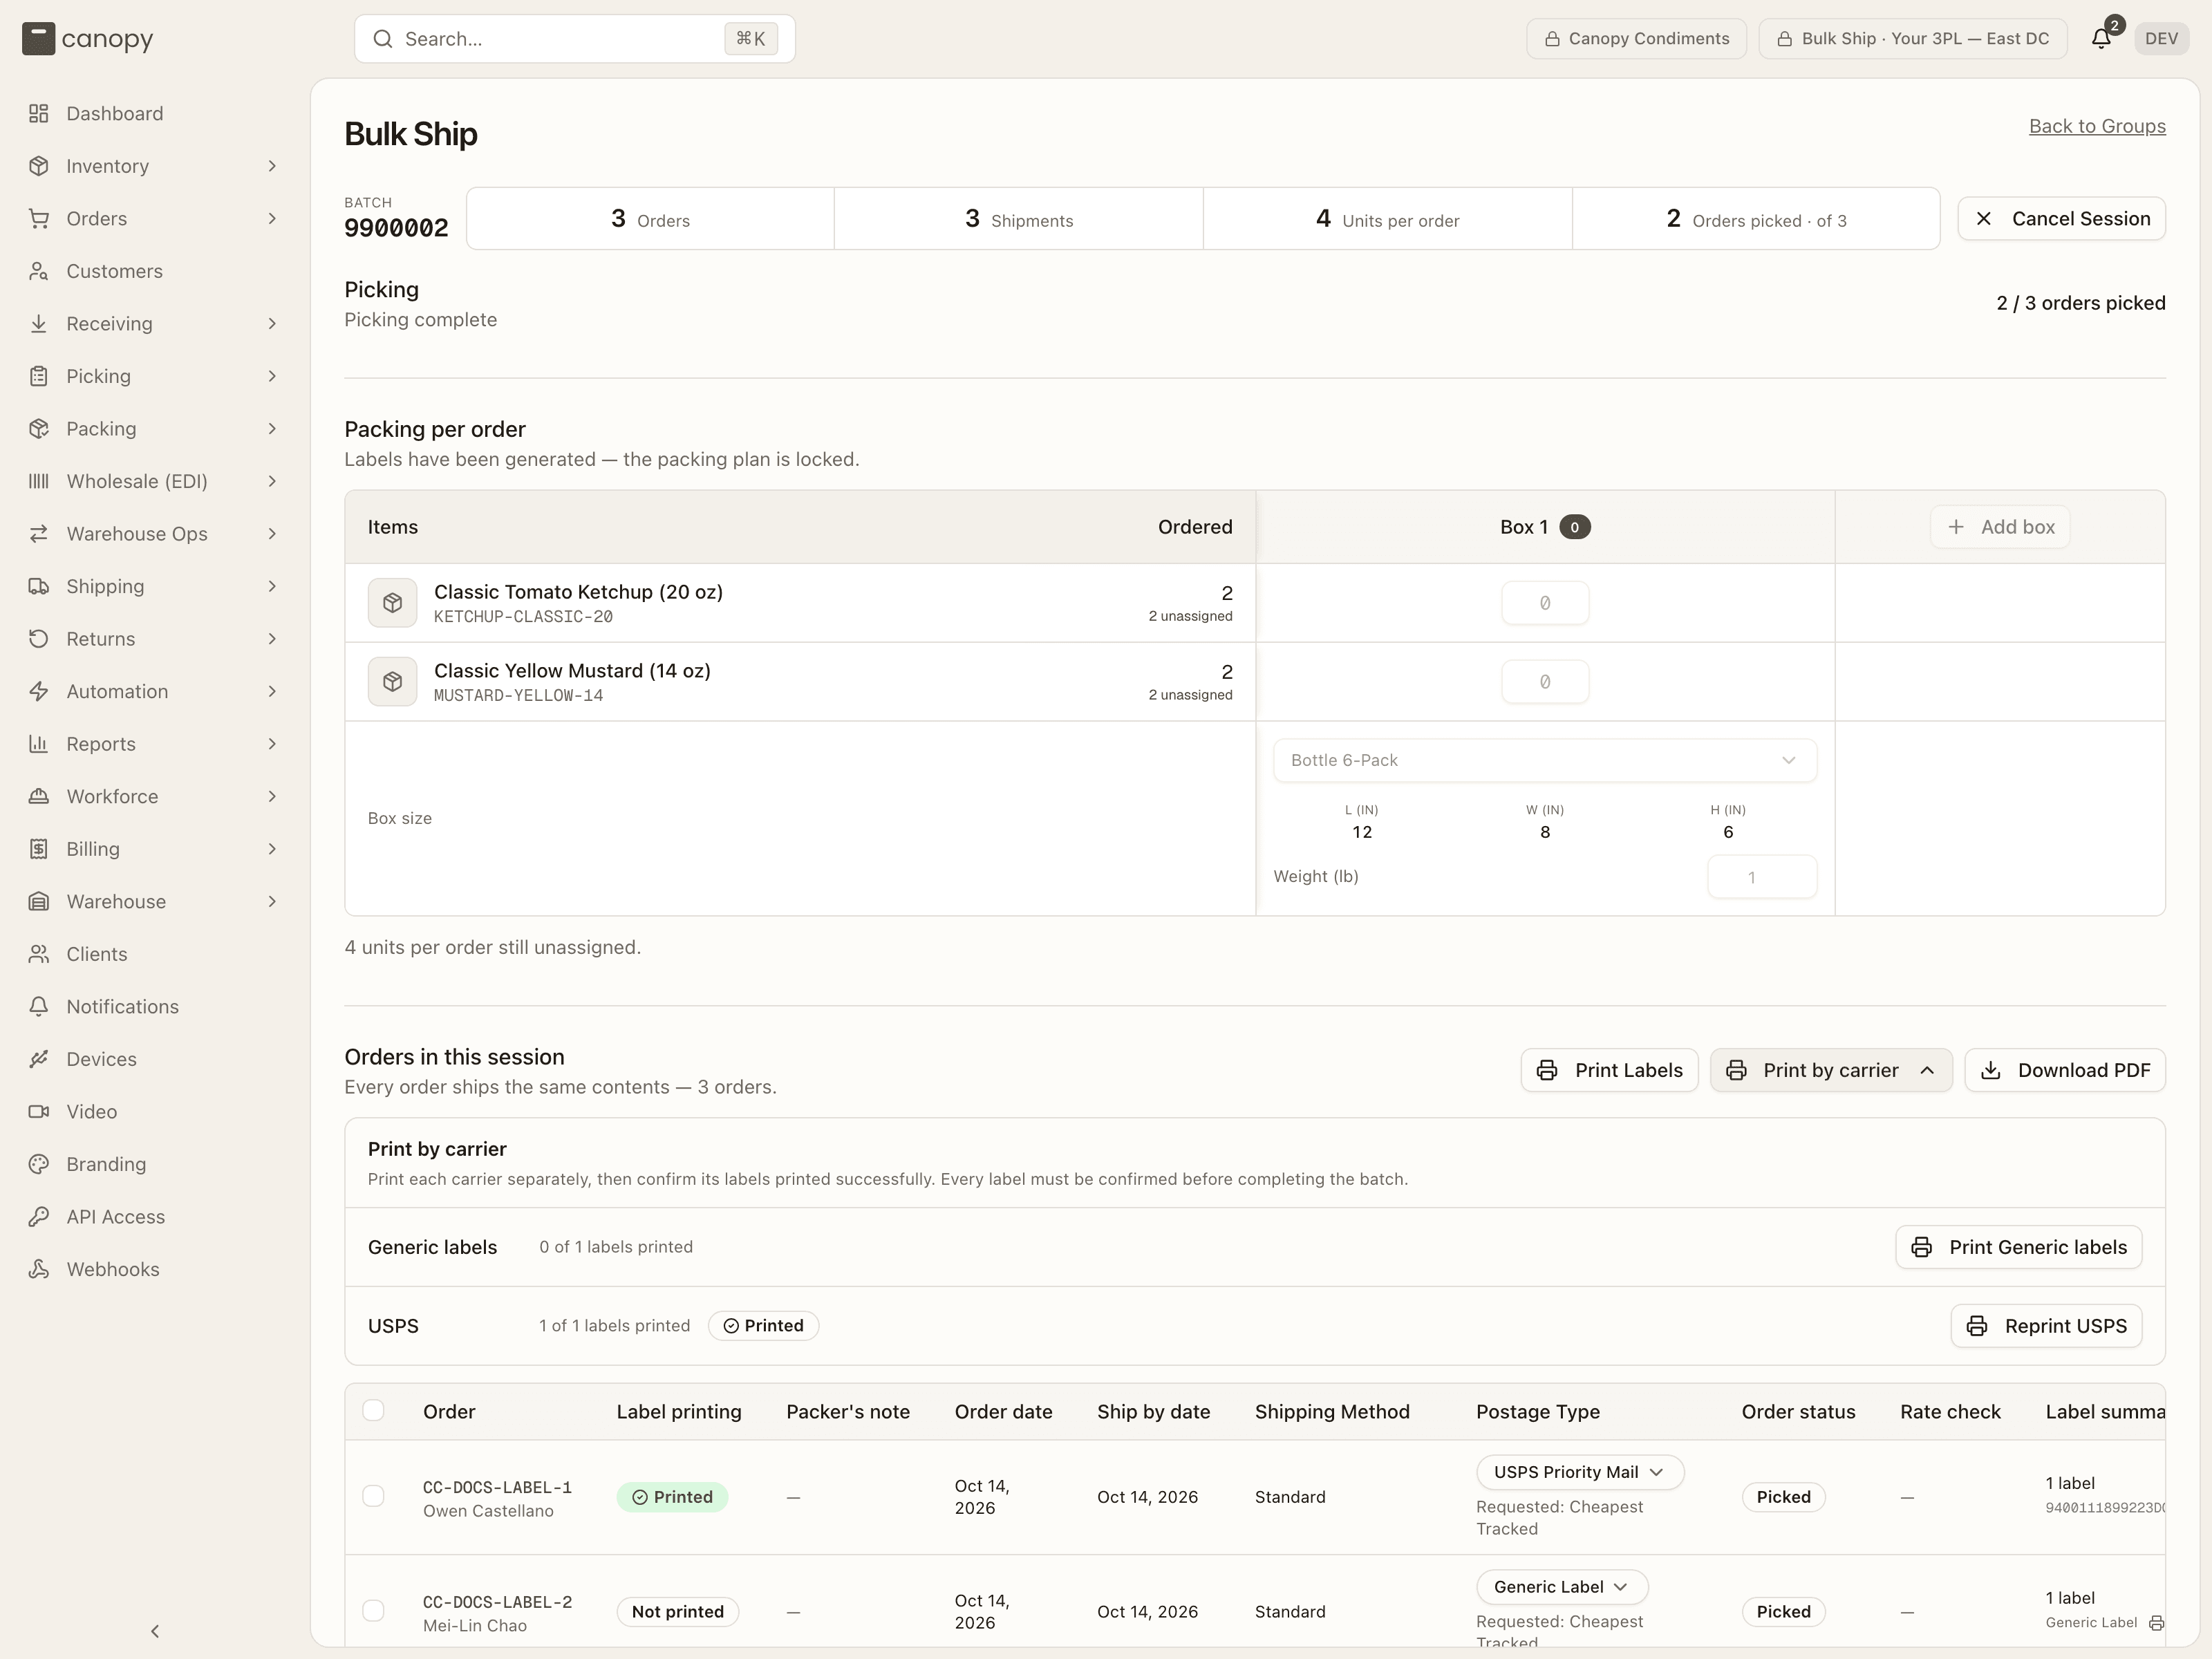
Complete Bulk Ship (beside Add charge when billing is enabled) unlocks once every order carries a label and every carrier's labels are confirmed printed. While it is locked the reason sits under it: "Wait for label generation to finish", "Generate labels for every order first", or "Print and confirm every carrier's labels before completing the batch". The server checks the same things and names the way out: "Print and confirm every label before completing this batch. Still unprinted: UPS, USPS."; a label voided from the Shipments page leaves the order marked labeled, so "Can't complete this batch — CC-… is missing a label voided outside this batch. Select it, choose Void labels, then generate and print its labels again."; with an order that has no label at all, "Generate and print labels for every order before completing this batch."; an order on hold, "Can't complete this batch — CC-… is on hold (…), and a held order doesn't ship. Remove it from the batch, then complete." (adding "Where a label is already bought, check whether the box is still here: if it is, void the label first; if it already left, release the hold instead." when its label was bought, and "… every order in it is on hold (…). Release a hold to ship that order with the batch, or cancel the batch." when none is left to ship); and, on a batch picked on the floor, an order never carted: "Can't complete this batch — CC-… isn't picked, and a batch that is labeling takes no more carts. Remove it from the batch, then complete." (with "One still on its cart can finish it and get its label from Generate labels instead." when a cart is still open); and a live member whose own cancel, line or address change landed after its label was bought, waiting behind its own box — "Can't complete this batch — CC-… changed after its label was bought. Answer at Boxes to pull: a box scanned there is put back and its order leaves the batch; one marked gone ships with it. Then complete.", naming every such order together when more than one is waiting.
A hold placed after those checks, in the moment before the batch locks its orders, is caught as well. The toast "Couldn't complete the session" reads "Order is on hold (…) — resolve the hold before shipping it", and nothing in the batch is completed. A cancel or a second Complete that won the race answers "This batch was cancelled or completed while it was completing — nothing was completed. Refresh the batch." It ends on "Bulk Ship Complete — N orders have been packed and labeled." A cancelled session ends on "Session Cancelled"; both offer Back to Groups.
Batch history
The History tab is the record of every batch that reached a terminal state — Completed or Cancelled — newest first. It's read-only: nothing here changes a batch, and a row opens its detail instead.
Each row carries the batch number, how many orders it covered, the client, the
items each of those orders contained, when it started and finished, how many
labels were bought (N/M labeled, or — for a cancelled batch), who started it,
and its status. Search by batch number or by any order number in the batch, and
filter to Completed or Cancelled. With nothing finished yet it reads "No
finished batches yet"; with a filter on that matches nothing, "No batches
match."
View (or clicking the row) opens the batch sheet: the client and warehouse, the order and label counts, start and finish times, who ran it, the box the batch was packed in, and the items each order held. Below that, every member order with its customer, tracking number and status — and, for a completed batch, a Picked from table naming the SKU, bin, lot and quantity each line was pulled from (a batch picked on the floor has none: its picks are on each cart's pick list). Labels print again from here: Print all labels at the top sends the whole batch as one document (Reprint all labels once every label has been printed; with nothing printable it toasts "No labels to print"), and each parcel line — Box 1: tracking on a multi-box order — carries its own print icon; a parcel with no document is marked No printable label for this parcel, and a cancelled batch's button is off with Labels were voided when this batch was cancelled. A cancelled batch shows "Voided on cancel" in place of labels and no tracking numbers.
The "items in each order" line is the composition recorded when the batch started, so it survives a cancel and later order edits. A batch from before that record was kept, whose pick items can't be divided into an exact per-order share, reads "— composition unavailable for this batch" rather than showing a misleading one.
How to pack at a pack station
Open Pack Station and scan the tote
Open Packing → Pack Station. The screen reads Scan tote to start packing with "Waiting for scan..." under it. Scan the barcode on the picked tote. If it will not scan, press Type manually, type it into Type tote barcode... and press Start. The pack session opens on one screen. The header shows the order number and customer, a Tote badge with the barcode, "0/N packed", the running "X lb scanned" weight, Cancel Pack and Packing Slip.
Read the warning strips
Before you touch the items, read any one-line strip under the header and tap it to expand it: Note or Notes, Gift note (it goes in the box), Instructions (what the brand's packing rules ask of this box), Order changed and Put-back ("Do not pack: …"). What each one means is in The session at a glance. If the scan lands on an Order Fulfilled Externally or Order Cancelled card instead of a session, press Acknowledge & Continue (or Acknowledge & Scan Next Tote) and take the tote to put-back, as described in When the tote should not be packed. If the scan lands on On hold — set this tote aside, do not pack the tote. Set it aside, and scan it again once the hold is resolved. If On hold — set the tote aside replaces the session while you pack, stop, set the tote aside and press Set aside & scan next tote. Both are described in A tote whose order is on hold.
Scan every item into the box
Items to Pack on the left lists each line with a badge for the units still owed, and "Scan to pack" pulses while any remain. Scan one unit at a time. Each scan moves a unit into Inside the box · N/M units on the right and fills the progress bar under the header. For a unit with no readable barcode, tap its row ("Tap to confirm one unit into the box"), or press Type barcode manually, type it into Type SKU barcode... and press Verify. Scanned the wrong thing? Tap that row under Inside the box to put one unit back. A unit that is missing or damaged is a short: press Short beside its row and follow How to declare a short. On a client with partial shipments off there is no Short button; a dashed note reads "Partial shipments are off for this client. Missing or damaged a unit? Cancel the pack and resolve it in Short Picks."
Check the box
The Box card on the right arrives with a box already chosen, and a badge says why: Set by automation rule, Suggested from past packs or Default — no pack history yet. Open the dropdown to change it; each option reads name · L×W×H in · max N oz, and only the client's active boxes are listed. If the right box is not there, press + beside the dropdown to open Create New Box Size and add it on the spot.
Weigh the parcel
Weight (lb) is filled in from the products' catalog weights. Put the packed box on the scale and type the reading over it, or let the USB scale do it: press Scale once to connect it, and the button becomes a readout that says Ready with nothing on the platter, Weighing… while the load settles, then the weight in lb. With auto-capture on (the default) the settled weight drops into the field by itself; otherwise click the readout. Once the field differs from the catalog weight, a revert arrow appears beside it (Revert to product weight) and puts the catalog weight back. The Scale button only appears in Chrome or Edge; pairing a scale is done once per workstation on Settings → Devices.
Generate the label
When nothing is left to pack, the left card turns green, "All items verified — everything is in the box", and shows a barcode captioned Scan to generate label (its value is GENERATE-LABEL; the words are not printed). Scan it, or press Generate Label at the bottom of the Shipping Method card. The station fetches rates, buys the label and sends it to the printer in one go, then toasts "Label sent to printer." If the button reads "Loading carrier accounts...", wait a moment: the station is loading the client's carrier accounts, and the scan does nothing until it has. The label is priced on the account the order's saved postage choice buys on, then bought on that account. If the button reads "Select a box first" or "Verify N more to generate label", do that first. A label over $100 stops for a check: the button becomes Confirm & Generate Label and the barcode caption Scan again to confirm & generate. Press or scan once more, or pick a cheaper service from Or choose a carrier & service with its Use button. The same stop appears when no estimate came back at all: the red line reads "Couldn't estimate the cost — confirm above to proceed.", with no carrier list to pick from. The gate is explained under Labels over $100.
Check the label printed
The left card becomes Label Generated, with the tracking number, the postage type and Rate + Tax = Total. Stick the label on the box. The label button now reads Reprint Label. If it still says Print Label, the file never reached the printer, so press it. Fetch & Print Label means the carrier is still rendering the file; wait a moment and press it.
Complete the pack
Scan the barcode captioned Scan to complete packing on the Label Generated card (its value is COMPLETE-PACKING), or press Complete Packing at the bottom of the Box card, beside Capture photo and Add ad-hoc charge. For a photo of the packed box, press Capture photo first. The order moves to Fulfilled (or Partially Shipped when units are still owed), the tote is released, and the station returns to Scan tote to start packing for the next tote.
How to add a box size
Open Box Sizes for one client
Open Packing → Box Sizes. Boxes belong to a client, so pick the brand in the client switcher first. With All clients selected the page only lists boxes, grouped by client, and its subtitle reads "Box sizes across all clients — select a client to add or edit".
Press Add Box Size
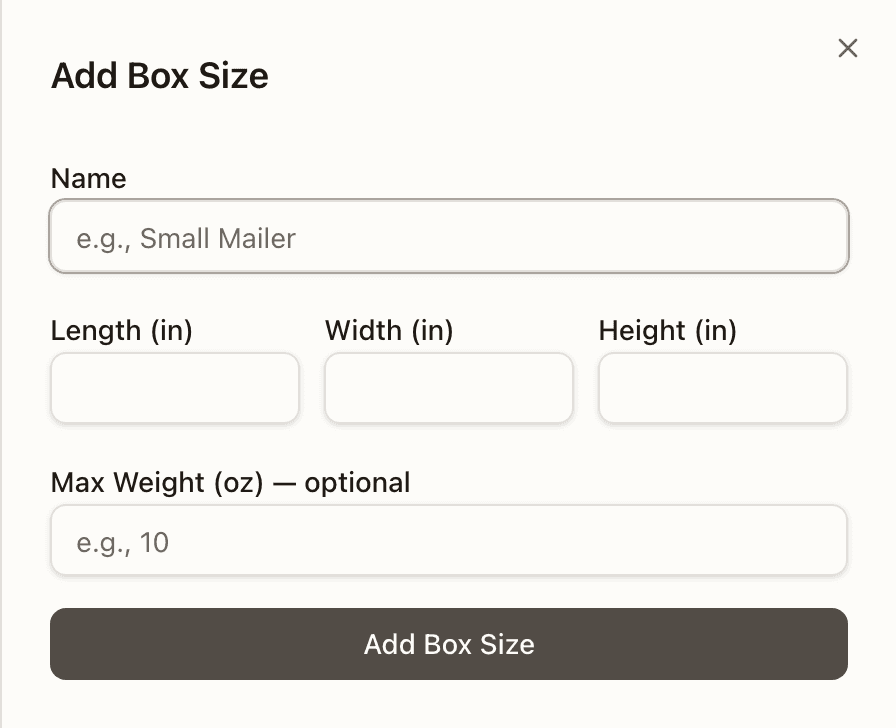
Press Add Box Size in the top right. On a client with no boxes yet the page shows "No box sizes configured" with the same button under it. An Add Box Size panel slides in from the side.
Describe the box
Type a Name the packer will recognise on the bench (the field suggests "e.g., Small Mailer"). Enter the Length (in), Width (in) and Height (in); all three are required and take decimals. Max Weight (oz) — optional is the most the box should carry; leave it blank if there is no limit.
Save it
Press Add Box Size at the bottom of the panel. It reads "Saving...", then the panel closes and the new row appears with its dimensions, its max weight (or "—" when none was given) and an Active pill. A problem comes back as a red line above the form; fix it and press again.
Check it at the bench
On the next pack for that client, open the Pack Station's Box dropdown: the box is listed as name · L×W×H in · max N oz. A packer who needs a box mid-pack can also press + beside that dropdown; the Create New Box Size dialog takes the same fields and saves to the same catalog. To retire a box, press Deactivate on its row here; it turns Inactive and leaves the station's dropdown.
How to declare a short
Press Short beside the line
In Items to Pack, find the line whose unit is missing or damaged and press the yellow Short button at the right end of its row. Do not tap the row itself; that verifies a unit into the box. Declaring covers every unit of that line still unverified, so scan the units you do have first. No Short button? The dashed note in its place says why, such as "Partial shipments are off for this client." In that case cancel the pack and resolve it in Short Picks instead. The rules are under Declaring a short.
Pick the reason
The dialog is headed with the count, like "2 of 5 × SKU-XYZ not in the box". Choose one reason; selecting it shows what to do with your hands. Not in the tote (lost): there is nothing to set aside. Damaged: set the unit aside and do not pack it. Hold back — ship in a later parcel: leave the units in the tote. Hold back is greyed for a kit component ("Kit components can't be withheld — a kit ships whole or not at all. …") and for a line whose declaration would leave the box empty ("Nothing would ship — cancel the pack instead."). Press Declare short.
Replace it, or ship what is in the box
After Hold back the dialog simply closes. After Not in the tote or Damaged it asks "Replace it, or ship what's in the box?" and checks for stock. Quick-pick a replacement — suspends this pack appears when enough pickable units exist; the line under it says how many. Press it and you land in Short Picks filtered to this order. Quick-pick the replacement there, then come back and scan the tote again to repack whole. With no stock the same button reads Cancel this pack and resolve via Short Picks. Ship what's in the box now closes the dialog and leaves the shortfall to re-allocate for a later parcel; it is not offered for a kit component or an empty box.
Check the Declared short group
The line leaves Items to Pack for a dashed Declared short card showing the reason and "N of M". It cannot be tapped and there is no undo: the footer reads "Cancel the pack to change this.", and even cancelling does not rewind a lost or damaged record. Keep packing the rest.
Buy the label and complete
Once everything else is verified the card reads "Ready to ship X of Y units" and the label button reads Generate label — partial (N units stay behind). Press it, or scan GENERATE-LABEL. Under the box a yellow summary says what completing will do: "Ships X of Y units; N re-allocate for a later parcel.", each reason listed, and whether the tote is flagged for put-back (held-back units) or released. Press Complete Packing. The order lands in Partially Shipped and the remainder ships in a later cycle.